21
Chapter 6 – Replacing Filters
Chapter 6 – Replacing Filters
The IQAir system is equipped with a Filter Life Monitor which is designed to assist you in determining when a filter
needs to be replaced. If the air pollution in your environment is very high, there is a possibility that the filters may
not be effective throughout the displayed life time and may have to be replaced earlier than indicated by the Filter
Life Monitor.
For this reason it is important to look out for the signs of expired filters and replace filters earlier if neccesary.
The main signs are:
•Increased operating noise
•Decreased airflow
•Clogged filters
•Increased odor presence
Note: After a filter has been replaced, the filter life must be reset in the control panel. Refer to section 4.4.8.
6.1 Location of the Filters
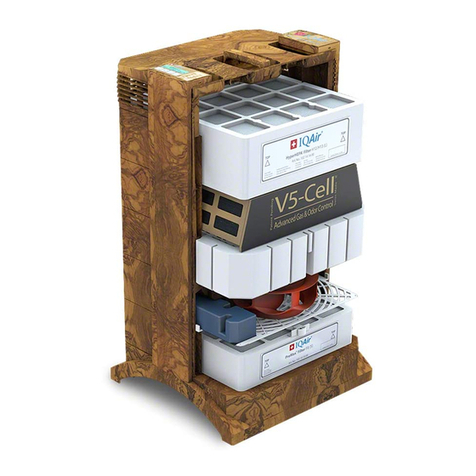
The IQAir system features a modular housing design which enables easy replacement of
all filters in a matter of minutes.The illustration of the IQAir system on the control panel
shows the positions of the individual filters. These positions correspond to the actual
positions of the filters within the system.
5.3 Replacing the Battery of the Remote Control
When the battery becomes weak, the transmission results will deteriorate and the battery
should be replaced. The remote control requires one CR2025 battery. The battery
compartment is located at the bottom end of the remote control.
To open the battery compartment, press the small lever to the side and slide the battery
compartment out. Remove the used battery and insert the new battery.
6.2 Ordering Replacement Filters
To order replacement lters, please contact a local IQAir authorized dealer. To locate the dealer nearest to you,
call 877-400-1050 or visit www.iqair.com.
Please order your replacement filters by quoting the appropiate article numbers stated below:
IQAir HealthPro Plus: PreMax Pre-Filter Art. No. 102 10 10 00
V5-Cell Gas & Odor Filter Art. No. 102 18 10 00
HyperHEPA Filter Art. No. 102 14 14 00
IQAir HealthPro: PreMax Pre-Filter Art. No. 102 10 10 00
HyperHEPA Filter Art. No. 102 14 14 00
HyperHEPA
V5-Cell
PreMax
Filter positions as shown
on the control panel
Battery compartment
(Battery type: CR2025)
6.3 Opening and Closing the Housing
The stacked housing elements are held together by two locking arms that hook into the diffuser. To open the system,
follow the steps below.
1. Disconnect the IQAir system from the power supply before attempting to open
the system.
2. Press the first locking arm outward, using both thumbs as shown. Press just hard
enough to release the arm from its snap-in position in the diffuser. Disengage the
other arm in the same way.
3. Pull both locking arms evenly outwards until they snap into place and remain
open. Access to all filters is now possible (to change a specific filter, refer to the
appropriate section below).
4. To close the housing, simply align the housing elements and push the locking arms inwards simultaneously until
they snap back into the housing (top of the diffuser).
22
Chapter 6 – Replacing Filters
Opening Closing
6.3.1 Troubleshooting When Closing the Housing
If the IQAir system does not close properly, the upper part of the system
may be offset against the lower part.
To solve this problem, simply open both locking arms again, ensure the
housing is aligned, and push both locking arms in simultaneously.
6.4 Replacing the PreMaxTM Filter (F1)
1. Open the locking arms, making sure they
are fully extended outward. For details,
refer to the section 6.3.
2. Opening the arms will cause the upper
part of the housing to separate from
frame 1. This will leave a narrow gap.
3. Keeping the locking arms open, place
your hands on opposite sides of frame 1,
lift it slightly and pull it out slowly. As the
frame is withdrawn, tilt it progressively
upward to remove it completely.
gap
23
Chapter 6 – Replacing Filters
6. With the palm of the hand, press down on
the filter and loosen the frame.
5. Turn the frame over so it is upside down.4. Remove the filter clamps that secure the
filter in the frame by pulling these out of
the sliding grooves.
9. Turn the frame over (right side up again)
and insert the new lter. Ensure that the
arrows on the lter label point upward.
11. To reinsert frame 1, tilt it upwards at
an angle while progressively pushing
the frame back into the housing.
For details on how to close the housing,
please refer to section 6.3.
8. Dispose of the used filter by placing it
into the plastic bag in which the new
filter is supplied (see section 6.7).
7. Lift the frame from the filter.
10. Make sure that the filter is inserted all the
way into the frame. Insert the clamps into
the sliding grooves inside the frame and
push them down, securing the filter into
place.
V5-Cell
Filter
Frame 2
1. Open the locking arms, making sure they
are fully extended outward. For details,
refer to section 6.3.
2. Opening the arms will release the top
housing modules. Remove the diffuser
and Frame 3. Then put these aside.
3. Frame 2 contains the V5-Cell filter.
5. Insert the new filter. "TOP" indicates the
filter's upright position. Ensure that "TOP"
is visible when filter is installed.
4. Remove the used V5-Cell by lifting it out of
the frame (disposal see section 6.7).
Frame 3
Frame 2
Diffuser
6.5 Replacing the V5-CellTM Filter (F2) – HealthPro Plus Only
6. Put the frame back into the housing,
followed by frame 3 and the diffuser. For
closing refer to section 6.3.
Diffuser
Frame 2
Frame 3
12. After a filter has been replaced, the Filter
Life Monitor must be reset from the
control panel (see section 4.4.8).
7. After a filter has been replaced, the
Filter Life Monitor must be reset from the
control panel (see section 4.4.8).
Important: Black dust from V5-Cell can
stain. Wear rubber or plastic gloves and
protect clothing and other surfaces while
handling.
24
Chapter 7 – Maintenance
1. Open the locking arms, making sure they
are fully extended outward. For details,
refer to section 6.3.
2. Opening the arms will release the top
housing modules. Removing the diffuser
will reveal the HyperHEPA filter inside
Frame 3.
3. Remove Frame 3 containing the
HyperHEPA filter.
5. With the palm of the hand, press down on
the filter and loosen the frame.
4. Turn the frame over so it is upside down.
Frame 3
Diffuser
6.6 Replacing the HyperHEPA® Filter (F3)
6. Lift the frame from the filter.
Frame 3
HyperHEPA
filter
8. Turn the frame over (right side up again)
and insert the new lter. Ensure that the
arrows on the lter label point upward.
The label “this way up” should be visible
when installed properly. Re-install four
filter clamps.
7. Dispose of the used filter by placing it into
the plastic bag in which the new filter is
supplied (see section 6.7).
9. Put frame 3 back into the housing and
reposition the diffuser. For closing refer to
section 6.3.
Frame 3
6.7 Discarding Used Filters
Used lters can normally be put into the regular household trash for
disposal. If the system may have been exposed to potentially hazardous
substances, the lters may have to be disposed of as hazardous waste.
Please refer to local regulations and laws for proper handling and disposal.
Chapter 7 – Maintenance
7.1 Cleaning the Housing
•Unplug the IQAir system before attempting to clean it.
•Use a soft and clean cloth for cleaning.
•For water soluble stains, use a window cleaning uid.
•For the removal of tough, non water soluble stains, use a silicon spray.
•Do not use any solvents or any organic cleaning uids.
10. After a filter has been replaced, the Filter
Life Monitor must be reset from the
control panel (see section 4.4.8).
