IQAir GCX series User manual

GCX Series
High-Performance Air Cleaning System
User’s Manual Swiss Made

2
About This User’s Manual
Congratulations on your purchase of this IQAir® high-performance air cleaning system. Please study this user manual
carefully to familiarize yourself with the special features and functions of your IQAir® system and keep it in a safe
place for future reference.
Read these instructions before using the appliance:
•Do not use this appliance as sole protection against harmful pollutants.
•Do not immerse the appliance in water or other liquids.
•Always disconnect the power from this appliance by unplugging the power cable before adding or removing
parts and before cleaning.
•Do not operate this appliance if it has a damaged cord or plug, if the motor fan fails to rotate, if it is not working
properly, if it has been dropped or damaged, or dropped into water.
•If the power cord of this appliance should become damaged, it may be replaced with a similar two-pole cord set,
as is commonly used for computers and similar appliances.
•Only use this appliance for its intended purpose of air cleaning in non-industrial environments.
•Do not use this appliance in areas with very high concentrations of dusts or powder to prevent the danger of dust
explosions.
•Do not use this appliance in explosive areas.
•Do not use attachments or lters not recommended by IQAir®.
•Do not use outdoors.
•Do not obstruct the air inlet and air outlet of the appliance.
•Do not place the appliance on a soft surface such as a bed or other soft furnishings.
•Only use this appliance in an upright position.
•Do not place next to a humidier.
•Keep the power cord away from heated surfaces.
•Save these instructions for future reference.
Important Safety Instructions
The IQAir® Group reserves the right to change specications contained in this document at any time and without prior notice.
© 2009 The IQAir® Group. All rights reserved. IQAir® is the registered trademark of The IQAir® Group. EvenFlow™ is a trademark of The IQAir® Group. IQAir® systems
and lters are protected under U.S. patents 6 001 145 and 6 159 260. Other U.S.,
European and Asian patents pending.
105.10.10.50 / 0309

3
Page
Important Safety Instructions 2
Chapter 1 – Air Cleaning Systems and Indoor Air Quality 4
1. 1 Improving Indoor Air Quality 4
Chapter 2 – Setting Up 5
2. 1 Unpacking 5
2. 2 Choosing a Suitable Location 6
2. 3 Connecting to Power 6
Chapter 3 – The IQAir® System’s Components 7
3. 1 Description of Housing Components 7
3. 2 Description of Removable Components 8
3. 3 How the IQAir® System Works 8
Chapter 4 – Using the Control Panel 9
4. 1 Description of Control Panel 9
4. 1. 1 Description of Control Panel Keys 9
4. 2 Control Panel Locking Function 10
4. 3 Fan Speed and Air Delivery 10
4. 3. 1 Regulating Fan Speed 10
4. 3. 2 Air Exchange Rates in Differently Sized Rooms 11
4. 4 Using the Menu Functions 11
4. 4. 1 Menu Overview 11
4. 4. 2 Filter Life Monitor 12
4. 4. 3 Setting the Auto Timer 13
4. 4. 4 Day-of-the-Week Timer 14
4. 4. 5 Timer ON/OFF Fan Speed Selection Menu 14
4. 4. 6 Timer Information in the Control Panel 15
4. 4. 7 Time & Day Setting 16
4. 4. 8 Filter Life Reset 16
4. 4. 9 Changing Airow Units 17
4. 4. 10 Language Setting 17
Chapter 5 – Using the Remote Control 18
5. 1 Remote Control Elements and Functions 18
5. 2 Getting the Best Transmission Results 18
5. 3 Replacing the Battery of the Remote Control 19
Chapter 6 – Replacing Filters 19
6. 1 Location of the Filter Elements 19
6. 2 Ordering Replacement Filters 20
6. 3 Opening and Closing the Housing 20
6. 3. 1 Troubleshooting when Closing the Housing 20
6. 4 Replacing the Pre-Filter (Filter 1) 20
6. 5 Replacing the Gas Phase Filter Cartridges
and Post-Filter Sleeves (Filter 2) 21
6. 6 Discarding Used Filters 22
Chapter 7 – Maintenance 22
7. 1 Cleaning the Housing 22
7. 2 Maintenance-Free Fan 22
7. 3 Technical Support and Repairs 22
7. 4 IQAir Warranty 22
Chapter 8 – Anti-Tampering Kit Instructions 23
Chapter 9 – IQAir® Accessories (Optional) 25
Table of Contents

4
Chapter 1 – Air Cleaning Systems and Indoor Air Quality
State-of-the-art ltration technology
Your IQAir advanced air cleaning system has been developed especially for the control of specic gaseous
components. Thanks to advanced gas cartridge (GCX) lter technology, each model of the IQAir GCX Series has been
optimized for the control of specic gaseous pollutant groups. The following model congurations are available:
•IQAir® GCX VOC for the control of volatile organic compounds
•IQAir® GCX MultiGas for the control of volatile organic compounds and many inorganic compounds
•IQAir® GCX Chemisorber for the control of many inorganic compounds and some organic compounds
•IQAir® GCX AM for the control of ammonia and amines
1.1 Improving Indoor Air Quality
Air cleaning can play an important role when it comes to improving indoor air quality. However, it should be noted
that air cleaning should be used in conjunction with pollution source control and ventilation, wherever possible.
Strategy to improve indoor air quality
To tackle any indoor air quality problem, keep the following three-step strategy in mind:
1. Eliminate or reduce the air pollution source as much as possible. Source control is by far the most effective way to
improve indoor air quality, since it sets out to deal with air pollution at the point of origin.
2. Ensure that sufcient fresh air is entering the room from outside. Air cleaners are not a substitution for sufcient
ventilation. They are not able to reverse the conversion of oxygen (O2) into carbon dioxide (CO2), caused by
breathing and combustion processes.
3. Ensure the IQAir® system can clean enough air to cope with your room size. The actual hourly air volume cleaned
by the system should be at least double the air volume of your room. If the rate at which pollutants enter the room
air is high or the indoor air quality requirements are stringent, the hourly air delivery of the system needs to
exceed the room air volume several times. To achieve that level of air turnover, it may be necessary to employ
more than one IQAir system, or consider an IQAir whole-house system.
Air Cleaning Results
Although air cleaners may be advertised and sold to be suitable for use in specic indoor environments and to deal
with specic indoor air quality problems, the manufacturer and distributors make no claim as to the specic air
cleaning results that are achieved under the user’s individual operating conditions. The air quality improvements
that can be realized with the IQAir® system (as with any air cleaner) in indoor environments depends to a signicant
degree on circumstantial factors, which are out of the control of the manufacturer or distributors. Important factors
which will inuence the air quality improvements that can be achieved in an indoor environment with an air cleaner
include:
•Type of air pollutants present
•Intensity of the pollutant source(s)
•Pollutant concentration
•Size of the indoor environment (room size)
•Operating speed of the unit
•Number of air cleaners placed in the indoor environment
•Saturation state of the lters in the air cleaner
Consult a qualied specialist to determine an effective and comprehensive indoor air quality strategy.

GCX Series
High-Performance Air Cleaning System
User’s Manual SwissMade
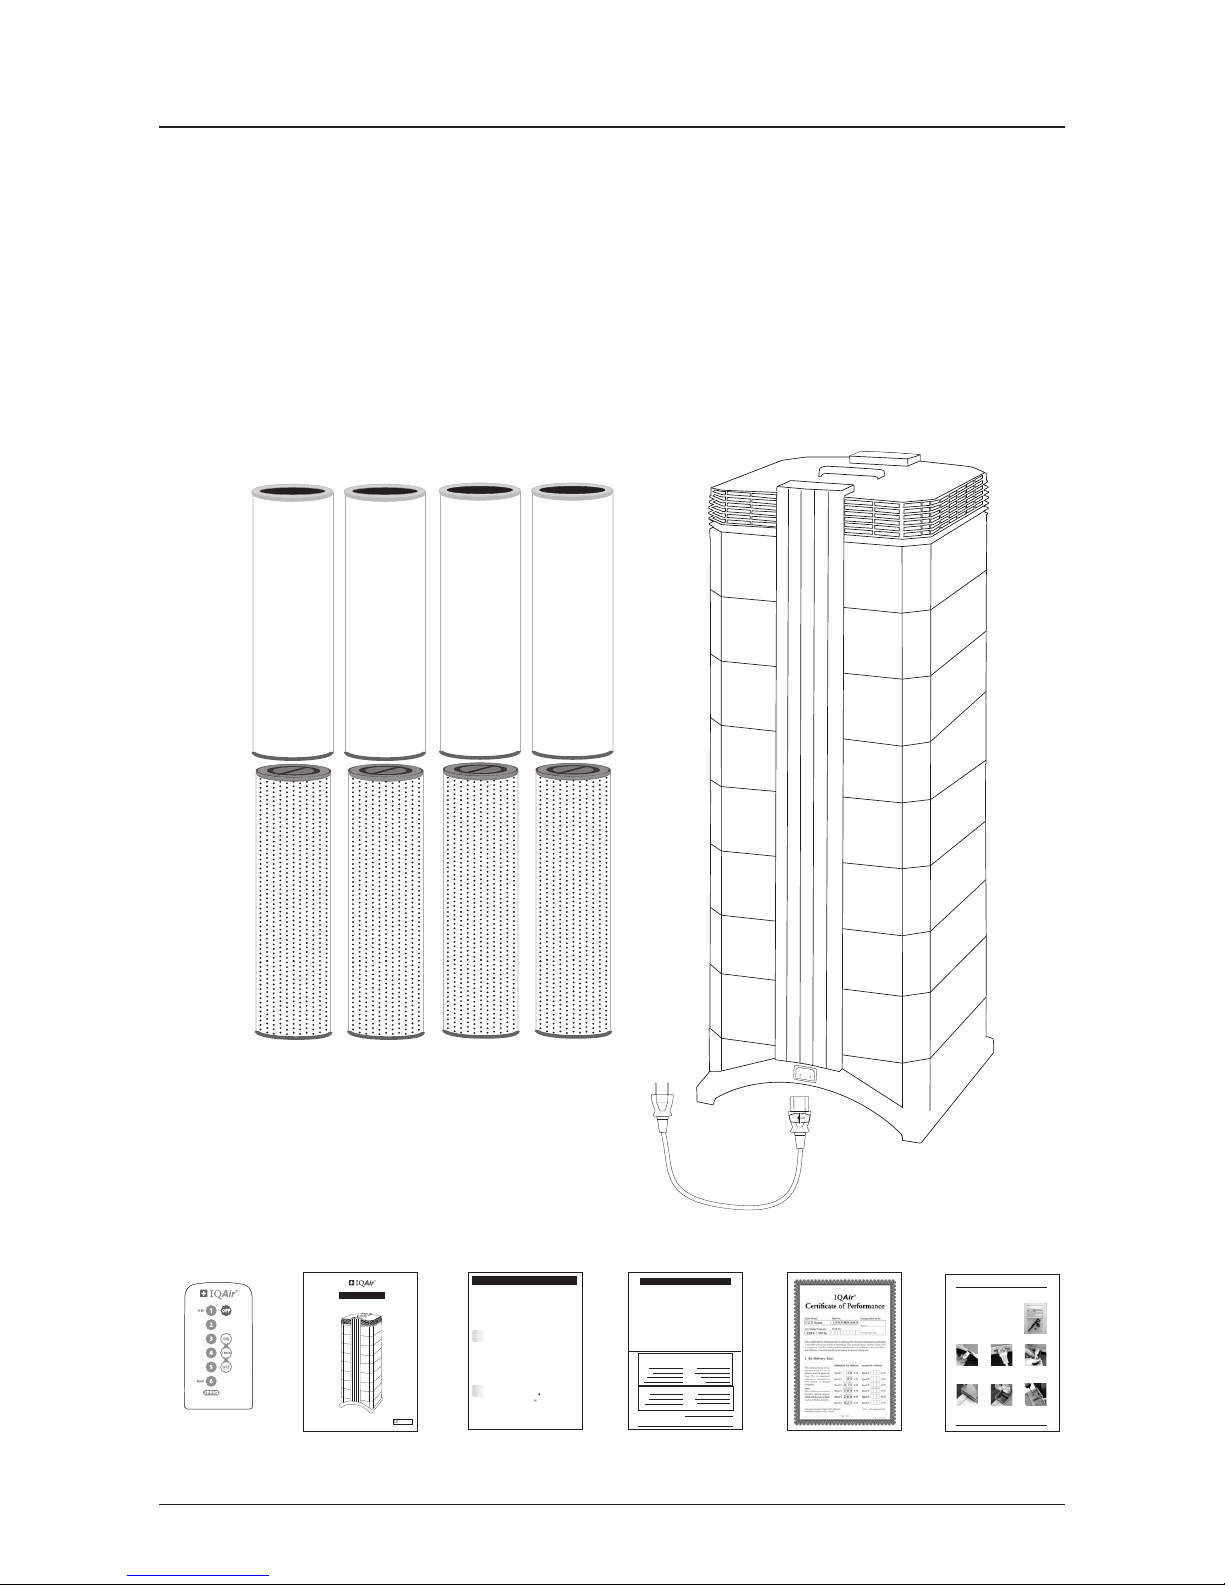
Power cord
User manual
IQAir®
Advanced Air Cleaning System
Remote control
including battery
4 gas phase filter cartridges
Note: The gas phase filter cartridges for the air cleaner are
supplied in a separate box and must be installed before use.
4 post filter sleeves
Note: The sleeves are supplied inside the IQAir system. Pull
the post filter sleeves over the cartridges before installing
the cartridges in the air cleaner.
5
Chapter 2 – Setting Up
2.1 Unpacking
To unpack the IQAir® system, open the top of the box and remove the square styrofoam pad which contains all
accessories and product literature. Lay the box on its side, hold the system by the handle and pull it out of the box.
Remove the plastic bag and foam belt. Keep the packaging for future transport and service needs.
QuickStart Guide
Getting Started with Your IQAir® GCX System
Thankyou for choosing an IQAir advanced air cleaning system. This 2-page instruction sheet will assist you in getting
started with your IQAir in a matter of minutes. Simply follow the instructions below.To access some of the more
advanced featuresof your IQAir GCX system, such as the timer, please refer to the detailed instructions in the IQAir
UserManual.
YourIQAir GCX system is supplied with the following items:
•Individually Numbered Certificate of Performance
•User Manual with Warranty Registration Card
•IQAir Referal Program Card
•Power Connection Cord
•Remote Control (incl. battery)
•Set of 4 GCX Cartridges (delivered in a separate box)
•Set of 4 GCX Post-Filter Sleeves (inside the air cleaner in the F2 chamber)
•Getting Started Instruc tions
•How to Install Anti-tampering Features
•Anti-tampering Kit
1
2
SettingUp Your IQAir GCX System
A) Unpacking
Tounpack your GCX system, open the top of the boxand remove the user manual, certificate of performance and
thestyrofoam pad. Lay the box on its side and pull the GCX system out by its top handle. Place the device in its
uprightposition and remove all packaging materials. The GCX cartridges are supplied in a separate box.
B) Choosing a suitable location
TheGCX system should be positioned as centrally as possible in the room where clean air is desired and at least
onefoot (12 inches) away from the nearest vertical surface.
C) Install yourGCX Car tridges
YourGCX cartridges have come in a separate box - to avoid shipping damage. Therefore, you’ll need to install
your GCX cartridges. Open the GCX system to gain access to filter2 (GCX car tridges). Forfurther explanation,
pleaserefer to the GCX User Manual chapter 6. Unpack the four (4) GCX cartridges located in a separate shipping
box.Cover the GCX cartridges with the post-filter sleeves provided.
D) Connectingthe GCX system to the power supply
Plug the connector-end of the power cord into the base of the GCX system.Locate a suitable wall socket and
connectthe power cord. The GCX system is now in standby mode ready to be switched on.
Usingthe Electronic Control Panel
A) Switchingthe GCX system on/off
Toswitch the GCX system on or off, simply press the POWER button , located on the far left of the control
panel.
B) Regulating the fan speed
Toselect the desired fan speed, simply press the ARROW button onthe control panel. When the top speed
hasbeen reached, the display will start again at the lowest fan speed with the next push of the “arrow” button.
C) Setting the clock
Settingthe time and weekday is not essential for the GCX system to keep track of filter life. However,the setting
of the clock is required to programthe GCX system’s daily and weekly timer. For detailed instructions, please
referto the GCX Series user manual.
(over)
Certificate of
Performance
Referral Program
Icertify that the above information is correct. Referrer’s Signature:
The IQAir®Re ferral Program
Shellno : Serialno: .
Lastname: Firstname :
Companyname: Phone:
Address: Purchasedfrom :
City: Zip Code / Posta l Code:
TheIQAir®Referral Program
Tothank you for recommending IQAir,we are proud to introduce the IQAirReferral Program. For every IQAir system
purcha sed through you r recommendation, you will receiv e one free pre-filter pe rre ferral. The more people or
businesses you refer,the morep re-filtersyou’llreceive, FREE!Additional brochuresfor your family,friends, colleagues
orcompany are enclosed with the IQAirsystem you p urchased. Youmay alsod ownloada b rochureat www.iqair.com
andemail itto them.
Asa n IQAirowner you experience first hand the performance and elega nceof IQAir. Please share your satisfaction
with IQAir with your family, frien ds, colleagues and commun ity. Word-of-mouth recommendation s allowa n ever
increasing number of people to experience how truly clean air can improve their quality of life. The IQAir Referral
Program is IQAi r’s way of say ing th an k you for sh arin g IQAir with t he peop le you ca re abou t.
Thankyo u for choo sing IQAi r asyou r air clean ing solu tion!
Asa n IQAircu stomer,we value your thou ghts and s uggestions. You can contact us at (877) 715-4-AIR (247), fax u s at
TermsandConditions: The referrer and the referee must be registeredwarranty customers. Referralclaim must be
received within 6 week s of referee’s purch ase. Pre-filter will be sh ipped to referre rwh en referral sa le becomes final.
Limited to one p re-filter p er referral. Please f ill out one card per ref erral. Allow 4 week s for ship ping. Self referral is n ot
eligible.The IQAir ReferralProgram is notav ailableto IQAir Dealers,Resellers, Retailersor Installers. The Programterms
and cond itions are subject to ch ang e withou t notice.
Fillou t the card below to claim you r free p re-filte r. Ple ase write legibly. T han k you !
Information abo ut you (r eferr er)
Pleasereturn this cardto: IQAir Nort hA merica, Inc., 10440 Ontiveros Place, U nit 1, Santa Fe Springs, CA 90670, USA
Alternat ively you may fa x this p age: (562) 903- 7601 Questions?Call us toll free a t (877) 400-1050
Lastname: Firstname :
Address: Phone:
City: Zipcod e:
Serialno. (ifknown): .
Information abou tr eferee (per son who pur chased IQAir on yo ur recommend ation)
0707/10501 00 01
Anti-Tampering Kit
23
Chapter8 – Anti-TamperingKit Instructions
Chapter 8 – Anti-TamperingKit Instructions
Your I QAir ®systemcomes with two anti-tampering features designed to prevent unauthorized tampering with
thesystem:
•Thearm-locking xture prevents unauthorized access to the system’s
replacementlters.
•Thepower cord inlet xture helps to prevent the unauthorized
unpluggingof the system. Note: Additional measures have to be
takento prevent unplugging of the air cleaner from the wall plug.
What’sincluded in the anti-tampering kit:
1x Torx 10 Safety Tool
1x Torx 20 Safety Tool
2x Torx 10 Safety Screws
4x Torx 20 Safety Screws
Theonly additional tool you need to enable the anti-tampering features is a
mediumsize at head screw driver.
Howto install the power cable xture
1)Make sure the power cord
is unplugged. Plug the
power cable into the air
cleaner’spower socket.
2) The metal clamp on the
cablenow lines up with two
screw holes in the base of
theair cleaner.
3) Insert two of the small
screws supplied (Torx 10)
and fix the metal clamp to
the air cleaner, using the
suppliedtool.
13
1) Disconnect the power
cord. Press with the at-
head screwdriver into the
smallopening on the side of
the arm with the IQAir logo
face plate (not the control
panelside).
2)Lift out the face plate.
2
3) Use the larger screws and
tool supplied. Insert the
screws through the two
holesand tighten.
Howto install the arm locking xture
23
1
Table of contents
Other IQAir Air Cleaner manuals

IQAir
IQAir GCX AM User manual

IQAir
IQAir Allergen 100 Manual

IQAir
IQAir HealthPro series User manual

IQAir
IQAir GC series User manual

IQAir
IQAir CleanZone 3030 series User manual

IQAir
IQAir Atem User manual

IQAir
IQAir HealthPro User manual

IQAir
IQAir HealthPro series User manual

IQAir
IQAir Perfect 16 User manual

IQAir
IQAir HealthPro Compact User manual

IQAir
IQAir Cleanroom H 13 User manual

IQAir
IQAir Dental series User manual

IQAir
IQAir CleanZone 3020 series User manual

IQAir
IQAir Atem User manual

IQAir
IQAir Allergen 100 User manual

IQAir
IQAir HealthPro 250 User manual

IQAir
IQAir Atem X User manual

IQAir
IQAir Atem User manual

IQAir
IQAir HealthPro Plus User manual

IQAir
IQAir HealthPro 150 User manual