manuals.online logo
Brands
  1. Home
  2. •
  3. Brands
  4. •
  5. ISLANDSAFE
  6. •
  7. Safe
  8. •
  9. ISLANDSAFE MODERNO XN Series User manual

ISLANDSAFE MODERNO XN Series User manual

Other ISLANDSAFE Safe manuals

ISLANDSAFE QT25 Series User manual

ISLANDSAFE

ISLANDSAFE QT25 Series User manual

ISLANDSAFE QT25 Series User manual

ISLANDSAFE

ISLANDSAFE QT25 Series User manual

ISLANDSAFE XN25 Series User manual

ISLANDSAFE

ISLANDSAFE XN25 Series User manual

Popular Safe manuals by other brands

Euromate 406210 Original instructions

Euromate

Euromate 406210 Original instructions

SPORTS AFIELD PRESERVE SA72-60WD instruction manual

SPORTS AFIELD

SPORTS AFIELD PRESERVE SA72-60WD instruction manual

Squire Stronghold Keysafe Fitting instructions

Squire

Squire Stronghold Keysafe Fitting instructions

Phoenix FS0352C Instructions & Guarantee Registration

Phoenix

Phoenix FS0352C Instructions & Guarantee Registration

Hornady SnapSafe Trunk Safe II owner's manual

Hornady

Hornady SnapSafe Trunk Safe II owner's manual

Phoenix KS0030E Series operating instructions

Phoenix

Phoenix KS0030E Series operating instructions

Vaultek 10 Series Quick setup

Vaultek

Vaultek 10 Series Quick setup

Arregui CLASS operating instructions

Arregui

Arregui CLASS operating instructions

Technomax Trony Series Instruction handbook

Technomax

Technomax Trony Series Instruction handbook

SPORTS AFIELD INSTINCT BIOMETRIC Series instruction manual

SPORTS AFIELD

SPORTS AFIELD INSTINCT BIOMETRIC Series instruction manual

SPORTS AFIELD SA-HD5-BIO instruction manual

SPORTS AFIELD

SPORTS AFIELD SA-HD5-BIO instruction manual

Olymp GOsafe 110 operating instructions

Olymp

Olymp GOsafe 110 operating instructions

Phoenix SS0100E Operating Instructions & Guarantee Registration

Phoenix

Phoenix SS0100E Operating Instructions & Guarantee Registration

Ankaro ANK EZ I quick start guide

Ankaro

Ankaro ANK EZ I quick start guide

Honeywell 2077D - 1.21 Cubic Foot Anti-Theft Safe user guide

Honeywell

Honeywell 2077D - 1.21 Cubic Foot Anti-Theft Safe user guide

Beaumont SMART KEYBOX user guide

Beaumont

Beaumont SMART KEYBOX user guide

Phoenix FS1270E Series operating instructions

Phoenix

Phoenix FS1270E Series operating instructions

Shure T-Wall Series Assembly instructions

Shure

Shure T-Wall Series Assembly instructions

manuals.online logo
manuals.online logoBrands
  • About & Mission
  • Contact us
  • Privacy Policy
  • Terms and Conditions

Copyright 2025 Manuals.Online. All Rights Reserved.

PRODUCT SPECIFICATION
1. Mounting holes
2. Removable shelf
3. Reset button
4. Anti-pry bolt holders
5. Carpeted interior
6. Bolts
7. Battery
compartment
SETTING UP ACCESS CODES
After opening the safe, wait
for the light puts out, press the
reset button once.
Yellow light (smiley face) will
flash, input a new passcode
(3-8 digits), Press “#” to confirm.
12
Green light (OK) will flash
indicating that your new pass-
code has been accepted.
Close the door, then rotate the
Knob counter-clockwise to
close the safe.
3
1
4
7
2
5
8
3
6
9
*
0
#
4
To set up user code:
1
4
7
2
5
8
3
6
9
*
0
#
1
4
7
2
5
8
3
6
9
*
0
#
Default User Code: 159
11” (28 cm)
9.8”
(25 cm)
13.7” (35 cm)
1
376
5
2
4
XN25
4.7”4.7”
Knob
Yellow Light
“Smiley Face”
Red Light
“Battery”
Geen Light
“Ok”
Keypad Emergency
Battery Box Slot
Key Slot
The Panel:
User
manual (1)
123*
4560
789#
XN25
AA
batteries (4)
XN25
Mounting
bolts (2)
XN25
Emergency
keys (2)
XN20
WHAT’S IN THE BOX
Emergency
battery box (1)
7.8” (20cm)
7.8”
(20cm)
9.2” (23.5cm)
1
376
5
4
7.5” (19cm)
Open the emergency battery
box cover. Install four AA
batteries into the emergency
battery box.
Insert the cable into power
jack outlet. Yellow light will
flash. Input the passcode
“159”, then press # to confirm.
open
1 2
Green light (OK) will flash,
turn the knob clockwise to
open the safe.
Locate the battery compart-
ment on the back of the door.
Install four AA batteries.
1
4
7
2
5
8
3
6
9
*
0
#
34
1
4
7
2
5
8
3
6
9
*
0
#
To open the safe for the first time, use the emergency
battery box provided.
Default User Code: 159
GETTING STARTED
Press the emergency key slot
cover on the right of the panel
to open the cover.
Insert the emergency key into
the keyhole. Turn the key
counter-clockwise.
Do not release the key.
1
4
7
2
5
8
3
6
9
*
0
#
1
1
4
7
2
5
8
3
6
9
*
0
#
2
Hold the key, and turn the
knob clockwise.
Pull the door to open the safe.
1
4
7
2
5
8
3
6
9
*
0
#
34
To open the safe for the first time, use the
emergency key provided.
NOTE: If the “smiley face” flashes with three
beeps, then your passcode setup has been
rejected. Please try again.
Shelf Height: 0.8”
If battery’s low (red light indicator flashes) or dead,
please replace fresh batteries.
REMOVE THE SHELF
To remove the shelf, make sure the safe is empty:
Left the shelf upwards for. Rotate the shelf in 15°, then pull
the left side towards you to get
it out of the safe.
12
R
123*
4560
789#
123*
4560
789#
USER’S MANUAL
MODEL : IS-XN20
IS-XN25
MODERNO XN SERIES
An instruction manual is available at:
https://www.islandsafe.co/manuals
Video Tutorial
Please follow us on our
social media platforms
for news and updates!
islandsafe
islandsafeco
3 Continuously false entries will activate the alarm, and
automatic system lock for 20 seconds.
6 Continuously false entries will activate the alarm, and
automatic system lock for 5 minutes.
The keypad will be disabled during the alarm. Stop the
alarm by opening the safe with emergency key and
power-cut by removing the battery.
ALARM FUNCTION
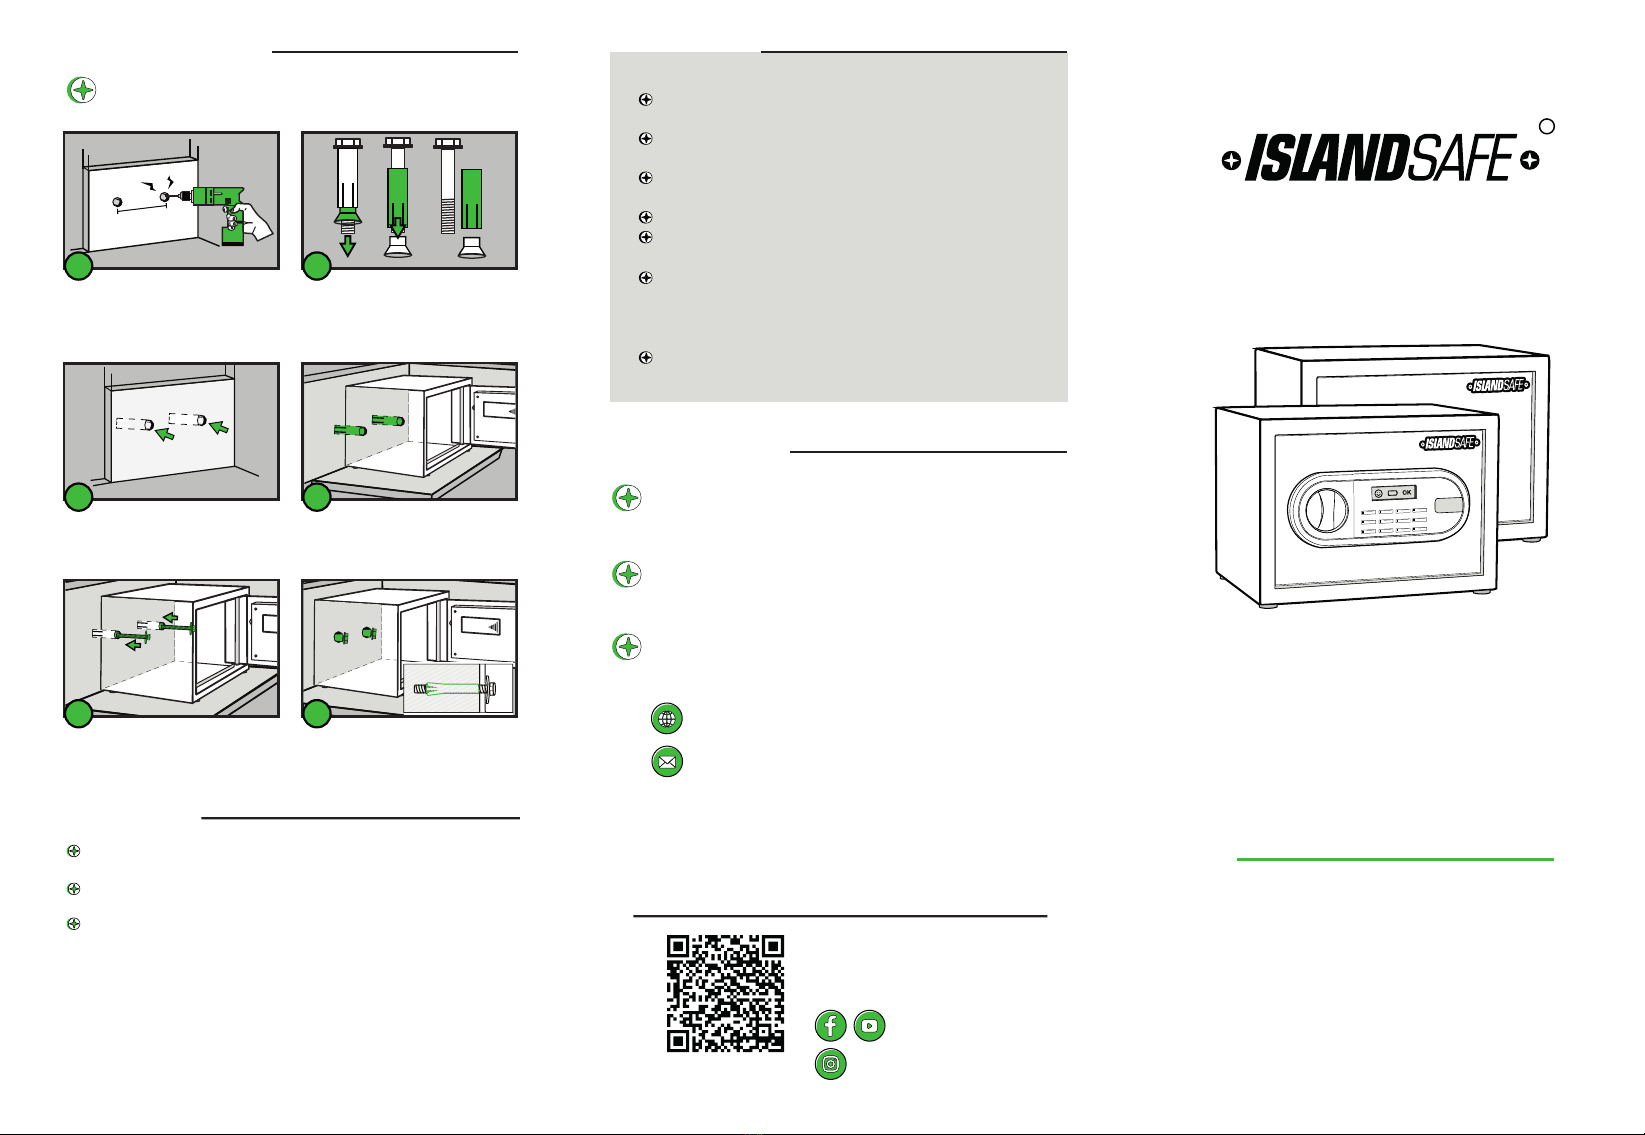
BOLTING DOWN THE SAFE
Mark and use 12mm drill bit to
drill two 2-inch-deep holes for
the bolts.
(distance = 7.2” or 18.5cm)
Separate the bolts from the
plugs by turing the bolts
counter-clockwise.
7.2”
12
Insert the plugs into the holes
on the wall.
Place the safe into position.
Make sure the safe holes in
align with the wall holes.
34
Secure the bolts through the
safe, into the holes.
Make sure the safe is mounted
in place, and all the bolts are
tighten.
5
WALL SAFE
6
Pick a secure location for your safe. A concrete wall
is preferred. Please do not store the emergency keys inside your
safe!
Keep a record of your key number and serial
number in a secure place seperate from your safe.
The backup key is for emergency use only in the
event of forgotten passcode.
Don’t use this product near the water.
This Safe is not designed to be a fully Fireproof safe
or to stand against moisture.
To prevent leakage of liquid from damaging the
electronic system, we recommend to remove or
replace the batteries with fresh ones in case the
safe is not used for long time.
Keep away from children.
WARNING SAFETY
CUSTOMER SUPPORT
Islandsafe is encouraging you to write a review
sharing your experience with the product. Please
visit: amazon.com/review/review-your purchases#
You are covered for limited warranty support. For
more details visit:
https://www.islandsafe.co/warranty
For general inquiries concerning your ISLANDSAFE
products, or for further information, please contact
our customer service department.
[email protected]
islandsafe.co