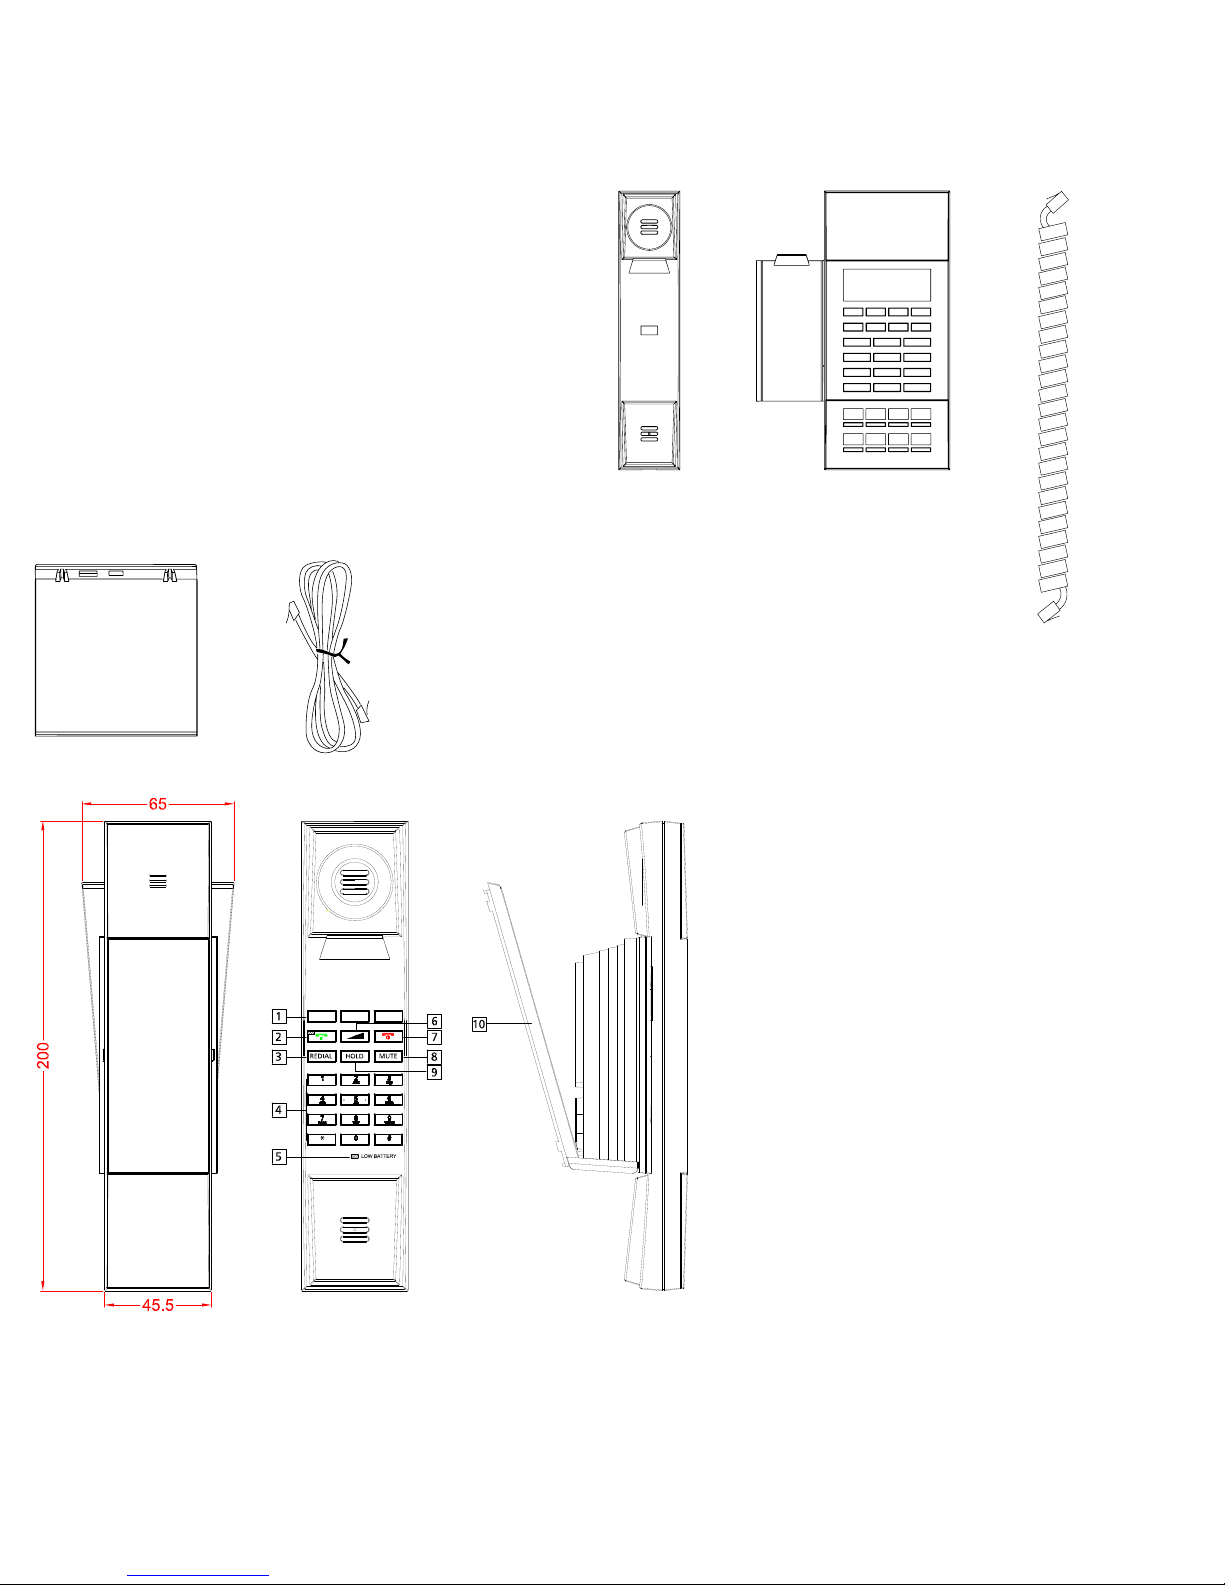
Jacob Jensen IP60D User manual

Telephone IP60D
User Manual

2
CONTENTS
4. 5.
1. 2. 3.
The following items are included in the
package of JACOB JENSEN Telephone IP60D:
1. Telephone handset
2. Base station
3. Handset coiled cord
4. Table stand
5. Line cord
6. HS20D
6.

3
MAIN FEATURE LIST
1. The Base and Handset can make/answer calls
independently. One Base can work with 1–4 Handsets.
2. Supports SIP V2/SDP/RTP/RTCP/STUN/SNTP/ DNS/SNMPv2
protocols.
3. Supports IEEE802.1 Q standard, IEEE802.3af protocols.
4. Supports G.711/G.722(HD Voice)/G.723/G.729AB /G.726/
iLBC
5. Supports 1.8/1.9Ghz, DECT6.0 and adopts HF numerical
coding technique between Base and Handsets.
6. Mute, hold, flash, redial and Speaker feature
7. Message waiting light compatible with main PBX, MWL
indicator and withdraw feature
8. Owns ten (10 ) service keys
9. Both Base volume and Handset volume are adjustable
(5-levels)
10. Supports DHCP and static IP address protocol for getting
IP address.
11. Supports upgrade through HTTP/TFTP protocol.
12. Adopts dynamic speech detection; Comfortable noise
generation; Speech buffering technologies.
13. Integrated PoE power supply and external POE adapter
power supply.
14. The handset on the base is corded.

4
CONTROLS AND FUNCTIONAL KEYS
1. MUTE Key
2. HOLD Key
3. VOL –
4. VOL +
5. Number Keys
6. Handset
7. Service keys
8. Indicator
9. Redial/PG
10. Speaker
11. MWL
12. FLASH
13. DC Jack
14. LAN Port
15. WAN Port
16. Handset Jack

5
1. Service keys
2.
3. REDIAL
4. Number key
5. Low Power Indicator
6.
7.
8. MUTE
9. HOLD
10. Bracket
11. Power Adaptor
12. Charge Indicator
13. DC Jack

6
1. IP address broadcast
In off-hook mode, press * button four times to enter the
voice menu. Press 1 (network setting) then press 2 (WAN
port IP address), a voice synthesizer will announce the IP
address.
2. WEB interface
Input the obtained IP address to launch WEB interface
. Type in user and password to log in
WEB interface.
3. Launch WEB interface
Input the obtained IP address to launch WEB interface
. Type in user and password to log in
WEB interface.
Note:
1) Both the user name and password in initial management
mode are ‘admin’.
2) The default network mode is DHCP. Once the phone is
connected into the network environment with DHCP
service, it can get online automatically
4. WEB interface function description
4.1. Phone status
Product
Information
It shows the basic information of the
product.
Line Status It shows the registration state of each
line.
CONGRATULATIONS ON YOUR NEW JACOB JENSEN™
TELEPHONE
IP60D including JACOB JENSEN™ HS20D cordless Handset:
The telephone is designed in Denmark by Jacob Jensen,
whose products have gained international recognition for
their original, simple and classic design. Jacob Jensen™ has
received about 100 prizes from around the world and has
19 products included in The Design Study Collection and
The Design Collection of The Museum of Modern Art in
New York.
The IP60D has been designed specifically for hotel use.
Voice
over IP and DECT technologies are employed for clear
sound
and reliable operation. SIP protocols ensure compatibility
with all major brands.
Installation
1. Please place the supplied chargeable battery into the
handset, making sure the polarity of the jack and socket
match. Always use the same specification battery as that
supplied with phone..
2. Please connect the phone handset cord
3. Power by POE: Connect the output end to the WAN
port of the phone and connect the input end to the
Internet cable from hotel switch POE port.
4. Power by adaptor (The default is POE)
Please connect the 9V power adapter to the DC power
input, which is in the rear of the phone; connect the
Internet cable to WAN port of the phone, and connect
the Internet cable to the LAN port of Data port/access
point.
5. Please install the phone in a dry and clean environment
and avoid contact with damp.
6. The telephone should not come in to contact with fire,
water spray, or shock. Clean the surface with a soft
damp cloth; never use chemical solvents.
CONFIGURE THE PHONE THROUGH WEB INTERFACE
http: //xxx.xxx.xxx.xxx

7
Network
Status
It shows the information of Internet Port
WIFI and PC port.
Wireless Info It shows the current WIFI setting and
status.
System Status It shows the current time and the running
time of the product.
4.2. Network status
Telephone can obtain IP address from DHCP server in default
mode. Enter WEB interface to configure all related settings
in accordance with real network environment.
WAN IP Mode Select WAN port IP address obtainment
modes including static/ DHCP/ PPPoE/
Bridge.
MAC Address
Clone
Enable MAC address clone or not
NAT Enable Activate NAT function or not.
VLAN Mode Activate VLAN mode or not
VLAN ID Set VLAN ID
DNS Mode If DNS mode is Manual, user needs to set
primary DNS and secondary DNS manually.
If DNS mode is Auto, IP phone will obtain
primary DNS and secondary DNS from
DHCP server automatically.
Primary DNS The Primary DNS setting
Secondary DNS The optional DNS setting
IP Address The network port IP address
Subnet Mask The network port subnet mask
Default
Gateway
The network port default gateway
Note:
1) When telephone IP address is switched from DHCP
to static mode, all parameters such as IP address,
Subnet Mask, Default Gateway and DNS need to be set
manually.
2) Save and apply switched IP address settings and reboot
the phone for new IP address obtainment. Make sure the
network is normal during daily use.
4.3. SIP Account Setting
For normal phone usage, only the Proxy Server, Display
Name , Phone Number, Account, and Password needs to be
configured.
Basic Set basic information from VoIP service
supplier,like phone number, account,
password, SIP proxy, etc.
Audio
Configuration
Select audio format
Supplementary
Service
Subscription
Auxiliary function
Call Waiting Enable call waiting or not
Hot Line Set hot line
MWI Enable Enable MWI or not
Voice Mailbox
Numbers
Voice Mailbox server
MWI Subscribe
Enable
Support MWI subscription
4.4. Administration
Client can set password, languages, restore factory
defaults,etc
4.5. Upgrade
Local Upgrade Click “Browse” to select certain firmware,
click Upgrade button for upgrading.
After upgrade, phone will return to initial
interface.
Note: After upgrading, please restore factory settings.
4.6. WEB Operation
Except regular configuration, please do not modify other
corresponding information.

8
5. Voice Menu Instruction
The phone has a voice menu function; relevant information
can be configured through the voice menu. After starting
the phone, press the * key 4 times to enter the voice menu.
Hang up to exit the voice menu.
Main Menu:
Network
Configuration
After choosing key 1, the phone will enter
Submenu 1.1 network configuration setting.
Telephone port
configuration
After choosing key 2, the phone will enter
Submenu 2.1 phone port configuration set-
ting.
Factory Reset After choosing key 3, enter the password;
the phone will then return to factory setting.
Speed Dial
configuration
After choosing key 4, enter speed-dial
configuration option; enter speed-dial
key, then enter the speed-dial number to
complete the configuration.
Reboot After choosing key 5, enter password; the
phone will then reboot.
WAN Port
Login
After choosing key 6, enter password to set
up whether WAN port can allow logging.
WEB Access
Port
After choosing key 7, enter password to
set up Web access port.
Software
Version
After choosing key 8, current software
version will be broadcast.
Submenu 1.1.:
Wan port
connection
type
After choosing key 1, the phone will
broadcast current Wan port connection
type; after entering password, DHCP or
static IP address can be set up.
Wan port IP
address
After choosing key 2, the phone will broad-
cast current IP address; after the broadcast
is finished, IP address can be set up.
Wan port
subnet mask
After choosing key 3, the phone will broad-
cast current subnet mask; after the broad-
cast is finished, subnet mask can be set up.
Gateway After choosing key 4, the phone will broad-
cast current gateway; after the broadcast is
finished, gateway can be set up.
DNS After choosing key 5, the phone will
broadcast current DNS; after the
broadcast is finished, DNS can be set up.
Submenu 2.1.:
Telephone
number
After choosing key 1, the phone will
broadcast current phone number.
Server IP
address
After choosing key 2, the phone will
broadcast current server IP address.
Physical port After choosing key 3, the phone will
broadcast current physical port.
Call transfer
configuration
After choosing key 4, call transfer option
can be set up.
Volume control
mode
After choosing key 5, volume control
mode can be selected.
Redial timing After choosing key 6, whether redialing
number will be removed after a fixed time
can be set up.
Ringing voice
adjusting mode
After choosing key 7, whether ringing
volume adjustment is allowed can be set
up.
Speed-dial
button and
voice mail
configuration
After choosing key 8, speed-dial button
can be configured.
Note:
1) When using voice menu configuration to achieve relevant
operation, please reboot the phone.
2) After entering password, IP address or other number,
please enter # to confirm.
3) When using keyboard to enter password,
Press number key 2 if A, B, C, a, b, c is to be entered.
Press number key 3 if D, E, F, d, e, f is to be entered.
Press number key 4 if G, H, I, g, h, i is to be entered.
Press number key 5 if J, K, L, j, k, l is to be entered.
Press number key 6 if M, N, O, m, n, o is to be entered.
Press number key 7 if P, Q, R, S, p, q, r, s is to be entered.
Press number key 8 if T, U, V, t, u, v is to be entered.
Press number key 9 if W, X, Y, Z, w, x, y, z is to be entered.
When using the keyboard to enter the password, other
characters can be replaced by number key 0.
When entering IP address, use “*” to replace “.”;
for example, if the IP address is 192.168.10.100,enter
192*168*10*100 instead.
4) Press * key one time to return to the menu; press * key
twice to return to the menu if in IP address entering
status.
5) Hang up the phone to exit the voice menu.

9
BASIC OPERATION OF PHONE
1. To register the Handset
1) On-hook status, press HOLD+*+HOLD+MUTE on the base
(the indicator of SPKR, MUTE and HOLD will flash),
2) Press HOLD+*+HOLD+MUTE on the cordless handset,
3) After 5-8s, press REDIAL/PG key on the base.
4) The handset will ring, which means successful
registration.
2. Off-hook
Press on the handset or press button on the
base.
3. On-hook
1) Put the handset back on the base or press again
2) Please press key of the handset or put the Handset
back on the charging base
3) Press button again if it’s in speaker mode.
4. Service Button
1) Off-hook mode, press a service key to dial the number
directly.
2) How to Store:
Keep the base in on-hook mode, press HOLD+ Desired
number + Service key / MWL key. There will be indicating
tone if succeed.
For the handset, in on-hook mode, press HOLD +
*+HOLD+N+M of the base (N=1,2 or 3, which stands
for the location of the service button of the handset; M
stands for the service button of base) .
For example, if you want to program the 2nd service
button of the handset and the desired number is same as
the 7th service button of the base, the solution is:
On-hook status, press HOLD + *+HOLD+2+7th service
button on the base.
3) How to delete:
On-hook mode, press HOLD+HOLD+ service key / MWL
key of the base. Please make sure that there is power.
5. Using the hold key
Press HOLD key, the indicator will turn on, the current line is
held, press HOLD key again or press of the handset
or press on the base can release the hold mode.
6. Mute
Off-hook mode, press MUTE key once to mute the
microphone, press it again to remove the mute mode (LED
indicator on Base).
7. Adjust the call volume
1) Press or on the base to adjust the volume. There are
five levels.
2) Press to adjust the volume. There are five levels.
8. To redial the last number dialed and Call the handset
1) Off-hook, press REDIAL key of the base or the handset to
dial the last number dialed.
2) Default mode:
After on-hook, the last dialed number will disappear
automatically within five minutes.
9. MWL Message Waiting Light
When there is new message, the MWL will flash, press the
MWL key to retrieve the message
10. Handset/Base speaker mode and Handset/Base
intercom
1) Press on the cordless handset to enter speaker
mode; press again will enter non-speaker mode
2) For the base, picking up the corded handset will enter
into non-speaker mode; press and put the corded
handset back on the base to enter into speaker mode.
3) From Base to Handset:
When Base is in speaker mode or handset mode, press
on the handset and press on the base, it will
enter handset non-speaker mode.
4) From Handset to Base:
When Handset is calling, press on the base or pick
up the corded handset, then press key on the
handset.

10
RESTORE FACTORY
When the phone is powered on, after it boots up
successfully, press 3 when in the voice menu, enter the
phone password + # Key to restore factory settings, then
reboot the phone.
POE POWER SUPPLY INSTRUCTIONS
The phone can view the POE power supply level by manag-
ing the POE switch. If powering the sound or charging stand,
the power level is 0 or 6 and the maximum value is 12.95W;
If only powering a phone, the power level is 2 and the maxi-
mum value is 6.49W. The power level of this type is 2.
INSTALLATION ATTENTION & MAINTENANCE
The phone has been manufactured using the very latest
technology and the highest quality components and
workmanship, under ISO9001 quality control procedures.
It can be relied on to provide many years of trouble-free
service, especially if these simple tips are followed:
• Handle with care, avoiding hard knocks and shocks.
• Do not expose this product to dust, strong sunlight,
humidity, high temperature, or mechanical shock.
• Do not use corrosive or abrasive cleansers on this product.
Keep the unit dust free by wiping it with a soft, damp cloth.
• Do not tamper with or attempt to modify the phone,
it would make it unsafe to use. Should any service
difficulties or faults be encountered, the following list
may help you identify and remedy problems. In many
cases, however, it may be necessary to call the distributor
from whom you purchased it.
TROUBLESHOOTING
1. No dialing tone
• Check the telephone network
• Check the connection of handset cord and straight line cord
2. No ringing or no continuous ring
• Check the telephone line
• Check the quantity of parallel phone sets.
3. Noise during talk
• Check the telephone line
• Check the handset cord
WARRANTY
This product is warranted for a period of 12 months from the
date of purchase against faulty materials or workmanship.
If during this period a defect arises, we may repair or replace
the product, at Bittel’s discretion, provided that:
1. The product has not been used for any purpose other
than normal use.
2. Unauthorized product repair or modifications have not
been attempted.
3. The product has never been used in a harsh or corrosive
environment.
4. No damage in transit.
THIS LIMITED WARRANTY GIVES THE BUYER SPECIFIC LEGAL
RIGHTS. THE BUYER MAY ALSO HAVE OTHER RIGHTS WHICH
VARY FROM JURISDICTION TO JURISDICTION.
This warranty is only valid for merchandise purchased
directly from Bittel or dealers or distributors authorized by
Bittel Co.
FCC APPROVAL
Complies with Part 68 of the FCC rules. On the bottom of this
telephone is a label that contains, among other information,
the FCC registration number and the ringer equivalence
number (REN) for this telephone. If requested, you must
provide this information to the Telephone Company.
EC Declaration of Conformity
Hereby Bittel declares that this equipment (Telephone IP60D,
type JJ IP60D incl. Cordless handset HS20D) is in compliance
with the essential requirements and other relevant
provisions of Directive 2014/53/EU.
Jacks:
Use RJ11C USOC standard modular jacks.

11
IMIP60D.08052018
CONTACT INFORMATION
Shandong Bittel Intelligent Technology Co., Ltd.
Telephone: (86) 633-2212119/2212113
Internet: www.bittelgroup.com, www.hotelphone.com
Email: [email protected]
Address: Shandong Bittel Intelligent Technology Co., Ltd.
No. 1 Rizhao North Road, Rizhao, Shandong,
276800, China
Service center North America:
Bittel Technology Inc.
1722 Little Orchard Street San Jose,California 95125 USA
Telephone: 1-888-9-BITTEL or 1-408-298-8206
Copyright © 2015 Bittel Inc. All rights reserved.
Produced in licence from:
Bell Xpress A/S
Telephone: (45) 70 22 60 33
Internet: www.bellxpress.dk
Email: [email protected]
Address: Sletvej 50, DK-8310 Tranbjerg J, Denmark
ENVIRONMENTAL CONCERNS AND DISPOSAL
Electric and electronic appliances contain materials,
components and substances that can be damaging to
people’s health and to the environment, if the waste is not
disposed of correctly. Electric and electronic appliances are
marked with a crossed-out wheelie bin symbol as illustrated
below. It indicates that electric and electronic appliances are
banned from being disposed of as general household waste,
and have to be collected separately.
Please ask you dealer about current means of disposal.
– The contents of this manual are subject to change without
notice.
– The manufacturer and its suppliers accept no liability
whatsoever for any damage, expense, loss of profits or any
other damage incurred as a result of using this product.

12
Product by: Bell Xpress A/S, Sletvej 50, 8310 Tranbjerg J, Denmark · www.bellxpress.dk
www.jacobjensen.com
Generation to generation...
Other manuals for IP60D
1
Table of contents
Other Jacob Jensen IP Phone manuals