Javo Quickfiller User manual

Manual version 2011-4-1
Javo Quickfiller
Machine no.: ……………………………………
Handleiding Javo Overduw Robot
Handleiding
PO Box 21
2210 AA Noordwijkerhout
The Netherlands
T: +31 (0)252 343121
F: +31 (0)252 377423
E: info@javo.eu
W: www.javo.eu
© All rights reserved
The information provided herein may not be reproduced and/or published in any form, by print, photo print, microfilm or any other means
whatsoever (electronically or mechanically) without the prior written authorisation of JAVO B.V.

Javo Quickfiller Manual
Version 2011-4-1 Page 1
Introduction
Thank you for buying a Javo Quickfiller. This tray machine allows you to further automate the tray process.
This is the user manual for the Javo Quickfiller potting machine.
This document explains the operation of the machine. This is made as clear as possible with the aid of photos and
drawings. The chapter on safety and troubleshooting contains several tips and solutions for common problems.
The Javo Quickfiller has been developed and manufactured using state of the art technology. This manual is part of
the engineering file which is maintained by the machine engineering plant.
The user manual has been written with the utmost care, and is intended for anyone who uses this Javo system. Javo
BV accepts no responsibility for errors in this manual or for any consequences of its use.
Read and understand this manual before using the machine.

Javo Quickfiller Manual
Version 2011-4-1 Page 2
Contents
Introduction ........................................................................................................................................................ 1
General information ............................................................................................................................................ 4
Supplier information..................................................................................................................................................... 4
Intended use ................................................................................................................................................................. 4
Non-recommended use ................................................................................................................................................ 4
Conditions of use .......................................................................................................................................................... 4
Description of the machine........................................................................................................................................... 4
Operating principle ....................................................................................................................................................... 5
Workstations at the machine........................................................................................................................................ 5
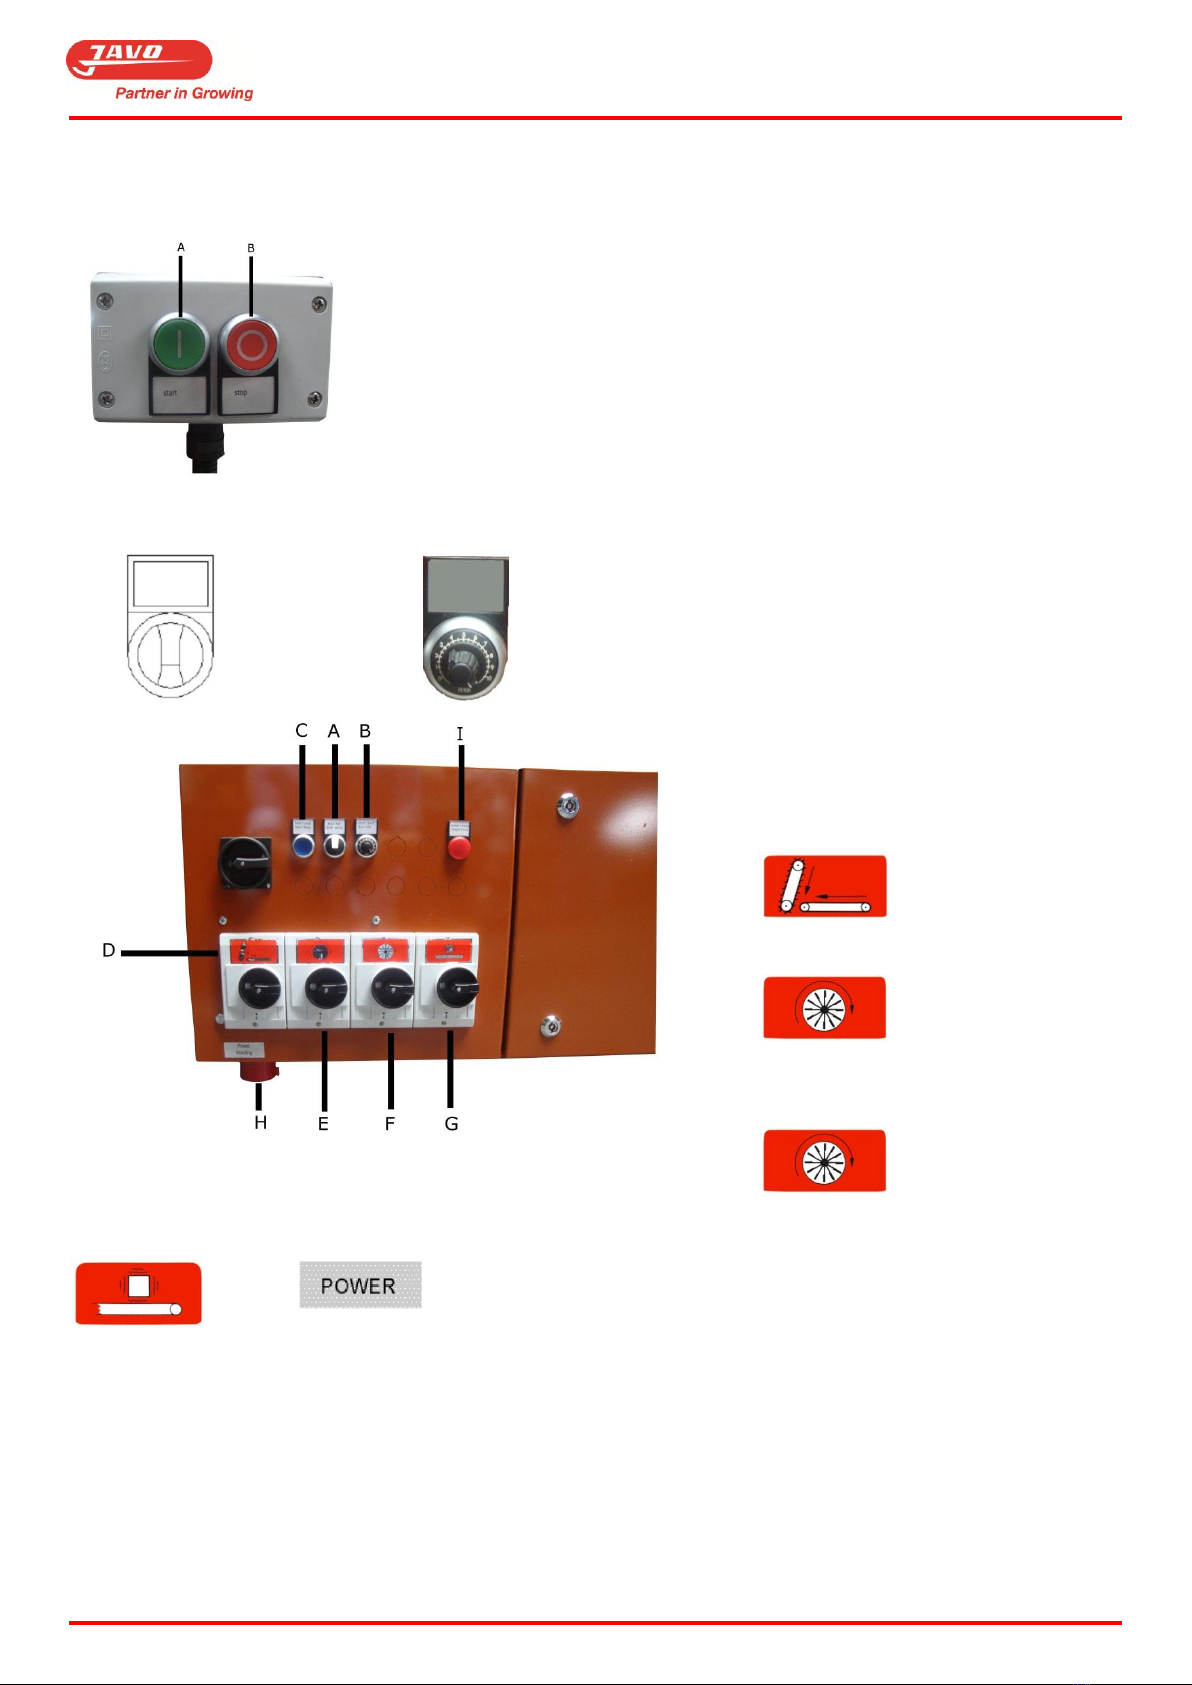
Controls......................................................................................................................................................................... 6
Safety .................................................................................................................................................................. 7
Use of personal safety equipment................................................................................................................................ 7
Important safety factors ............................................................................................................................................... 7
Safety precautions ........................................................................................................................................................ 7
Safety features on the machine.................................................................................................................................... 7
Safety precautions ........................................................................................................................................................ 7
Explanation of the symbols on the machine................................................................................................................. 8
Assembly, installation and commissioning............................................................................................................ 9
Location......................................................................................................................................................................... 9
Assembly / connection.................................................................................................................................................. 9
Setting-up / adjusting.................................................................................................................................................... 9
Covers and doors ...................................................................................................................................................... 9
Type of soil ................................................................................................................................................................ 9
Elevator direction of movement............................................................................................................................... 9
Soil belt tension......................................................................................................................................................... 9
Elevator chain tension............................................................................................................................................. 10
Facilities to be provided by the user........................................................................................................................... 10
Operation .......................................................................................................................................................... 11
Setting-up and adjustments........................................................................................................................................11
Type of soil ..............................................................................................................................................................11
Soil elevation conveyor speed ................................................................................................................................11
Conveyor belt speed adjustment............................................................................................................................11
Rotor height ............................................................................................................................................................11
Brush height ............................................................................................................................................................ 12
Soil plate in the soil bin...........................................................................................................................................12
Tray levelling height................................................................................................................................................12
Soil guide plates ...................................................................................................................................................... 13
Starting, normal operation, stopping, emergency stop.............................................................................................. 13

Javo Quickfiller Manual
Version 2011-4-1 Page 3
Troubleshooting..........................................................................................................................................................14
Maintenance and cleaning ................................................................................................................................. 15
Daily cleaning, maintenance and inspection .............................................................................................................. 15
Emptying the soil bin...............................................................................................................................................15
Nature and frequency of maintenance and cleaning .................................................................................................16
Tools and equipment required ...................................................................................................................................16
Safety precautions ...................................................................................................................................................... 16
Conditions for repositioning ............................................................................................................................... 16
Disconnect energy supplies ........................................................................................................................................16
Transport..................................................................................................................................................................... 16
Waste disposal................................................................................................................................................... 17
Only for countries within the EU.................................................................................................................................17
Attachments...................................................................................................................................................... 18
Name and address of the manufacturer and/or dealer ............................................................................................. 18
Symbols and information on the machine..................................................................................................................18
Type plate................................................................................................................................................................18
Safety symbols ........................................................................................................................................................18
Other markings ....................................................................................................................................................... 19
Personal safety equipment (PSE)............................................................................................................................19
Machine specifications................................................................................................................................................19
List of spare parts........................................................................................................................................................19
Drawings and diagrams............................................................................................................................................... 19
JavoNet........................................................................................................................................................................19
Customer service and support.................................................................................................................................... 19
EC Declaration of Conformity ..................................................................................................................................... 20

Javo Quickfiller Manual
Version 2011-4-1 Page 4
General information
Supplier information
The machine must be installed by the supplier or the manufacturer's representative.
Manufacturer:
Javo BV
Westeinde 4, 2211 XP
PO Box 21, 2210 AA
Noordwijkerhout
The Netherlands
Intended use
The Javo Quickfiller is designed to be used for automatically filling trays with substrate. A complete overview of the
machine operation can be found on page 5 under the heading “Operating principle".
Non-recommended use
Please do not use this machine for purposes other than those described in this manual:
-Always keep hands and loose clothing away from the moving parts of the machine.
-Do not stand on the machine while it is in use.
-The machine may only be used to process trays, substrate and other material as described in this manual.
Conditions of use
The Javo Quickfiller must only be used under supervision of a qualified individual. Anyone working with the machine
should have read and understood the complete manual prior to starting work.
In addition, the conditions are to comply with the requirements that are set for a normal working area. Other
circumstances may affect the functionality.
The Javo Quickfiller can be equipped with several options, depending on the intensity of use and the customer's
requirements. Please contact your sales representative for further information.
Description of the machine
A. Soil bin
B. Tray input
C. Tray output
D. Emergency stops
E. Elevator*
* On delivery, the moving parts of the machine are fitted with covers and doors.
TRÄDGÅRDSTEKNIK AB
Helsingborgsv., Varalöv
262 96 ÄNGELHOLM

Javo Quickfiller Manual
Version 2011-4-1 Page 5
Operating principle
The machine process starts at the soil bin, which is filled with potting soil. The soil moves onto the elevator via the
soil supply conveyor.
The elevator takes up the soil and fills the trays which another Javo machine or the machine operator has placed on
the conveyor belt.
The height and width can be adjusted for different trays making the machine suitable for various tray dimensions.
The conveyor belt moves the trays neatly under the rotor where the soil is distributed evenly. Then the trays move
past the leveller and brush and the trays will be brushed off neatly here.
The trays are now ready for further processing.
The machine is fitted with wheels making it easy to move.
Workstations at the machine
The are two workstations on the Javo Quickfiller; the tray entry and exit on the side of the soil bin.

Javo Quickfiller Manual
Version 2011-4-1 Page 6
Controls
The machine is controlled through the control panel, which has the following buttons:
A. Start button
B. Stop button
The following user-instruction stickers are attached to the electrical cabinet on the machine also:
A. Conveyor belt/belt ON/OFF B. Speed / Conveyor belt speed
C. Reset / Ready
D. Elevator ( On/Off)
E. Rotor
F. Brush
G. Vibrator unit H. Connector for power-in. I. Stopped / error

Javo Quickfiller Manual
Version 2011-4-1 Page 7
Safety
Read all safety warnings and instructions. Failure to heed these warnings and instructions can result in an electric
shock, fire or serious injury.
Use of personal safety equipment
-Be alert, pay attention to what you are doing and work sensibly when using the machine.
-Do not use the machine when tired, under the influence of drugs, alcohol or medicines.
-Wear suitable clothing / shoes without loose parts.
-Wear non-slip working shoes.
Important safety factors
-Always keep hands, hair, loose clothing and/or jewellery away from moving parts on the machine.
-Use of procedures and accessories, not specified in this documentation, may result in exposure to electrical shock
hazards and/or mechanical hazards.
-Never move the machine while it is still plugged-in.
Safety precautions
-Keep the working environment clean and well lit. An untidy or unlit working environment can lead to accidents.
-Keep children and other (unauthorized) persons away from the machine, while working.
-Do not expose the machine to rain and excessive humidity.
-Keep the power cable away from heat, oil, sharp edges and moving parts.
-If using the machine in a humid area cannot be avoided, an earth leakage circuit breaker must be used.
-Do not allow individuals who have not read and are not familiar with these instructions to operate the machine.
Electrically powered machines are dangerous when operated by inexperienced individuals.
-Maintain the parts properly. Check that moving parts function correctly and are not jammed and/or parts are not
broken or damaged to an extent that they adversely affect operation of the machine. Have damaged parts
repaired before use. Many accidents are caused by poorly maintained parts.
-The machine should only be repaired by qualified and competent individuals and using original replacement parts
only. This guarantees the safety of the machine.
Safety features on the machine
-Covers and doors protect the moving parts. Always replace them and close the doors before starting the
machine. The covers and doors should remain closed while the machine is in operation also.
-The machine’s motors are protected by thermal switches. These switches are located inside the control cabinet.
Safety precautions
-Read and follow these instructions before using the machine.
-Engage the brake on the swivel wheels before starting the machine.
-Never use the thermal overload switches to turn the machine on or off.
-If you have followed all of the operating instructions in this manual but the machine does not function correctly,
consult your supplier.

Javo Quickfiller Manual
Version 2011-4-1 Page 8
Explanation of the symbols on the machine
The symbols below show the emergency stops and the safety signs on the machine with references to the potential
hazards.
Read and understand this manual before:
- starting the machine Hazard: injury from moving parts
- performing maintenance.
Hazard: injury from pinching parts.
Emergency stop Hazard: injury from electric shocks
No access
Direction of movement
Soil supply speed
Tray conveyor belt
Brush disk
Elevator
Rotor

Javo Quickfiller Manual
Version 2011-4-1 Page 9
Assembly, installation and commissioning
Location
The machine should be placed on a flat surface, with sufficient load-bearing capacity. A Javo engineer should be
present during delivery of the machine to unload it from the truck.
Assembly / connection
Any loose components supplied together with the machine should be fitted to the machine. When doing so, ensure
that moving parts are not obstructed.
When the machine is fully assembled, it can be connected to the power supply (by a qualified individual) by inserting
the plug into the socket.
Setting-up / adjusting
The following points must be checked before starting the machine:
Covers and doors
All covers and doors must be closed and secured.
Type of soil
Depending on instructions.
Elevator direction of movement
The direction of movement of the elevator must be from bottom to top. The front of the elevator
(viewed from the soil bin) must move downwards. The covered side of the elevator must move
upwards.
If it is not, have an engineer correct this.
Soil belt tension
The tension is correct when the belt hangs down ± 40 mm in the centre.
The tension can be adjusted by turning the nuts (A) simultaneously.
The four bolts (B) on the block bearings must be loosened before turning these bolts.
The tension is correct when the belt hangs down ± 40 mm.

Javo Quickfiller Manual
Version 2011-4-1 Page 10
Elevator chain tension
The elevator chain tension is correct when it can move ± 20 mm in
the centre.
The tension can be adjusted using the two tensioning nuts on either
side of the elevator housing.
Tighten the nuts (A) equally on both sides of the elevator housing.
Note:
1. The chain tension must not be too tight.
Facilities to be provided by the user
Before the machine is delivered, the necessary materials and facilities (compressed air, power supply, potting
material, etc.) need to be easily available within 3 metres of the machine.
Power supply: 200 Volt, 1 Phase + Neutral + Earth. (N. America: 220 V 3 phase. 60 Hz).

Javo Quickfiller Manual
Version 2011-4-1 Page 11
Operation
Setting-up and adjustments
The following points must be checked before starting the machine:
Covers and doors
Type of soil
Elevator direction of movement
Soil belt tension
The above mentioned settings are described in detail on pages 9 and 10. (Setting-up / adjustments", under the
heading "Assembly, installation and commissioning")
Soil elevation conveyor speed
There is a hand wheel (A) on the left side of the elevator housing. When the rod (B) is unlocked
the hand wheel can turned both left and right.
Turning to the right makes the soil elevation conveyor move more slowly. Turning to the left
increases the speed of the soil elevation conveyor.
Conveyor belt speed adjustment
The speed of the conveyor belt can be controlled using the potentiometer (A) on the
electrical cabinet.
The speed of the potentiometer ranges from 1 to 10. The conveyor belt moves fastest at
speed 10.
Rotor height
Remove the protective cover (A) using the door key. Once the protective cover has been removed one clamp (B)
must be loosened. Then the crank handle (C) can be used to adjust the rotor up and down.

Javo Quickfiller Manual
Version 2011-4-1 Page 12
Brush height
The protective cover (A) must be removed using a door key before the brush height can be adjusted. Once the
protective cover has been removed one clamp (B) must be loosened. Then the brush can be adjusted up and down
using the crank handle (C).
Soil plate in the soil bin
The height of the soil plate (A) in the soil bin can be adjusted to
set the amount of potting soil reaching the elevator.
The soil plate is attached by two wing nuts (B). Loosening these
two wing nuts allows the plate to be position higher or lower.
Tray levelling height
After the tray has been filled with potting soil it moves past a leveller to remove the surplus soil. Remove the
protective cover (A) using the door key and loosen the clamp (B). The height of the leveller can now be adjusted.

Javo Quickfiller Manual
Version 2011-4-1 Page 13
Soil guide plates
The Quickfiller has two guide plates at the potting soil discharge to send the potting soil in the right direction.
Remove the protective cover (A) using a door key so that the soil guide plates (B) can be adjusted. Turning the two
wing nuts (C) changes the position of the soil guide plates.
Starting, normal operation, stopping, emergency stop
The machine can be started in various ways, depending on how the machine was switched off earlier. The various
options are explained below.
Turn the main switch (A) on the electrical cabinet ON.
Switch the elevator, conveyor belt, rotor, brush and vibrator unit ON using the
switches (B, C, D, E & F) on the electrical cabinet. Push the blue reset button
(G).
Push the green push-button on the
control panel (see A on the right) to start
the machine .
Normal stop
Press the red stop button on the control panel.
Emergency stop
Push the red emergency stop button on the machine to activate the
emergency stop.
Restart after an emergency stop
1. Make sure the cause of the emergency stop has been resolved.
2. Close all covers and doors.
3. Pull out the red button on the emergency stop to reset it.
4. Push the blue reset button.
5. Push the green push-button on the control panel to start the machine
Unplug the machine:
-When it is not in use
-Before moving the machine
-Before cleaning the machine
-Before maintenance

Javo Quickfiller Manual
Version 2011-4-1 Page 14
Troubleshooting
Problem
Possible cause
Action/solution
Fault in the electric motor
the mains voltage differs from the
nominal motor voltage by more than
10%
Ensure that the correct mains voltage is
available
Cooling air temperature too high
Supply cool air
Poor cable connection
Check and repair the cable connection if
necessary.
Blown fuse
Replace the fuse
Insufficient cool air due to a blocked
cooling air vent
Ensure the adequate supply and
discharge of cooling air
The motor hums and consumes
too much power
Defective winding
Repair or replace the motor
Relay broken on the motor
Call an engineer
Fuses keep blowing
Short circuit in the wiring or in the
motor
Repair the short circuit
The motor is shorting on the housing
or there is a short circuit in the
windings
Call-in a repair company to repair the
short circuit
The motor is connected incorrectly
Connect the motor correctly

Javo Quickfiller Manual
Version 2011-4-1 Page 15
Maintenance and cleaning
Always remove the plug from the socket before carrying out work. A number of items of personal safety equipment
(PSE) must be worn before starting maintenance work:
Safety glasses
Safety gloves
Safety clothing
Daily cleaning, maintenance and inspection
Check the tension of the elevator and belts is still correct daily. (For specifications see pages 8 and 9). In addition,
you should check that no pots or other materials have fallen into the machine. If they have, they should be removed
before the machine is restarted.
Emptying the soil bin
The paddles in the elevator should be
cleaned regularly to prevent excessive
wear and tear. The two protective
covers (A and B) on the elevator can be
loosened using the supplied door key.
Once the two protective covers have
been removed from the elevator (C) the
paddles and the elevator chain can be
spray-cleaned using compressed air.
Lubricating the conveyor belt bearings
The tray conveyor belt (A) is fitted with
block bearings. The block bearings (B)
must be lubricated after every 320 operating hours using a grease gun.

Javo Quickfiller Manual
Version 2011-4-1 Page 16
Nature and frequency of maintenance and cleaning
Part
Action
Frequency
Clean the elevator
Clean using compressed air
After every 160 operating hours
Lubricate the conveyor belt bearings
Grease using a grease gun
After every 320 operating hours
Clean the soil return chain
Clean using compressed air
Daily after use
Clean the entire machine
Clean using compressed air
After every 160 operating hours
Tools and equipment required
The standard maintenance set supplied with the machine contains the following:
A. Allen key 4 mm
B. Door key
C. Open ended spanner 24-27 mm
D. Open ended spanner 17-19 mm
E. Open ended spanner 10-13 mm
Safety precautions
Unplug the machine:
-When it is not in use
-Before moving the machine
-Before cleaning the machine
-Before maintenance
The remaining safety precautions can be found on page 7 ("Safety")
Conditions for repositioning
Disconnect energy supplies
Power, pneumatics and hydraulics should be disconnected before repositioning the machine. Make sure cables and
hoses are stored properly.
Transport
When repositioning the machine within the same location (machine does not have to be lifted) energy sources must
be disconnected and disassembly work must have been carried out properly. Check the condition of the machine
(wheels) before moving it. Make sure the route is clear so that the machine can be moved to its new location
without running into any obstacles.
When the machine needs to be lifted (moving to a different location) contact your supplier or enlist the aid of a
professional company.

Javo Quickfiller Manual
Version 2011-4-1 Page 17
Waste disposal
Machines, accessories and packaging must be recycled and disposed of in an environmentally responsible way.
Only for countries within the EU
Electrical components
Do not dispose of electrical components in the household waste. In accordance with the European directive on
waste electrical equipment and the translation of the directive into national legislation electrical equipment that is
no longer usable must be collected separately and recycled in an environmentally responsible manner.
Waste oil
Waste oil, such as oil from a reduction gear unit, classifies as household hazardous waste (HHW). A duty of collection
applies for HHW. This means that waste oil cannot be disposed of in household waste. Waste oil has to be collected
by/delivered to a company which is certified to collect these oils.

Javo Quickfiller Manual
Version 2011-4-1 Page 18
Attachments
Name and address of the manufacturer and/or dealer
Manufacturer:
Javo BV
Westeinde 4, 2211 XP
PO Box 21, 2210 AA
Noordwijkerhout
The Netherlands
Dealer:
Symbols and information on the machine
Type plate
The CE-mark is shown on the type plate attached to the control cabinet door. This plate contains the following
information:
A. Machine type
B. Unique machine serial number (CE number)
C. Year of manufacture
D. Motor
E. Voltage
F. Maximum power consumption
G. Number of phases
H. Frequency
Safety symbols
The symbols below show the emergency stops and the safety signs on the machine with references to the potential
hazards.
Read and understand this manual before:
- starting the machine Hazard: injury from moving parts
- performing maintenance.
Hazard: injury from pinching parts.
Emergency stop: Hazard: injury from electric shocks.
No access
TRÄDGÅRDSTEKNIK AB
Helsingborgsv., Varalöv
262 96 ÄNGELHOLM

Javo Quickfiller Manual
Version 2011-4-1 Page 19
Other markings
Direction of movement
Soil supply speed
Personal safety equipment (PSE)
Safety glasses Safety gloves Safety clothing
Machine specifications
Length: 3,180mm
Width: 2,150mm
Height: 1,730mm
Weight: 600 kg
Voltage: 4 frequency regulated electric motors 240 Volt / 50 Hz
Phases: 1
Amperage: 16 Amp
Power: 2.6 kW
List of spare parts
-16 A plug
-3 x open ended spanners
-1 x door key
-1 x Allen key
Drawings and diagrams
The drawings for this machine have been combined in a separate file. The electrical diagrams are supplied in the
machine's electrical cabinet.
Please use the “exploded view drawings” of this machine to order spare parts. These can be found on JavoNet.
JavoNet
We recommend that you register your machine on JavoNet. This way you will have online
access to the technical drawings and documents for your own machine.
Visit our website (www.javo.eu) for more information and to request an account.
Customer service and support
Our technical department will answer any other questions you may have regarding repair and maintenance of your
machine and about spare parts.
We will be happy to provide advice on purchasing, using and setting-up products and accessories.
.se
Table of contents
Other Javo Industrial Equipment manuals
Popular Industrial Equipment manuals by other brands

PA
PA A42FR2 Maintenance handbook

Balluff
Balluff IO-Link BNI LH1-303-S11-K091 user guide

Bitzer
Bitzer VARIPACK quick start guide

Panduit
Panduit R4PFP Installation Instructions-Mounting

Meritor
Meritor MM-0861 Maintenance manual

Illinois Tool Works
Illinois Tool Works ITW Dynatec APEX SLOT DIE APPLICATOR Technical documentation

John Crane
John Crane 5625 Installation, operation & maintenance instructions

DBI SALA
DBI SALA 2100180 User instruction manual

NRI
NRI Currenza H2 Hopper Series Technical documentation

Dielectric
Dielectric 2200ST SmartTech Modular Dehydrator Instruction and operation manual

ATOMSTACK
ATOMSTACK R2 V2 installation manual

Eaton
Eaton Crouse-hinds series operating instructions