JBL 54368 User manual

MANUAL DE INSTRUCCIONES · INSTRUCTION MANUAL · GUIDE D’UTILISATION · BEDIENUNGSANLEITUNG ·
MANUALED’USO·MANUALDEINSTRUÇÕES·MANUALDEINSTRUCŢIUNI·HANDLEIDING·
ÜZEMELTETÉSIUTASÍTÁS·РУКОВОДСТВОПОЭКСПЛУАТАЦИИ·INSTRUKCJAOBSŁUGI
MÁQUINA DE LIMPIEZA DE SISTEMA DE REFRIGERACIÓN................ 2
COOLINGSYSTEMCLEANINGMACHINE...........................................10
54368

· 2 ·
REF.54368
MANUAL DE INSTRUCCIONES
ES
PRESENTACIÓN DEL PRODUCTO
Esta máquina le permite limpiar y volver a re-
llenar de líquido refrigerante el sistema de re-
frigeración.
Es totalmente automática, por lo que puede
asegurar que la cantidad de refrigerante ex-
traído se corresponde exactamente con la
cantidad de líquido introducido en el sistema.
INSTRUCCIONES DE SEGURIDAD
Lea atentamente estas instruc-
ciones antes de usar el producto.
Si no sigue correctamente estas
instrucciones se podrían producir
daños personales y/o al produc-
to.
Guarde estas instrucciones para futuras con-
sultas.
El operador debe llevar gafas y guantes para
evitar que el líquido salpique los ojos y la piel.
Antes de usar la máquina, asegúrese que no
hay fugas en el radiador ni en las mangueras
del radiador.
Abra la tapa del radiador sólo cuando el ra-
diador esté frío.
Para evitar que la sobrepresión dañe el radia-
dor, la presión del aire y del líquido debe ser
inferior a 0,2Mpa.
ESPECIFICACIONES TÉCNICAS
Fuente de alimentación: DC12V
Manómetro: 0~2kg/cm2
Longitud manguera de salida de uido: 2.5m
Longitud manguera de retorno de uido: 2.5m
Capacidad del depósito de uido nuevo: 20L
Capacidad del depósito de uido usado: 20L
Pantalla: Táctil LCD
Ruedas giratorias 360 grados: Sí
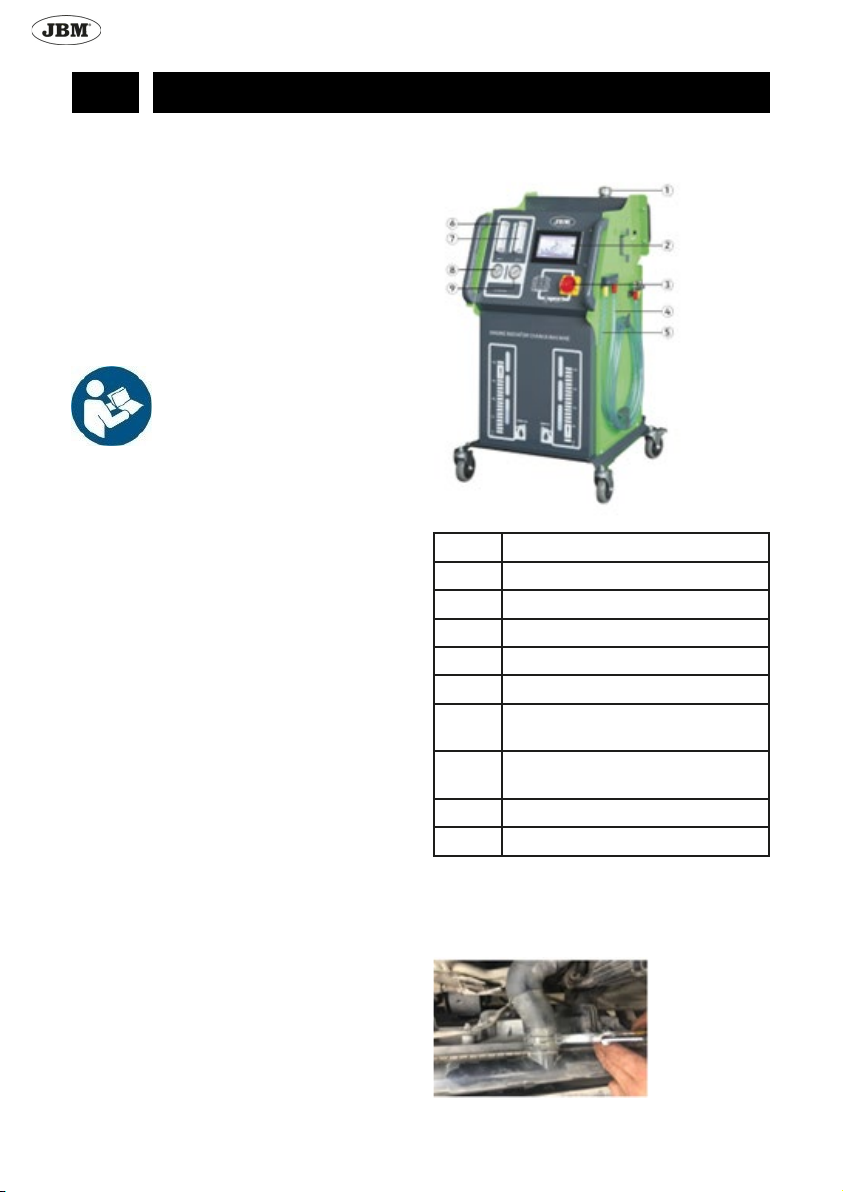
LISTADO DE PARTES
Num. Descripción
1 Filtro
2 Pantalla táctil
3 Interruptor
4 Manguera de entrada de fluido
5Manguera de salida de fluido
6Ventana de inspección de líquido
nuevo
7Ventana de inspección de líquido
usado
8 Manómetro de salida de líquido
9 Manómetro de entrada de líquido
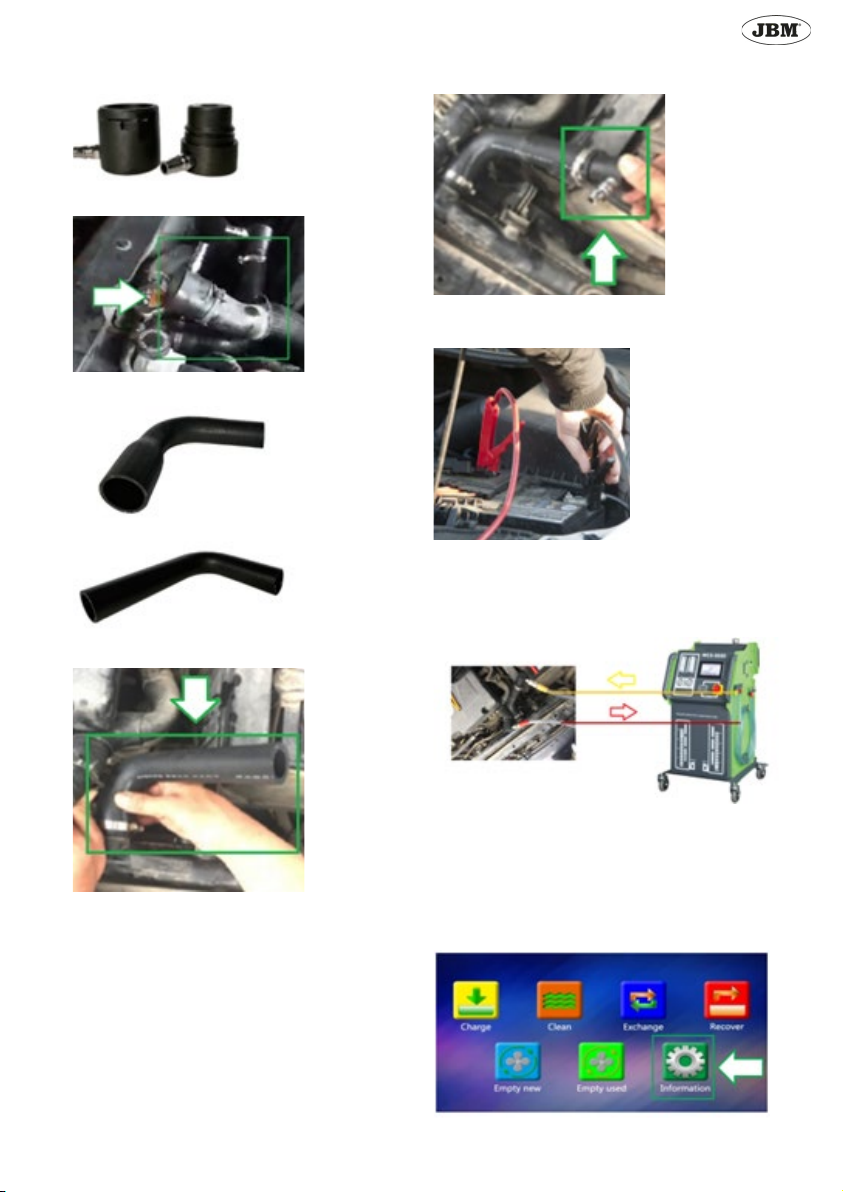
MONTAJE
Retire el tubo superior del radiador.

· 3 ·
REF.54368
Elija el adaptador más adecuado.
Póngalo en la manguera del radiador.
Elija el tubo de goma más adecuado.
Conecte el tubo al radiador.
Ponga un adaptador en el tubo.
Conecte la batería con el cable de alimenta-
ción de 12V.
Conecte la manguera roja (entrada de refri-
gerante) a la manguera del radiador.
Conecte la manguera amarilla (salida de refri-
gerante) al radiador.
FUNCIONAMIENTO
Nota: La primera vez que encienda la máqui-
na, la pantalla principal estará en inglés.
Para cambiar el idioma, presione el botón de
información.

· 4 ·
REF.54368
A continuación, presione este botón.
Seleccione el idioma.
La pantalla principal muestra varias opciones:
- Rellenar
- Limpiar
- Intercambiar
- Recuperar
- Vaciar depósito nuevo
- Vaciar depósito usado
- Información
Rellenar
Añada líquido refrigerante nuevo a la máqui-
na.
Rellene la máquina con líquido refrigerante
nuevo.
Ajuste la cantidad al número de cilindros del
vehículo.
Número de cilindros
del vehículo
Cantidad de líquido
3 cilindros 4 L
4 o 6 cilindros 6 L
8 cilindros 8 L
Conecte este tubo a la manguera amarilla.
Ponga el extremo del tubo dentro del radia-
dor.
Nota: También puede poner el tubo dentro del
depósito del líquido refrigerante.

· 5 ·
REF.54368
Encienda la máquina.
Presione rellenar.
A continuación, presione “Inicio”. La máquina
introducirá el refrigerante en el circuito del ve-
hículo.
Presione “Parar” cuando haya acabado.
Limpiar
Quite la tapa del radiador.
Ponga el agente limpiador en el radiador.
Ponga la tapa del radiado.
Encienda la máquina.
Pulse limpiar
Ajuste el tiempo de limpieza según el número
de cilindros del vehículo:
Número de cilindros
del vehículo
Tiempo
3 cilindros 8 min
4 o 6 cilindros 12 min
8 cilindros 15 min
Encienda el motor
Espere unos 30 minutos, hasta que la tempe-
ratura del líquido augmente.
Cuando vea líquido en la manguera roja,
pulse “Inicio”.

· 6 ·
REF.54368
La máquina empezará a limpiar y verá el
refrigerante en las dos mangueras.
Una vez la limpieza haya acabado, pulse
Parar.
Intercambiar
Añada líquido refrigerante nuevo a la máqui-
na.
Rellene la máquina con líquido refrigerante
nuevo.
Ajuste la cantidad al número de cilindros del
vehículo.
Número de cilindros
del vehículo
Cantidad de líquido
3 cilindros 4 L
4 o 6 cilindros 6 L
8 cilindros 8 L
Encienda el motor.
Espere hasta que vea líquido en la manguera
roja.
Pulse intercambiar.
Ajuste la presión de bomba a 80 y pulse
“Inicio”.

· 7 ·
REF.54368
Compare el color del fluido nuevo y usado a
través de las ventanas.
Cuando el color del fluido nuevo y usado
es parecido significa que el intercambio ha
terminado.
Apague el motor.
Pulse Parar.
Una vez finalizado el intercambio, espere 30
minutos antes de retirar las mangueras.
Compruebe que el nivel de líquido refrigeran-
te sea suficiente.
Si no es suficiente, añada más al radiador.
Recuperar
Presione Recuperar.
Encienda el motor.
Cuando el líquido empiece a fluir por la man-
guera roja, presione “Inicio”.
La máquina recuperará el fluido usado y lo
pondrá en el tanque de líquido usado.
Cuando haya acabado de recuperar, presio-
ne “Parar”.
¡Advertencia! Mientras esté usando esta fun-
ción compruebe la temperatura.
Si la temperatura es demasiado alta, pare el
proceso inmediatamente.
Vaciar depósito nuevo
Conecte este tubo a la manguera amarilla.
Ponga el extremo del tubo dentro de una
garrafa.
Pulse “Vaciar depósito nuevo”.

· 8 ·
REF.54368
Pulse “Inicio”.
La máquina empezará a vaciar el líquido en
la garrafa.
Vaciar depósito usado
Conecte este tubo a la manguera amarilla.
Ponga el extremo del tubo dentro de una
garrafa.
Pulse “Vaciar depósito usado”.
Pulse “Inicio”.
La máquina empezará a vaciar el líquido en
la garrafa.
Información
En esta pantalla encontrará la siguiente
información:
- Versión de hardware
- Versión de software
- Prueba del sistema
- Idioma
CONTENIDO
Listado de adaptadores:
FOTO MEDIDAS
Diámetro:
32mm
40mm
Diámetro:
38mm
43mm
Diámetro:
34mm
37mm
41mm
Diámetro:
19mm
24mm
32mm
Diámetro:
55mm
43mm
45mm

· 9 ·
REF.54368
Diámetro:
45mm
33mm
Diámetro:
38mm
Longitud:
11mm

· 10 ·
REF.54368
PRODUCT’S PRESENTATION
This machine allows you to clean and rell the
cooling system with new coolant.
It is completely automatic, so it can make sure
the quantity of coolant extracted from the
system is the same as the quantity introduced
in it.
SAFETY INSTRUCTIONS
Read carefully this owner’s ma-
nual before using the product.
Failure to comply with these ins-
tructions could result in personal
injury and/or damage
to the product.
Please keep the instructions for future referen-
ce.
Operator should wear goggles and gloves to
prevent the liquid spatter on the eyes and skin.
Before using the machine, make sure that the-
re is no leakage in the radiator and the radia-
tor hoses.
Open radiator lid only when the radiator is
cold.
To avoid that over pressure damage the ra-
diator, air and liquid pressure must be less than
0.2 Mpa.
TECHNICALSPECIFICATIONS
Power supply: DC12V
Pressure gauge: 0~2kg/cm2
Fluid outlet hose length: 2.5m
Fluid return hose length: 2.5m
New uid tank capacity: 20L
Used uid tank capacity: 20L
Screen: LCD touch screen
360 degrees rotation wheels: Yes
PARTS LIST
Num. DESCRIPTION
1 Filter
2 Touch screen
3 Switch
4 Liquid inlet hose
5Liquid outlet hose
6 New fluid inspection window
7 Used fluid inspection window
8 Gauge for fluid out
9 Gauge for fluid in
ASSEMBLY
Remove the radiator upper pipe.
INSTRUCTION MANUAL
EN

· 11 ·
REF.54368
Choose the more suitable adaptor.
Put it on the radiator hose.
Choose the more suitable rubber tube.
Connect the tube to the radiator.
Put an adapter on the tube.
Connect the battery with the 12V power cable.
Connect the red hose (coolant inlet) to the ra-
diator hose.
Connect the yellow hose (coolant outlet) to
the radiator.
OPERATION
Note: The first time that you turn on the machi-
ne, the main window is in English.
To change the language, press the information
button.

· 12 ·
REF.54368
Then, press this button.
Select the language.
The main screen will show you many options:
- Charge
- Clean
- Exchange
- Recover
- Empty new tank
- Empty used tank
- Information
Charge
Add new cooling liquid to the machine.
Adjust the quantity to the number of cylinders
of the vehicle.
Number of cylinders
of the vehicle
Amount of liquid
3 cylinders 4 L
4 or 6 cylinders 6 L
8 cylinders 8 L
Connect this tube to the yellow hose.
Put the end of the tube inside the radiator.
Note: You can also put the tube inside the
coolant’s deposit.

· 13 ·
REF.54368
Turn on the machine.
Press charge.
Then, press “Run”. The machine will put the
coolant into the vehicle’s circuit.
Press “Stop” when finished.
Clean
Take out the lid of the radiator.
Put the cleaning agent in the radiator.
Put the lid of the radiator.
Turn on the machine
Press clean.
Set the cleaning time, according to the num-
bers of cylinders of the vehicle.
Numbers of vehicle
cylinders
Time
3 cylinders 8 min
4 or 6 cylinders 12 min
8 cylinders 15 min
Start the engine
Wait for about 30 minutes, until the liquid
temperature rises.
When you see liquid in the red hose, press
“Run”.

· 14 ·
REF.54368
The machine will begin cleaning and you we
will see the coolant in the two hoses.
Once the cleaning is done, press Stop.
Exchange
Add new cooling liquid to the machine.
Adjust the quantity to the number of cylinders
of the vehicle.
Number of cylinders
of the vehicle
Amount of liquid
3 cylinders 4 L
4 or 6 cylinders 6 L
8 cylinders 8 L
Start the engine.
Wait until you see liquid in the red hose.
Press exchange.
Set the pump pressure value to 80 and press
“Run”.
Compare with the new and used fluid’s colour
through the windows.

· 15 ·
REF.54368
When the colour of new and used fluid is simi-
lar that means the exchange finished.
Stop the engine.
Press Stop.
When the exchange finished, wait 30 minutes
before removing the hoses.
Check if the quantity of coolant fluid is
enough.
If not enough, fill the radiator with more.
Recover
Press Recover.
Start the engine.
When the liquid begins flowing in the red
hose, press “Run”.
The machine will recover the used fluid and
will put it in the used liquid tank.
When the recovering is complete, press “Stop”.
Warning! While performing this function plea-
se check the temperature.
If the temperature is too high, stop the pro-
cess immediately.
Empty new tank
Connect this tube to the yellow hose.
Put the end of the tube inside a tank.
Press “Empty new tank”.

· 16 ·
REF.54368
Press “Run”.
The machine will empty the liquid into the
tank.
Empty used tank
Connect this tube to the yellow hose.
Put the end of the tube inside a tank.
Press “Empty used tank”.
Press “Run”.
The machine will empty the liquid into the
tank.
Information
In this screen you will find the following infor-
mation:
- Hardware version
- Software version
- System test
- Language
CONTENTS
Adapters list:
PHOTO MEASUREMENTS
Diameter:
32mm
40mm
Diameter:
38mm
43mm
Diameter:
34mm
37mm
41mm
Diameter:
19mm
24mm
32mm
Diameter:
55mm
43mm
45mm
Diameter:
45mm
33mm

· 17 ·
REF.54368
Diameter:
38mm
Length:
11mm
Table of contents
Languages:
Popular Cleaning Equipment manuals by other brands

Hydro-Force
Hydro-Force SX-15 manual

Caviblaster
Caviblaster 0625-G Operation & maintenance manual

Blastrac
Blastrac 2-30DS Global operating instructions

Fervi
Fervi 0232 Operation and maintenance manual

Bieffe
Bieffe SANIBLASTER BF370 Use and maintenance manual

Bissell
Bissell PET STAIN ERASER 2842 Series Battery removal instructions