manuals.online logo
Brands
  1. Home
  2. •
  3. Brands
  4. •
  5. Jecod
  6. •
  7. Controllers
  8. •
  9. Jecod RW-4 User manual

Jecod RW-4 User manual

Wireless Controller for Wave Maker
User’s Manual
Matched models:RW-4、RW-8、RW-15、RW-20
Company:Jecod Co.Ltd
Address:Tongmao Industrial Park, Dongsheng Town, Zhongshan city.
Guangdong Pro. China
Tel.: +86-760-28136717/20/21 Fax: +86-760-28136725
E-Mail: [email protected] Website: www.jecod.com
Jecod wave makers are well designed as a good equipment to
stimulate the natural sea environment by high technology, which offers
a natural environment for different sea livings in the fish tank or in the
pond. Before assembling and operating correctly , please read the
manual carefully.
In case of printing error, we apologize for the inconvinence
caused!
I. Function Overview
1、Unique control system allows to wave of different types and multiple
function, which can achieve different wave patterns as desired.
2、Wireless controllers allow synchronize operation among wave makers. One
main controller can remote control the sub-controllers
3、Low voltage DC electronic pump with variable frequency provides a safe
enviroment for user.
4、Easy operation to achieve the multiple sea movings.
5、Flow direction can be adjusted by different modes needed.
6、Large range of voltage input((AC100~240V 50/60Hz)allows to operate in
various power system and prevent the impact on waves.
II. Assembly Notice
1、Suitable for most sizes of the fish tank, the tank thickness of less than 15mm
would be better.
2、Accessies: wireless controller, adaptor, power cable, double side adhesive tape,
user’s manual.
3、Pump assembly: Take away the magnet at the back of the pump basket, locate
the pump in the center of the fish tank inside ad suck it closely by the rubber pad and
shift the magnet slant to the same position on the outside wall. Take care of your
fingers to be clamped because of the strong magnetism of magnet.
4、Peel off the protection paper on the double-side adhesive sticker and paste in
the center of back of controller. Peer off the other protection paper on the other side of
and paste the controller on the fish tank, as shown in fig.1.
This action can be omitted if the controller is not aimed to be sticked on water
tank.
5、Connect the pump with the 3-pin connection wire. Insert adaptor plug to the
controller and connect AC wire adaptor
Fig 1: assembly and operation
MODE
NIGHT
SPEED
FEED
Wi-Le
LOCK
Light Sensor
Speed
POWERPUMP
W1W2 Else H C
Fast Slow
Master Slave
10min
W1 W2
Wavemaker
MODE
NIGHT
SPEED
FEED Wi-Le
LOCK
LightSensor
Speed
POWER PUMP
W1W2 Else H C
Fast Slow
Master Slave
10min
W1 W2
Wavemaker
Fig. 1
Fig.2
III. Operation and Function
Control panel of wireless controller
1、Button and Knob
MODE/NIGHT: press the button to select different modes and enter to the
Night mode by long hold-down the button .
SPEED/FEED: press the button to adjust the flow rate and enter to the Feed
mode by long hold-down the button .
Wi-Le/ LOCK: Press the button to set Master control, Slave control or
operate individually and Lock the setting by long hold-down the button.
Knob: Rotate the knob to adjust different wave period and patterns in W1
mode; to adjust the flow speed in W2 and ELSE mode. To shift the time in
mode C.
2、Function Description
Wireless controller is defined to allow operation without the wire among
wave makers.
MASTER Control:Press “Wi-Le” once and enter into Master control when
“Master” indicator lights. Master controller can operate all the functions for
the Slave Control: Press“Wi-Le” until the “Salve”indicator lights and enter
into Slave mode , where all operation is invalid except adjusting flow rate by
rotate the knob.
Among two or more wave makers, set one as the Master and the others as
Slave. You can achieve the same function and operation for all the pumps by
adjusting the Master controller.
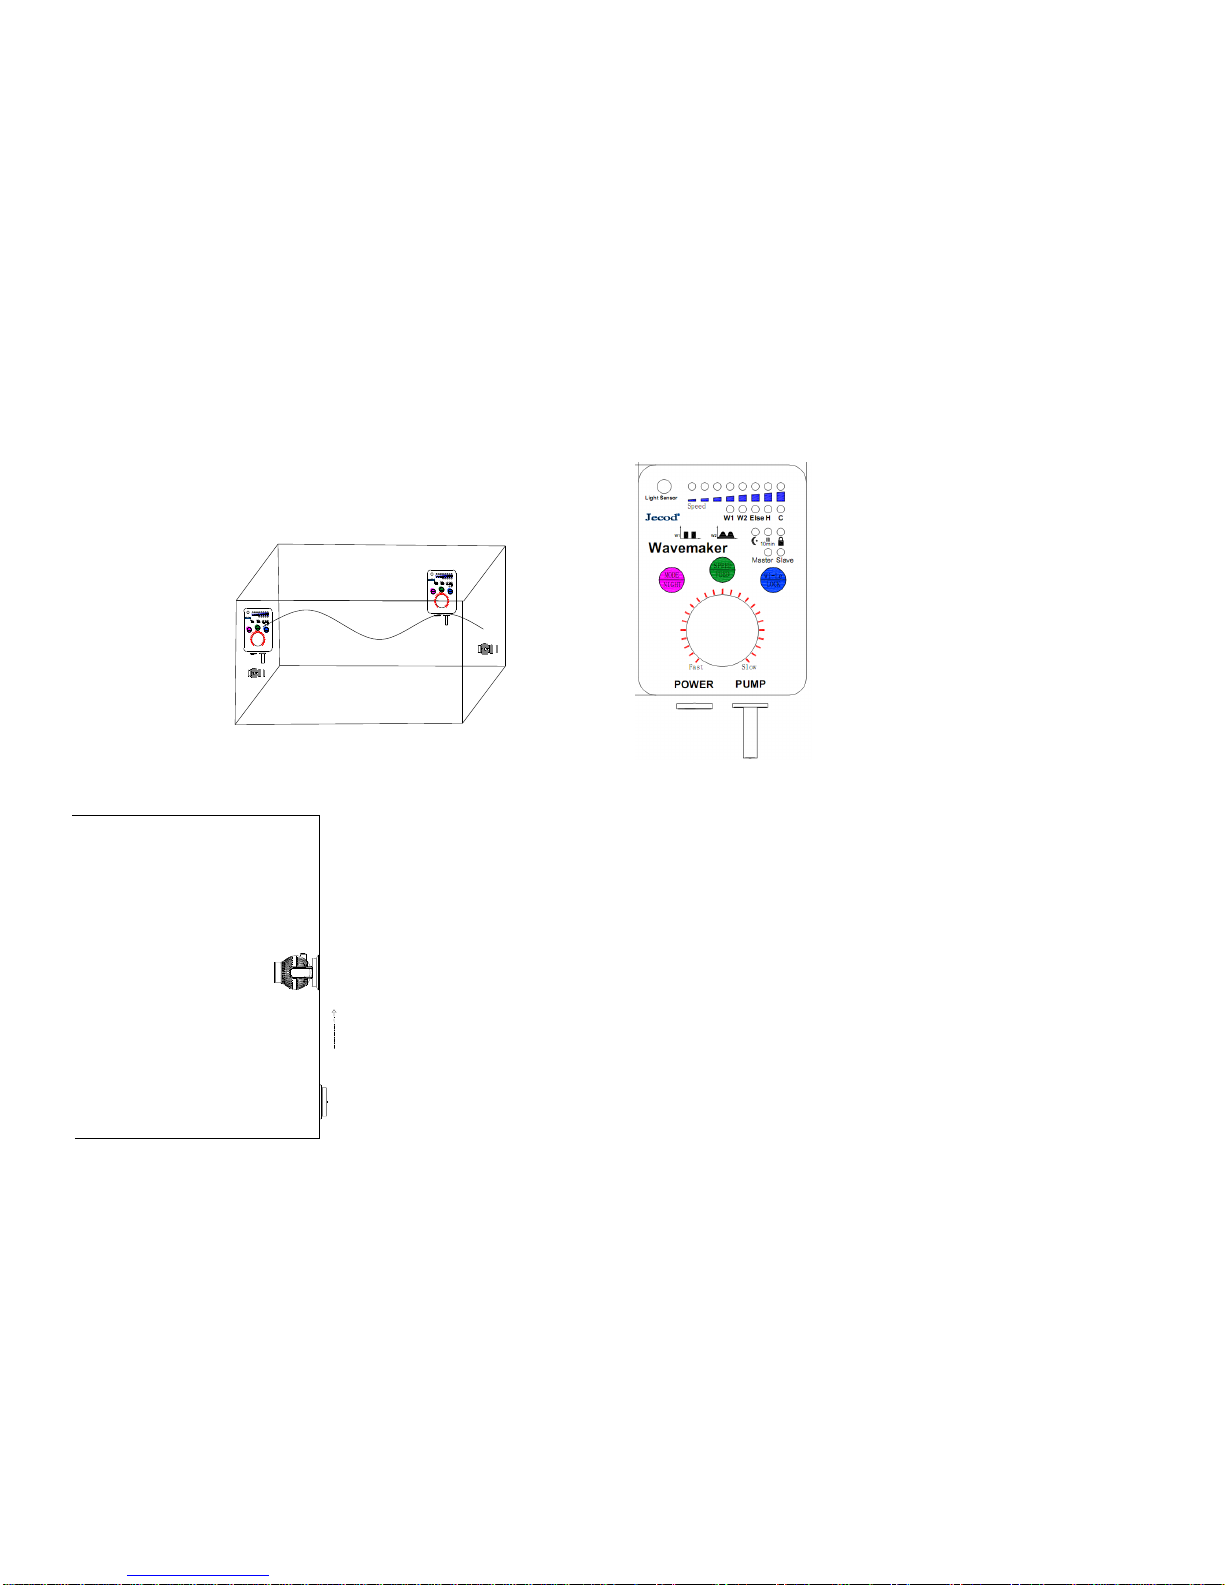
3、Introduction of each mode
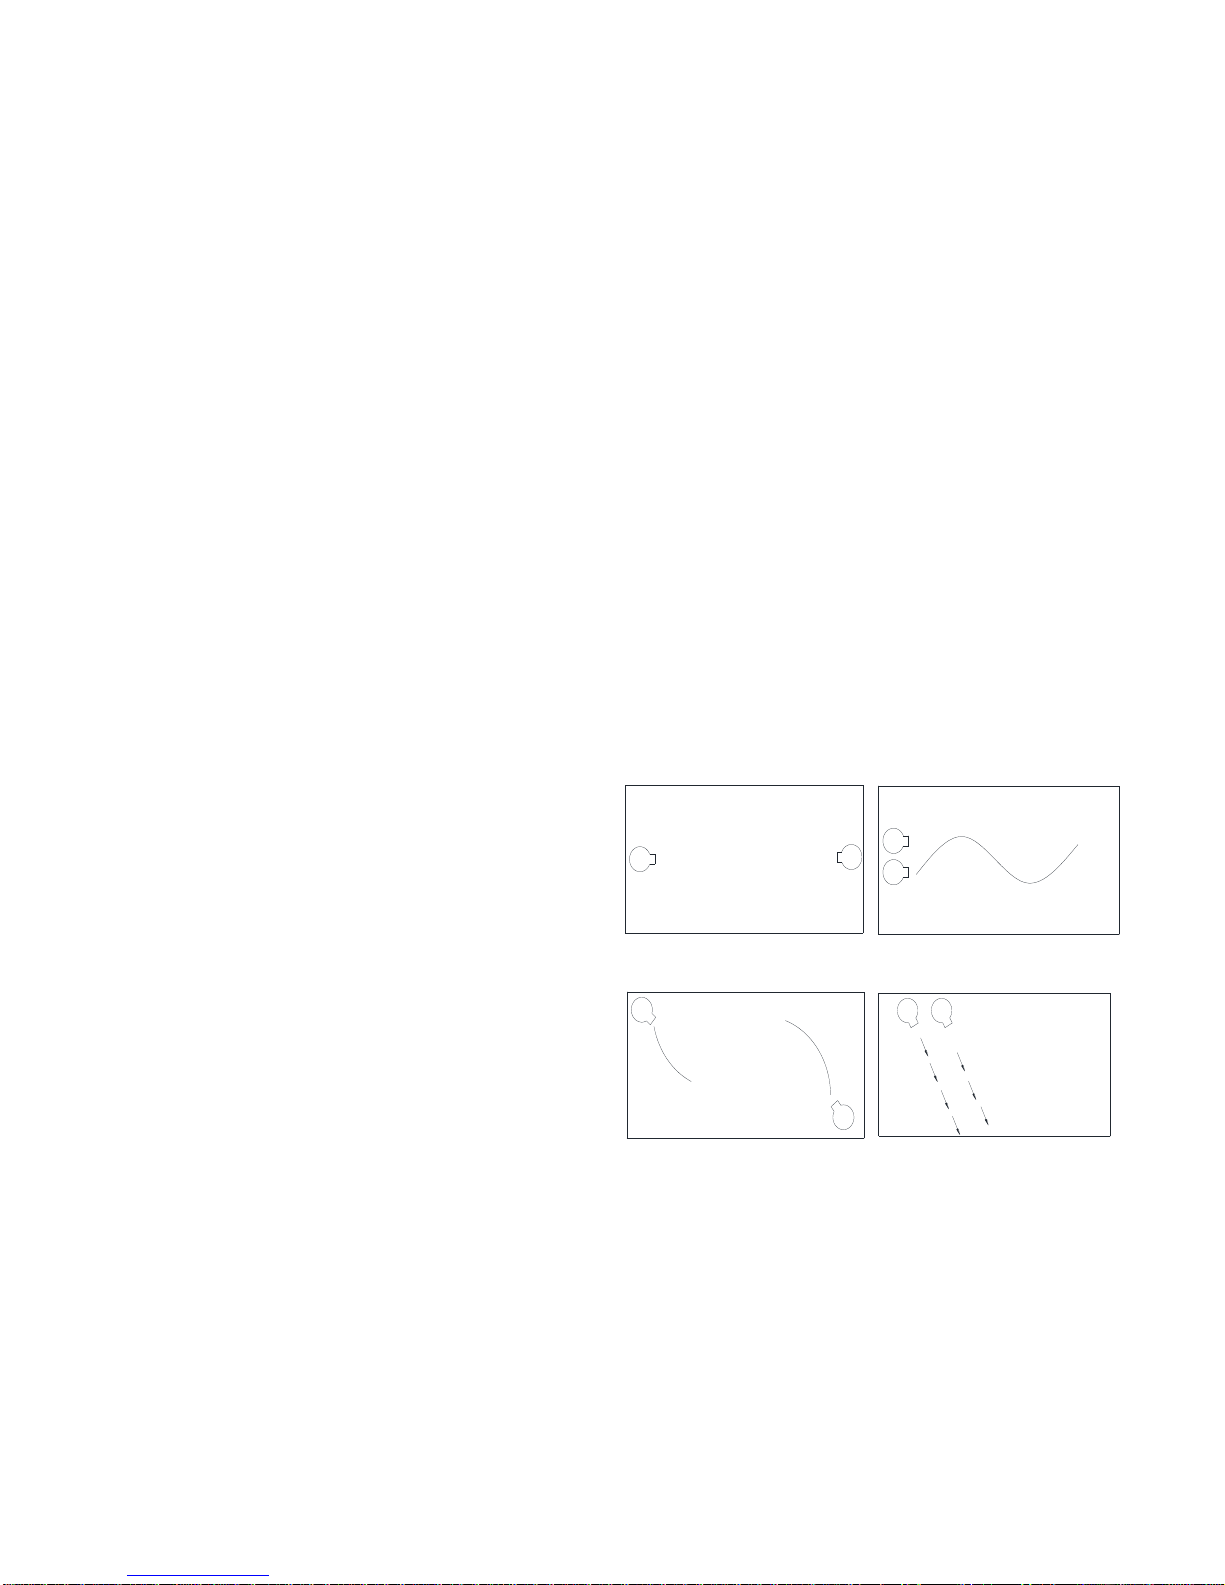
W1:Wave Mode
Remoting the knob is necessary when operate this mode to adjust the
wave patterns among one or more pumps at the same time.As the volum of
water in tank is different from the capacity of the tank, wave period needed to
be adjusted by switching the knob. The wave is biggest when wave length turn
to be same as the length of tank; Increase the wave length by switching the
knob in clockwise, and reduce in anti clockwise.
Tips: You should switch the knob gradually and notice the wave pattern
in a certain period after each adjustment.Press “SPEED/FEED”to adjust the
flow rate.
W2:Sine Mode
One or more pumps can operate at the same time in this mode. The power
various between 30%-100% and the regulation looks like a sine curve.
Else:Random Mode
One or more pumps can operate at the same time. It is a random mode as
the power of pump is changing to a random data all the time without
regulation.
H:Flow Mode
One or more pumps can operate at the same time. In constant flow. Flow rate
can be adjusted by “SPEED/FEED”
C:Shift to flow mode
Two pumps are needed to be operated at the same time, when they shift wave
and flow in cycles. P1 work, P2 stop;P2 work, P1 stop;P1 work, P2 stop. and
cycles like this. Cycle period (1s-1min)can by adjusted by switching the
knob and adjust the flow rate by pressing SPEED/FEED
Night Function: Enter into Night Mode by long press-down
MODE/NIGHT” button until yellow “NIGHT”indicator lights. It works
normally during day time and enter into NIGHT mode automatically
when it’s dark, when the water flows at the least speed. Quit the mode
by long press down”NIGHT”button until the yellow indicator dims
FEED Function: Long press down “SPEED/FEED” button until the blue
indicator light, and the pump stops working and allow fish to eat for 10
min. and back to normal mode after that. If need to return back to work
during feeding, just long press down the SPEED/FEED button until
the “10min”indicator dims.
Knob Locking Function: Long press the Wi-Le/LOCK button until the red
LOCK indicator light, which shows the setting is locked. Wave
patterns and shift time is fixed without change. It prevents the wave
pattern and time to be changed if adjust the knob or button on no
purpose
IV. Warnings
1、No water operation to ensure the performance
2、Select a dry place to locate the controller to prevent water splashed on it.
3、Be careful when assemble the magnet, better to shift parallel the pad close to the
outside wall of fish tank to prevent breaking the fish tank.
4、Never disassemble the controller and adaptor without professional guidance.
v. Maintance
1、Clean the controller regular to ensure good performance
2、Rub the controller surface with dry cloth if there’re any water to prevent water drip
into controller
3、Sweep the waste in the pump by rotating the basket in anti clockwise to open and
lock in clockwise direction.
4、Use soft cloth to rub the blade and clean the dirties in the pump
5、This product is indoor use only, never submerged in the water to cause unnecessary
loss.
Appendix: PUMPLOCATING
1P 2P
1P
2P
1P
2P
1P 2P
l
Ref.1
Ref.2
Ref.3
Ref.4

This manual suits for next models

3

Popular Controllers manuals by other brands

Eelectron BO24F01KNX user manual

Eelectron

Eelectron BO24F01KNX user manual

Elster J125B Commissioning instructions

Elster

Elster J125B Commissioning instructions

Philips Dynalite DDLE801 installation instructions

Philips

Philips Dynalite DDLE801 installation instructions

SiAECOSYS VOTOL EM Program manual

SiAECOSYS

SiAECOSYS VOTOL EM Program manual

MRC THROTTLEPACK 9950 manual

MRC

MRC THROTTLEPACK 9950 manual

PRO SIGNAL PSG03180 quick start guide

PRO SIGNAL

PRO SIGNAL PSG03180 quick start guide

Enttec 70314 manual

Enttec

Enttec 70314 manual

Pixsys DRR 245 user manual

Pixsys

Pixsys DRR 245 user manual

Lenovo ServeRAID M5015 Product guide

Lenovo

Lenovo ServeRAID M5015 Product guide

Elsner WS1000 Color Installation, setting, operation

Elsner

Elsner WS1000 Color Installation, setting, operation

Interlogix Topaz ACURT2 Information Packet

Interlogix

Interlogix Topaz ACURT2 Information Packet

ZIGBEE 612 quick start guide

ZIGBEE

ZIGBEE 612 quick start guide

Apex Tool Group Cleco mPro400GCD-P Hardware description

Apex Tool Group

Apex Tool Group Cleco mPro400GCD-P Hardware description

Salda Stouch Technical manual

Salda

Salda Stouch Technical manual

Belimo T24-DM1 manual

Belimo

Belimo T24-DM1 manual

Norac UC4+ installation manual

Norac

Norac UC4+ installation manual

HTC VIVE 2Q3Z100 manual

HTC

HTC VIVE 2Q3Z100 manual

HP StorageWorks ESL E Series quick start guide

HP

HP StorageWorks ESL E Series quick start guide

manuals.online logo
manuals.online logoBrands
  • About & Mission
  • Contact us
  • Privacy Policy
  • Terms and Conditions

Copyright 2025 Manuals.Online. All Rights Reserved.