Jensen JCR-315 User manual

Digital AM/FM Dual Alarm Clock Radio with Wood Cabinet
MODEL: JCR 315
USER MANUAL
PLEASE READ THIS USER MANUAL COMPLETELY BEFORE OPERATING THIS UNIT
AND RETAIN THIS BOOKLET FOR FUTURE REFERENCE

E-1
WARNING
TO PREVENT FIRE OR SHOCK HAZARD, DO NOT USE THIS PLUG WITH AN
EXTENSION CORD, RECEPTACLE OR OTHER OUTLET UNLESS THE BLADES CAN BE
FULLY INSERTED TO PREVENT BLADE EXPOSURE. TO PREVENT FIRE OR SHOCK
HAZARD, DO NOT EXPOSE THIS APPLIANCE TO RAIN OR MOISTURE.
The C ution M rking is loc ted t the b ck enclosure of the pp r tus.
The R ting pl te is loc ted t the b ck enclosure of the pp r tus.
IMPORTANT SAFETY INSTRUCTIONS
1. Re d these instructions.
2. Keep these instructions.
3. Heed ll w rnings.
4. Follow ll instructions.
5. Do not use this pp r tus ne r w ter.
6. Cle n only with dry cloth.
7. Do not block ny ventil tion openings. Inst ll in ccord nce with the m nuf cturer’s
instructions.
8. Do not inst ll ne r ny he t sources such s r di tors, he t registers, stoves, or other
pp r tus (including mplifiers) th t product he t.
9. AC d ptor is used s disconnect device nd it should rem in re dily oper ble during
intended use. In order to disconnect the pp r tus from the m ins completely, the AC
d ptor should be disconnected form the m ins socket outlet completely.
10. Only use tt chments/ ccessories specified by the m nuf cturer.
11.
Use only with c rt, st nd, tripod, br cket, or t ble recommended by the
m nuf cturer, or sold with the product. When c rt is used, use c ution
when moving the c rt/ pp r tus combin tion to void injury from tip-over.
12. Unplug this pp r tus during lightning storms or when unused for long
period of time.
13. Refer ll servicing to qu lified service personnel. Servicing is required when the pp r tus
h s been d m ged in ny w y, such s power-supply cord or plug is d m ged, liquid h s
been spilled or objects h ve f llen into the pp r tus, the pp r tus h s been exposed to
r in or moisture, does not oper te norm lly, or h s been dropped.
14. This ppli nce sh ll not be exposed to dripping or spl shing w ter nd th t no object filled
with liquids such s v ses sh ll be pl ced on the pp r tus.

E-2
15. Do not overlo d w ll outlet. Use only power source s indic ted.
16. Use repl cement p rt s specified by the m nuf cturer.
17. Upon completion of ny service or rep irs to this product, sk the service technici n to
perform s fety checks.
18. Power Sources - This product should be oper ted only from the type of power source
indic ted on the m rking l bel. If you re not sure of the type of power supply to your
home, consult your product de ler or loc l power comp ny. For products intended to
oper te from b ttery power, or other sources, refer to the oper ting instruction.
19. Object nd Liquid Entry - Never push objects of ny kind into this product through
openings s they m y touch d ngerous volt ge points or short-out p rts th t could result
in fire or electric shock. Never spill liquid of ny kind on the product.
20. D m ge Requiring Service - Unplug this product from the w ll outlet nd refer servicing to
qu lified service personnel under the following conditions:
) When the power-supply cord or plug is d m ged,
b) If liquid h s been spilled, or objects h ve f llen into the product,
c) If the product h s been exposed to r in or w ter,
d) If the product does not oper te norm lly by following the oper ting instructions. Adjust
only those controls th t re covered by the oper ting instructions s n improper
djustment of other controls m y result in d m ge nd will often require extensive
work by qu lified technici n to restore the product to its norm l oper tion.
e) If the product h s been dropped or d m ged in ny w y, nd
f) When the product exhibits distinct ch nge in perform nce - this indic tes need for
service.
21. B ttery sh ll not be exposed to excessive he t such s sunshine, fire or the like
22. Excessive sound pressure from e rphones nd he dphone c n c use he ring loss.
23. Minimum dist nces of 10 cm round the pp r tus for sufficient ventil tion.
24. The ventil tion should not be impeded by covering the ventil tion openings with items,
such s newsp pers, t ble-cloths, curt ins, etc.
25. No n ked fl me sources, such s lighted c ndles, should be pl ced on the pp r tus.
26. The use of pp r tus in moder te clim tes.
27. Attention should be dr wn to the environment l spects of b ttery dispos l.
SAVE THESE INSTRUCTIONS

E-3
COMPLIANCE WITH FCC REGULATIONS
This device complies with P rt 15 of the FCC Rules. Oper tion is subject to the following two
conditions:
(1) This device m y not c use h rmful interference, nd
(2) This device must ccept ny interference received, including interference th t m y
c use undesired oper tion.
This equipment h s been tested nd found to comply with the limits for Cl ss B Digit l
Device, pursu nt to P rt 15 of the FCC Rules. These limits re designed to provide
re son ble protection g inst h rmful interference in residenti l inst ll tion. This equipment
gener tes, uses nd c n r di te r dio frequency energy nd, if not inst lled nd used in
ccord nce with the instructions, m y c use h rmful interference to r dio communic tions.
However, there is no gu r ntee th t interference will not occur in p rticul r inst ll tion. If
this equipment does c use h rmful interference to r dio or television reception, which c n be
determined by turning the equipment off nd on, the user is encour ged to try to correct the
interference by one or more of the following me sures:
- Reorient or reloc te the receiving ntenn .
- Incre se the sep r tion between the equipment nd receiver.
- Connect the equipment into n outlet on circuit different from th t to which the receiver
is connected.
- Consult the de ler or n experienced r dio/TV technici n for help.
WARNING
Changes or modifications to this unit not expressly approved by the party responsible
for compliance could void the user's authority to operate the equipment.
PROTECT YOUR FURNITURE
This system is equipped with non-skid rubber ‘feet’ to prevent the product from moving
when
you
oper te the controls. These ‘feet’ re m de from non-migr ting rubber m teri l
speci lly
formul ted
to void le ving ny m rks or st ins on your furniture. However cert in
types of oil b sed
furniture
polishes, wood preserv tives, or cle ning spr ys m y c use the
rubber ‘feet’ to soften, nd
le ve
m rks or rubber residue on the
furniture.
To prevent ny d m ge to your furniture we strongly recommend th t you purch se sm ll
self-
dhesive felt p ds, v il ble t h rdw re stores nd home improvement centers
everywhere
nd
pply these p ds to the bottom of the rubber ‘feet’ before you pl ce the
product on fine
wooden furniture.

E-4
DEAR JENSEN
®
CUSTOMER
Selecting fine udio equipment such s the unit you've just purch sed is only the st rt of
your
music l enjoyment. Now it's time to consider how you c n m ximize the fun nd
excitement
your
equipment offers. This m nuf cturer nd the E l ect ron i c Industries
Associ tion's
Consumer
Electronics Group w nt you to get the most out of your equipment
by pl ying it t s fe level.
One
th t lets the sound come through loud nd cle r without
nnoying bl ring or distortion nd,
most
import ntly, without ffecting your sensitive he ring.
Sound c n be deceiving. Over time
your
he ring "comfort level" d pts to higher volumes
of sound. So wh t sounds "norm l" c n
ctu lly
be loud nd h rmful to your he ring.
Gu rd g inst this by setting your equipment t s fe
level
BEFORE your he ring
d pts.
To
establish
a safe l
e
v
e
l
:
• St rt your volume control t low
setting.
• Slowly incre se the sound until you c n he r it comfort bly nd cle rly, nd without
distortion.
• Once you h ve
est blished
comfort ble sound
l
e
v
e
l
:
Set the di l nd le ve it
there.
T king minute to do this now will help to prevent he ring d m ge or loss in the future.
After
ll, we w nt you listening for
lifetime.
We Want You
Listening
For a
Li
f
e
t
i
m
e
Used wisely, your new sound equipment will provide lifetime
of
fun nd enjoyment. Since he ring d m ge from loud noise
is
often undetect ble until it is too l te, this m nuf cturer nd
the
Electronic Industries
Associ tion
'
s
Consumer
Electronics
Group
recommend you void prolonged exposure to excessive
noise.
Customer's
Re
c
o
r
d
:
The seri l number of this product is found on its bottom cover. You should note the seri l
number
of this unit in the sp ce provided s perm nent record of your purch se to id in
identific tion
in the
event of theft of
loss.
Model Number: JCR-315 Seri l Number:

E-5
LOCATION OF CONTROLS
1
SPEAKER 12 TIME/ALARM SET DOWN BUTTON
2
TUNE BUTTON - 13 SLEEP/SNOOZE/DIMMER BUTTON
3
TUNE BUTTON + 14 DISPLAY BUTTON
4
AM/FM BUTTON 15 SET BUTTON
5
VOLUME CONTROL 16 ALARM BUTTON
6
M – (MEMORY DOWN BUTTON) 17 USB CHARGING PORT
7
M + (MEMORY UP BUTTON) 18 AUX IN JACK
8
LCD DISPLAY 19 EARPHONE JACK
9
TELESCOPIC FM ANTENNA 20 DC IN JACK
10
ON/OFF BUTTON 21 BATTERY COMPARTMENT
11
TIME/ALARM SET UP BUTTON

E-6
POWER SOURCE
The JCR-315 oper tes with n extern l AC-DC d ptor with output DC 5V 1200mA
.
The unit is lso equipped with b ttery b ck-up system for the clock th t is powered by
2 x AAA size b tteries (Not included).
POWER CONNECTION
1. Connect the cord of the power d ptor to the DC IN JACK (#20) of the JCR-315.
2. Connect the plug of the power d ptor to w ll socket.
The JCR-315 is powered nd in st ndby mode when you see the LCD DISPLAY (#8) is
switched on.
BATTERY BACK UP SYSTEM
The B ttery B ck-up System ensures the clock nd l rm settings will be ret ined during
power interruption or power out ge [in order to preserve the b ttery life, the LCD DISPLAY
(#8) will not light]. All clock settings will be kept in memory, however, the clock time m y
require djustment for ex ct ccur cy once the power returns. If the b tteries re not inst lled,
the LCD DISPLAY (#8) will blink”12:00” when the power is restored. This will indic te th t you
h ve to reset the time nd l rm settings.
BATTERY INSTALLATION
1. Open the b ttery door on the b ck of the c binet.
2. Follow the pol rity di gr m shown inside the BATTERY COMPARTMENT (#21) nd
Inst ll 2 X “AAA” size b tteries (not included).
3. Repl ce the b ttery door.
IMPORTANT:
Be sure th t the b tteries re inst lled correctly. Wrong pol rity m y d m ge
the unit.
NOTE:
Only use well-known br nd of b ttery to ensure longest life nd the best
perform nce.
CAUTIONS:
1. Do not mix old nd new b tteries.
2. Do not mix lk line, st nd rd (c rbon-zinc) or rech rge ble (nickel-c dmium) b tteries.
3. If the unit is not to be used for n extended period of time, remove the b tteries. Old or
le king b tteries c n c use d m ge to the unit nd m y void the w rr nty.
4. Do not dispose of b tteries in fire, b tteries m y explode or le k.
5. B tteries sh ll not be exposed to excessive he t such s sunshine, fire or the like.
6. Repl ce ll the b tteries t the s me time, no m tter exh usted or not, every 2 ye rs t
the s me time to void possible b ttery le k ge.
7. Do not try to rech rge b tteries not intended to be rech rged; they c n overhe t, rupture
nd le k. (Follow b ttery m nuf cturer's directions).
8. Only n dult should repl ce the b tteries.

E-7
TIME AND CALENDAR SETTING
In order for the clock to function properly
,
the clock h s to be set before you use it for the first
time. After powering up the JCR-315, the LCD is in time displ y mode nd show 12:00.
1. Press the SET BUTTON (#15), minute digits will blink.
2. T p the TIME/ALARM SET UP BUTTON (#11) or TIME/ALARM SET DOWN BUTTON
(#12) repe tedly until the correct minute is displ yed.
3. T p the SET BUTTON (#15) to confirm. The hour digits will blink.
4. T p the TIME/ALARM SET UP BUTTON (#11) or TIME/ALARM SET DOWN BUTTON
(#12) repe tedly until the correct hour is displ yed.
5. T p the SET BUTTON (#15) to confirm. 12Hr will blink.
6. T p the TIME/ALARM SET UP BUTTON (#11) or TIME/ALARM SET DOWN BUTTON
(#12) repe tedly to select 12Hr or 24Hr.
7. T p the SET BUTTON (#15) to confirm nd complete the time setting.
CALENDAR SETTING
1. T p the DISPLAY BUTTON (#14) repe tedly to select c lend r displ y mode.
2. T p the SET BUTTON (#15), the d te digits will blink.
3. T p the TIME/ALARM SET UP BUTTON (#11) or TIME/ALARM SET DOWN BUTTON
(#12) repe tedly until the correct d te is displ yed.
4. T p the SET BUTTON (#15) to confirm. The month digits will blink.
5. T p the TIME/ALARM SET UP BUTTON (#11) or TIME/ALARM SET DOWN BUTTON
(#12) repe tedly until the correct month is displ yed.
6. T p the SET BUTTON (#15) to confirm. The l st two digits of the ye r will blink.
7. T p the TIME/ALARM SET UP BUTTON (#11) or TIME/ALARM SET DOWN BUTTON
(#12) repe tedly until the correct ye r is displ yed.
8. T p the SET BUTTON (#15) to confirm nd complete the time setting.
Notes:
- Press nd hold the TIME/ALARM SET UP BUTTON (#11) or TIME/ALARM SET DOWN
BUTTON (#12), the setting digit will go f st forw rd/b ckw rd.
- The unit will return to clock displ y mode utom tic lly if no button is pressed within 15
seconds.
ALARM OPERATION
SETTING THE ALARM TIME
You c n set two different l rm times nd select w ke to RADIO / ALARM sound.
1. Press the ALARM BUTTON (#16) repe tedly to select Al rm1 or Al rm2.
2. T p the SET BUTTON (#15), the minute digits fl sh.
3. T p the TIME/ALARM SET UP BUTTON (#11) or TIME/ALARM SET DOWN BUTTON
(#12) repe tedly to set the minute.
4. T p the SET button (#15), the hour digits fl sh.
5. T p the TIME/ALARM SET UP BUTTON (#11) or TIME/ALARM SET DOWN BUTTON
(#12) repe tedly to set the hour.
6. T p the SET BUTTON (#15) to confirm.
7. T p the TIME/ALARM SET UP BUTTON (#11) or TIME/ALARM SET DOWN BUTTON
(#12) repe tedly to select w ke to l rm, r dio or off.

E-8
Notes:
•
Once the l rm is set nd w ke to r dio is selected, the w ke to preset r dio st tion c n
be ch nged.
Repe t bove steps 1, 2, 4 nd 6, the r dio frequency will fl sh on the LCD DISPLAY (#8).
T p the TIME/ALARM SET UP BUTTON (#11) or TIME/ALARM SET DOWN BUTTON
(#12) repe tedly to select the stored preset r dio st tion. T p the SET BUTTON (#15) to
confirm.
•
IF Al rm 1 nd Al rm 2 set t s me time, only Al rm 1 will function.
Deactivating a sounding alarm
During the l rm sound, press ny buttons on the top except the SLEEP/SNOOZE/DIMMER
BUTTON (#13) to turn off the l rm. The l rm will resume fter 24 hours (the next d y).
SNOOZE FUNCTION
After the r dio or l rm sounds, you m y press the SNOOZE/SLEEP/DIMMER BUTTON
(#13) for few more minutes sleep. The l rm will stop for pproxim tely 9 minutes nd
then turn on g in.
RADIO OPERATION
Listening to the radio
1. T p the ON/OFF BUTTON (#10) to turn on the JCR-315.
2. T p the AM/FM BUTTON (#4) to select the AM/FM b nd. The frequency will show on the
LCD DISPLAY (#8).
3. T p the TUNE BUTTON + (#3) or the TUNE BUTTON - (#2) to djust frequency.
4. Press nd hold the TUNE BUTTON + (#3) or the TUNE BUTTON - (#2) to utom tic lly
tune to the next v il ble st tion.
5. Rot te the VOLUME CONTROL (#5) to obt in the desired sound level.
6. T p the ON/OFF BUTTON (#10) to turn off the JCR-315.
Notes:
•
Use m nu l tuning to select we ker st tions th t might be skipped during utom tic
tuning.
•
If the utom tic tuning does not stop on the ex ct frequency of the st tion, for ex mple, it
stops on 88.9 MHz inste d of 88.8 MHz, use the m nu l tuning method to “fine tune” to
the ex ct frequency of the desired st tion.
•
To insure m ximum FM tuner reception, fully extend the TELESCOPIC FM ANTENNA (#9)
for best FM r dio reception.
•
The AM ntenn is built inside the r dio. If AM reception is we k, ch nge the position of
the unit until the intern l ntenn picks up the strongest sign l.
Setting the Radio Station Presets
The unit llows you to store up to 20 FM st tions nd 20 AM st tions for e sy rec ll t ny
time.
1. T p the ON/OFF BUTTON (#10) to turn on the JCR-315 nd select AM/FM b nd.
2. Tune to the r dio st tion you w nt to store in memory.
3. T p the SET BUTTON (#15). The preset ch nnel number will blink on LCD DISPLAY (#8).
4. To ch nge the preset ch nnel number loc tion, press the M + (MEMORY UP BUTTON)
(#7) or the M - (MEMORY DOWN BUTTON) (#6) to step through the preset loc tions (1-
20).
5. To confirm the preset loc tion, t p the SET BUTTON (#15).
6. To store up to 20 st tion presets, repe t steps 2-5 bove.

E-9
Hints
This unit fe tures n AUTO SEARCH function th t will utom tic lly s ve the first 20 AM nd
20 FM strong st tions found. To use this fe ture, m ke sure the unit is in R dio mode, nd
select the FM or AM b nd. Press nd hold the SET BUTTON (#15). The unit will sc n from
the lowest frequency to the highest frequency within the selected frequency b nd. The first
strong r dio st tions found will be stored in the preset loc tions st rting from 1.
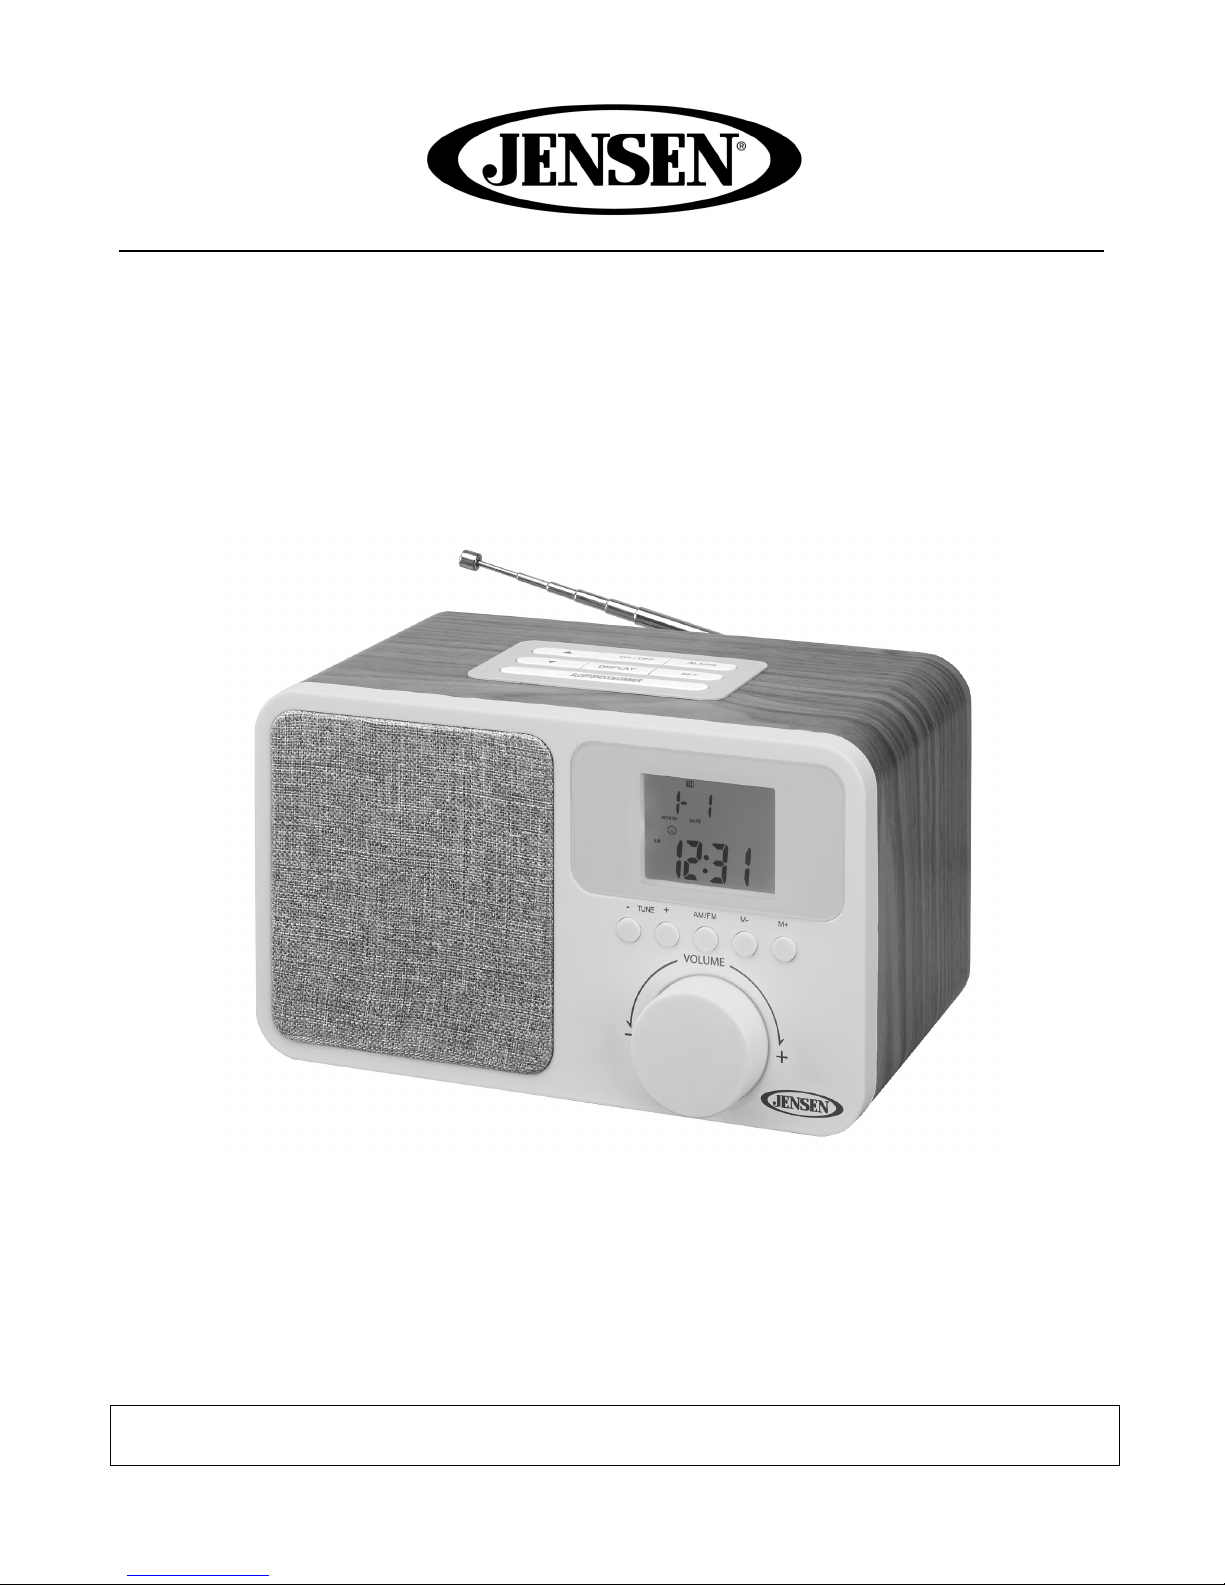
Recall Preset Station
T p the ON/OFF BUTTON (#10) to turn on the JCR-315 nd select AM/FM Mode. T p the M +
(MEMORY UP BUTTON) (#7) or the M - (MEMORY DOWN BUTTON) (#6) to select the
preset st tion.
TIPS FOR BEST RADIO RECEPTION
AM - The AM ntenn is built inside the r dio. If AM reception is we k, ch nge the position of
the unit until the intern l ntenn picks up the strongest sign l
FM – To obt in the best FM reception, fully extend the TELESCOPIC FM ANTENNA (#9).
Avoid close to the spe kers or other electric l ppli nce.
SLEEP OPERATION
This function llows you to progr m the system to turn itself OFF fter set period of time.
You c n set your sleep time while in Power On (R dio or AUX) mode:
1. To ctiv te the sleep function, press the SLEEP/SNOOZE/DIMMER BUTTON (#13)
repe tedly on the unit, the LCD DISPLAY (#8) will show “90, 80, 70, 60, 50, 40, 30, 20, 10,
OFF in sequence.
2. When the LCD DISPLAY (#8) shows your desired sleep time, rele se the button, the
sleep timer is now ctiv ted, the SLEEP Indic tor will Turn On. The LCD DISPLAY (#8)
show “10” is to indic te “10 minutes” sleep time nd so on. When the sleep time counts to
zero, the unit will go off.
AUX IN OPERATION
The JCR-315 provides n uxili ry udio sign l input j ck for connecting extern l udio
devices like MP3 pl yers, CD pl yers nd iPods (except iPod shuffle 3rd gener tion) nd
listen to your extern l source through the spe ker of this system.
1. You need n udio c ble (not included) with one 3.5 mm stereo plug on e ch end of the
c ble.
2. Plug one end of the c ble into the AUX IN j ck (#18) loc ted on the right h nd side of the
unit nd the other end of the c ble into the Line-out J ck or He dphone J ck of your
extern l udio device.
3. Turn on the extern l udio device.
4. Turn on JCR-315 nd it will switch to AUX mode utom tic lly.
5. The volume level c n now be controlled through the volume control of your r dio. Oper te
ll other functions on the uxili ry device s usu l.
Notes:
(1) If you connected the Line-out J ck of your extern l device then you only need to djust
the volume control of this system. If you connected the He dphone J ck of your extern l
device then you m y need to djust both the volume control of your extern l device nd
the volume control of this system to find the most desir ble volume setting.
(2) Remove the udio c ble from AUX IN JACK (#18) when you finish listening. Don't forget
to switch off the power on your extern l device s well.

E-10
EARPHONE CONNECTION
Connect the plug of the stereo e rphone (not included) into the EARPHONE JACK (#19).
When using e rphone, the spe ker will be utom tic lly disconnected. Adjust the VOLUME
CONTROL (#5) to the desired volume level
CAUTION
•
Avoid excessive volume levels for long period of time when using the e rphone.
Prolonged use t high levels m y imp ir your he ring.
DIMMER CONTROL
Press nd hold the SLEEP/SNOOZE/DIMMER BUTTON (#13), Hi, Low or Off will show on
the LCD DISPLAY (#8). T p the SLEEP/SNOOZE/DIMMER BUTTON (#13) repe tedly to
select the brightness. The current Dimmer Selection will show for few seconds nd then
return to the previous screen.
USB BATTERY CHARGING
CONNECTING A USB CORD (NOT INCLUDED) FOR CHARGING YOUR CELL PHONE
(DC 5V 1000MA)
1. Plug the st nd rd end of the USB c ble (not included) into the USB
CHARGING PORT
(#17) loc ted on the b ck of the JCR-315. Plug the other end of the c ble into the device
you wish to ch rge.
2. Observe the b ttery ch rge indic tor on your device to m ke sure the ch rging process
st rts norm lly.
3. Unplug the c ble when your device is fully ch rged.
WARNING!
The USB CHARGING PORT (#17) loc ted on the b ck of the JCR-315 is designed for
sm rt phone or port ble device b ttery ch rging only nd does not support d t tr nsfer
or connection to computer.
Don’t connect the USB CHARGING PORT (#17) of the JCR-315 to other USB ch rger. It
m y d m ge both units nd void the w rr nty.
RESETTING THE UNIT
In c se of m lfunction due to electrost tic disch rge, reset the unit by disconnecting the DC
plug of the AC Ad pter from its re r DC IN JACK (#20). Remove the b ckup b tteries. W it t
le st for 3 minutes before reconnecting the DC plug to the DC IN JACK (#20) nd repl ce the
b ckup b tteries.

E-11
CARE AND MAINTENANCE
•
Cle n the r dio with soft d mp cloth nd let ll p rts dry completely fter cle ning.
•
Do not use ny ggressive cle ners, brushes with nylon bristles, sh rp or met llic
cle ning utensils, knives, h rd scr pers nd the like. They could d m ge the surf ces of
the r dio.
•
Do not immerse the r dio in w ter nd do not let w ter getting into the housing of the
r dio.
•
Unplug the power d ptor nd cle n the r dio before stor ge.
•
Alw ys store the r dio in dry nd cle n pl ce.
SPECIFICATION
Power: AC Ad ptor:
Input: AC 100-240V ~
Output: DC 5V 1200mA
B ckup b ttery: 2 x 1.5V AAA b tteries (not included)
USB Ch rging: DC 5V 1000mA
Frequency R nge: FM 87 – 108 MHz
AM 520 – 1710 KHz
TROUBLESHOOTING GUIDE
If you experience difficulties in the use of this clock r dio, ple se check the following or c ll 1-
800-777-5331 for Customer Service nd support
.
SYMPTOM POSSIBLE CAUSE POSSIBLE SOLUTION
Power does not come on
Power d ptor connect unst ble
Reconnect d ptor
No sound
VOLUME control t minimum
position. Incre se Volume
Noise or sound distorted FM
- St tion is not tuned properly
- Antenn is not extended
- Retune the Bro dc st
st tion
- Fully extend the ntenn
USB no ch rging function USB c ble defective
Try reconnecting the USB
c ble or repl ce the USB
c ble
At Spectr , environment l nd soci l responsibility is core v lue
of our business. We re dedic ted to continuous implement tion
of responsible initi tives with n im to conserve nd m int in the
environment through responsible recycling.
Ple se visit us t http://www.spectr intl.com/green.htm for more inform tion on Spectr ’s
green initi tives or to find recycler in your re .

E-12
90 DAY LIMITED WARRANTY AND SERVICE
VALID IN THE U.S.A. ONLY
SPECTRA MERCHANDISING INTERNATIONAL, INC. w rr nts this unit to be free from
defective m teri ls or
f ctory workm nship for period of 90 d ys from the d te of origin l
customer purch se nd provided the
product is utilized within the U.S.A. This w rr nty is
not ssign ble or tr nsfer ble. Our oblig tion under this
w rr nty is the rep ir or
repl cement of the defective unit or ny p rt thereof, except b tteries, when it is
returned
to the SPECTRA Service Dep rtment, ccomp nied by proof of the d te of origin l consumer
purch se, such s duplic te copy of s les receipt.
You must p y ll shipping ch rges required to ship the product to SPECTRA for w rr nty
service. If the product is rep ired or repl ced under w rr nty, the return ch rges will be t
SPECTRA’s expense. There re no other express w rr nties other th n those st ted herein.
This w rr nty is v lid only in ccord nce with the conditions set forth below:
1. The w rr nty pplies to the SPECTRA product only while:
. It rem ins in the possession of the origin l purch ser nd proof of purch se is
demonstr ted.
b. It h s not been subjected to ccident, misuse, buse, improper service, us ge outside
the descriptions nd w rnings covered within the user m nu l or non-SPECTRA
pproved modific tions.
c. Cl ims re m de within the w rr nty period.
2. This w rr nty does not cover d m ge or equipment f ilure c used by electric l wiring not
in compli nce with
electric l codes or SPECTRA user m nu l specific tions, or
f ilure to provide re son ble c re nd
necess ry m inten nce s outlined in the user
m nu l.
3.
Warranty of all SPECTRA products applies to residential use only and is void when products are
used in nonresidential environment or installed outside the United States.
This w rr nty gives you specific leg l rights, nd you m y lso h ve other rights which v ry
from st te to st te. TO OBTAIN SERVICE ple se remove ll b tteries (if ny) nd p ck the
unit c refully nd send it freight prep id to SPECTRA t the ddress shown below. IF THE
UNIT IS RETURNED WITHIN THE WARRANTY PERIOD shown bove, ple se include
proof of purch se (d ted c sh register receipt) so th t we m y est blish your eligibility for
w rr nty service nd rep ir of the unit without cost. Also include note with description
expl ining how the unit is defective. A customer service represent tive m y need to cont ct
you reg rding the st tus of your rep ir, so ple se include your n me, ddress, phone
number nd em il ddress to expedite the process.
IF THE UNIT IS OUTSIDE THE WARRANTY PERIOD, ple se include check for
$20.00
to
cover the cost of rep ir, h ndling nd return post ge. All out of w rr nty returns must be sent
prep id.
It is recommended th t you cont ct SPECTRA first t 1-800-777-5331 or by em il t
custserv@spectr intl.com for upd ted inform tion on the unit requiring service. In some
c ses, the model you h ve m y be discontinued, nd SPECTRA reserves the right to offer
ltern tive options for rep ir or repl cement.
SPECTRA MERCHANDISING INTERNATIONAL, INC.
4230 North Norm ndy Avenue,
Chic go, IL60634, USA. 1-800-777-5331
To register your product, visit the link on the website below to enter your inform tion.
http://www.spectr intl.com/wform.htm
0118 Printed in Chin
Table of contents
Other Jensen Clock Radio manuals

Jensen
Jensen JCR-150 User manual

Jensen
Jensen JEP-150 User manual

Jensen
Jensen JCR-228 User manual

Jensen
Jensen JCR-275 User manual

Jensen
Jensen JCR-300 User manual

Jensen
Jensen JWM-160 User manual

Jensen
Jensen JCR-255 User manual

Jensen
Jensen JCR-208 User manual

Jensen
Jensen JCR-260 User manual

Jensen
Jensen JBD-100A User manual

Jensen
Jensen MR-720 User manual

Jensen
Jensen SAB-55B User manual

Jensen
Jensen JCR-266 User manual

Jensen
Jensen JBS-215 User manual

Jensen
Jensen JCR-210 User manual

Jensen
Jensen JCR-208A User manual

Jensen
Jensen JCR-540 User manual

Jensen
Jensen JCR-255 User manual

Jensen
Jensen JCR-212 User manual

Jensen
Jensen JCR-295W User manual