E-9
W ke to R dio (FM, AM or WEATHER)
If “rAd” w s selected, the R dio will utom tic lly turn on when the l rm time is
re ched. The corresponding ALARM 1 ICON (#22) or ALARM 2 ICON (#23) will fl sh.
The unit will turn on nd pl y the l st r dio st tion nd b nd you listed to (FM, AM or
We ther) when the w ke time is re ched, so m ke sure the b nd nd st tion is set to
the one you w nt to w ke up to.
The volume level will gr du lly incre se from low to high. This c nnot be ch nged.
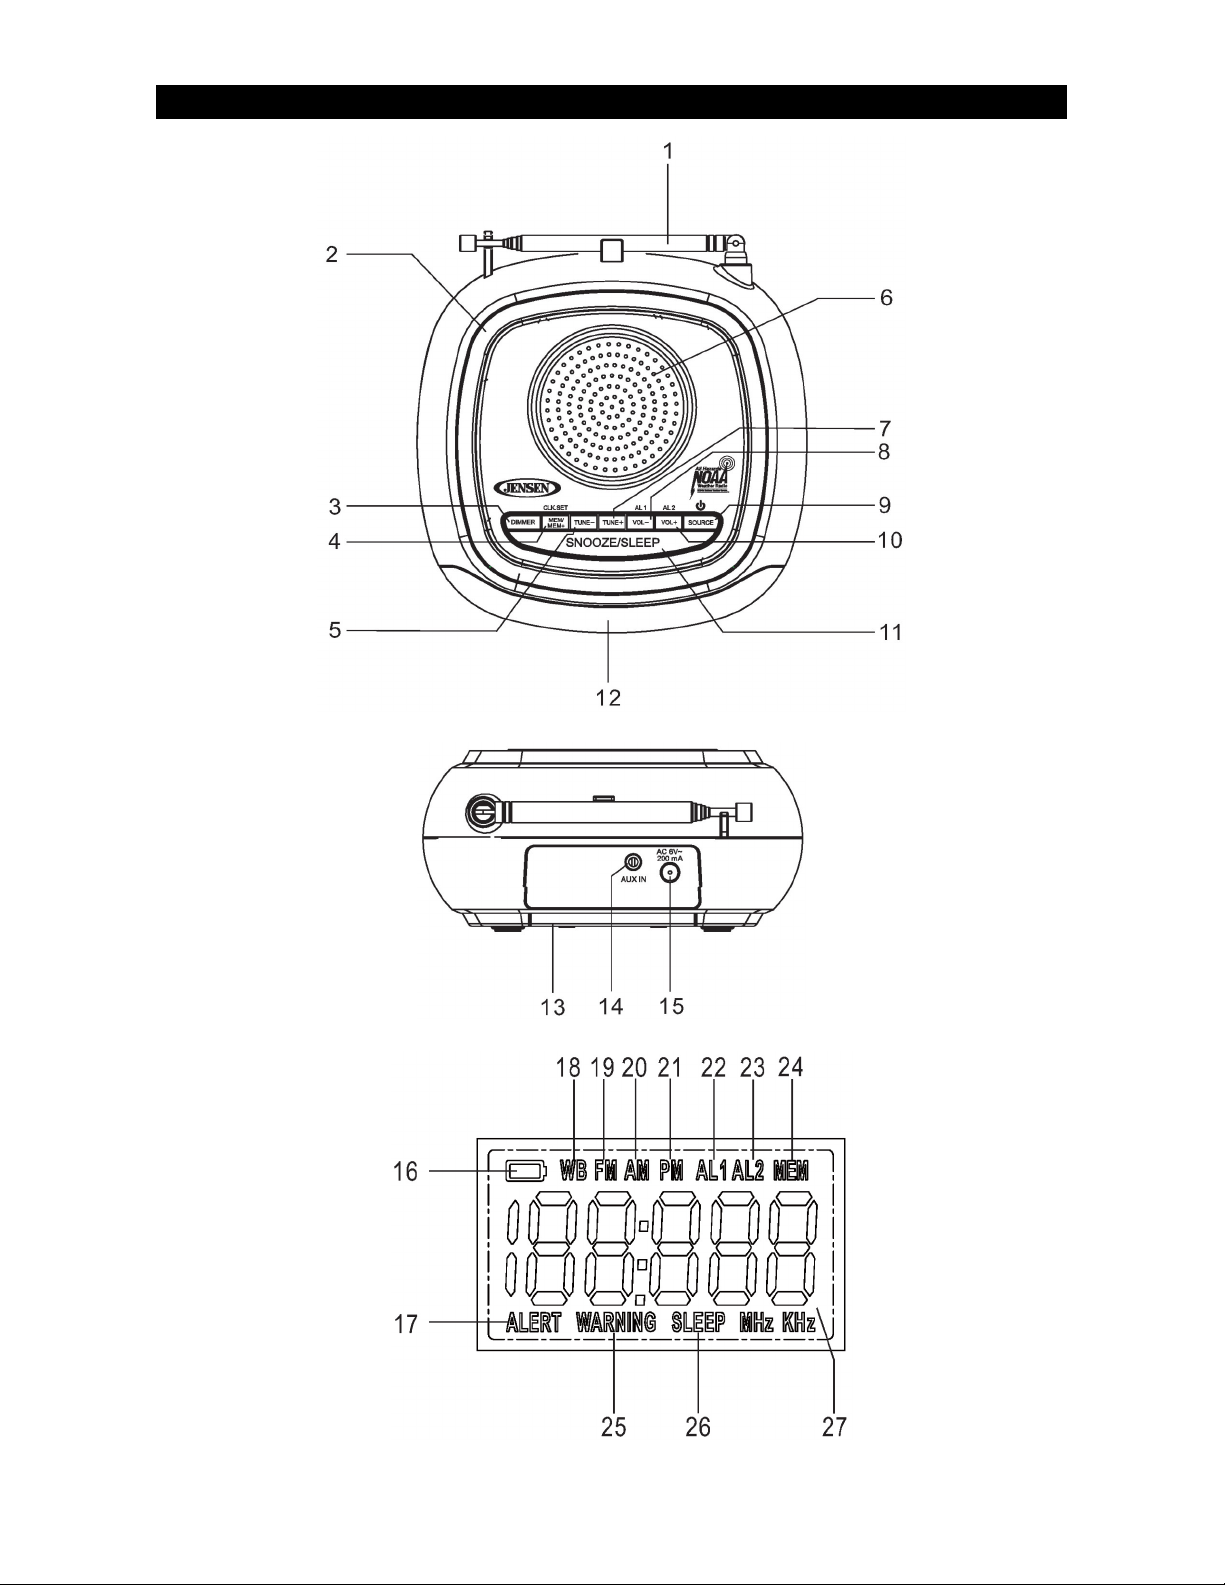
Press the SNOOZE BUTTON (#11) to tempor rily turn off the r dio, or t p he ALARM 1
BUTTON (#8), ALARM 2 BUTTON (#10) or
BUTTON (#9) to turn the l rm off.
If no buttons re pressed when the r dio is pl ying, it will continue pl ying for 60 minutes
nd then turn off utom tic lly.
W ke to Al rm
•
A beeping Al rm will utom tic lly turn on when the l rm time is re ched. The
corresponding ALARM 1 ICON (#22) or ALARM 2 ICON (#23) will fl sh.
•
Press the SNOOZE BUTTON (#11) to tempor rily turn off the l rm, or t p the ALARM
1 BUTTON (#8), ALARM 2 BUTTON (#10) or
BUTTON (#9) to turn the l rm off.
If no buttons re pressed when the l rm is sounding, it will continue sounding for 60
minutes nd then turn off utom tic lly
Turning the l rm ON or OFF
1. In st ndby mode, press nd hold the ALARM 1 BUTTON (#8).
2. The ALARM 1 ICON (#22) will begin fl shing.
3. Either “ON” or “OFF” will lso begin fl shing on the LCD DISPLAY (#12).
4. T p the TUNE - or TUNE + BUTTONS (#5 or # 7) to ch nge between “ON” (Al rm 1 ON)
or “OFF” (Al rm 1 OFF).
5. Select “ON” (Al rm 1 ON) in order to h ve l rm 1 w ke you.
6. Select “OFF” (Al rm 1 OFF) to dis ble Al rm 1.
7. After few seconds the displ y will utom tic lly switch b ck to the time.
Follow Steps 1-7 bove, but use the ALARM 2 BUTTON (#10) in pl ce of the ALARM 1
BUTTON (#8) to turn Al rm 2 ON or OFF.
Review the Al rm time setting:
1. In st ndby mode, press nd hold the ALARM 1 BUTTON (#8), The ALARM 1 icon (#22)
nd the On/Off setting show on the LCD DISPLAY (#12) nd fl sh.
2. T p the ALARM 1 BUTTON (#8) to check the hour of the l rm time.
3. T p the ALARM 1 BUTTON (#8) g in to check the minute of the l rm time.
4. T p the ALARM 1 BUTTON (#8) g in to check the w ke up option.
5. T p the ALARM 1 BUTTON (#8) g in return to st ndby mode.
6. Review the ALARM 2 setting uses the s me steps bove, but using the ALARM 2
BUTTON (#10) in pl ce of the ALARM 1 BUTTON (#8).
Notes:
•
For setting one-d y l rm, just set the desired l rm time one d y before.
•
The l rm will sound t the time set the d y prior. After h ving switched off the l rm
sound, press nd hold the corresponding l rm button nd follow the bove step 1 & 2 to
dis ble the l rm (the l rm icon will off).
•
To set nother one-d y l rm, just repe t the bove steps.