Jensen JiMS-252i User manual

ES
SISTEMA MUSICAL DE ACOPLAMIENTO Para iPod y iPhone
JiMS-252i
MANUAL DEL USUARIO
(No incluye iPod/iPhone)
POR FAVOR LEA CUIDADOSAMENTE ESTE MANUAL DEL USUARIO EN SU
TOTALIDAD
,
ANTES DE OPERAR EST
A
UNIDAD Y GUARDE EL FOLLETO PAR
A
GB
DOCKING DIGITAL MUSIC SYSTEM FOR iPod AND iPhone
JiMS-252i
USER MANUAL
(iPod/iPhone not Included)
PLEASE READ THIS USER MANUAL COMPLETELY BEFORE OPERATING THIS
UNIT AND RETAIN THIS BOOKLET FOR FUTURE REFERENCE.
W166-R(JiMS-252i)_GB_ES IB.indd 1 18 - 36 1 2012-2-28 8:36
size:148x210mm,80gms book paper,BK+BK.

GB
2
DEAR JENSEN® CUSTOMER
Selecting fine audio equipment such as the unit you've just purchased is only the start of your musical
enjoyment. Now it's time to consider how you can maximize the fun and excitement your equipment
offers. This manufacturer and the Electronic Industries Association's Consumer Electronics Group want
you to get the most out of your equipment by playing it at a safe level. One that lets the sound come
through loud and clear without annoying blaring or distortion and, most importantly, without affecting
your sensitive hearing. Sound can be deceiving. Over time your hearing "comfort level" adapts to
higher volumes of sound. So what sounds "normal" can actually be loud and harmful to your hearing.
Guard against this by setting your equipment at a safe level BEFORE your hearing adapts.
To establish a safe level:
Start your volume control at a low setting.
Slowly increase the sound until you can hear it comfortably and clearly, and without distortion.
Once you have established a comfortable sound level:
Set the dial and leave it there.
Taking a minute to do this now will help to prevent hearing damage or loss in the future. After all, we
want you listening for a lifetime.
We Want You Listening For a Lifetime
Used wisely, your new sound equipment will provide a lifetime of fun and enjoyment. Since hearing
damage from loud noise is often undetectable until it is too late, this manufacturer and the Electronic
Industries Association's Consumer Electronics Group recommend you avoid prolonged exposure to
excessive noise.
Customer's Record:
The serial number of this product is found on its bottom cover. You should note the serial number of this
unit in the space provided as a permanent record of your purchase to aid in identification in the event of
theft of loss.
:rebmuNlaireSi252-SMiJ:rebmuNledoM
ES
2
ESTIMADO CLIENTE JENSEN®
Seleccionar un equipo de audio de alta calidad como la unidad que usted acaba de comprar es
solamente el inicio de su gratificación musical. Ahora es el momento de considerar cómo puede
maximizar la diversión y el entusiasmo que su equipo le ofrece. Este fabricante y el Grupo de
Consumidores de Electrónica de la Asociación de Industrias Electrónicas desean que usted obtenga lo
máximo de su equipo y que funcione dentro de un nivel seguro. Un nivel que permita que el sonido
llegue en forma alta y clara sin estruendo o distorsión y, lo más importante, sin afectar la sensibilidad
de su audición. El sonido puede ser engañoso. Con el tiempo su “nivel de comodidad” auditivo se
adapta a volúmenes de sonido más altos. Por lo tanto, lo que suena “normal” puede en realidad ser
excesivo y dañar su oído. Prevéngalo configurando su equipo a nivel seguro ANTES de que su oído
se adapte.
Para establecer un nivel seguro:
zColoque el control de volumen a un nivel bajo.
zAumente lentamente el sonido hasta que pueda escucharlo con comodidad, claramente y sin
distorsión.
Una vez que haya establecido un nivel de sonido confortable:
zAjuste el dial y déjelo allí.
Tomar un minuto ahora le ayudará a prevenir daños a su sentido del oído o pérdidas en el futuro.
Después de todo, nosotros deseamos que usted escuche para toda la vida.
Nosotros deseamos que usted escuche toda la vida
Usado conscientemente, su nuevo equipo de sonido brindará toda una vida de diversión y gratificación.
Debido a que el daño al sentido del oído por ruidos excesivos es a menudo indetectable hasta que es
demasiado tarde, este fabricante y el Grupo de Consumidores de Electrónica de la Asociación de
Industrias Electrónicas le recomiendan evitar la exposición prolongada al ruido excesivo.
Registro del cliente:
En la cubierta inferior de este producto encontrará su número de serie. Es aconsejable anotar el
número de serie de este producto en el espacio suministrado, como un registro permanente de su
compra para ayudar en la identificación en caso de robo o pérdida.
Modelo Número: JiMS-252i Número de Serie:
W166-R(JiMS-252i)_GB_ES IB.indd2 18 - 235 2012-2-28 8:36
size:148x210mm,80gms book paper,BK+BK.

ES
3
IMPORTANTES INSTRUCCIONES DE SEGURIDAD
Esta unidad ha sido diseñada y fabricada para proteger su seguridad personal cuando se utiliza según
las instrucciones. Sin embargo, si se usa de forma inadecuada se corre el riesgo de recibir una
descarga eléctrica o de causar incendio. Por favor, lea todas las instrucciones de seguridad y
funcionamiento de la unidad antes de instalarla y usarla, y manténgalas a mano para referencia
posterior. Preste atención a todas las advertencias en estas instrucciones y en la unidad.
1. Lea estas instrucciones. Antes de usar este aparato deberá leer todas las instrucciones de
seguridad y de operación.
2. Guarde estas instrucciones. Es preciso guardar las instrucciones de seguridad y de operación
para futura referencia.
3. Preste atención a todas las advertencias. Es indispensable adherirse a las indicaciones en las
advertencias en el aparato y en las instrucciones de operación.
4. Siga todas las instrucciones. Es preciso seguir las instrucciones de uso y de operación.
5. No utilice este aparato cerca del agua. Este aparato no debe usarse cerca del agua, por ejemplo,
cerca de bañeras, lavamanos, lavatrastos, lavadoras, sótanos húmedos, o piscinas.
6. Límpielo únicamente con un paño seco. Limpie el aparato únicamente como lo recomienda el fabricante.
7. No obstruya las rejillas de ventilación. Instálelo según las instrucciones del fabricante. El aparato
deberá estar colocado de manera que su ubicación o posición no interfiera con una ventilación
adecuada. Por ejemplo, no coloque el aparato sobre la cama, un sofá, alfombra o superficies similares
que pudieran obstruir las rejillas de ventilación; tampoco lo coloque en instalaciones empotradas,
como libreras o gabinetes que pudieran impedir el flujo de aire por las rejillas de ventilación.
8. No lo instale cerca de fuentes de calor, como radiadores, registros de calefacción, estufas u otros
aparatos que generan calor (incluyendo amplificadores).
9. Proteja el cable de suministro de corriente eléctrica de manera que no quede prensado o puedan pararse
encima de él, especialmente en las espigas, tomas de corriente, y el punto de salida del aparato.
10. El sistema tiene una espiga para corriente alterna (AC), y se ajustará únicamente a los
tomacorrientes de corriente alterna. Este es un atributo de seguridad para reducir la posibilidad de
una descarga eléctrica. Si la espiga no se ajusta a los tomacorrientes de corriente alterna, solicite
a un electricista autorizado que cambie el tomacorrientes. No use adaptadores para ajustar la
espiga al tomacorriente. El hacerlo anula la función de seguridad usted podría correr el riesgo de
recibir una descarga eléctrica.
11. Use únicamente los complementos/accesorios especificados por el fabricante.
12. Desenchufe este aparato durante tormentas eléctricas, o si no va a utilizarlo por un tiempo prolongado.
13. Cualquier servicio deberá referirlo a personal calificado. Hay necesidad de llevarlo a servicio si el
aparato recibió alguna clase de daños, como daños al cable de suministro de corriente,
penetración de algún objeto o líquidos, o porque el aparato se expuso a lluvia o humedad, por mal
funcionamiento o por caída.
14. No debe exponer este aparato a salpicaduras o goteos, y no deberá colocarle encima ningún
objeto con líquido, como por ejemplo floreros.
15. Suministro de corriente eléctrica. Conecte este aparato únicamente al tipo de suministro de
corriente eléctrica descrito en las instrucciones de operación, o según lo indicado en la etiquetas
del aparato. No sobrecargue los tomacorrientes.
16. Hay riesgo de explosión por colocar la batería en forma incorrecta. Sustitúyala únicamente con
baterías iguales o equivalentes.
17. No intente desarmar, abrir o reparar este aparato usted mismo. Si el aparato falla, busque la
asesoría de un técnico local de servicio, o comuníquese con el distribuidor al número telefónico
que se encuentra en la contraportada de este manual.
18. Las marcas de precaución y placas de identificación se encuentran en la parte posterior del producto.
NOTAS IMPORTANTES
Evite instalar la unidad en los lugares descritos a continuación:
xLugares expuestos a los rayos solares o cerca de aparatos que generan calor como por ejemplo
calentadores eléctricos.
xLugares con vibraciones constantes.
xLugares mojados, húmedos o con mucho polvo.
xFuentes de ruido eléctrico, como por ejemplo, las lámparas fluorescentes o motores.
GB
3
IMPORTANT SAFETY INSTRUCTIONS
When used in the directed manner, this unit has been designed and manufactured to
ensure your personal safety. However, improper use can result in potential electrical shock
or fire hazards. Please read all safety and operating instructions carefully before installation
and use, and keep these instructions handy for future reference. Take special note of all
warnings listed in these instructions and on the unit.
1. Read these instructions – All the safety and operating instructions should be read before the
appliance is operated.
2. Keep these instructions – The safety and operating instructions should be kept for future reference.
3. Heed all warnings – All warnings on the appliance and in the operating instructions should be
adhered to.
4. Follow all instructions – All operation and use instructions should be followed.
5. Do not use this apparatus near water – The appliance should not be used near water; for example,
near a bath tub, washbowl, kitchen sink, laundry tub, in a wet basement, or near a swimming pool.
6. Clean only with dry cloth – The appliance should be cleaned only as recommended by the
manufacturer.
7. Do not block any ventilation openings. Install in accordance with the manufacturer’s instructions.
The appliance should be situated so that its location or position does not interfere with its proper
ventilation. For example, the appliance should not be situated on a bed, sofa, rug, or similar
surface that may block the ventilation openings; or placed in a built-in installation, such as a
bookcase or cabinet that may impede the flow of air through the ventilation openings.
8. Do not install near any heat sources such as radiators, heat registers, stoves, or other apparatus
(including amplifiers) that produce heat.
9. Protect the power cord from being walked on or pinched particularly at plugs, convenience
receptacles, and the point where they exit from the apparatus.
10. The system has as AC plug and will only fit into matching AC outlets. This is a safety feature to
reduce the possibility of electric shock. If the plug will not fit in yourAC outlets, you should have the
outlet changed by qualified licensed electrician. Do not use an adaptor to make the plug fit into
your outlet. This defeats the safety feature and could expose you to electric shock.
11. Only use attachments / accessories specified by the manufacturer.
12. Unplug this apparatus during lightning storms or when unused for long periods of time.
13. Refer all servicing to qualified service personnel. Servicing is required when the apparatus has
been damaged in any way, such as power-supply cord or plug is damaged, liquid has been spilled
or objects have fallen into the apparatus, the apparatus has been exposed to rain or moisture,
does not operate normally, or has been dropped.
14. This appliance shall not be exposed to dripping or splashing water and that no object filled with
liquids such as vases shall be placed on the apparatus.
15. Power Sources – The appliance should be connected to a power supply only of the type described
in the operating instructions or as marked on the appliance. Do not overload wall outlet.
16. Danger of explosion if battery is incorrectly replaced. Replace only with the same or equivalent type.
17. Do not attempt to dismantle, open or repair this product yourself. If a fault occurs, seek advice from
your local qualified service technician or contact the distributor via the telephone number at the
back of this instruction manual.
18. Caution marking and nameplate are located on bottom of product.
IMPORTANT NOTES
Avoid installing the unit in locations described below:
xPlaces exposed to direct sunlight or close to heat radiating appliances such as electric heaters.
xPlaces subject to constant vibration.
xDusty, humid or moist places.
xSources of electrical noise such as fluorescent lamps or motors.
W166-R(JiMS-252i)_GB_ES IB.indd3 18 - 343 2012-2-28 8:36
size:148x210mm,80gms book paper,BK+BK.

GB
4
COMPLIANCE WITH FCC REGULATIONS
This device complies with Part 15 of the FCC Rules. Operation is subject to the following two conditions:
(1) this device may not cause harmful interference, and
(2) this device must accept any interference received, including interference that may cause
undesired operation.
NOTE : This equipment has been tested and found to comply with the limits for a Class B digital device,
pursuant to Part 15 of the FCC Rules. These limits are designed to provide reasonable protection
against harmful interference in a residential installation. This equipment generates, uses and can
radiate radio frequency energy and, if not installed and used in accordance with the instructions, may
cause harmful interference to radio communications. However, there is no guarantee that interference
will not occur in a particular installation. If this equipment does cause harmful interference to radio or
television reception, which can be determined by turning the equipment off and on, the user is
encouraged to try to correct the interference by one or more of the following measures:
- Reorient or relocate the receiving antenna.
- Increase the separation between the equipment and receiver.
- Connect the equipment into an outlet on a circuit different from that to which the receiver is
connected.
- Consult the dealer or an experienced radio/TV technician for help.
CAUTION:Changes or modifications not expressly approved by the party responsible for
compliance could void the user’s authority to operate the equipment.
PROTECT YOUR FURNITURE
This model is equipped with non-skid rubber 'feet' to prevent the product from moving when you
operate the controls. These 'feet' are made from non-migrating rubber material specially formulated to
avoid leaving any marks or stains on your furniture. However certain types of oil based furniture
polishes, wood preservatives, or cleaning sprays may cause the rubber 'feet' to soften, and leave
marks or a rubber residue on the furniture. To prevent any damage to your furniture we strongly
recommend that you purchase small self-adhesive felt pads, available at hardware stores and home
improvement centers everywhere, and apply these pads to the bottom of the rubber 'feet' before you
place the product on fine wooden furniture.
PRODUCT FEATURES
The JiMS-252i is an iPod/iPhone Docking Digital Music System with incorporates the following
features:
zPlayer / Charger for iPod nano, iPod touch, iPod classic, iPod video and iPhone.
zVideo Line-out provides video signal output when iPod/iPhone with video is docked
zDual Alarm timer function
zWake up to Alarm, FM radio or iPhone/iPod with Snooze function
zSleep timer function
zFM digital tuner with 20 presets
zLCD display with dimmer function
zAuxiliary input jack for connecting other digital audio player
zPreset EQ control (Jazz, Classic, Rock & Pop), Bass/Treble adjustable and Bass Boost function
z2-Way Pivoting Speaker Boxes
ES
4
CONFORMIDAD CON LAS REGULACIONES FCC
Este aparato cumple con lo estipulado en la Parte 15 de los Reglamentos de la FCC. Su operación
queda sujeta a las dos condiciones siguientes:
(1) este dispositivo no puede causar interferencia dañina, y
(2) este dispositivo deberá aceptar cualquier interferencia recibida, incluyendo interferencia que
pudiera causar operación no deseada
NOTA : Al someterlo a pruebas se confirmó que este equipo cumple con los límites establecidos para
dispositivos digitales de Clase B, según la Parte 15 de las Normas de FCC. Estos límites proporcionan
una protección razonable contra interferencia dañina en una instalación residencial. Este equipo
genera, usa y puede emitir energía de radiofrecuencia, y si no se instala o no se usa de acuerdo con
estas instrucciones, puede causar interferencia dañina a las radiocomunicaciones. Sin embargo, no
hay ninguna garantía de que no habrá interferencia en alguna instalación determinada. Si este
equipo causa interferencia no deseada contra la recepción de radio o televisión, la cual se puede
determinar encendiendo y apagando el aparato, se aconseja al usuario a tratar de corregir el problema
de la interferencia tomando una o más de las siguientes medidas:
- Reoriente o reubique la antena de recepción.
- Aumente la distancia de separación entre el equipo y el receptor.
- Conecte el equipo en un tomacorriente situado en un circuito distinto al del receptor.
- Consulte al concesionario o a un radiotécnico experimentado para que le ayude.
PRECAUCIÓN: Cualquier cambio o modificación no aprobada explícitamente por la parte
responsable de asegurar la conformidad, podría anular la autorización del
usuario para operar el equipo.
PROTEJA SUS MUEBLES
Este modelo está equipado con soportes antideslizantes para evitar que se mueva al operar los
controles. Estos soportes están hechos de caucho antideslizante especialmente formulado para evitar
dejar rastros o manchas en su muebles. Sin embargo, algunos muebles tienen acabados a base de
aceite, presevantes para la madera, o limpiadores que podrían hacer que los soportes se suavicen, y
dejen marcas o residuos de caucho sobre los muebles. Para evitar cualquier clase de daños a sus
muebles, le recomendamos especialmente que adquiera protectores de fieltro, disponibles en
cualquier ferretería o almacén de productos para el hogar, y que los coloque bajo los soportes de hule
antes de colocar el aparato sobre sus muebles de maderas finas.
ATRIBUTOS DEL PRODUCTO
El JiMS-252i es un sistema musical digital con acoplamiento para iPod/iPhone, que cuenta con los
atributos siguientes:
zReproductor / Cargador para iPod nano, iPod touch, iPod classic, iPod video y iPhone.
zSalida de video que permite el paso de la señal de video al estar acoplado el iPod/iPhone con video.
zFunción de temporizador para la alarma doble
zFunción de despertador con alarma, radio FM, iPhone/iPod, y ciclos para dormitar
zFunción de temporizador para quedarse dormido
zSintonizador digital FM con capacidad para pre-configurar 20 estaciones
zPantalla LCD con control de atenuación
zConector de entrada auxiliar para conectar otro reproductor de audio digital
zControl pre-configurado para Ecualizador (EQ) ajustable para (Jazz, Clásica, Rock y Pop), tonos
Bajos/Altos y función de amplificador de bajos
zAltavoces giratorios en doble dirección
INICIO
Batería de respaldo para el reloj
El compartimiento de la batería de respaldo se encuentra en la parte inferior de la unidad.
(1) Quite la puerta del compartimiento de baterías.
(2) Siguiendo el diagrama de polaridad dentro del compartimiento, instale 2 baterías AAA (UM-4)
(las baterías no están incluidas).
W166-R(JiMS-252i)_GB_ES IB.indd4 18 - 433 2012-2-28 8:36
size:148x210mm,80gms book paper,BK+BK.

ES
5
INICIO
(3) Vuelva a colocar la puerta del compartimiento de baterías.
NOTA: Use únicamente baterías de marca reconocida para garantizar una vida útil más larga y el
mejor desempeño.
Advertencia:
- Las baterías no deben exponerse al calor excesivo, como los rayos solares, fuego o similares.
- Asegúrese de instalar correctamente las baterías. La polaridad equivocada podría dañar la unidad.
- No combine baterías viejas y nuevas.
- No combine baterías alcalinas, estándar (carbono-zinc) o recargables (níquel-cadmio).
- Se recomienda usar únicamente baterías iguales o equivalentes.
- Si no va a usar la unidad por un tiempo prolongado, quítele las baterías.
-No elimine las baterías en el fuego ya que podrían derramarse o hacer explosión.
-Existe riesgo de explosión si se colocan las baterías en forma incorrecta.
Control Remoto
La unidad de control remoto funciona con una batería de litio de “CR2025” (Incluida). Para activar el
control remoto, quite la pestaña de aislamiento insertada en el compartimiento de las baterías. Cuando
el funcionamiento del control remoto sea intermitente o poco satisfactorio,
reemplace la batería original con una batería nueva de 3 voltios.
1.) Deslice el porta-baterías hacia afuera del control remoto.
2.) Reemplace la batería de 3V CR2025. Asegúrese de instalar la batería
correctamente. El control remoto no trabajará si la batería está instalada con la
polaridad equivocada.
PRECAUCIÓN: Hay riesgo de explosión si la batería se reemplaza en forma
incorrecta. Reemplácela solo con el mismo tipo de batería.
3.) Vuelva a insertar el porta-baterías en la ranura de la batería.
NOTA: Use únicamente baterías de marca reconocida para garantizar una vida útil
más larga y el mejor desempeño.
Conexión de los altavoces
Desempaque cuidadosamente la unidad. Los cables del altavoz ya están conectados a la unidad
principal. Maneje los cables con cuidado para evitar dañarlos. Coloque el altavoz izquierdo del lado
izquierdo de la unidad principal y coloque el altavoz derecho del lado derecho de la unidad principal.
Conexión del adaptador AC-DC
El suministro de corriente de la unidad pasa a través de un Adaptador de corriente alterna a corriente
directa (AC-DC), con salida de 12V DC / 2000mA. (Incluido)
(1) Inserte la espiga de salida de corriente directa (DC) del adaptador en el conector de entrada DC
situado en la parte posterior de la unidad.
(2) Enchufe el adaptador en un tomacorriente principal AC.
NOTA: La unidad no tiene pantalla magnética y podría causar distorsión en las imágenes de algunos
televisores y monitores de video. Para evitarlo, podría necesita alejar la TV o monitor si hay cambios
de color no naturales o si hay distorsión de imagen.
Montaje de los altavoces giratorios
La parte superior de ambos altavoces está diseñada para girar hacia la izquierda o derecha para
encauzar el sonido en diferentes direcciones. Puede girar la parte superior del altavoz a un ángulo
máximo de 60 grados en cualquiera de las direcciones para obtener un mayor campo de sonido
alrededor del cuarto.
V
ista superio
r
Gire la parte superior del
altavoz izquierdo Gire la parte superior delUnidad principal altavoz derecho
CR2025
RELEASE
OPEN
PUSH
MADE IN CHINA
GB
5
GETTING STARTED
Clock setting battery back-up
The battery back-up compartment is located on the bottom of the unit.
(1) Remove the battery compartment door.
(2) Followthe polarity diagram shown inside the compartment and install 2 x AAA (UM-4) batteries (notincluded).
(3) Replace the battery compartment door.
NOTE: Only use a well-known brand of battery to ensure the longest life and best performance.
Warnings:
- Batteries shall not be exposed to excessive heat such as sunshine, fire or the like.
- Be sure that the batteries are installed correctly. Wrong polarity may damage the unit.
- Do not mix old and new batteries.
- Do not mix alkaline, standard (carbon-zinc) or rechargeable (nickel- cadmium) batteries.
- Only batteries of the same or equivalent type as recommend are to be used.
- If the unit is not to be used for an extended period of time, remove the battery.
- Do not dispose of batteries in fire, battery may explode or leak.
- Danger of explosion if battery is incorrectly replaced.
Remote Control
The remote control operates on one CR2025 battery (included). To activate the
remote control, remove the insulation tab inserted in the battery compartment.
When the operation of the remote control becomes intermittent or unsatisfactory
replace the original battery with a new 3-volt lithium battery.
1.) Slide out the battery holder from the remote control case.
2.) Replace the 3V CR2025 battery. Be sure the battery is installed correctly. The
remote will not work if the battery is installed with the wrong polarity.
CAUTION: Danger of explosion if the battery is replaced incorrectly. Replace only with the same type battery.
3.) Insert the battery holder back into the battery slot.
NOTE: Only use a well-known brand of battery to ensure the longest life and best performance.
Speaker Connection
Unpack the unit carefully. The speaker wires are already attached to main unit. Handle with care to
avoid damaging the wires. Place the left speaker on the left side of the main unit and place the right
speaker on the right side of the main unit.
AC-DC Adaptor connection
The unit is powered by an external AC-DC Power Adaptor (included) with output DC12V / 2000mA.
(1) Insert the adaptor’s DC output plug into the DC IN jack at the back of the unit.
(2) Plug the adaptor into an ac main outlet.
NOTE: This unit is not magnetically shielded and may cause color distortion on the screen of some TVs
or video monitors. To avoid this, you may need to move the unit further away from the TV or monitor if
unnatural color shifts or image distortion occurs.
Pivoting Speaker Set-up
The top part of both speakers are designed to pivot to the left or right and direct the sound in different
directions. You can twist the upper part of the speaker to a maximum angle of about 60 degrees in
either direction to obtain a wider sound field around the room.
Top
V
iew
Twist Upper Part o
f
Left-Speaker Main Unit Twist Upper Part o
f
Right-Speaker
CR2025
RELEASE
OPEN
PUSH
MADE IN CHINA
W166-R(JiMS-252i)_GB_ES IB.indd5 18 - 325 2012-2-28 8:36
size:148x210mm,80gms book paper,BK+BK.

GB
6
LOCATION OF CONTROLS
Main Unit Top View Rear View
Front View
1. iPhone/iPod docking station
2. SNOOZE / DIMMER button ----- Activate the snooze function; Turn display Dim / Bright.
3. VOLUME UP(+) / DOWN (-) button ----- Adjust volume level up and down; Set clock / alarm minute;
Select alarm source / level.
4. iPhone/iPod docking connector
5. PRESET button ----- Recall preset radio channel In radio mode.
6. / button --------
-
In clock/alarm set mode, adjust clock / alarm hour.
In radio mode, tune the radio frequency up / down.
In iPod mode, skip tracks Backward / Forward or perform high speed search.
7. ALARM button ----- Press & hold to enter alarm setting mode; Tap to turn the alarm on/off.
8. / FUNCTION button ----- Turn the unit on and standby; Select FM radio, iPod or AUX function mode.
9. ST./MONO / button ----In Radio mode, select FM radio Stereo / Mono reception.
In iPod mode, Play / Pause iPhone/iPod music.
10. MODE / MEM button ------- In standby mode, select different setting mode (12/24 hours display
format, clock and radio reception region).
In FM radio mode, save preset radio station
11. Upper Right-Speaker
12. Power status indicator (on right speaker box)
13. Lower Right-Speaker
14. Upper Left-Speaker
15. Power status indicator (on left speaker box)
16. Lower Left-Speaker
17. Power status indicator (on main unit)
18. LCD display
1
2
3
4
798
6
10
5
2122
2324
26
27 25
17
11
12
13
14
15
16
181920
ES
6
UBICACIÓN DE LOS CONTROLES
Unidad principal Vista Superior Vista Posterior
Vista Frontal
1. Estación de acoplamiento para iPhone/iPod
2. Botón DORMITAR/ATENUAR -----Activa la función de ciclos para dormitar; Atenúa/Abrillanta la pantalla.
3. Botón para SUBIR (+) / BAJAR (-) volumen ----- Sube o baja el nivel del volumen; Fija Reloj /
minutos de la alarma; Selecciona el origen/nivel de la alarma.
4. Conector de acoplamiento para iPhone/iPod
5. Botón PRE-CONFIGURAR ----- Activa una estación de radio pre-establecida en modalidad de radio.
6. Botón / ----- En modalidad de radio/configurar alarma, ajusta el reloj/hora de la alarma.
En modalidad de radio, sintoniza la frecuencia de radio arriba/abajo
En modalidad de iPod, salta hacia atrás/adelante en las pistas, o ejecuta
una búsqueda a alta velocidad.
7. Botón de ALARMA ----- Oprímalo y sosténgalo para ingresar a la modalidad de configuración de
alarma; dé un ligero golpecito para encender/apagar la alarma.
8. / Botón de FUNCIÓN -----Enciende la unidad y la pone en espera; Selecciona radio FM o
modalidad de función AUX.
9. Botón ESTÉREO/MONO / ----- En modalidad de Radio, selecciona recepción FM mono/estéreo
de Radio;En modalidad de iPod, Reproduce/Pausa música del iPhone/iPod.
10. Botón MODALIDAD / MEM ---En modalidad de espera, selecciona modalidad de configuración
diferente (formato de pantalla de 12/24 horas, reloj y región de
recepción de radio).
En modalidad de radio FM, guarda la estación de radio pre-configurada
11. Altavoz derecho parte superior
12. Indicador de estatus de corriente (en el altavoz derecho)
13. Altavoz derecho parte inferior
14. Altavoz izquierdo parte superior
15. Indicador de estatus de corriente (en el altavoz izquierdo)
1
2
3
4
798
6
10
5
2122
2324
26
27 25
17
11
12
13
14
15
16
181920
W166-R(JiMS-252i)_GB_ES IB.indd6 18 - 631 2012-2-28 8:36
size:148x210mm,80gms book paper,BK+BK.

ES
7
16. Altavoz izquierdo parte inferior
17. Indicador de estatus de corriente (en la unidad principal)
18. Pantalla LCD
19. Sensor infrarrojo del control remoto
20. Compartimiento de la batería para el Reloj/Memoria (ubicado en la parte inferior de la unidad principal)
21. ENTRADA DC ----- Para conectar suministro de corriente directa (DC) externa.
22. Conector de video RCA ----- Salida de señal de video compuesta.
23. Conector de ENTRADAAUX IN ----- Entrada auxiliar de señal de audio.
24. Botón de REINICIO -----Para restaurar la unidad.
25. Antena de cable FM
26. Tornillo para la cubierta de la entrada de los altavoces
27. Entrada de altavoz izquierdo/derecho (bajo la cubierta)
Control Remoto
1. Transmisor infrarrojo
2. Botón de Encendido/En espera ---- Enciende la unidad
y la pone en espera.
3. Botón de MENÚ del iPod
4. Sube/baja en el / menú del iPod
5. Botón de (selección) ACEPTAR del iPod
6. Botón para SUBIR (+) / BAJAR(-) volumen ----- Ajusta el nivel del
volumen subiéndolo y bajándolo; Ajusta el reloj/ minutos de la
alarma. Selecciona el origen/nivel de la alarma.
7. Botón de SINTONIZAR+ / y SINTONIZAR - / ---
En modalidad de radio/configurar alarma, ajusta el reloj/hora de la alarma.
En modalidad de radio, sintoniza la frecuencia de radio arriba/abajo
En modalidad de iPod, salta pistas hacia Adelante/Atrás o ejecuta
una búsqueda a alta velocidad.
8. Botón de SILENCIO ---- Cancela el volumen.
9. Botón MODALIDAD / MEM -------- En modalidad de espera,
selecciona modalidad de configuración diferente (formato de
pantalla de 12/24 horas, reloj y región de recepción de radio).
En modalidad de radio, guarda la estación de radio pre-configurada.
10. Botón DORMITAR/ATENUAR ----- Activa la función de ciclos para dormitar;Atenúa/abrillanta la pantalla.
11. Botón de dormir ---- Selecciona el tiempo de duración del temporizador para dormir.
12. Botón de SALIDA DE VIDEO ENCENDIDO/APAGADO ----- Oprímalo para ENCENDER o APAGAR la
salida del video hacia la TV.
13. Botón de FUNC ---- Selecciona la modalidad de función de radio FM, iPod o AUX.
14. BotónESTÉREO/MONO/ -----En modalidad de Radio, selecciona recepción FMmono / estéreo de Radio.
En modalidad de iPod, Reproduce/Pausa música del iPhone/iPod.
15. Botón PRE-CONFIGURAR+ / REPETIR ---- En modalidad de radio, activa un canal (estación) de
radio pre-configurado. En modalidad de iPod, repite la reproducción de música del iPod/iPhone.
16. Botón PRE-CONFIGURAR - / reproducción ALEATORIA ---- En modalidad de radio, activa el canal
(estación) de radio pre-configurado. En modalidad de iPod, repite la reproducción de música del
iPod/iPhone en forma aleatoria.
17. Botón de ALARMA ----- Oprímalo y sosténgalo para ingresar a la modalidad de configuración de
alarma; dé un ligero golpecito para encender/apagar la alarma.
18. Botón de AMPLIFICADOR DE BAJOS ---- Selecciona el efecto de amplificación de los bajos.
19. Botón ECUALIZADOR (EQ) ---- Selecciona el efecto pre-configurado para el ecualizador.
20. Compartimiento de la batería
1
2
3
5
4
6
7
8
9
10
20
11
12
13
15
16
17
18
14
19
GB
7
19. Remote Control Infrared Sensor
20. Clock/Memory battery compartment (located on the bottom of the main unit)
21. DC-IN jack ----- For the connection of external DC power supply.
22. RCA Video jack ----- Composite video signal output.
23. AUX IN jack ----- Auxiliary audio signal input.
24. RESET button -----For resetting the unit.
25. FM wire antenna
26. Speaker socket cover screw
27. Left / Right Speaker sockets(under cover)
Remote Control
1. Infrared Transmitter
2. POWER ON/STANDBY button ---- Turn the unit on and standby.
3. iPod MENU button
4. iPod menu Up / Down button
5. iPod ENTER (Select) button
6. VOLUME UP(+) / DOWN(-) button ----- Adjust volume level up and down;
Adjust clock / alarm minute.
Select alarm source / level.
7. TUN+ / and TUN - / button ---
In clock/alarm set mode adjust clock / alarm hour;
In radio mode, tune the radio frequency up / down;
In iPod mode, Skip tracks Forward / Backward or perform high
speed search.
8. MUTE button ---- Mute the volume.
9. MODE / MEM button ---- In standby mode, select different setting
mode (12/24 hours display format, clock and radio reception region.
In radio mode, save preset radio station.
10. SNOOZE / DIMMER button ----- Activate the snooze function;
Turn display Dim / Bright.
11. SLEEP button ---- Select the time duration of the sleep timer.
12. VIDEO OUT ON/OFF button ----- Press to turn video output to a TV ON or OFF.
13. FUNC button ---- Select FM radio, iPod orAUX function mode.
14. ST./MONO / button --------- In radio mode, select FM radio Stereo / Mono reception.
In iPod mode, Play / Pause iPhone/iPod music.
15. PRESET+ / REPEAT button ----In radio mode, recall preset radio channel (station).
In iPod mode, iPod/iPhone music repeat playback.
16. PRESET - / SHUFFLE button --------In radio mode, Recall preset radio channel (station).
In iPod mode, iPod/iPhone music random playback.
17. ALARM button ---- Press & hold to enter alarm setting mode; Tap to turn alarm on / off.
18. BASS BOOST button ---- Select bass boost effect.
19. EQ button ---- Select preset EQ effect.
20. Battery Compartment
1
2
3
5
4
6
7
8
9
10
20
11
12
13
15
16
17
18
14
19
W166-R(JiMS-252i)_GB_ES IB.indd7 18 - 307 2012-2-28 8:36
size:148x210mm,80gms book paper,BK+BK.

GB
8
LISTENING TO YOUR iPod/iPhone
Playing iPhone / iPod music
1. Use the iPod adaptor included with your iPod (if needed) and insert it into the docking area. No adaptor
required if you use an iPhone. Your iPod/iPhone can now be inserted into the docking bay by placing
the connector on the bottom of the iPhone/iPod onto the connector in the docking station.
Note: Please be careful when seating the iPhone/iPod into the docking bay to avoid damaging the
30-pin connector on the iPhone/iPod or in the docking system.
2. Tap the / FUNCTION button on main unit or button on remote control to turn on the unit, the
power status LED indicator lights steadily.
3. Tap the / FUNCTION button on main unit or FUNC button on remote control to select iPod
mode, the indicator “iPod” displays.
4. Press the button to start iPhone/iPod music playback. Press it again to pause.
5. Adjust the sound level by pressing the VOLUME Up (+) / Down (-) button.
Note: 1.The volume level cannot be adjusted using the volume control on your iPhone/iPod after being docked.
2.The iPod/iPhone will charge in all modes.
6. To remove the iPod/iPhone from the unit, press and hold the button for three seconds to
switch off the device and then gently remove it from the docking connector.
7. Press and hold the / FUNCTION button on main unit or tap button on the remote control to
turn unit into standby mode after listenning. The power status LED lights off.
iPhone / iPod playback control
— Press the button to pause or resume the iPhone/iPod playback.
— Press the / button to skip to the next or previous song.
— Press and hold the / button for fast-forwarding or fast-rewinding during playback.
iPod/iPhone control function keys (using remote control)
- To set iPod music play-mode in random, press the SHUFFLE button.
- To set iPod music in repeat play-mode, press the REPEAT button.
- To mute the volume, press the MUTE button. Press the MUTE button again to resume
listening to the music.
- To access your iPod / iPhone menu, press the MENU button.
- To navigate and select your iPod/iPhone menu, tap the Up / Down / ENTER buttons as
from your iPod /iPhone to highlight and select desired items.
Note: 1. The iPod Menu Control function will work with most iPod touch/iPhone models in iPod mode.
Please make sure your iPod/iPhone is in Music or iPod mode. The function will NOT work if
the iPod/iPhone is on the MAIN or LOCKED screen.
2.The iPod menu navigating function of remote control will work on most iPhone
or iPod models except iPod nano 6th gen.
WATCH VIDEOS ON YOUR iPod/iPhone
The default setting of this unit is to play back video on the screen of your iPod, iPod touch and iPhone.
However, if your iPod has TV out ON/OFF selection, then you may need to set TV out of your iPod to
OFF manually.
1. Dock your iPod/iPhone carefully and securely onto the Docking Connector.
2. Tap the button on the main unit or remote control to turn on the unit. Press the FUNCTION
(FUNC) button to select iPod mode.
3. Access the video menu of your iPod/iPhone and select the video clip you want to play.
4. Press the Enter button of your iPod/iPhone, the video will start play back on the LCD screen of
your iPod/iPhone.
5. After selecting the video you wish to view and it starts to play, press the button from the main
unit or remote control to Play/Pause the video.
6. Tap the Button to advance to end of the current clip. Press and hold it during playback for fast
forward search within the clip.
ES
8
PARA ESCUCHAR SU iPod/iPhone
Reproducción de música desde su iPhone / iPod
1. Utilice el adaptador de iPod incluido con su iPod (si lo necesita), e insértelo en el área de
acoplamiento. No necesitará adaptador si utiliza un iPhone. Ahora puede insertar su iPod/iPhone
en la bahía de acoplamiento colocando del conector de la parte inferior del iPhone/iPod en el
conector de la estación de acoplamiento.
Nota: Por favor tenga mucho cuidado al colocar el iPhone/iPod en la bahía de acoplamiento para
evitar causar daños al conector de 30 pines del iPhone/iPhod, o del sistema de acoplamiento.
2. Dé un ligero golpecito al botón de / FUNCIÓN en la unidad principal o al botón en el control
remoto para encender la unidad, la luz del indicador LED se iluminará y quedará fija.
3. Dé un ligero golpecito al botón de / FUNCIÓN en la unidad principal o al botón de FUNCIÓN
del control remoto para seleccionar modalidad de iPod, aparecerá en pantalla el indicador “iPod”.
4. Oprima el botón para iniciar la reproducción de música de iPhone/iPod. Oprímalo de nuevo
para hacer una pausa.
5. Ajuste el nivel del sonido oprimiendo el botón de Subir (+) / Bajar (-) VOLUMEN.
Nota: 1.No se podrá ajustar el nivel de volumen usando el control de volumen de su iPhone/iPod
después de que lo haya acoplado.
2. En cualquiera de las modalidades el iPod/iPhone estará adquiriendo carga.
6. Para retirar el iPod/iPhone de la unidad, oprima y sostenga el botón durante tres segundos
para apagar el dispositivo y luego quítelo cuidadosamente del conector de acoplamiento
7. Oprima y sostenga el botón de / FUNCIÓN en la unidad principal o dé un ligero golpecito al
botón del control remoto para colocar la unidad en modalidad de espera después de escuchar.
La luz LED indicadora de suministro de corriente eléctrica se apaga.
Control de reproducción del iPhone / iPod
— Oprima el botón para pausar o continuar la reproducción del iPhone/iPod.
— Oprima el botón / para saltar a la melodía siguiente o anterior.
— Oprima y sostenga el botón / avanzar o retroceder rápidamente durante la reproducción.
Botones de control de funciones del iPod/iPhone (usando el control remoto)
- Para elegir la modalidad al azar durante la reproducción de música del iPod, oprima el botón
REPRODUCCIÓN ALEATORIA.
- Para elegir la modalidad de repetición durante la reproducción de música del iPod, oprima el botón REPETIR.
- Para silenciar el volumen, oprima el botón SILENCIO. Oprima de nuevo el botón SILENCIO para
volver a escuchar la música.
- Para tener acceso al menú de su iPod / iPhone, oprima el botón MENÚ.
- Para navegar y seleccionar el menú de su iPod/iPhone, dé un ligero golpecito a los botones Subir
/ Bajar / ACEPTAR como lo hace en su iPod/iPhone para resaltar y seleccionar los
elementos deseados.
Nota:1. La función de control del menú del iPod funciona con la mayoría de modelos de iPod
touch/iPhone en la modalidad de iPod.Por favor asegúrese que su iPod/iPhone se
encuentre en modalidad de Música o iPod. La función NO trabajará si el iPod/iPhone se
encuentra en la pantalla PRINCIPAL osiestá BLOQUEADO.
2. El atributo de navegación del menú del iPod en el control remoto funcionará en la mayoría
de modelos de iPhone y de iPod, excepto iPod nano 6a gen.
VEA VIDEOS EN SU iPod/iPhone
La opción pre-configurada de esta unidad es la reproducción de videos en la pantalla de su iPod, iPod
touch y iPhone. Sin embargo, si su iPod tiene selección para ENCENDIDO/APAGADO de salida de
TV, podría necesitar configurar manualmente a APAGADA la salida de TV de su iPod.
1. Acople firme pero cuidadosamente su iPod/iPhone al conector de acoplamiento.
2. Dé un ligero golpecito al botón en la unidad principal o en el control remoto para encender la
unidad. Oprima el botón de FUNCIÓN (FUNC) para seleccionar modalidad de iPod
3. Ingrese al menú de video de su iPod/iPhone y seleccione el video clip que quiera reproducir.
4. Oprima el botón Aceptar en su iPod/iPhone, para comenzar a reproducir el video en la pantalla
LCD de su iPod/iPhone.
W166-R(JiMS-252i)_GB_ES IB.indd8 18 - 829 2012-2-28 8:36
size:148x210mm,80gms book paper,BK+BK.

ES
9
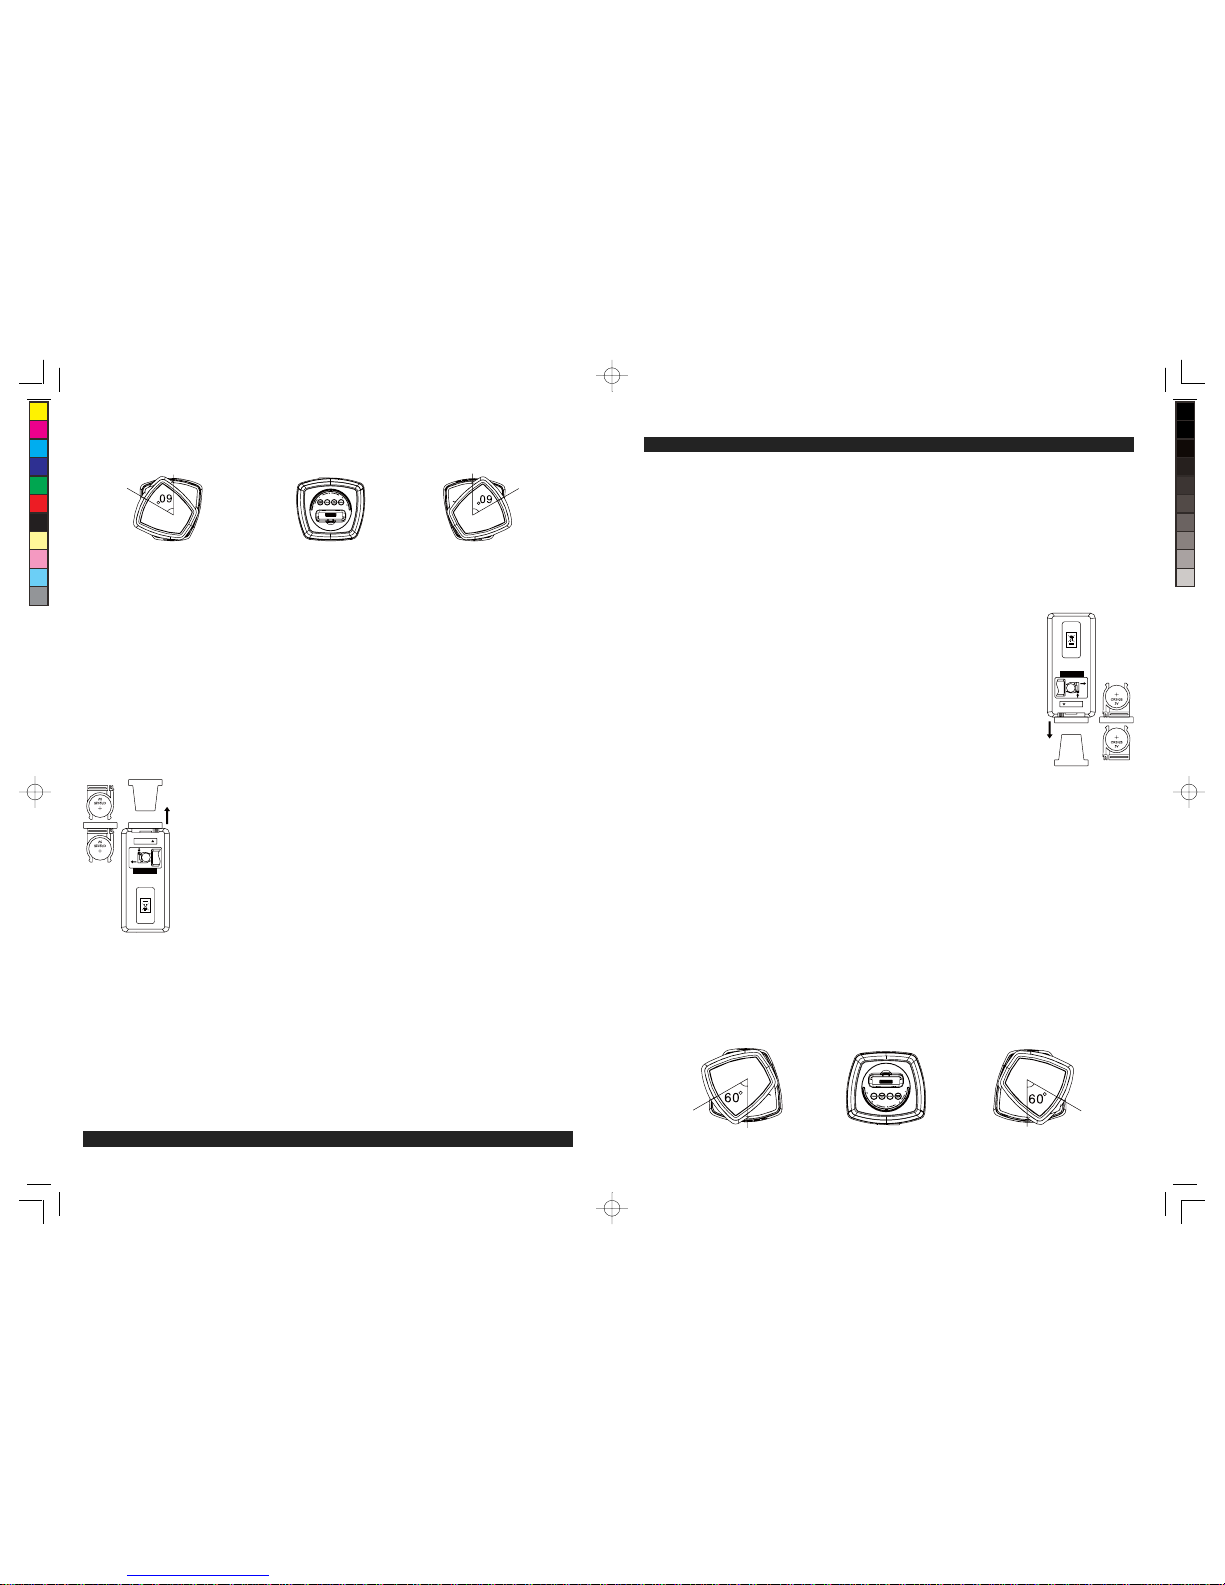
5. Después de seleccionar el video que desee ver, y que éste comience a reproducirse, oprima el
botón de la unidad principal o del control remoto para Reproducir/Pausar el video.
6. Dé un ligero golpecito al botón para avanzar al final del video clip actual. Oprímalo y
sosténgalo durante la reproducción para avanzar rápidamente dentro del clip.
7. Dé un ligero golpecito al botón para ir al inicio del clip actual. Oprímalo y sosténgalo durante
la reproducción para retroceder rápidamente dentro del clip.
8. Oprima los botones para subir (+) o bajar (-) el volumen en la unidad o en el control remoto para
ajustar el nivel de volumen.
9. Oprima el botón Silencio del control remoto para cancelar la salida del audio por los altavoces.
Oprímalo de nuevo para seguir escuchando.
CÓMO VER VIDEOS EN UNA TV (ÚNICAMENTE CON EL CONTROL REMOTO)
1. Enchufe el conector de salida de Video del JiMS-252i a la entrada compuesta de video de su TV
externa, con un cable de video adecuado (no incluido).
2. Acople firmemente su iPod o iPhone con video.
3. Dé un ligero golpecito al botón para encender la unidad y seleccionar modalidad de iPod.
4. Ingrese al menú de video de su iPod/iPhone y seleccione el video clip que quiera reproducir. Éste
se reproducirá en la pantalla LCD de su iPod/iPhone.
Nota: Para el iPod nano (a partir de la 3a generación), iPod video y iPod classic, seleccione el menú
de“Videos” o “Podcasts” para ubicar sus video clips favoritos en la pantalla LCD del dispositivoApple.
5. Dé un ligero golpecito al botón en el control remoto para reproducir o pausar.
6. El control remoto tiene un botón de “ENCENDIDO/APAGADO DE LA SALIDA DE VIDEO". Si
usted está usando un iPod touch o iPhone, dé un ligero golpecito al botón ENCENDIDO/
APAGADO, en cuanto el control remoto apunte hacia el Infrarrojo. El sensor de la unidad principal
cambiará la forma como se despliega el video.
7. Dé un ligero golpecito a la pantalla del disposit
ivo de Apple, u oprima los botones de MENÜ / en
el control remoto para seleccionar el video que
usted quiera reproducir y luego oprima el botón
ACEPTAR. Su dispositivo Apple mostrará en la pantalla el mensaje "TV conectada" y comenzará
a reproducir el video en la pantalla externa de TV.
8. Puede cambiar el video para reproducirlo en la pantalla del dispositivo Apple (pre-configurada) o
por la salida de video oprimiendo el BOTÓN DE VIDEO ENCENDIDO/APAGADO y luego
seleccionando para reproducir un video de su biblioteca de videos.
Si está usando un iPod touch o iPhone
1). Durante la reproducción de video en la pantalla externa de TV, dé un ligero golpecito al botón
ENCENDER/APAGAR SALIDA DE VIDEO para pausar la reproducción actual y regresar
automáticamente a la pantalla de la biblioteca de películas de su iPod/iPhone.
2). Seleccione el mismo, u otro, video clip de la biblioteca y luego oprima el botón ACEPTAR.
Iniciará la reproducción de video en su pantalla de iPod/iPhone.
3). Repita los pasos anteriores 1) - 2) durante la reproducción de video en su pantalla de
iPod/iPhone para cambiar de nuevo a la salida externa de pantalla de TV.
Si está usando un iPod nano, iPod classic o iPod video
1). Durante la reproducción de video en la pantalla externa de TV, dé un ligero golpecito al botón
ENCENDER/APAGAR SALIDA DE VIDEO, y la película continuará reproduciéndose.
2). Dé un ligero golpecito al botón MENÚ en el control remoto de su iPod para regresar
manualmente a la pantalla de la biblioteca de películas.
3). Seleccione el mismo, u otro, video clip de la biblioteca y luego oprima el botón ACEPTAR.
Iniciará la reproducción de video en su pantalla de iPod/iPhone.
4). Repita los pasos anteriores 1) - 3) durante la reproducción de video en su pantalla de
iPod/iPhone para cambiar de nuevo a la salida externa de pantalla de TV.
9. Oprima los botones para subir (+) o bajar (-) el volumen en la unidad o en el control remoto para
ajustar el nivel de volumen.
Nota: Si quita el iPod touch / iPhone del conector de acoplamiento y lo vuelve a acoplar después, el
dispositivo Apple regresará a su modalidad pre-configurada de reproducción y los videos se
reproducirán en la pantalla de su dispositivo Apple. Siga las instrucciones anteriores una vez más para
configurar la salida de TV de su dispositivo Apple, si desea ver sus videos en la pantalla de TV.
GB
9
7. Tap the Button to go to the start of current clip. Press and hold it during playback for fast
backward search within the clip.
8. Press the Volume Up (+) and Volume Down (-) buttons on the unit or remote to adjust the volume
output level.
9. Press the Mute Button of the remote to cut off the audio output from the speakers. Press again to
resume listening.
HOW TO WATCH VIDEOS ON A TV (REMOTE CONTROL ONLY)
1. Connect the Video Out Jack of the JiMS-252i to the composite video input of your external TV with
a suitable video cable (not included).
2. Securely dock your iPod or iPhone with video.
3. Tap the button to turn on the unit and select iPod mode.
4. Access the video menu of your iPod/iPhone and select the video clip you want to play. It will be
played back on the LCD screen of your iPod/iPhone.
Note: For the iPod nano (3rd generation and up), iPod video and iPod classic, select the Videos or
Podcasts menu to locate your favorite video clips on the Apple device s LCD screen.
5. Tap the button on remote to play or pause.
6. The remote control features a Video Out On/Off" Button. If you are using iPod touch or iPhone,
tap the Video Out On/Off Button once when the remote is pointing towards the IR Sensor on the
main unit will change how the video is displayed.
7. Tap the Apple device s screen or press the MENU
/
buttons on the remote control to select the
video you want to play and then press the ENTER button. Your Apple device will show TV
Connected message on its screen and the video will begin playing on the external TV screen.
8. The video can be switched between the local Apple device screen (default) and Video-out by
pressing VIDEO OUT ON/OFF button and then select a video from video library to play.
If you are using an iPod touch or iPhone
1). During video playback on the external TV screen, tap the VIDEO OUT ON/OFF button once will
pause current video playback and automatically return to the movie library screen of your
iPod/iPhone.
2). Select the same or other video clip from the library and then press the ENTER button. It will
start video playback on your iPod/iPhone screen.
3). Repeat above steps 1) - 2) during video playback on your iPod/iPhone screen will switch video
out to the external TV screen again.
If you are using an iPod nano, iPod classic or iPod video
1). During video playback on the external TV screen, tap the VIDEO OUT ON/OFF button once,
the movie will carry on playback.
2). Tap the MENU button of the remote control or your iPodto return to the movie library screen manually.
3). Select the same other video clip from the library and then press the ENTER button. It will start
video playback on your iPod/iPhone screen.
4). Repeat above steps 1) – 3) during video playback on your iPod/iPhone screen will switch video
out t o the external TV screen again.
9. Press the Volume Up (+) / Down (-) buttons on the unit or remote to adjust the sound output level.
Note: If you remove the iPod touch / iPhone from the docking connector and dock it again later, the
Apple device will revert back to its default play mode and play videos on the screen of the Apple
device. Follow the instructions above again to set the TV Out of your Apple device if you want to
watch its videos on a TV.
W166-R(JiMS-252i)_GB_ES IB.indd 9 18 - 28 9 2012-2-28 8:36
size:148x210mm,80gms book paper,BK+BK.

GB
10
LISTENING TO THE FM RADIO
FM Antenna
Fully extend the FM antenna wire for the best FM radio reception.
Radio Tuning
1. Press the button to turn on the unit.
2. Tap the / FUNCTION button on main unit or FUNC button on remote to select FM radio mode,
the radio indicator ĀFMādisplays.
3. To manually tune to a desired station, repeatedly press the TUN +/- / button.
4. To automatically search for stations with strong signals, press and hold the TUN+/- /
button until the frequency digits on display begins to scan then release the button. The tuner will
stop on the first strong signal it finds.
5. Press the Volume Up (+) and Volume Down (-) buttons on the unit or remote to adjust the volume output level.
6. If necessary, you may tap the ST./MONO button to select stereo (the stereo indicator displays)
or mono (the indicator is off) reception.
7. Press and hold the / FUNCTION button on main unit or tap button on the remote control to
turn unit into standby mode after listenning. The power status LED lights off.
Notes:
- Manual tune to select weaker stations that might be skipped during automatic tuning.
- If the automatic tuning does not stop on the exact frequency of the station, for example, it
stops on 88.9 MHz instead of 88.8 MHz, use the manual tuning method to "fine tune" to the
exact frequency of the desired station.
- If you dock an iPod or iPhone for charging while listening to the radio, the unit will
automatically switch to iPod mode for authentication. Wait a few seconds, then tap the
FUNCTION button twice to switch the unit back to FM radio mode.
Radio Preset Stations
The unit allows you to store up to 20 FM stations for easy recall at any time.
Setting Preset Stations
Auto Preset
1. Tap the button to turn on the unit.
2. Tap the FUNCTION (FUNC) button to select FM radio mode.
3. Press and hold the MODE / MEM button for auto preset. The tuner will automatically scan for stronger
radio stations from low frequency to high frequency and then store them in the preset channels.
Manual Preset
1. Tap the button to turn on the unit.
2. Tap the FUNCTION (FUNC) button to select FM radio mode.
3. Tune to the radio station you want to store in memory by using the TUN +/- / button.
4. Tap the MEM button. The preset channel number appears on display and blinks.
5. To select desired preset station number, tap the / button on the main unit or PRESET +/-
button on the remote control.
6. To confirm preset location, tap the MEM button.
7. Repeat steps 3 to 6 to store other stations if necessory.
Notes:
- There is a 5 seconds delay when programming, after 5 seconds, the unit will automatically
switch back to normal tuner mode.
- You can overwrite a preset station by overwriting and storing the new frequency in its place.
Recalling a Preset Station
1. Tap the button to turn on the unit.
2. Tap the FUNCTION (FUNC) button to select FM radio receiving mode.
3. To select desired preset channel, tap the PRESET button and then the / button from the
main unit or press the PRESET +/- button from the remote control directly.
ES
10
PARA ESCUCHAR RADIO FM
Antena FM
Extienda totalmente la antena de cable FM para obtener la mejor recepción.
Sintonía del Radio
1. Oprima el botón para encender la unidad.
2. Dé un ligero golpecito al botón de / FUNCIÓN en la unidad principal o al botón de FUNCIÓN del
control remoto para seleccionar modalidad de Radio FM, el indicador “FM” aparecerá en pantalla.
3. Para sintonizar manualmente su radiodifusora favorita, oprima repetidamente el botón
SINTONIZAR +/- /.
4. Para efectuar una búsqueda automática de radiodifusoras con buena señal, oprima y sostenga el
botón SINTONIZAR+/- / hasta que aparezca la secuencia de los dígitos de las
frecuencias en la pantalla, y luego suelte el botón. El sintonizador se detendrá en la primera señal
fuerte que encuentre.
5. Oprima los botones para subir (+) o bajar (-) el volumen en la unidad o en el control remoto para
ajustar el nivel de volumen.
6. Si fuera necesario, dé un ligero golpecito al botón ESTÉREO/MONO para seleccionar la recepción
estéreo (aparecerá el indicador de estéreo , o bien mono (en el cual el indicador estará
apagado .
7. Oprima y sostenga el botón de / FUNCIÓN en la unidad principal o dé un ligero golpecito al
botón del control remoto para colocar la unidad en modalidad de espera después de escuchar.
Se apagará la luz LED indicadora de suministro de corriente eléctrica.
Notas:
- Sintonice manualmente las estaciones más débiles que podrían pasar desapercibidas durante la
sintonización automática.
- Si la sintonización automática no se detiene en la frecuencia exacta de la radiodifusora, por
ejemplo, si se detiene en 88.9 MHz y no en 88.8 MHz, use el método manual de sintonización
para "afinar" la sintonía a la frecuencia exacta de la radiodifusora.
- Si acopla su iPod o iPhone para cargarlo mientras escucha radio, la unidad cambiará
automáticamente a modalidad de iPod para autenticación. Espere unos segundos, luego dé dos
ligeros golpecitos al botón de FUNCIÓN para regresar a la modalidad de radio FM.
Estaciones de Radio Pre-configuradas
La unidad le permite almacenar en la memoria hasta 20 estaciones FM y reactivarlas en cualquier momento.
Configuración de Estaciones en la Memoria
Auto-configuración
1. Oprima el botón para encender la unidad.
2. Dé un ligero golpecito al botón FUNCIÓN (FUNC) para seleccionar la modalidad de radio FM .
3. Oprima y sostenga el botón MODALIDAD / MEM para hacer la pre-configuración. El sintonizador
escaneará automáticamente las estaciones más fuertes, desde una baja frecuencia hasta una alta
frecuencia, y luego las almacenará en los canales pre-configurados.
Pre-configuración Manual
1. Dé un ligero golpecito al botón para encender la unidad.
2. Dé un ligero golpecito al botón FUNCIÓN (FUNC) para seleccionar la modalidad de radio FM.
3. Sintonice la estación de radio que quiera guardar en la memoria, usando el botón
SINTONIZADOR +/- /.
4. Dé un ligero golpecito al botón MEM. En la pantalla aparecerá y parpadeará el número de canal
pre-configurado.
5. Para seleccionar el número deseado para la estación pre-configurada, dé un ligero golpecito al
botón / en la unidad principal o al botón PRE-CONFIGURAR +/- en el control remoto.
6. Para confirmar la ubicación pre-configurada, dé un ligero golpecito al botón MEM.
7. Repita los pasos del 3 al 6 para guardar otras estaciones si lo desea.
W166-R(JiMS-252i)_GB_ES IB.indd10 18 - 1027 2012-2-28 8:36
size:148x210mm,80gms book paper,BK+BK.

ES
11
Notas:
- Hay una demora de 5 segundos al programar, después de 5 segundos, la unidad
automáticamente regresará a modalidad normal de radio.
- Se puede sobrescribir una estación pre-configurada y guardar una nueva frecuencia en su lugar.
Para activar una estación pre-configurada
1. Dé un ligero golpecito al botón para encender la unidad.
2. Dé un ligero golpecito al botón FUNCIÓN (FUNC) para seleccionar la modalidad de recepción de radio FM.
3. Para seleccionar el canal pre-configurado que desea, dé un ligero golpecito al botón
PRE-CONFIGURAR y luego al botón / en la unidad principal u oprima el botón
PRE-CONFIGURAR +/- en el control remoto.
Selección del sistema de radio difusión
Si está unidad se usa en otro país con sistemas ligeramente distintos, usted puede ajustarla a los
sistemas de radiodifusión de los EE. UU, UNIÓN EUROPEA, Japón yAustralia.
1. Encienda la unidad en modalidad de espera, dé ligeros golpecitos repetidamente al botón de
MODALIDAD hasta que la pantalla muestre parpadeando el indicador “USA”, “EUr”, “JAP” o “AUS”.
2. Dé un ligero golpecito al botón de VOLUMEN + / - para seleccionar uno de los siguientes
sistemas de radiodifusión.
Sistema de Radiodifusiónde los EstadosUnidos Paso de sintonización FM 87.5 – 108 MHz, 0.1MHz
Sistema de Radiodifusión de la Unión Europea (EUr) Paso de sintonización FM 87.5 – 108 MHz, 0.05MHz
Sistema de Radiodifusión de Japón Paso de sintonización FM 76.0 – 90 MHz, 0.1MHz
Sistema de Radiodifusión de Australia Paso de sintonización FM 87.5 – 108 MHz, 0.05MHz
3. Para guardar esta configuración y salir de esta modalidad, dé un ligero golpecito en el botón
MODALIDAD.
ENTRADA AUXILIAR
Esta unidad tiene una entrada auxiliar de audio para conectarla con dispositivos externos como
reproductores MP3, reproductores de CD y para escuchar sus fuentes externas de audio a través de
los altavoces de este sistema.
1. Use un cable de audio (no incluido) con enchufe de 3.5 mm en cada extremo.
2. Conecte uno de los extremos al conector de ENTRADA AUXILIAR en el respaldo de la unidad.
3. Enchufe el otro extremo del cable al conector de la línea de salida o conector de audífonos de su
dispositivo externo de audio.
4. Encienda su dispositivo externo.
5. Para seleccionar la línea auxiliar de audio, dé un ligero golpecito al botón de FUNCIÓN (FUNC) hasta que
el indicador despliegue “AUX”.
6. Ahora podrá controlar el nivel de volumen a través de su unidad principal. Opere todas las demás
funciones en el dispositivo auxiliar como siempre.
Nota:
-Si ya conectó la línea de salida de su dispositivo externo, entonces solo necesita ajustar el control
de volumen de esta unidad. Si usted conectó la salida de audífonos de su dispositivo externo,
entonces necesitará ajustar el control de volumen de su dispositivo externo y también el control de
volumen de esta unidad para encontrar el volumen de su preferencia.
- Si acopla su iPod o iPhone para que adquiera carga mientras está en modalidad AUX, la unidad
cambiará automáticamente a modalidad de iPod para autenticación. Espere algunos segundos,
luego dé un golpecito al botón de FUNCIÓN para regresar a la modalidad AUX.
-Oprima y sostenga el botón en la unidad principal o dé un ligero golpecito al botón en el
control remoto para que el sistema entre a modalidad de espera cuando usted haya terminado de
escuchar. No olvide también apagar la corriente de su dispositivo externo.
GB
11
Radio Broadcast System Selection
If this unit is used in a different country with slightly different radio broadcast systems, you can adjust
the system to select USA, EU, Japan and Australia broadcasts.
1. Turn the unit to standby mode, tap the MODE button repeatedly until the display shows the blinking
“USA”, “EUr”, “JAP” or “AUS” indicator.
2. Tap the VOLUME + / - button to select one of the following broadcasting systems.
USA’s Radio Broadcast System FM 87.5 – 108 MHz, 0.1MHz tuning step
EU’s Radio Broadcast System FM 87.5 – 108 MHz, 0.05MHz tuning step
Japan’s Radio Broadcast System FM 76.0 – 90 MHz, 0.1MHz tuning step
Australia’s Radio Broadcast System FM 87.5 – 108 MHz, 0.05MHz tuning step
3. To save the setting and exit the setting mode, tap the MODE button.
AUXILIARY INPUT
This unit provides an auxiliary audio signal input for connecting external audio devices MP3 players,
CD players and listen to your external source through the speakers of this system.
1. Use an audio cable (not included) with one 3.5 mm stereo plug on each end of the cable
2. Plug one end into the AUX-IN Jack located at the back of the unit.
3. Plug the other end of the cable to a Line Out Jack or Headphone Jack of your external audio
device.
4. Turn on the external audio device.
5. To select auxiliary audio input, tap the FUNCTION (FUNC) button until the “AUX” indicator
displays.
6. The volume level can now be controlled through the main unit. Operate all other functions on the
auxiliary device as usual.
Note:
- If you connected the Line-Out Jack of your external device then you only need to adjust the volume
control of this unit. If you're connected the Headphone Jack of your external device, then you may
need to adjust both the volume control of your external device and the volume control of this unit to
find the most desirable volume setting.
- If you dock iPod or iPhone for charging during listening to AUX mode, the unit will automatically
switch to iPod mode for authentication. Wait for few seconds, then tap the FUNCTION button once
to switch unit back to AUX mode.
- Press and hold the button on the main unit or tap button on the remote control to place the
system into standby mode when you finish listening. Don't forget to switch off the power of your
external device as well.
W166-R(JiMS-252i)_GB_ES IB.indd11 18 - 2611 2012-2-28 8:36
size:148x210mm,80gms book paper,BK+BK.

GB
12
PRESET EQ AND BASS BOOST(REMOTE CONTROL ONLY)
Preset EQ
The unit provides 4 preset EQ settings for your selection.
To select the preset EQ [JAZZ , CLASSIC, ROCK, POP , (OFF)] in either radio, AUX (auxiliary) or iPod
mode, tap the EQ button from the remote control. The corresponding indicator shows on display.
You can select the desired effect by tapping the "EQ" button on remote control repeatedly at following
sequence: OFF JAZZ CLASSIC ROCK POP
Bass / Treble Adjustment
1. Press and hold EQ button from the remote control, “BASS“ indicator displays. Tap the TUN + / -
/ button to increase or decrease bass level.
2. Tap the EQ button again, “TRE” indicator displays. Tap the TUN + / - / button to increase
or decrease treble level.
3. BASS, TRE or BASS/TRE indicator will show on display if you have set their level other than “0”.
Bass Boost function
If necessary, you can enhance the bass boost effect by tap the BASS BOOST button from the remote control.
1. Tap the BASS BOOST button once, it will cancel your previous EQ setting and jump to bass boost
effect immediately. “BASS” indicator will display.
2. Tap the BASS BOOST button again, it will resume to your previous EQ setting. “BASS” indicator
will disappear form display.
Note:
- Only either one of “Preset EQ”, “Bass/Treble” or “Bass Boost” sound effect operates at a time.
- If you have set bass effect in Bass/Treble Adjustment section, “BASS” indicator will be always
showing on the display even you tap the BASS BOOST button.
CLOCK SETTING
When the unit is in standby mode,
Set 12/24 Hour format
1. Tap the MODE button once entering 12/24 hour format setting mode.
2. Tap the VOLUME +/- button to select 12 or 24 hour display format.
Set Clock
3. Tap the MODE button again and the clock hour and minute digits blink.
4. Tap the TUN +/- / button repeatedly to set hour. Press and hold the buttons to speed the
forward or reverse scanning of the digits.
Note: Make sure the hour is set so that the AM or PM indicators are displayed correctly.
5. Tap the VOLUME +/- button repeatedly to set minute. Press and hold the buttons to speed the
forward or reverse scanning of the digits.
Exit setting mode
6. Tap the MODE button after clock set, radio region will blink & default setting is “USA”.
7. To save all settings without change radio region and exit the setting mode, tap the MODE button
twice or wait for a few seconds.
ES
12
PRE-CONFIGURACIÓN DEL ECUALIZADOR (EQ) Y AMPLIFICADOR DE
BAJOS (ÚNICAMENTE EN EL CONTROL REMOTO)
Pre-configuración del Ecualizador (EQ)
La unidad proporciona cuatro configuraciones EQ.
Para elegir entre [JAZZ , CLÁSICA, ROCK, POP , (APAGADO)] en cualquiera de las modalidades de
radio, AUX (auxiliar) o iPod, dé un ligero golpecito al botón EQ desde el control remoto. Aparecerá el
indicador correspondiente en la pantalla.
Usted puede elegir su efecto favorito dando ligeros golpecitos repetidos al botón "EQ" en el control
remoto, en la secuencia siguiente:
APAGADO JAZZ CLÁSICA ROCK POP
Ajuste para tonos bajos / altos
1. Oprima y sostenga el botón EQ en el control remoto, y aparecerá el indicador "BASS" (para tonos
bajos). Dé un ligero golpecito al botón SINTONIZADOR + / - / para aumentar o reducir el
nivel de los bajos.
2. Dé un ligero golpecito una vez más al botón EQ y aparecerá el indicador “TRE” (para tonos
altos). Dé un ligero golpecito al botón SINTONIZADOR + / - / para aumentar o reducir el
nivel de los tonos altos.
3. El indicador BASS, TRE o BASS/TRE aparecerá en la pantalla, si la configuración del nivel no es “0”.
Función de amplificación de bajos
Si fuera necesario, puede mejorar el efecto de los tonos bajos dando un golpecito al botón AMPLIFICADOR DE
BAJOS en el control remoto.
1. Al dar un solo golpecito al AMPLIFICADOR DE BAJOS, se cancelará su configuración anterior del
EQ y saltará de inmediato al efecto de amplificación de bajos. Aparecerá en la pantalla el
indicador “BASS” (tonos bajos).
2. Dé un ligero golpecito de nuevo al botón AMPLIFICADOR DE BAJOS, y regresará a la configuración
anterior del ecualizador. El indicador “BASS” (tonos bajos) desaparecerá de la pantalla.
Nota:
- Solo se puede utilizar uno de los efectos del ecualizador a la vez, “EQ pre-configurado”, “Tonos
bajos/altos” o “Amplificador de bajos”.
- Si tiene el efecto de bajos en la sección Tonos bajos/altos, el indicador de BAJOS siempre
aparecerá en la pantalla aún si aplica el botón AMPLIFICADOR DE BAJOS.
CONFIGURACIÓN DEL RELOJ
Cuando la unidad está en modalidad en espera,
Configure el formato de las horas 12/24
1. Dé un ligero golpecito al botón MODALIDAD para ingresar a la modalidad de hora 12/24.
2. Dé un ligero golpecito al botón VOLUMEN +/- para seleccionar el formato de pantalla en 12 horas o 24 horas.
Configuración del reloj
3. Dé un ligero golpecito una vez más al botón de MODALIDAD y aparecerán parpadeando los
dígitos de horas y de minutos del reloj.
4. Dé golpecitos repetidamente al botón SINTONIZADOR +/- / para configurar la hora.
Oprima y sostenga los botones para adelantar o retroceder rápidamente revisando los dígitos.
Nota: Asegúrese de configurar la hora de modo que los indicadores de AM oPM estén correctos.
5. + / - para configurar los minutos. Oprima y sostenga los botones para adelantar o retroceder
rápidamente en la secuencia de dígitos.
Para salir de la modalidad de configuración
6. Dé un ligero golpecito al botón MODALIDAD después de configurar el reloj, la región para la radio
aparecerá parpadeando y la región pre-configurada es la de los Estados Unidos “USA”.
7. Para guardar todas las configuraciones sin cambiar la región de radio y salir de la modalidad de
configuración, dé dos ligeros golpecitos al botón MODALIDAD o espere unos cuantos segundos.
W166-R(JiMS-252i)_GB_ES IB.indd12 18 - 1225 2012-2-28 8:36
size:148x210mm,80gms book paper,BK+BK.

ES
13
OPERACIÓN DE LA ALARMA
Configuración de la Alarma 1
1. Con la unidad en modalidad en espera, oprima y sostenga el botón de ALARMA hasta que
aparezcan parpadeando los dígitos de Alarma 1.
2. Dé golpecitos repetidamente al botón SINTONIZADOR +/- / para configurar la hora de la alarma.
3. Dé golpecitos repetidamente al botón VOLUMEN +/- para configurar los minutos de la alarma.
Nota: Oprima y sostenga el botón de / o VOLUMEN +/- para retroceder o adelantar
rápidamente en la secuencia de dígitos.
4. Dé un ligero golpecito una vez más al botón de ALARMA y el indicador del origen de la alarma,
“iPod / BEEP (pitido) / RADIO”, aparecerá parpadeando en la pantalla.
5. Dé un ligero golpecito en el botón VOLUMEN +/- para seleccionar el origen de la alarma como
iPod, Pitido o radio.
Al seleccionar despertar con iPhone/iPod, aparecerá parpadeando el indicador “iPod”.
Al seleccionar despertar con el pitido de la alarma, aparecerá parpadeando el indicador de pitido “BEEP”.
Al seleccionar despertar con radio, aparecerá parpadeando el indicador “RADIO”.
Configure el nivel de sonido máximo de la alarma (aplica únicamente al despertar con iPhone/iPod o radio)
6. Oprima el botón de ALARMA y en la pantalla aparecerán los dígitos del volumen.
7. Oprima el botón de VOLUMEN +/- para configurar el nivel de volumen máximo que usted prefiera
para la alarma.
Configuración de la Alarma 2
8. Oprima el botón de ALARM una vez más y aparecerán parpadeando los dígitos de Alarma 2.
9. Repita los pasos del 2 al 8 anteriores para configurar la alarma 2 mientras la pantalla LCD muestra
el indicador de alarma 2 .
10. Dé un ligero golpecito al botón de ALARMA para finalizar la configuración de la doble alarma.
Para salir de la modalidad de configuración de alarma
Para guardar la configuración de la Alarma 1 y salir de la modalidad de configuración sin haber configurado
la Alarma 2, espere unos cuantos segundos.
Habilitar la alarma diaria
1. Dé un ligero golpecito en el botón de Alarma 1, y la pantalla desplegará el indicador de Alarma 1 .
2. Dé un ligero golpecito una vez más en el botón de Alarma, y la pantalla desplegará el indicador de
Alarma 2 .
3. Dé un ligero golpecito una vez más al botón de ALARMA para habilitar la Alarma 1 y la Alarma 2, en la
pantalla aparecerán los dos indicadores, Alarma 1&2.
4. Para deshabilitar todas las alarmas, dé un ligero golpecito al botón de ALARMA una vez más hasta
que todos los indicadores de alarma desaparezcan de la pantalla.
Nota:
-Para activar la alarma diaria, el indicador del origen de la alarma “ iPod / PITIDO / RADIO”
deberán aparecer en la pantalla.
- Cuando seleccione "Despertar con el radio", asegúrese que la estación que usted quiere escuchar
sea la sintonizada
- Cuando seleccione “Despertar con iPod/iPhone”, asegúrese que la música que quiere escuchar
en su iPod/iPhone sea la seleccionada antes de colocar la unidad en modalidad en espera. Si
seleccionó "Despertar con iPhone/iPod” pero su iPod/iPhone no está acoplado, el origen de
alarma automáticamente pasará a Pitido, al llegar la hora de activación de la alarma.
Alarma de pitido
* Al llegar la hora de activación de la alarma, el indicador de origen de la alarma aparece
parpadeando y el pitido de la alarma suena por tres minutos.
* Si no se oprime ningún botón, automáticamente entrará a la función de ciclos para dormitar. El
indicador de origen de la alarma estará parpadeando. La alarma apaga la función de dormitar
(más o menos a los 10 minutos) y se reanuda el ciclo de activación de la alarma.
GB
13
A
LARM OPERATION
Setting Alarm 1
1. With the unit in standby mode, press and hold the ALARM button until the Alarm 1 time digits blink.
2. Tap the TUN +/- / button repeatedly to set alarm hour.
3. Tap the VOLUME +/- button repeatedly to set alarm minute
Note: Press and hold the / or VOLUME +/- button to speed the forward or reverse scanning of
the digits.
4 Tap the ALARM button again and source indicator “iPod / BEEP / RADIO” blinks on display.
5. Tap the VOLUME +/- button to select wake up alarm source from iPod, Beep or radio.
To select wake to iPhone/iPod, the “iPod” indicator blinks.
To select wake to beep alarm, the “BEEP” indicator blinks.
To select wake to radio, the “RADIO” indicator blinks.
Set maximum alarm sound level (apply to wake to iPhone/iPod or radio only)
7. Press the ALARM button and the volume level digits display.
8. Press the VOLUME +/- button to set maximum alarm sound level you desired.
Setting Alarm 2
9. Press the ALARM button once more and the Alarm 2 time digits blink.
10. Repeat steps 2 to 8 above to set alarm 2 while the LCD shows the alarm 2 indicator .
11. Tap the ALARM button to finish dual alarms set up.
Exit alarm setting mode
To save settings of Alarm 1 and exit the setting mode without setting Alarm 2, wait for few seconds.
Enable daily alarm
1. Tap the ALARM button once to enable alarm 1, the alarm 1 indicator displays.
2. Tap the ALARM button again to enable alarm 2, the alarm 2 indicator displays.
3. Tap the ALARM button once more to enable both alarm 1 & 2, the alarm 1&2 indicators
display.
4. To disable all alarms, tap the ALARM button again until all alarm indicators disappear from display.
Note:
-To activate the daily alarm, the alarm source indicator “ iPod / BEEP / RADIO” should appear on
the display.
- When "Wake to Radio" is selected, make sure the radio station you want to wake to is tuned.
- When “Wake to iPod/iPhone” is selected, make sure the music that you want to play on your
iPod/iPhone is selected before you place the unit into standby mode. If "Wake to iPhone/iPod” is
selected but your iPhone/iPod has not been docked, the alarm source will be redirected to the
Beep alarm automatically when the alarm time is reached.
Wake to Beep alarm
* When the alarm time is reached, the alarm source indicator blinks and the beep alarm will sound
for three minutes.
* It goes into auto-Snooze mode if no button has been pressed. The alarm source indicator blinks.
The alarm turns off for the snooze time (around 10 minutes) then comes on again.
* You may activate the snooze function after the alarm sounds by pressing the SNOOZE
button. The alarm stops for the snooze time (around 10 minutes) then comes again.
* The snooze operation (including auto-snooze and manual snooze) can be repeated 3 times.
* To cancel the snooze before it expires, press the ALARM button.
* To stop the alarm immediately after the beep alarm sounds, you can also press the ALARM
button. It resets itself for the following day.
W166-R(JiMS-252i)_GB_ES IB.indd13 18 - 2413 2012-2-28 8:36
size:148x210mm,80gms book paper,BK+BK.

GB
14
ALARM OPERATION
Wake to Radio, iPhone/iPod
* When the alarm time is reached, the selected alarm source Radio or iPhone/iPod will automatically
turn on. It starts softly and gradually becomes louder. The alarm source indicator blinks.
* It plays for 30 minutes then shuts off and resets itself for the following day.
* During the activation of the alarm source, you may press the SNOOZE button to activate the
snooze function. The alarm stops for the snooze time (around 10 minutes) then turns on again.
* The snooze operation can be repeated 3 times.
* To cancel the snooze before it expires, press the ALARM button.
* To stop the alarm immediately after the alarm sounds, you can also press the ALARM
button. It resets itself for the following day.
Note: “Wake to iPhone/iPod” will not sound if you place your JiMS-252i into standby mode when
watching a video, please make sure you set your iPhone/iPod to music playback mode prior to going to
sleep.
SLEEP TIMER FUNCTION (BY REMOTE CONTROL)
Sleeptotimer
This feature allows you to fall asleep to the radio or iPhone/iPod music to 120 Minutes.
The unit shuts off automatically when the time expires.
1. Press the button to turn the unit on.
2. Either tune to the desired radio station in radio mode or playback music from iPhone/iPod.
3. To select the sleep timer to turn the unit off after 15, 30, 45, 60, 90 or 120 minutes, press the
SLEEP button from the remote control repeatedly. The display shows the sleep time and the sleep
indicator . The unit plays for the selected length of time then automatically turns off.
4. To turn the unit off before the sleep timer counts down to zero, press and hold the button at any
time.
Notes:
* To check the remaining sleep time, tap the SLEEP button once from the remote control.
* If you are falling asleep to music from an external device connected to the AUX input, the sleep
timer will shut off the power to this system but it will not turn off the external device.
ES
14
* Usted puede activar la función de ciclos para dormitar después de que suene la alarma
oprimiendo el botón DORMITAR. La alarma apaga la función de dormitar (más o menos a los 10
minutos) y se reanuda el ciclo de activación de la alarma.
* La función de dormitar (incluyendo dormitar automática y dormitar manual) puede repetirse 3 veces.
* Para cancelar la función de Dormitar antes de que termine, oprima el botón de ALARMA.
* Para detener la alarma inmediatamente después de que suene el pitido, también puede oprimir el
botón de ALARMA. La alarma se reconfigura automáticamente para el día siguiente.
Despertar con Radio, iPhone/iPod
* Al llegar la hora de activación de la alarma, el origen de la alarma seleccionado, Radio o
iPhone/iPod, funcionará automáticamente. Comenzará a escucharlo suavemente e irá
aumentando el volumen gradualmente. El indicador de origen de la alarma estará parpadeando.
* Funcionará durante 30 minutos y luego se apagará, reconfigurándose automáticamente para
funcionar al día siguiente.
* Durante la activación de la alarma, usted puede oprimir el botón DORMITAR para activar la
función de ciclos para dormitar. La alarma apaga la función de dormitar (más o menos a los 10
minutos) y se reanuda el ciclo de activación de la alarma.
* La función de dormitar puede repetirse 3 veces.
* Para cancelar la función de Dormitar antes de que termine, oprima el botón de ALARMA.
* Para detener la alarma inmediatamente después de que suene, también puede oprimir el botón de
ALARMA . La alarma se reconfigura automáticamente para el día siguiente.
Nota: “Despertar con iPhone/iPod” no funcionará si usted coloca su JiMS-252i en modalidad en espera
mientras mira un video, por favor antes de irse a dormir asegúrese de colocar su iPhone/iPod en
modalidad de reproducción musical.
FUNCIÓN DE TEMPORIZADOR PARA QUEDARSE DORMIDO (A CONTROL
REMOTO)
Duerma con el temporizador
Este atributo le permite quedarse dormido con la música de radio o de su iPhone/iPod que funcionará
hasta por 120 minutos.
La unidad se apaga automáticamente cuando termina el plazo.
1. Oprima el botón para encender la unidad.
2. Sintonice su estación favorita en modalidad de radio, o coloque la modalidad de reproducción de
música de su iPhone/iPod.
3. Para seleccionar el plazo del temporizador para dormir a 15, 30, 45, 60, 90 o 120 minutos, oprima
el botón DORMIR repetidamente en el control remoto. La pantalla muestra el tiempo para dormir y
el indicador de dormir . La unidad funcionará durante el período de tiempo seleccionado y
luego se apagará automáticamente.
4. Para apagar la unidad antes de que el conteo en reversa de los minutos llegue a cero, en cualquier
momento oprima y sostenga el botón .
Notas:
* Para revisar cuánto tiempo queda de la función para dormirse con el temporizador, dé un ligero
golpecito al botón DORMIR en el control remoto.
* Si usted está escuchando música para quedarse dormido y ésta música proviene de un dispositivo
externo conectado al conector AUX, el temporizador apagará el suministro de corriente para este
sistema, pero no apagará el del dispositivo externo.
W166-R(JiMS-252i)_GB_ES IB.indd14 18 - 1423 2012-2-28 8:36
size:148x210mm,80gms book paper,BK+BK.

ES
15
CUIDADO Y MANTENIMIENTO
- No someta la unidad a esfuerzos excesivos, golpes, polvo o temperaturas extremas.
- No manipule los componentes internos de la unidad.
- Para limpiar la unidad utilice un paño ligeramente húmedo (pero nunca utilice uno mojado). Nunca
use solventes ni detergentes.
- Evite dejar la unidad bajo los rayos del sol, o en lugares con exceso de calor, humedad o polvo.
- Mantenga la unidad alejada de aparatos y fuentes de ruido eléctrico, como por ejemplo, lámparas
fluorescentes o motores.
Restauración de la Unidad
En caso de que la unidad haya sido sometida a sobretensión o descarga eléctrica, el micro-controlador
interno puede bloquearse y la unidad no responderá a ninguno de los controles del tablero.
Para resolverlo, use un clip para papeles enderezado, un palillo de dientes o algún otro objeto similar para
oprimirelbotóndeREINICIOubicadoenlaparteposteriordelaunidad(vealafiguraacontinuación).La
operación del reinicio borra la memoria del sistema borrando todas las configuraciones que usted haya
colocado.
PRECAUCIÓN: PARA OPRIMIR EL BOTÓN DE RENICIO NUNCA USE OBJETOS AFILADOS NI
PUNZANTES. ÉSTOS PODRÍAN DAÑAR EL INTERRUPTOR DE REINICIO DENTRO DE LA
UNIDAD.
BOTÓN DE REAJUSTE
GB
15
CARE AND MAINTENANCE
- Do not subject the unit to excessive force, shock, dust or extreme temperature.
- Do not tamper the internal components of the unit.
- Clean your unit with a damp (never wet) cloth. Solvent or detergent should never be used.
- Avoid leaving your unit in direct sunlight or in hot, humid or dusty places.
- Keep your unit away from heating appliances and sources of electrical noise such as fluorescent
lamps or motors.
Resetting the Unit
If the unit experiences a power surge or electric shock, it is possible that the internal micro-controller
may lock up and the unit will not respond to any commands from the panel controls.
In this event, use a straightened paper clip, toothpick or similar objects to press the RESET button
located at rear of the unit (see the below figure). The reset operation clears the system memory and all
of your previous settings will be erased.
CAUTION: DO NOT USE A SHARP OR POINTED OBJECT TO PRESS THE RESET BUTTON.
IT MAY DAMAGE THE RESET SWITCH INSIDE THE UNIT.
RESET Button
W166-R(JiMS-252i)_GB_ES IB.indd15 18 - 2215 2012-2-28 8:36
size:148x210mm,80gms book paper,BK+BK.

GB
16
TROUBLESHOOTING GUIDE
Symptom Possible Problem Solution
The unit
does not
respond (no
power).
AC Adaptor is not plugged
into a wall outlet or the
connector is not plugged
into the power supply jack
on the back of the unit.
Plug the AC adaptor into a wall outlet and plug the
connector into the supply jack on the unit.
Wall outlet is not
functioning. Plug another device into the same outlet to confirm the
outlet is working.
iPod/iPhone
does not
respond to
the speaker
system.
iPod/iPhone is not installed
properly.
Remove your iPod/iPhone from the dock and check for
obstruction on the connectors in the dock and on your
iPod/iPhone. Then reseat it on the dock.
Your iPod/iPhone is locked
up.
Please make sure that your iPod/iPhone is working
properly before docking into the unit. Please refer to
your iPod/iPhone manual for info on resetting the
iPod/iPhone.
iPod/iPhone
does not
charge.
iPod/iPhone is not installed
properly.
Remove your iPod/iPhone from the dock and check for
obstruction on the connectors in the dock and on your
iPod/iPhone. Then reseat it in the dock.
iPod/iPhone is locked up/
frozen. iPod/iPhone battery
has problem.
Please make sure your iPod/iPhone is working properly
before docking into the unit. Please refer to your
iPod/iPhone manual for details on resetting.
Weak FM
reception FM antenna wire is not fully
extended. Extend or reposition the wire antenna for best
reception.
Sound is
distorted.
Volume level is set too
high. Decrease the volume.
Sound source is distorted.
If the iPod/iPhone original sound source is of poor
quality, distortion and noise are easily noticed with
high-power speakers. Try a different audio source such
as a music CD.
If you are using an external sound source like older
Turn the unit off for a period of time or lower volume.
generation of iPod, try reducing the output volume on
the device itself. Also try turning bass boost OFF or
change the EQ setting.
Unit gets
warm after
extended
play at high
volume.
This is normal.
ES
16
SOLUCIONADOR DE PROBLEMAS
Síntoma Posible problema Solución
La unidad no
responde (no hay
corriente)
El cable de suministro de
corriente no está enchufado
adecuadamente a un
tomacorriente de la pared, o
el conector no está
enchufado en la entrada AC
en la parte posterior del
Sistema.
Conecte el adaptador AC al tomacorriente de la
pared y enchufe el conector al suministro de
corriente de la unidad
El tomacorriente de la pared
no funciona.
Enchufe otro dispositivo en el mismo
tomacorriente para comprobar si funciona el
tomacorriente.
El iPod/iPhone no
responde al
sistema de
altavoces.
´El iPod/iPhone no está
instalado adecuadamente.
Quite su iPod/iPhone del acoplamiento y revise
que no haya obstrucciones en los conectores del
acoplamiento o de su iPod/iPhone. Vuelva a
acoplarlo.
Su iPod/iPhone está
bloqueado.
Por favor asegúrese de que su iPod/iPhone esté
funcionando adecuadamente antes de acoplarlo a
la unidad. Por favor consulte su manual de
iPod/iPhone para obtener información sobre cómo
reconfigurar el iPod/iPhone.
El iPod/iPhone no
carga.
El iPod/iPhone no está
instalado adecuadamente.
Quite su iPod/iPhone del acoplamiento y revise
que no haya obstrucciones en los conectores del
acoplamiento ni en los de su iPod/iPhone. Luego
vuelva a acoplarlo.
Su iPod/iPhone está
bloqueado/congelado. La
batería del iPod/iPhone
tiene problemas.
Por favor asegúrese de que su iPod/iPhone esté
funcionando adecuadamente antes de acoplarlo a
la unidad. Por favor consulte el manual de su
iPod/iPhone para detalles de cómo reiniciarlo.
Recepción débil
de FM La antena de cable FM no
está totalmente extendida. Extienda la antena de cable o cámbiela de
posición para obtener la mejor recepción.
El sonido está
distorsionado.
El nivel de volumen está
demasiado alto. Bájele el volumen.
La fuente del sonido está
distorsionada
Si la fuente original de sonido del iPod/iPhone es
de mala calidad, el ruido y distorsión se notarán
fácilmente en los altavoces de alta potencia.
Pruebe otra fuente de audio como por ejemplo un
CD de música.
Si está usando una fuente externa de sonido, por
ejemplo un iPod, haga la prueba reduciendo la
salida de volumen en ese dispositivo. También
intente APAGANDO el amplificador de bajos o
cambiando la configuración del EQ.
La unidad se
calienta después
de reproducir por
un largo período
de tiempo con
mucho volumen.
Esto es normal. Apague la unidad por un rato o bájele el volumen.
W166-R(JiMS-252i)_GB_ES IB.indd 16 18 - 16 21 2012-2-28 8:36
size:148x210mm,80gms book paper,BK+BK.

ES
17
ESPECIFICACIÓN
Necesidades de corriente zH06,~V021CA:adartnECD-CArodatpadA
Unidad Principal Entrada DC: DC12V, 2000mA
Batería de respaldo para el reloj DC 3V --- 2 baterías “AAA” (UM-4) (no incluidas)
Control remoto 1 batería de Litio 3V CR2025
Rango de Frecuencia de Radio:
EE.UU Paso de sintonización FM 87.5 – 108 MHz, 0.1MHz
Unión Europea Paso de sintonización FM 87.5 – 108 MHz, 0.05MHz
Japón Paso de sintonización FM 76.0 – 90 MHz, 0.1MHz
Australia Paso de sintonización FM 87.5 – 108 MHz, 0.05MHz
“Hecho para iPod” y “Hecho para iPhone” significa que el accesorio electrónico fue diseñado para
conectarse específicamente a iPod y iPhone, respectivamente, y que ha sido certificado por el
desarrollador para cumplir con los estándares de desempeño de Apple. Apple no se responsabiliza
de la operación de este dispositivo o de su cumplimiento con los estándares reglamentarios y de
seguridad. Por favor observe que el uso de este accesorio con iPod o iPhone podría afectar el
desempeño inalámbrico.
iPhone, iPod, iPod classic, iPod nano, iPod shuffle, y iPod touch son marcas registradas de Apple Inc.,
registradas en los EE. UU. y otros países.
Los modelos iPhone y iPod no están incluidos
En Spectra, la responsabilidad ambiental y social es uno de los valores
fundamentales de nuestra empresa. Nos dedicamos a la continua
implementación de iniciativas responsables con el objeto de conservar y
mantener el medio ambiente a través del reciclaje responsable.
Por favor visítenos en http://www.spectraintl.com/green.htmpara mayor información sobre las
iniciativas de protección del medio ambiente o para encontrar los centros de reciclaje en su área.
GB
17
SPECIFICATION
Power Requirement
AC-DC adaptor Input: AC 120V~, 60Hz
Main unit DC input: DC12V, 2000mA
Battery backup for clock DC 3V --- 2 x “AAA” (UM-4) type battery (not included)
Remote Control 1 x 3V CR2025 Lithium Battery
Radio Frequency Range: USA FM 87.5 – 108 MHz, 0.1MHz tuning step
EU FM 87.5 – 108 MHz, 0.05MHz tuning step
Japan FM 76.0 – 90 MHz, 0.1MHz tuning step
Australia FM 87.5 – 108 MHz, 0.05MHz tuning step
“Made for iPod” and “Made for iPhone” mean that an electronic accessory has been designed to
connect specifically to iPod or iPhone respectively and has been certified by the developer to meet
Apple performance standards. Apple is not responsible for the operation of this device or its compliance
with safety and regulatory standards. Please note that the use of this accessory with iPhone or iPod
may affect wireless performance.
iPhone, iPod, iPod classic, iPod nano, iPod shuffle and iPod touch are trademarks of Apple Inc.,
registered in the U.S. and other countries.
iPhone and iPod models are not included.
At Spectra, environmental and social responsibility is a core value of our
business. We are dedicated to continuous implementation of responsible
initiatives with an aim to conserve and maintain the environment through
responsible recycling.
Please visit us at http://www.spectraintl.com/green.htm for more information on Spectra’s green
initiatives or to find a recycler in your area.
W166-R(JiMS-252i)_GB_ES IB.indd17 18 - 2017 2012-2-28 8:36
size:148x210mm,80gms book paper,BK+BK.

GB
18
90 DAY LIMITED WARRANTY AND SERVICE
VALID IN THE U.S.A ONLY
SPECTRA MERCHANDISING INTERNATIONAL, INC. warrants this unit to be free from defective
materials or factory workmanship for a period of 90 days from the date of original customer purchase
and provided the product is utilized within the U.S.A. This warranty is not assignable or transferable.
Our obligation under this warranty is the repair or replacement of the defective unit or any part thereof,
except batteries, when it is returned to the SPECTRA Service Department, accompanied by proof of
the date of original consumer purchase, such as a duplicate copy of a sales receipt.
You must pay all shipping charges required to ship the product to SPECTRA for warranty service. If the
product is repaired or replaced under warranty, the return charges will be at SPECTRA’s expense.
There are no other express warranties other than those stated herein.
This warranty is valid only in accordance with the conditions set forth below:
1. The warranty applies to the SPECTRA product only while:
a. It remains in the possession of the original purchaser and proof of purchase is demonstrated.
b. It has not been subjected to accident, misuse, abuse, improper service, usage outside the
descriptions and warnings covered within the user manual or non-SPECTRA approved
modifications.
c. Claims are made within the warranty period.
2. This warranty does not cover damage or equipment failure caused by electrical wiring not in
compliance with electrical codes or SPECTRA user manual specifications, or failure to provide
reasonable care and necessary maintenance as outlined in the user manual.
3. Warranty of all SPECTRA products applies to residential use only and is void when products are
used in a nonresidential environment or installed outside the United States.
This warranty gives you specific legal rights, and you may also have other rights which vary from state
to state. TO OBTAIN SERVICE please remove all batteries (if any) and pack the unit carefully and send
it freight prepaid to SPECTRA at the address shown below. IF THE UNIT IS RETURNED WITHIN THE
WARRANTY PERIOD shown above, please include a proof of purchase (dated cash register receipt)
so that we may establish your eligibility for warranty service and repair of the unit without cost. Also
include a note with a description explaining how the unit is defective. A customer service representative
may need to contact you regarding the status of your repair, so please include your name, address,
phone number and email address to expedite the process.
IF THE UNIT IS OUTSIDE THE WARRANTY PERIOD, please include a check for $50.00 to cover the
cost of repair, handling and return postage. All out of warranty returns must be sent prepaid.
It is recommended that you contact SPECTRA first at 1-800-777-5331 or by email at
model you have may be discontinued, and SPECTRA reserves the right to offer alternative options for
repair or replacement.
SPECTRA MERCHANDISING INTERNATIONAL, INC.
4230 North Normandy Avenue,
Chicago, IL60634, USA.
1-800-777-5331
To register your product, visit the link on the website below to enter your information.
http://www.spectraintl.com/wform.htm
0212 Printed in China
ES
18
GARANTÍA Y SERVICIOS DE COBERTURA LIMITADA POR 90 DÍAS
VÁLIDA EN LOS ESTADOS UNIDOS SOLAMENTE
SPECTRA MERCHANDISING INTERNATIONAL, INC. garantiza por un período de 90 días, que esta
unidad se encuentra libre de materiales o mano de obra de fábrica defectuosos, desde la fecha de la
compra original por parte del cliente, y siempre que el producto sea utilizado dentro de los Estados
Unidos. Esta garantía no es asignable ni transferible. Nuestra obligación de acuerdo a esta garantía es
reparar o reemplazar la unidad con defectos o cualquier pieza correspondiente, con excepción de las
baterías, cuando sea devuelta al Departamento de Servicios de SPECTRA, acompañada de la prueba
de la fecha original de compra por parte de cliente, como por ejemplo, una copia del recibo de ventas.
Usted debe cubrir todos los costos de envío requeridos para entregar el producto a SPECTRA para el
servicio de garantía. Si el producto es reparado o reemplazado de acuerdo a garantía, los gastos de
retorno serán por cuenta de SPECTRA. No existen otras garantías expresas diferentes de aquellas
declaradas en el presente documento.
Esta garantía es válida solamente en el cumplimiento de las condiciones que se establecen a continuación:
1. La garantía se aplica solamente al producto de SPECTRA siempre que:
A. Permanezca en posesión del comprador original y se exhiba la prueba de compra.
B. Que no haya sido sometido a accidentes, mal uso, abuso, servicio inapropiado,o uso fuera de
las descripciones de advertencia cubiertas dentro del manual del propietario, o
modificaciones no aprobadas por SPECTRA.
C. Los reclamos deben ser hechos dentro del período de garantía.
2. Esta garantía no cubre daños o fallas del equipo causados por conexiones eléctricas que no
cumplen con los códigos eléctricos, con las especificaciones del manual del propietario de
SPECTRA, o la falta de cuidado razonable y mantenimiento necesario como se describe en el
manual del propietario.
3. La garantía de todos los productos de SPECTRA es aplicable únicamente al uso residencial y no
tiene vigencia cuando los productos se utilizan en un ambiente no residencial o se instalan fuera
de los Estados Unidos.
Esta garantía le da derechos legales específicos, y usted podría tener también otros derechos que
varían de estado a estado. Para OBTENER SERVICIO por favor remueva todas las baterías (si las hay)
y embale la unidad con cuidado enviándola por correo postal asegurado y prepago o UPS a SPECTRA,
a la dirección que se menciona abajo SI LA UNIDAD ES DEVUELTA DENTRO DEL PERÍODO DE
GARANTÍA EXHIBIDO arriba, por favor incluya una prueba de compra (recibo de caja registradora con
fecha), para que podamos determinar su elegibilidad para el servicio de garantía y reparación de la
unidad sin costo. También incluya una nota con una descripción explicando en qué forma la unidad es
defectuosa. Un representante de atención al cliente tal vez deba contactarlo en relación al estado de
su reparación, por lo tanto incluya su nombre, dirección, número de teléfono y dirección de correo
electrónico para acelerar el proceso.
SI LA UNIDAD ESTÁ FUERADEL PERÍODO DE COBERTURADE LA GARANTÍA, por favor incluya un
cheque por cincuenta dólares ($50.00) para cubrir el costo de reparación, manejo y envío de retorno.
Cualquier devolución no cubierta por la garantía deberá ser enviada con gastos pre-pagados.
Se recomienda que primero entre en contacto con SPECTRA llamando al número 1-800-777-5331 o por
sobre la unidad que requiere servicio. En algunos casos el modelo puede haber sido descontinuado y
SPECTRA se reserva el derecho de ofrecer opciones alternativas de reparación o reemplazo.
SPECTRA MERCHANDISING INTERNATIONAL, INC.
4230 North Normandy Avenue,
Chicago, IL60634, USA.
1-800-777-5331
Para registrar su producto, siga el enlace a continuación en el sitio web para ingresar su información.
http://www.spectraintl.com/wform.htm
0212 Impreso en China
W166-R(JiMS-252i)_GB_ES IB.indd18 18 - 1819 2012-2-28 8:37
size:148x210mm,80gms book paper,BK+BK.
Table of contents
Other Jensen Docking Station manuals

Jensen
Jensen JiMS-210 User manual

Jensen
Jensen JiMS-182 User manual

Jensen
Jensen JIMS-125I User manual

Jensen
Jensen JiSS-250i User manual

Jensen
Jensen JiPS-200i User manual

Jensen
Jensen JiMS-198i User manual

Jensen
Jensen banshee JiSS-330 User manual

Jensen
Jensen JiTS-300i User manual

Jensen
Jensen JiSS-585 User manual

Jensen
Jensen JIPS-290I User manual

Jensen
Jensen JiMS-215i User manual

Jensen
Jensen JiSS-115 User manual

Jensen
Jensen JiMS-120 User manual

Jensen
Jensen JiMS-200 User manual

Jensen
Jensen JiMS-185i User manual

Jensen
Jensen JiSS-20 User manual

Jensen
Jensen JiMS-60 User manual

Jensen
Jensen JiSS-120i User manual

Jensen
Jensen JiMS-211i User manual

Jensen
Jensen JIMS-225 User manual