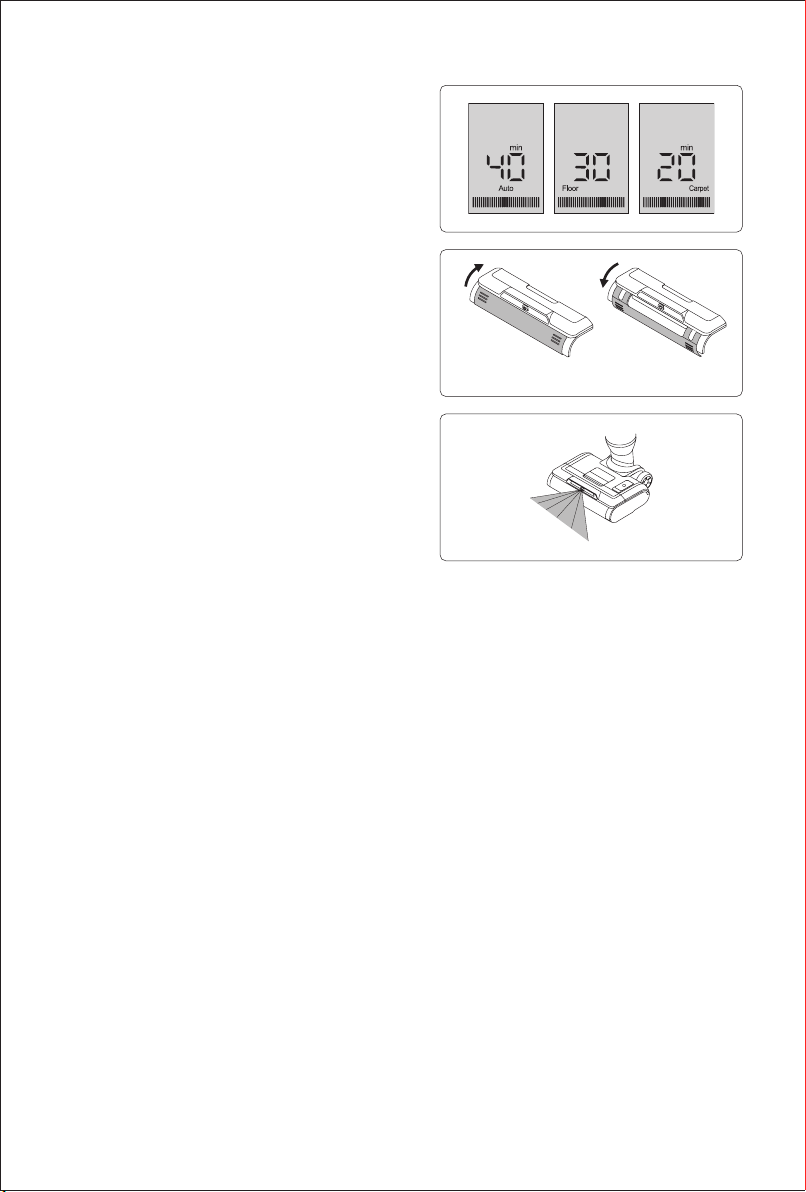
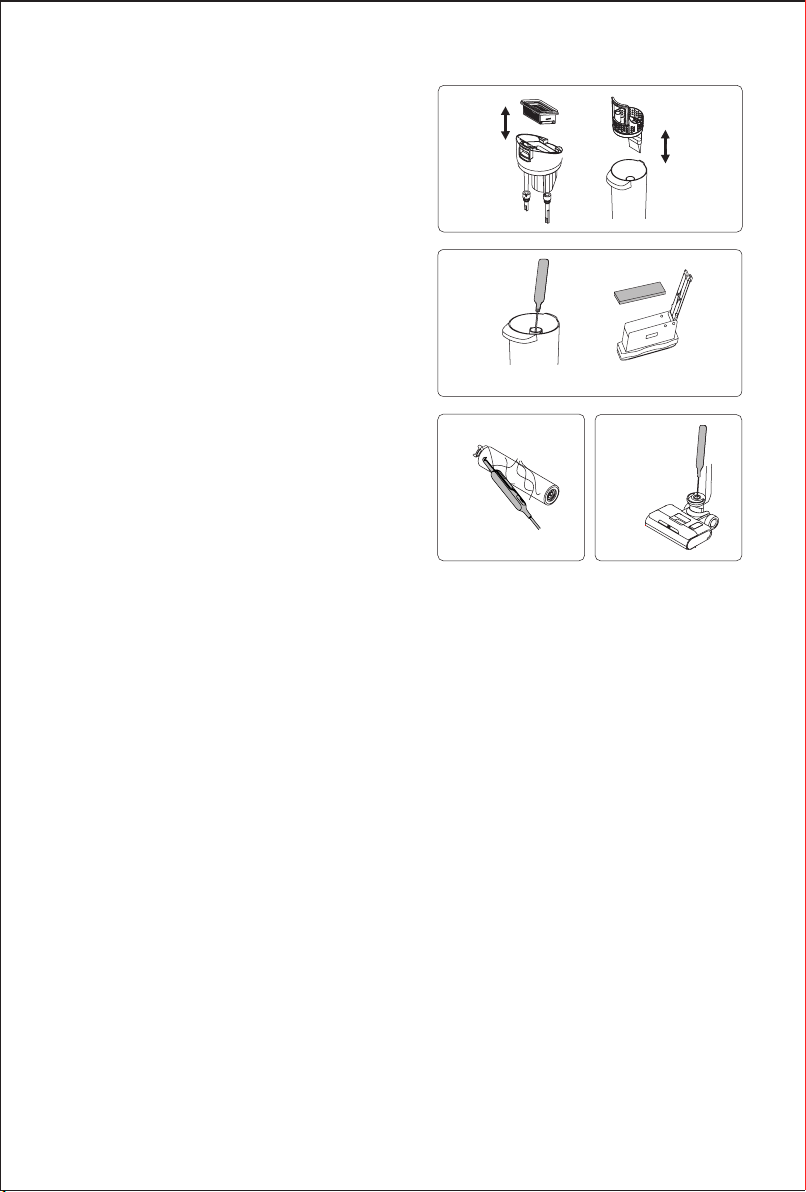
Jimmy HW9 Pro User manual

Instruction Manual Cordless Vacuum&Washer
Instrukcja Obsługi Bezprzewodowy odkurzacz i mop
Gebrauchsanweisung Schnurloser Staubsauger&Waschmaschine
Manuel d'instruction Aspirateur et laveur sans l
Manuale d'uso Aspirapolvere e lavapavimenti senza li
Manual de instrucciones Aspiradora y Lavadora sin cable
Инструкция по эксплуатации Беспроводной пылесос с функцией влажной уборки
HW9 Pro


1
Contents
English 2
Français
68
Italiano 55
Polski
41
Español
27Deutsch
14
русский язык 82

Chapter 1 Product Assembly
Part Name
2
Water spray
button
On/off button
Mode button
Battery pack
release button
Dirty water
tank release
button
Clean water
tank handle
Spray mouth
Clean water
tank plug
Battery pack
LED screen
Metal tube
Metal tube
release hole
Mute button
Dirty water
tank
Clean water
tank
Rear wheel
Charging base Cleaning brush Carpet brushroll Cleaning solution Charger
Holder 1 Holder 2
Packing list
Part Name Metal tube
Assembly
Floorhead
Assembly Battery pack Charging base Charger Carpet
brushroll
Quantity 1 1 1 1 1 1
Part Name Instruction
manual
Cleaning
solution
Cleaning
brush Holder1 Holder2 Dirty
water tank
Quantity 1 1 1 1 1 1

3
2
5 6
1
4
Battery pack
release button
Charging slot
Charging socket
Brushroll window
3
Product assembly and disassembly
Noted: Cut off electricity before product assembly and
disassembly.
Metal tube assembly and disassembly
Insert the metal tube into the mainbody vertically until
a“click”sound is heard. Make sure metal tube is rmly
locked. To disassemble the metal tube, use a hard tool
to insert into the handle release hole and meanwhile
pull out the metal tube upward.(Fig 1)
Assemble and disassemble battery pack
1.Slide battery pack along the slot and press the battery
pack down firmly until a“click”sound is heard. The
battery pack is locked.
2.Press the battery pack release button and pull the
battery pack in the direction opposite to the assembly
to unlock the battery pack(Except for the replacement
of the battery pack, the battery pack doesn’t need to be
taken out frequently)(Fig 2)
Charging holder assembly
Press the holder 1 and holder 2 into the charging base
until a “click” sound is heard.(Fig 3)
Place machine to charging base
To put machine back to charging base, hold machine
handle to lift the machine, aim charging slot on bottom
of machine to the charging socket on charging base
and put the machine into charging base. To use the
machine, hold machine handle and lift out machine from
charging base.(Fig 4)
Dirty water tank assembly and disassembly
To take off dirty water tank, hold machine with one hand
and hold dirty water tank with another hand, press dirty
water tank release button to pull out dirty water tank.
To assemble dirty water tank, place dirty water tank
bottom into mainbody, push dirty water tank towards
mainbody until a “click” sound is heard. (Fig 5)
Brushroll window and brushroll assembly and disassembly
To remove brushroll window, hold brushroll window latch and pull upward to remove brushroll window. To
assemble brushroll window, align the clips on two sides of brushroll window with the slots on two sides of
oorhead. Press brushroll window down until a “click” sound is heard. (Fig 6)

7 8
Clean water tank
4
Chapter 2 Use of the Product
Note: Before use, please check whether the machine has power, if no power, please fully charge the machine
before using it.
LED screen and instructions
To disassemble the brushroll, pull the brushroll cap
outward to take out brushroll. To assemble the brushroll,
hold brushroll cap, slide brushroll over the cylinder until
brushroll reaches the end. (Fig 7)
Clean water tank assembly and
disassembly
To take off clean water tank, hold the clean water tank
handle and pull out the clean water tank. To assemble clean water tank, put the clean water tank back to
nozzle, align with the brushroll window. (Fig 8)
Lights(indicate different power)
Clean water tank empty indicator
Mode display
Self cleaning
indicator
On/off button
Mode button
Battery power
percentage or
left working time
display
Battery power
icon display
Drying mode
indicator
Dirty water
tank full indicator

10
9
Floor cleaning
slide up the window
Carpet cleaning
slide down the window
11
55
Operation of machine
1.In the upright tilt state, press the on/off button, default
is in Auto mode, press the mode button to switch among
oor mode, carpet mode and Auto mode, accompanied
by English voice reminding. Press the on/off button
again, the voice reminds "Machine turning off", the main
motor will run for 2 seconds, the machine stops working.
When the battery level is lower than 20%, the machine
switches to the oor mode automatically. (Fig 9)
2.In Auto mode, the machine power changes
automatically basing on how much dirty water or dust
is detected. And LED light colour changes accordingly.
The more dirty water or dust is detected, the more red
lights. And the less dirty water or dust is detected, the
more blue lights.
Notes:
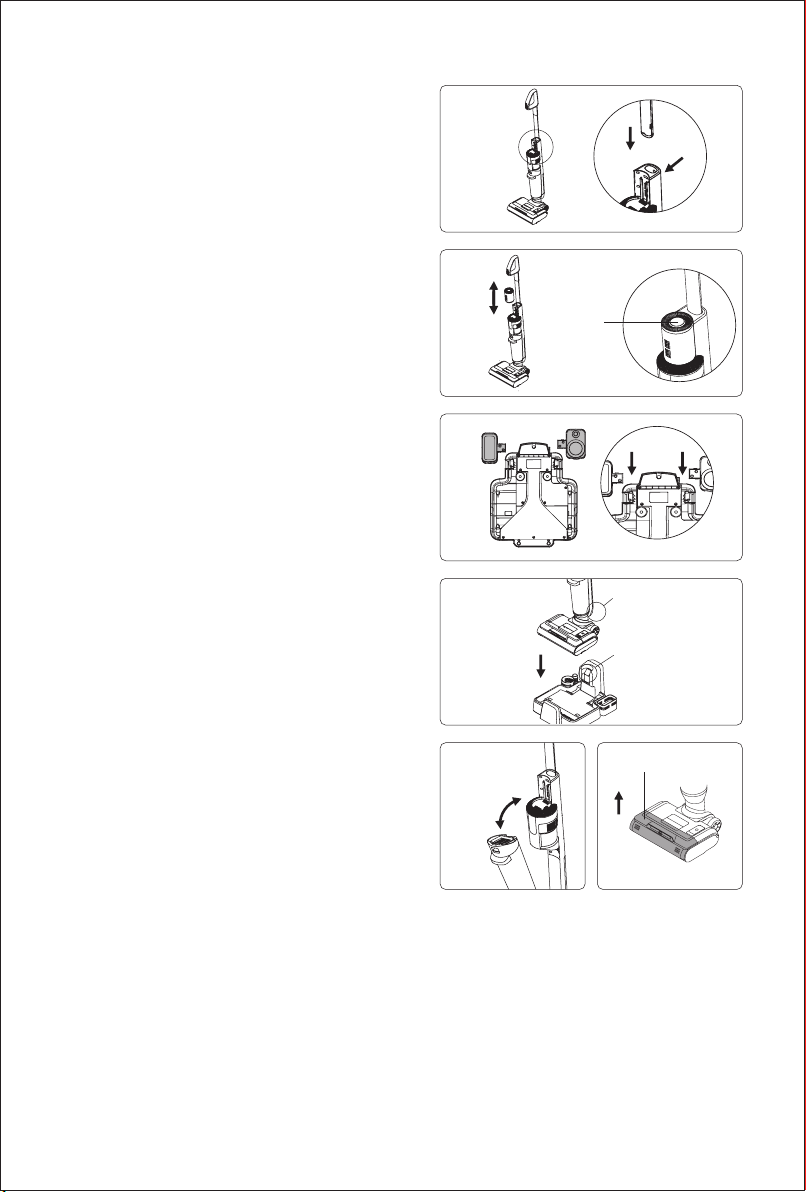
1.When cleaning carpet, please clean the floorhead
first (Refer to “Floorhead cleaning") and replace with
the carpet brushroll (Refer to “Brushroll window and
brushroll assembly and disassembly").
2.When cleaning the floor ,make sure the brushroll
window ip cover is slid up.(Fig 10)
3.When cleaning the carpet, make sure the brushroll
window ip cover is slid down.(Fig 10)
4.When using the machie, the brushroll rotates normally.
The machine will stop running if it is placed upright, the
display screen will keep the original use state, press the
on/off button within 30 seconds to shut down the screen, if there is no operation, The main motor will stop and
power off after running for 2 seconds, the display screen turn off.
5.After the machine nishes using, put it vertically on the charging base to ensure sufcient power for next
usage.
Water spray function
When the machine is working, press the water spray button, the spray mouth sprays fan-shaped water
continuously; release the water spray button to stop spraying water. Press the water spray button twice
continuously within one second, the spray mouth sprays fan-shaped water for 3 seconds.(Fig 11)
Notes:
1.The spray button cannot be used together with the on/off button or mode button.
2.Please use the JIMMY cleaning solution we provide to clean the product. Do not put high foam solution
into the cleaning tank,otherwise too much foam will be generated during using, which may penetrate into the
machine and cause danger.
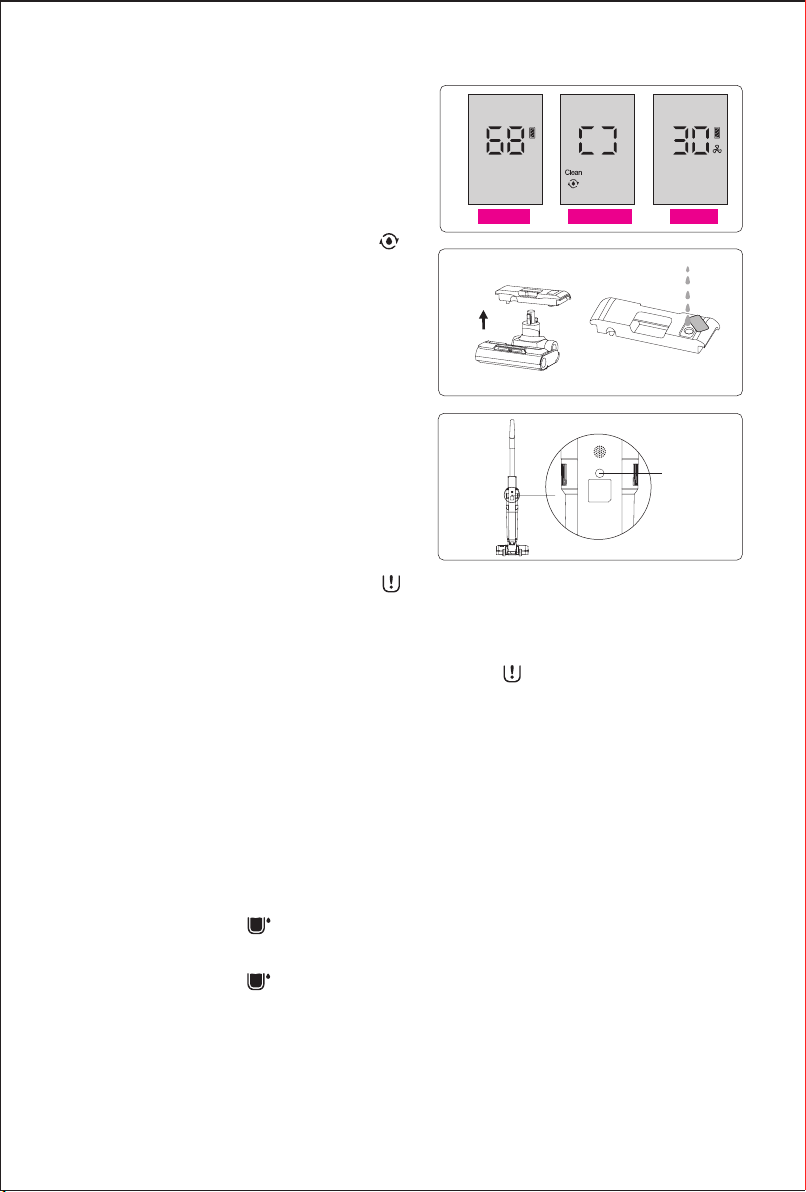
Machine charging
Connect the charge to the power supply and charging base, put the product into the charging base to start
charging.The display screen will turn off when fully charged.
Notes:
1.If the product is long idled , after purchase, please use the adapter supplied with the product to charge the
battery within every 3 months.
2.Do not leave the charger on power socket all the time to prevent children from touching it by mistake.
3.Keep the charger plug and your hands dry before inserting the charger into the charging stand.
4.Before the rst use, please fully charge the battery pack, and before the second charge, please empty the
battery to ensure the life of the battery pack.

12
13
14
充电模式 自清洁模式 烘干模式
Mute button
缺翻译
6 6
Brushroll self-cleaning and drying
function
Before self-cleaning, please empty the dirty water tank
rst, then ll the clean water tank with water and place
the machine on the charging base. In the charging
mode, long press the mode button for 3 seconds to
enter the self-cleaning mode, accompanied by voice
reminding. When the display screen shows " "
symbol, it will automatically enter the drying mode and
start charging. In the process of self-cleaning or drying,
press the handle on/off button or mode button to exit
the self-cleaning or drying mode and product change to
charging state.
Notes:
1.Before self cleaning, please make sure that the
brushroll window is slid up.
2.Drain the dirty water tank before and after self-
cleaning.
3.When the power is lower than 10%, the machine
cannot enter the self cleaning mode. After charging for a
period of time, it can run self cleaning mode.(Fig 12)
Clean water tank empty indicator
When the clean water tank is short of water, the
machine can still be used normally. The voice reminds
"No clean water, please fill water". The display " "
ashes until the machine is turned off or the screen is turned off in the upright state to remind the user to add
water to the clean water tank.
When using the self clean mode, if it is detected that there is no water in the clean water tank, the voice
reminds "No clean water, please fill water". The self cleaning will be stopped and automatically enter the
charging mode after the countdown of 10 seconds ends. The display " " ashes until the machine is taken
off the charging base, or reenters self clean mode or display screen is turned off after charging completed.
Note: When adding clean water, you can add the JIMMY cleaning solution equipped with the product, the ratio
is about two bottle of cleaning solution to one full water tank, the water temperature cannot exceed 40°C.
Fill up clean water tank
Fill up clean water tank: After removing the clean water tank, open the water lling plug, turn it to the side
to expose the water inlet hole, pour clean water and cleaning solution in, and then plug back to the original
position and reinstall the clean water tank to oorhead. (Fig 13)
Dirty water tank full indicator
When the upright vacuum cleaner detects that the dirty water tank is full, the machine will stop and give a
voice reminder. The display " " ashes and the screen will turn off after 10 seconds. Please clean the full
dirty water tank and put it back.
When it is detected that the dirty water tank is full in self clean mode, the machine will stop working and give a
voice reminder. The display " " ashes until the whole machine is removed from the charging base or the
dirty water tank is cleaned. Please clean the full dirty water tank and put it back.
Voice function
The voice of the new machine is turned on by default, press the mute button to turn off the voice function;
press the mute button again to turn on the voice function. (Fig 14)

7
Brushroll stuck indicator
When the cleaner is in working, if the brushroll is stuck, the whole machine will stop and give a voice reminder
“Please clean the brushroll”. The display "oor" and "carpet" ashes at the same time for 10 seconds and
then the screen turns off. When the cleaner is in cleaning mode, if the brushroll is stuck, the whole machine
will stop and give a voice reminder “Please clean brushroll”. The display "oor" ashes until the machine is
removed from the charging base or remove the brushroll. Clean the foreign matter attached to the brushroll or
the hair winding on brushroll(See" Cleaning and Maintenance of Floorhead Assembly " ).
Notes:
1.When cleaning the oorhead, As there may be some water in the dirty water tank, please remove the dirty
water tank rst.
2.Please do not put the machine upside down to prevent water from affecting the use of the machine and
oorhead.
3.If water ingress into the machine, do not restart it to avoid danger. Please shake out the water from the
machine and air dry it before use.
Air path blocked indicator
When the upright cleaner is in working or self clean mode, if the air path is blocked, the machine will stop
working and give a voice reminder “Please clean the air path and filter”. The display "floor" and "carpet"
flashes at the same time for 10 seconds and then the screen goes off. When the upright cleaner is self-
cleaning, if the air path is blocked, the machine will stop working and give a voice reminder “Please clean
the air path and lter”. The display "oor" and "carpet" ashes at the same time until the whole machine is
removed from charging base or the air path is cleaned.
Battery power indicator
When the upright cleaner is working, if the voice reminds " Low battery. Please charge the battery ", Please
use it after charging. When the upright cleaner is working, if the voice reminds " Low battery. Machine will be
turned off soon. Please charge the battery ", the power is about to be exhausted, and it will automatically shut
down. Need to charge for use.

15
16 Dirty water tank
cleaning
HEPA lter
cleaning
17 18
8
Chapter 3 Cleaning and
Maintenance
Notes:
1.HEPA filter,brushroll and cleaning solution are
available at distributors.
2.It is recommended to clean the dirty water tank in
time after use; When the amount of dust is too much
resulting in HEPA blocked, it is necessary to clean
HEPA, if necessary, HEPA can be replaced; After a long
time of use, the brushroll may entangle with hair and
other long subjects, which needs to be cleaned in time.
Dirty water tank cleaning
1.When dirty water tank is full, the dirty water tank full
indicator on LED screen will blink.The machine will stop
working immediately and has voice reminding “Dirty
water tank full, please empty tank”.
2.After turning off the vacuum cleaner, remove the dirty
water tank, lift the water tank top cover, and remove the
foam lter frame from it, open the ip cover of the foam
lter frame, take out the foam lter. Pour out dirty water
and dirt in the water tank, then wash dirty water tank,
water tank cover, foam lter frame and foam lter. (Fig 15)
3.If there is foreign matter in the dirty water tank pipe, it
can be cleaned with the cleaning brush.
4.Dry the above parts after washing. And then reassemble all the parts back into dirty water tank.
Notes:
1.When the machine is not in use, the upper cover of dirty water tank should be taken out for airing to avoid
odor.
2.After the machine has nished working, it is recommended to clean the dirty water tank immediately to avoid
odor. (Fig 16)
3.After cleaning the upper cover of the dirty water tank, the metal contact sheet on the top cover of the dirty
water tank must be wiped dry before use
Floorhead cleaning
Take out the brushroll window and pull out the brushroll. Use dry cloth to wipe brushroll housing and remove
the hair tangled around brushroll by the blade. Wash the brushroll window and brushroll in clean water. After
cleaning, assemble brushroll and brushroll window back to machine(The brushroll can also be put into the
accessories holder for drying).(Fig 17)
Notes:
1.Do not wash the whole oorhead in water or under tap water. Do not wash the oorhead in water or under
tap water after pulling out the brushroll. Do not use tap water to wash the air path of the oorhead after taking
of clean water tank. So as not to damage the components and affect the use.
2.If the cleaner will not be used soon after cleaning,completely dry the dirty water tank, dirty water tank cover,
lter, lter frame, brushroll, brushroll window, machine and then assemble the machine for storage, in order to
prevent the bacteria from breeding in the humid environment and producing odor.
Dust sensor cleaning
When the voice remind "Please clean the air path and lter", remove the dirty water tank. Check whether
there are large particles blocking the pipe of oorhead rst. Second, check whether the dust sensor located
inside air path is covered by dirt. Then wipe the inner wall of the pipe with mop or cleaning brush provided. (Fig 18)

9
Maintenance and Storage
1.Please turn off the machine before the cleaning.
2.Wipe the machine body with clean water or neutral detergent. Before wiping, be sure to wring out the
cleaning cloth to prevent water from owing into the electrical parts of the machine.
3.It is recommended to clean the dirty water tank, lter, brushroll and brushroll window after each use. The
machine will stop working if the dirty water reaches MAX line.Please drain the dirty water tank immediately.
After the accumulated use time of the lter reaches 30-50 hours (various basing on lter status), replace the
lter to avoid affecting machine performance. Filter can be bought from local distributor.
4.when the machine is long idled, place it in a cool and dry place, avoid direct sunlight or wet environment.
5.When pack and store the machine, Please be sure to clean the machine and dry all parts to prevent damage
to the machine.
Chapter 4 Important Safety Instructions
1.Read all instructions and warnings before using this appliance. Failure to follow the warnings and
instructions may result in electric shock, re or serious injury.
2.When using appliances, basic precautions should always be followed to reduce the risk of fire, electric
shock and injury.
Warning
1.The appliance is only for household use.
2.Before use the product, check whether the local voltage is consistent with the voltage marked on the power adaptor.
3.Inspect the product before use, stop use if the product or adaptor is damaged.
4.Use only as described in this manual.
5.This appliance cannot be used by children and persons with reduced physical, sensory or mental capabilities
or lack of experience and knowledge unless they have been given supervision or instruction concerning use
of the appliance in a safe way and understand the hazards involved.
6.Do not use this product as a toy. Keep this product away from the reach of children. Take care of children
and make sure they will not regard this product as a toy.
7.Do not touch plug with wet hand.
8.Use extra care when cleaning on stairs to prevent falling.
9.Do not use or disassemble or replace any component if there is damage on power cord, plug, battery or
conductive parts. Disassembly or replacement of the components by yourself may cause electric shock or
re. JIMMY will not take responsibility. Once damaged, the product need to be repaired or replaced by JIMMY,
JIMMY’s distributor or qualied person designated by JIMMY to avoid injury.
10.Recharge only with the adaptor specied by JIMMY.
11.Only to use the battery pack specied by JIMMY. Use of any other battery pack may cause explosion,
injury and or product damage.
12.If the product does not operate in accordance with the instructions, is seriously impacted, falls from a
height, is damaged, or falls into the water, do not use it and contact JIMMY or JIMMY distributor .
13.Only use JIMMY specied replacement parts or attachments.
14.Do not pull or press the cable. Keep cable away from heated surfaces. Do not place the cable in a closed
door or pull it through a sharp edge or corner. Keep the cable away from walking area. Do not operate product
across the cable.
15.Unplug the product when it is not used or before repairing.
16.Do not drag the cord or carry cord to move the product, or use cord as handle.
17.The product is a rechargeable electric appliance. Do not leave the machine to run unattended
18.Remove battery pack when the product is cleaned, repaired or long idled.
19.Do not get close to heating appliance or expose under sunshine longtime, to prevent over heating causing
housing deformation.
20.Keep objects that may obstruct air path from air inlet and outlet to prevent machine overheating.
21.Product mainbody and oorhead have electric components, cannot be washed under water.

10
22.Do not clean or disassemble brushroll cover or brushroll when the machine is power on or under working
to prevent injury.
23.Do not use the product to pick up amming objects like burning charcoal or cigarette etc.
24.Do not use the product to pick up sharp objects like broken glass.
25.Do not use the product to pick up lime, cement, toner, gypsum powder, flour and other ultra-fine
substances.
26.Do not use the product to pick up acid-base cleaning liquid, washing powder and other corrosive liquids.
27.Do not use the product to pick up inammable and explosive objects like gasoline, alcohol, perfume, paint,
etc.
28.Do not disassemble the closed machine, and do not try to change the performance of the machine.
Only get help from the professional personnel of the manufacturer, its maintenance department or similar
departments, otherwise it will cause danger.
29.Turn off power and unplug charger if the products is long idled.
30.Product technical specication of this manual are based on results from lab tests of JIMMY or designated
third parties. The company reserves all rights for nal explanations.
About use of the product
1.This product is suitable for hard oor in indoor environment, including waxed oor, rubber oor, tile oor and
sealed wood oor, solid wood oor and other at surface, use of the product on unat ground may not achieve
the best effect.
2.Do not turn on the machine before dirty water tank and clean water tank are assembled in place according
to instruction.
3.Do not shake the product up and down or collide violently to prevent dirty water from owing into the motor;
when the product is turned on, do not lift or carry the machine up and down, and do not tilt the product to one
side or lay it at on the oor to prevent dirty water from owing into the motor.
4.Do not run the product for a long time with the oat blocking the air inlet to avoid damage.
5.After using the product, clean the dirty water tank, suction nozzle, air path and store it in ventilated and dry
place. Wet place will affect the insulation and life of electrical appliances.
About Cleaning Solution
1.A large amount of cleaning solution entering into the motor may cause damage to the appliance.
2.Mix the solution with clean water according to the instructions (the ratio of solution to clean water is 1:50). It
is recommended to use provided cleaning solution. Do not use cleaning solution contains acid, alkali,alcoholic
solution or substances harmful to the environment.
3.Keep cleaning solution out of reach of children. If any solution gets into the eyes, immediately ush them
with clean water. If any solution is swallowed by accident, see medical care immediately.
4.Dirty water and solution disposal should comply with local environmental regulations.
About disposal of battery
1.The battery in the product contains materials harmful to the environment. Take out the battery pack from the
product before disposal.
2.Turn off the product and unplug adaptor before taking out battery pack.
3.Handle the waste battery pack safely and properly. Do not put it into re, water or soil.
4.If the disposed battery leakage causes pollution to skin or clothes, Wash with clean water and see medical
care immediately.

11
Chapter 5 Troubleshooting
Please check the following points before contacting the after sale service.
Problem Possible cause Solution
Can not start or stop
during use
Low battery power Recharge battery
On/off button is not pressed down Press down on/off button
Brushroll is entangled Clean brushroll
Dirty water tank full Clean dirty water tank
Battery pack not assembled properly Reassemble battery pack
Suction inlet blocked Clean suction inlet and lter
Weak suction
Suction inlet blocked Clean suction inlet and lter
No HEPA assembled Assemble HEPA
Abnormal noise
Suction inlet blocked Clean suction inlet
No HEPA assembled Assemble HEPA
Spray mouth does not
spray water
Clean water tank empty Fill clean water tank
Water spray button not pressed Press water spray button
Clean water tank not assembled
properly Reassemble clean water tank
Water spray out from
air exhaust
Filter is put to use without fully dry Dry the filter after washing before
use
Filter is not assembled in the dirty
water tank Assemble lter in dirty water tank
Soft plastic folds under the lter Reassemble the filter, the soft glue
must not be folded
Note: If the above troubleshooting guide fails to provide a solution or the screen displays error code F1 to F8,
please contact after service or local distributor for support.

¤¤¤¤¤¤
12
Chapter 6 Product Specication
Technical specication
Model No HW9 Pro
Rated Power 300W
Battery Capacity 3000mAH
Charging time 4-5H
Charger input voltage 100-240V ~ 50/60 Hz
Charger output voltage 30V 600mA
Circuit Diagram
Lithium battery
Protection
PCB
Brushless
motor
Handle switch
button PCB
Mute switch
button PCB Loudspeaker
Micro switch
Water pump
Transfer PCB 1
Dirty water tank
Infrared sensor
PCB
Floorhead
motor Adaptor
Fan
PTC
Display
screen PCB
Control PCB

13
Manufacturer Information
Manufacturer
Kingclean Electric Co., Ltd
Address
No.1 Xiangyang Road, Suzhou New District, Jiangsu Province 215009, China
Disposal
The machine, accessories and packaging should be sorted for environmental-friendly recycling.
Do not dispose of the machine into household waste!
Only for EC countries:
According to the European Guideline 2012/19/EU, machine that are no longer usable, and according to the
European Guideline 2006/66/EC, defective or used battery packs/batteries, must be collected separately and
disposed of in an environmentally correct manner.
Battery packs/batteries:
Integrated batteries may only be removed for disposal by qualied personnel. Opening the housing shell can
damage or destroy the machine.
Do not dispose of battery packs/batteries into household waste, re or water. Battery packs/batteries should, if
possible, be discharged, collected, recycled or disposed of in an environmental-friendly manner.
Subject to change without notice.
Warranty Information
This product enjoys two years warranty from the date of purchase.
Excluded from the guarantee is normal wear, commercial use, alterations to the appliance as purchased,
cleaning activities, consequences of improper use or damage by the purchaser or a third person, damage,
that can be attributed to external circumstances.

14
Opis produktu
Elementy produktu
Przycisk zasilania
Przycisk natrysku
Przycisk zwalniający
akumulator
Metalowa rura
Otwór zwalnia-jący
metalową rurę
Przycisk trybu
Zbiornik brudnej
wody
Zbiornik czystej
wody
Tylne kółko
Akumulator
Wyświetlacz LED
Przycisk zwalniający
zbiornik brudnej wody
korek
Uchwyt zbiornika czystej
wody
Otwór natrysku
Przycisk trybu
Szczotka do
czyszczenia
Baza ładująca Szczotka do
dywanów
ŁadowarkaŚrodek
czyszczący
Ładowarka
Uchwyt 1
Ładowarka
Uchwyt 2

15
Zawartość zestawu
Elementy
produktu Rura metalowa Głowica Akumulator Baza
ładująca Ładowarka Szczotka do
dywanów
Nazwa części 1 1 1 1 1 1
Elementy
produktu
Instrukcja
obsługi
Środek
czyszczący
Szczotka do
czyszczenia Uchwyt 1 Uchwyt 2 Zbiornik
brudnej wody
Nazwa części 1 1 1 1 1 1
3
2
1
4
Przycisk
zwalniający
akumulator
Gniazdo ładowania
Gniazdo ładowania
Montaż i demontaż produktu
Uwagi: Przed montażem i demontażem produktu należy
odłączyć zasilanie elektryczne.
Montaż i demontaż metalowej rury
Włóż metalową rurkę do korpusu w pionie, aż do
usłyszenia dźwięku "kliknięcia". Upewnij się, że
metalowa rurka jest prawidłowo zamocowana. Aby
zdemontować metalową rurkę, użyj sztywnego
narzędzia i włóż je w otwór zwalniający uchwyt, a
następnie wyciągnij metalową rurkę do góry. (Rys.1)
Naciśnij przycisk zwalniający akumulator i wyciągnij
akumulator w kierunku prze-ciwnym do montażu, aby go
odblokować (z wyjątkiem wymiany akumulatora)
(Rys. 2).
Uchwyt do ładowania
Wciśnij uchwyt 1 i uchwyt 2 do bazy ładującej aż do
usłyszenia dźwięku "kliknięcia" (rys. 3).
Umieść urządzenie w bazie ładującej
Aby umieścić urządzenie z powrotem w bazie ładującej,
należy unieść je za uchwyt, skierować gniazdo
ładowania na spodzie urządzenia do gniazda ładowania
w bazie ładującej i umieścić urządzenie wbazie. Aby
użyć urządzenia, należy chwycić za uchwyt i wyjąć je z
bazy ładującej (rys. 4).

16
Montaż i demontaż zbiornika na brudną
wodę
Aby wyjąć zbiornik na brudną wodę, należy jedną ręką
przytrzymać urządzenie, a drugą ręką zbiornik i nacisnąć
przycisk zwalniający zbiornik, aby go wyciągnąć.
Aby zamontować zbiornik na brudną wodę, należy
włożyć dno zbiornika do korpusu i przesunąć zbiornik w
kierunku korpusu, aż pojawi się dźwięk "kliknię-cia"
(Rys. 5).
Montaż i demontaż szczotki
Aby wyjąć szczotkę, przytrzymaj zatrzask szczotki
i pociągnij w górę, aby ją wyjąć. Aby zamontować
szczotkę, ustaw zatrzaski po dwóch stronach szczotki
w jednej linii ze szczelinami po dwóch stronach głowicy.
Wciśnij szczotkę w dół, aż usłyszysz dźwięk "kliknięcia".
(Rys. 6)
Aby zdemontować szczotkę, pociągnij osłonę szczotki na zewnątrz, aby ją wyjąć. Aby zamontować szczotkę,
przytrzymaj osłonę i przesuń do końca szczotkę po wałku. (Rys. 7)
Montaż i demontaż zbiornika czystej wody
Aby wyjąć zbiornik na czystą wodę, przytrzymaj uchwyt zbiornika i wyciągnij go. Aby zamontować zbiornik,
włóż go z powrotem do dyszy i ustaw w jednej linii ze szczotką. (Rys. 8)
5 6
Okienko
7 8
Zbiornik czystej wody

17
Obsługa wyświetlacza
Uwaga: przed pierwszym użyciem, należy naładować urządzenie do pełna.
Ekran LED
Diody (wskazują poziom mocy)
Ostrzeżenie o pustym zbiorniku na czystą wodę
Obecny tryb
Wskaźnik
samoczyszczenia
Przycisk natrysku
Przycisk trybu
Poziom mocy
Ikona
akumulatora
Wskaźnik
suszenia szczotki
Ostrzeżenie
o pełnym zbiorniku
na brudną wodę
9
Obsługa urządzenia
Jeśli urządzenie jest umieszczone pionowo, naciśnij
przycisk zasilania na uchwy-cie. Silnik główny i głowica
nie będą działać, a wyświetlacz się włączy. Przycisk
trybu i przycisk natrysku nie będą działać. Naciśnij
przycisk zasilania w ciągu 30 sekund, aby włączyć
urządzenie. W przeciwnym razie główny silnik włączy
się na 2 sekundy, a następnie automatycznie się
wyłączy.
Przechyl urządzenie i naciśnij przycisk zasilania. Domyślnie uruchomi się tryb Auto. Naciśnij przycisk trybu,
aby przełączyć między trybem oor, trybem carpet i trybem Auto, wraz z angielskim komunikatem głosowym.
Naciśnij ponownie przy-cisk zasilania, a komunikat wyda "Machine turning off" (Urządzenie zostało wyłą-
czone). Główny silnik będzie pracował przez 2 sekundy, a następnie urządzenie się wyłączy. Jeśli poziom
akumulatora jest niższy niż 20%, urządzenie automatycz-nie przełączy się na tryb oor. (Rys. 9)
W trybie Auto moc urządzenia zmienia się automatycznie na podstawie ilości brudnej wody lub kurzu. Kolor
wskaźnika zmieni się odpowiednio. Wskaźniki będą zwiększać się w zależności od ilości wykrytej wody lub
kurzu.

18
11
Uwaga:
1. W przypadku czyszczenia dywanów, należy najpierw
wyczyścić głowicę (Patrz "Czyszczenie głowicy
podłogowej") i zastąpić ją szczotką do dywanów (Patrz
"Montaż i demontaż szczotki").
2. Podczas czyszczenia podłogi upewnij się, że osłona
szczotki jest wysunięta do góry.
3. Podczas czyszczenia dywanu upewnij się, że osłona
szczotki jest zsunięta.
4. Podczas korzystania z urządzenia, szczotka obraca
się standardowo. Urządze-nie przestanie działać, jeśli
zostanie umieszczone w pozycji pionowej. Wyświe-
tlacz wciąż będzie włączony. Naciśnij przycisk zasilania
w ciągu 30 sekund, aby wyłączyć ekran. Główny silnik
zatrzyma się i wyłączy zasilanie po 2 sekundach, a
wyświetlacz zgaśnie.
5. Po zakończeniu użytkowania urządzenia, umieść
je pionowo w bazie ładującej, aby naładować je do
następnego użycia.
Funkcja natrysku wody
Jeśli urządzenie jest włączone, naciśnij przycisk natrysku, a woda rozpyli się w kształcie wachlarza. Zwolnij
przycisk natrysku, aby zatrzymać spryskiwanie wodą. Naciśnij przycisk natrysku dwa razy w ciągu jednej
sekundy, a woda będzie rozpylać się w kształcie wachlarza przez 3 sekundy.
Uwaga:
1. Przycisk natrysku nie może być używany razem z przyciskiem zasilania lub
przyciskiem trybu pracy.
2. Należy używać dostarczonego środka czyszczącego JIMMY do czyszczenia produktu. Nie należy wlewać
do zbiornika środka czyszczącego o wysokiej zawartości piany, w przeciwnym razie podczas użytkowania
wytworzy się zbyt dużo piany, która może przedostać się do wnętrza urządzenia i spowodować uszkodzenie
lub niebezpieczeństwo.
Ładowanie urządzenia
Podłącz urządzenie do ładowarki w bazie ładującej, aby rozpocząć ładowanie. Ekran wyświetlacza wyłączy
się po pełnym naładowaniu.
Uwaga:
1. Jeśli produkt jest długo nieużywany lub jest nowy, należy użyć adaptera dołą-czonego do produktu, aby
naładować akumulator. Należy ładować urządzenie regularnie, co 3 miesiące.
2. Nie należy pozostawiać ładowarki w gniazdku po zakończeniu ładowania.
3. Przed umieszczeniem ładowarki w bazie ładującej należy upewnić się, że ręce użytkownika i wtyczka
ładowarki są suche.
4. Przed pierwszym użyciem należy w pełni naładować akumulator, a przed drugim ładowaniem należy go
rozładować, aby zwiększyć jego żywotność.
10
Przed czyszczeniem
podłóg, podnieś osłonę
Przed czyszczeniem
dywanów, zsuń osłonę
Other manuals for HW9 Pro
1
Table of contents
Languages:
Other Jimmy Vacuum Cleaner manuals