Jimmy HW9 User manual

Instruction Manual Cordless Vacuum&Washer
Instrukcja Obsługi Odkurzacz bezprzewodowy
Gebrauchsanweisung Akku-Staubsauger
Mode d'emploi Aspirateur et laveur sans l
Manuale d'uso Aspirapolvere e lavapavimenti senza li
Instrucciones de uso Aspiradora sin cable
Инструкция по эксплуатации Вертикальный пылесос с функцией влажной уборки
HW9


1
Contents
English 2
Français
61
Italiano 49
Polski
37
Español
24Deutsch
13
русский язык 73

Chapter 1 Product Assembly
Part Name
2
On/off button
Mode button
Front cover
Floorhead
release button
LED screen
Clean water tank
Brushroll cover
Brushroll
Spray mouth
Spray trigger
Handle
Battery pack
Battery pack cover
Dirty water tank
Charging base Cleaning brush Carpet brushroll Cleaning solution Adaptor
Holder 1 Holder 2

3
Packing list
Product assembly
Noted: Cut off electricity before product assembly and
disassembly.
Handle assembly and disassembly
Insert the handle into the mainbody vertically until
a“click”sound is heard. Make sure handle is firmly
locked. To disassemble the handle, use a hard tool to
insert into the handle release hole and meanwhile pull
out the handle upward.(Fig 1)
Floorhead assembly and disassembly
Insert the floorhead into the mainbody vertically until
a“click”sound is heard. Make sure floorhead is firmly
locked.To disassemble the floorhead,press down the
floorhead release button, then hold the floorhead and
pull the oorhead down.(Fig 2)
Assemble battery pack
Press and hold the battery cover latch and remove the
battery cover.Then,slide battery pack along the slot into
mainbody until to the bottom, and then install the battery
pack cover into the body until the clear "click" sound is
heard. To remove battery pack, it can be disassembled
according to the opposite direction of installation. (Fig 3)
Assemble the charging base holder
Press the holder 1 and holder 2 into the charging base,
aiming at the slot until a “click” sound is heard. Make
sure the holders are rmly locked.( Fig 4)
Place machine to charging base
To put machine back to charging base, hold machine
handle to lift the machine, aim charging slot on bottom
of machine to the charging socket on charging base and
put the machine into charging base. To use the machine,
hold machine handle and lift out machine from charging
base. (Fig 5)
3
2
Floorhead
release
Battery cover
latch
Battery cover
Battery
cover
Battery
pack
Charging slot
Charging socket
Holder 1
Holder 2
5
1
Handlve Handle
release
hole
4
Part Name Mainbody Handle Floorhead
Assembly Battery pack Charging
base Adaptor
Quantity 1 1 1 1 1 1
Part Name Cleaning
Solution
Cleaning
brush Holder 1 Holder 2 Carpet
brushroll
Instruction
manual
Quantity 1 1 1 1 1 1

4
8
pull the brushroll cover upward
latch
brushroll cap
7
Clean water tank handle
Clean water tank
Disassemble and assemble dirty water
tank
To take off dirty water tank, hold machine with one
hand and hold the dirty water tank with another hand,
press dirty water tank release button to remove dirty
water tank. To assemble dirty water tank, place dirty
water tank bottom into mainbody, push dirty water tank
towards mainbody until a “click” sound is heard.(Fig 6)
Disassemble and assemble clean
water tank
To take off clean water tank, hold the clean water tank
handle and pull out the clean water tank. To assemble
clean water tank, put the clean water tank back to
nozzle, align with the brushroll window. (Fig 7)
Disassemble and assemble brushroll
cover and brushroll
1.To take off brushroll cover hold brushroll cover
latch and pull upward to remove brushroll cover.
To assemble brushroll cover, align the clips on two
sides of brushroll cover with the slots on two sides of
floorhead. Press brushroll cover down until a “click”
sound is heard. (Fig 8)
2.To disassemble the brushroll, pull the brushroll cap outward to take out brushrol. To assemble the brushroll,
hold brushroll cap, slide brushroll over the cylinder until brushroll reaches the end. (Fig 8)
6
Dirty water tank
release button
Dirty water tank
handle

5
Chapter 2 Use of the Product
Note: When using it for the rst time, please fully charge the machine before using it.
LED screen and instructions
Brushroll drying indicator
Lights
(indicate different power)
Error indicator
Mode display Battery power icon display
Battery power
percentage display
Self cleaning indicator
Dirty water tank
full indicator
Clean water tank
empty indicator
1.Lights:When charging,the lights turn blue and rotate.The lights will be fully bright when the machine is full
charged and no longer rotate.After 1 minute, the lights’ brightness will be halved, and turn blue while working.
In Max mode,the lights show bright red and the screen displays Max mode;in Auto and Eco mode,the lights
show blue and the screen displays Auto or Eco mode(The machine will automatically switch to Eco mode
when the power is lower than 20%).
2.Mode display: Displays current machine working mode.
3.Battery power percentage display: Displays battery power left currently.
4.Battery power icon display: Battery power warning(Battery power icon turns red to remind charging when
battery power is lower than 20%, alternatively lights are white).
5.Dirty water tank full indicator: When water in tank reaches MAX line, the indicator will blink to remind user to
drain dirty water tank.
6.Clean water tank empty indicator: When water tank is empty, the indicator will blink to remind user to add
clean water.
7.Self cleaning indicator: When machine is in self cleaning mode, the indicator will blink and display the
countdown to remind user that the machine is under self cleaning.
8.Brushroll drying indicator: After the self-cleaning is completed, the device enters brushroll air-drying mode
automatically. Brushroll drying indicator lights up to remind user that brushroll is under drying.

6
10
water spray button
on/off button
mode button
9
clean water tank plug
clean water
tank handle
11
Fill up clean water tank
1.Grasp the handle of the clean water tank to take off
clean water tank.
2.Pull out the clean water tank plug, open the injection
plug of the clean water tank, turn it to the side (about
90 degrees), expose the water injection hole, and ll in
clean water and cleaning solution inside.
3.Tighten clean water tank plug and make sure it is
tight.
4.Assemble clean water tank into floorhead until a
“click” sound is heard.(Fig 9)
Note:You can add the cleaning solution while filling
in clean water, the ratio is 1 bottle cap of cleaning
solution to one full tank of clean water.
Operation of machine
1.The on/off button of the machine is located on top
of handle, press on/off button to start working and the
Auto mode is enabled by default.The machine can
switch among Auto, Eco and Max mode by pressing
mode button. Press on/off button to stop working.
2.Press on/off button to start working and press the
water spray trigger to spray fan shape water ow from
front of oorhead, release the water spray triger and
water will stop spray.(Fig 10)
Notes:
1.The water spray button cannot be used together with the on/off button or the mode button.
2.When dirty water tank is full, the dirty water tank full indicator on LED screen will blink, and machine will
have voice reminding. Vacuum motor and brushroll motor will stop working immediately.
3.When the clean water tank is empty, press water spray button, there is no water spray out, clean water tank
empty indicator blinks and machine will have voice to remind user to add water.
4.When dirty water tank is taken out while the machine is working, the dirty water tank full indicator on LED
screen will blink and and machine will have voice reminding. Vacuum motor and brushroll motor will stop
working immediately.
5.After the machine nishes using, put it vertically on the charging base to ensure sufcient power for next
usage.
6.Please use the cleaning solution we provide to clean the product. Do not put high foam solution into the
cleaning tank,otherwise too much foam will be generated during using, which may penetrate into the machine
and cause danger.
Machine charging
1.Connect one end of the adapter to the charging stand, and the other end to the power socket;
2.Put the machine into the charging stand to enter the charging mode.The display screen shows the
percentage of battery power while charging. The display screen shows 100% power when the charging is
completed.(Fig 11)
Notes:
1.If the product is long idled after purchase, please use the adapter to charge the battery about every 3
months.
2.Do not leave the charger on power socket all the time to prevent children from touching it by mistake.
3.Keep the charger plug and your hands dry before inserting the charger into the charging stand,.
4.Before the rst use, please fully charge the battery pack, and before the second charge, please empty the
battery to ensure the life of the battery pack.

7
12
Keep 1/2 water inside
clean water tank
Keep pressing
mode button
Brushroll cleaning
13
14
Clean dirty
water tank
Upper cover
assembly
Filter assembly
Filter frame
Dirty water tank
Clean lter
frame
Take out the brushroll
window
pull out the brushroll
Brushroll storage Cleaning brush
storage
HEPA/Adaptor
storage
15
Self cleaning and brushroll drying
Before self-cleaning, Drain the dirty water tank, place
the machine on the charging base, insert the charger
into the socket, keep at least 1/2 of the water in the
clean water tan.
Press the mode button for 5 seconds, the machine will
enter self-cleaning mode, the self-cleaning indicator
on the LED display will blink. During self-cleaning
process, to end self-cleaning mode in advance , press
on/off button and machine will stop self cleaning and
return to charging mode. (Fig 12)
After self-cleaning is completed, the machine enters
brushroll drying mode automatically, the brushroll
drying indicator on the LED display will light up and
device also starts charging ; during the brushroll drying
process, to end the brushroll drying in advance , press
on/off button and machine will stop brushroll drying
and remain in charging mode.
Note:
1.Drain the dirty water tank before and after self-
cleaning to avoid odor.
2. When the power is lower than 10%, the machine
cannot enter the self cleaning mode.
Chapter 3 Cleaning and
Maintenance
Clean dirty water tank
1.When dirty water tank is full, the dirty water tank full
indicator on LED screen will blink.The machine will
stop working immediately and has voice reminding.
2.After stopping work, take out dirty water tank and
remove upper cover from dirty water tank, pour out the garbage from lter frame an and dirty water from dirty
water tank, wash the dirty water tank and the lter frame with clean water.
3.If there is stubborn stains on the inside of the dirty water tank, clean them directly with cleaning brush.
4.Dry the dirty water tank parts after washing, then put them back into the dirty water tank, and then assemble
the dirty water tank into the machine until a “click” sound is heard. (Fig 13)
Brushroll cleaning
Take out the brushroll window and pull out the brushroll. Use dry cloth to wipe brushroll housing and remove
the hair tangled around brushroll by the mini brush. Wash the brushroll window and brushroll in clean water.
After cleaning, assemble brushroll and brushroll window back to machine. (Fig 14) The brushroll can also be
put into the accessories holder for drying.(Fig 15)
Note:
1.Do not wash the whole oorhead in water.Do not wash the oorhead with water or immerse it in water after
pulling out the brushroll, so as not to damage the components and affect the use.
2.If the cleaner will not be used soon after cleaning,completely dry the dirty water tank, dirty water tank cover,
lter, lter frame, brushroll, brushroll window, machine and then assemble the machine for storage, in order to
prevent the bacteria from breeding in the humid environment and producing odor.

8
Maintenance and Storage
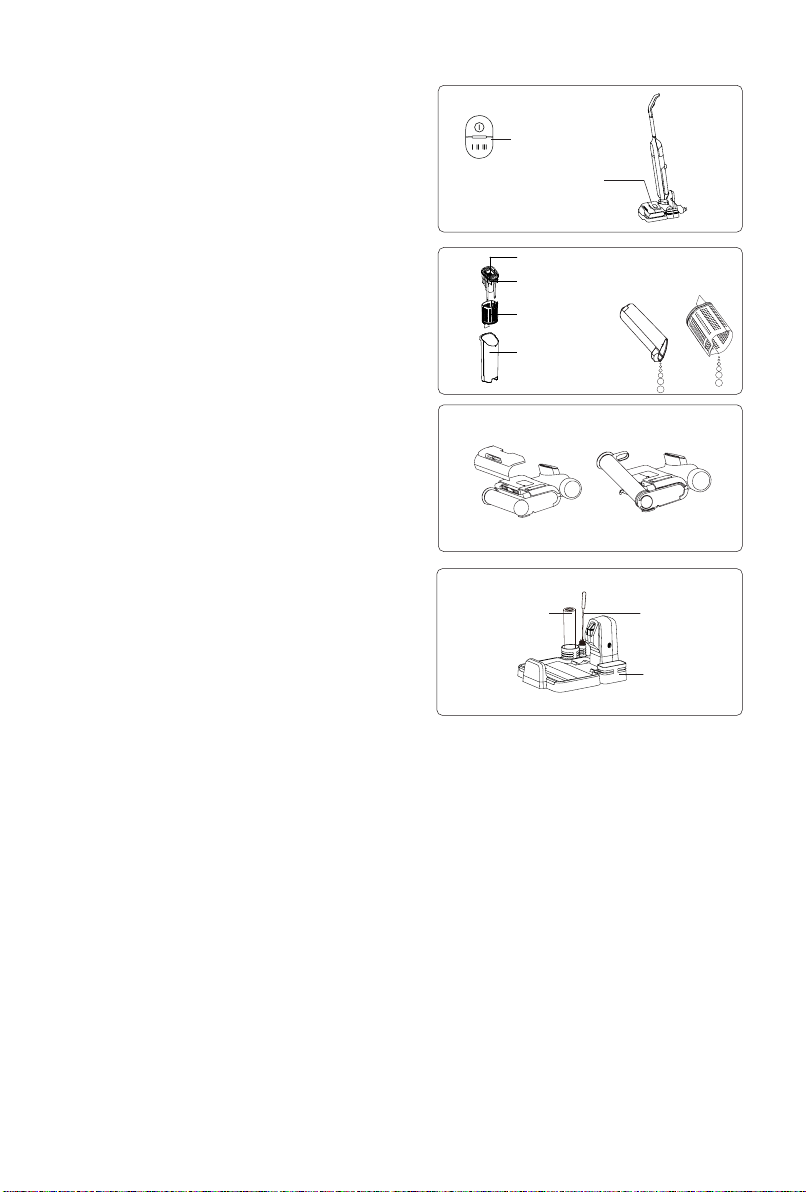
1.Please stop the machine before the cleaning.
2.Wipe the machine body with clean water or neutral detergent. Before wiping, be sure to wring out the
cleaning cloth to prevent water from owing into the electrical parts of the machine.
3.It is recommended to clean the dirty water tank, lter, brushroll and brushroll window after each use.
4.The machine will stop working if the dirty water reaches MAX line.Please drain the dirty water tank
immediately.
5.After the accumulated use time of the lter reaches 30-50 hours (various basing on lter status), replace the
lter to avoid affecting machine performance. Filter can be bought from local distributor.
6.When the machine is long idled, place it in a cool and dry place, avoid direct sunlight or wet environment.
Chapter 4 Important Safety Instructions
1.Read all instructions and warnings before using this appliance. Failure to follow the warnings and
instructions may result in electric shock, re or serious injury.
2.When using appliances, basic precautions should always be followed to reduce the risk of fire, electric
shock and injury.
Warning
1.The appliance is only for household use.
2.Before use the product, check whether the local voltage is consistent with the voltage marked on the power adaptor.
3.Inspect the product before use, stop use if the product or adaptor is damaged.
4.Use only as described in this manual.
5.This appliance cannot be used by children and persons with reduced physical, sensory or mental capabilities
or lack of experience and knowledge unless they have been given supervision or instruction concerning use
of the appliance in a safe way and understand the hazards involved.
6.Do not use this product as a toy. Keep this product away from the reach of children. Take care of children
and make sure they will not regard this product as a toy.
7.Do not touch plug with wet hand.
8.Use extra care when cleaning on stairs to prevent falling.
9.Do not use or disassemble or replace any component if there is damage on power cord, plug, battery or
conductive parts. Disassembly or replacement of the components by yourself may cause electric shock or
re. JIMMY will not take responsibility. Once damaged, the product need to be repaired or replaced by JIMMY,
JIMMY’s distributor or qualied person designated by JIMMY to avoid injury.
10.Recharge only with the adaptor specied by JIMMY.
11.Only to use the battery pack specied by JIMMY. Use of any other battery pack may cause explosion,
injury and or product damage.
12.If the product does not operate in accordance with the instructions, is seriously impacted, falls from a
height, is damaged, or falls into the water, do not use it and contact JIMMY or JIMMY distributor .
13.Only use JIMMY specied replacement parts or attachments.
14.Do not pull or press the cable. Keep cable away from heated surfaces. Do not place the cable in a closed
door or pull it through a sharp edge or corner. Keep the cable away from walking area. Do not operate product
across the cable.
15.Unplug the product when it is not used or before repairing.
16.Do not drag the cord or carry cord to move the product, or use cord as handle.
17.The product is a rechargeable electric appliance. Do not leave the machine to run unattended
18.Remove battery pack when the product is cleaned, repaired or long idled.
19.Do not get close to heating appliance or expose under sunshine longtime, to prevent over heating causing
housing deformation.
20.Keep objects that may obstruct air path from air inlet and outlet to prevent machine overheating.
21.Product mainbody and oorhead have electric components, cannot be washed under water.

9
22.Do not clean or disassemble brushroll cover or brushroll when the machine is power on or under working
to prevent injury.
23.Do not use the product to pick up amming objects like burning charcoal or cigarette etc.
24.Do not use the product to pick up sharp objects like broken glass.
25.Do not use the product to pick up lime, cement, toner, gypsum powder, flour and other ultra-fine
substances.
26.Do not use the product to pick up acid-base cleaning liquid, washing powder and other corrosive liquids.
27.Do not use the product to pick up inammable and explosive objects like gasoline, alcohol, perfume, paint,
etc.
28.Do not disassemble the closed machine, and do not try to change the performance of the machine.
Only get help from the professional personnel of the manufacturer, its maintenance department or similar
departments, otherwise it will cause danger.
29.Turn off power and unplug charger if the products is long idled.
30.Product technical specication of this manual are based on results from lab tests of JIMMY or designated
third parties. The company reserves all rights for nal explanations.
About use of the product
1.This product is suitable for hard oor in indoor environment, including waxed oor, rubber oor, tile oor and
sealed wood oor, solid wood oor and other at surface, use of the product on unat ground may not achieve
the best effect.
2.Do not turn on the machine before dirty water tank and clean water tank are assembled in place according
to instruction.
3.Do not shake the product up and down or collide violently to prevent dirty water from owing into the motor;
when the product is turned on, do not lift or carry the machine up and down, and do not tilt the product to one
side or lay it at on the oor to prevent dirty water from owing into the motor.
4.Do not run the product for a long time with the oat blocking the air inlet to avoid damage.
5.After using the product, clean the dirty water tank, suction nozzle, air path and store it in ventilated and dry
place. Wet place will affect the insulation and life of electrical appliances.
About Cleaning Solution
1.A large amount of cleaning solution entering into the motor may cause damage to the appliance.
2.Mix the solution with clean water according to the instructions (the ratio of solution to clean water is 1:50). It
is recommended to use provided cleaning solution. Do not use cleaning solution contains acid, alkali,alcoholic
solution or substances harmful to the environment.
3.Keep cleaning solution out of reach of children. If any solution gets into the eyes, immediately ush them
with clean water. If any solution is swallowed by accident, see medical care immediately.
4.Dirty water and solution disposal should comply with local environmental regulations.
About disposal of battery
1.The battery in the product contains materials harmful to the environment. Take out the battery pack from the
product before disposal.
2.Turn off the product and unplug adaptor before taking out battery pack.
3.Handle the waste battery pack safely and properly. Do not put it into re, water or soil.
4.If the disposed battery leakage causes pollution to skin or clothes, Wash with clean water and see medical
care immediately.

10
Chapter 5 Troubleshooting
Please check the following points before contacting the after sale service.
Problem Possible cause Solution
Machine does not work
Weak suction
Low battery power Recharge battery
On/off button is not pressed down Press down on/off button
Brushroll is entangled Clean brushroll
Water in dirty water tank achieves
MAX line Clean dirty water tank
On/off button or mode button is
pressed at the same time with water
spray button
Release water spray button, press
on/off button or mode button
separately
Brushroll not assembled Reassemble brushroll
Dirty water tank not assembled Reassemble dirty water tank
Weak suction
Water in dirty water tank achieves
MAX line Clean dirty water tank
Brushroll window and dirty water tank
not assembled properly
Reassemble brushroll window and
dirty water tank
Brushroll entangled Clean brushroll
Filter gets dirty Clean or replace lter
Lower battery power Recharge battery
Abnormal noise Suction inlet blocked Clean suction inlet
Water in dirty water tank achieves MAX line Clean dirty water tank
Floorhead does not
spray water
Clean water tank empty Fill clean water tank
Water spray button not pressed Press water spray button
Clean water tank not assembled
properly Reassemble clean water tank
Clean water tank is filled with dirty
water and blocked water path.
Do not ll clean water tank with dirty
water
Excessive foaming of cleaning
solution
Add the cleaning solution in the
correct proportion
Water spray out from
air exhaust
Water in dirty water tank achieves
MAX line
Take out the dirty water tank and
pour out the dirty water
The product was heavily shaked or hits
the wall with big force
Take out the dirty water tank and
pour out the dirty water
Filter is not assembled Assemble lter
Filter is put to use without fully dry Dry the lter after washing before
use
Note: If the above troubleshooting guide fails to provide a solution,due to the need to use special tools,
please go to the designated maintenance station for repair and replacement or contact after service of local
distributor for support.

11
Chapter 6 Product Specication
Technical specication
Model No HW9
Adaptor Input 100-240V ~ 50-60Hz 0.8A
Adaptor Output 34.2V 0.6A
Rated Voltage 28.8V
Rated Power 300W
Battery Capacity 3000mAH
Circuit Diagram
100-240V ~ 50-60Hz
Adaptor
Charging base
Dirty water tank electrode
LED lights
Loudspeaker
Mute Button
Switch button PCB
Floorhead motor
Vacuum motor
Pump
Lithium battery
Lithium battery
protection PCB
Control PCB
Transfer
PCB
M MM
············
......
......

12
Manufacturer Information
Manufacturer
Kingclean Electric Co., Ltd
Address
No.1 Xiangyang Road, Suzhou New District, Jiangsu Province 215009, China
Disposal
The machine, accessories and packaging should be sorted for environmental-friendly recycling.
Do not dispose of the machine into household waste!
Only for EC countries:
According to the European Guideline 2012/19/EU, machine that are no longer usable, and according to the
European Guideline 2006/66/EC, defective or used battery packs/batteries, must be collected separately and
disposed of in an environmentally correct manner.
Battery packs/batteries:
Integrated batteries may only be removed for disposal by qualied personnel. Opening the housing shell can
damage or destroy the machine.
Do not dispose of battery packs/batteries into household waste, re or water. Battery packs/batteries should, if
possible, be discharged, collected, recycled or disposed of in an environmental-friendly manner.
Subject to change without notice.
Warranty Information
This product enjoys two years warranty from the date of purchase.
Excluded from the guarantee is normal wear, commercial use, alterations to the appliance as purchased,
cleaning activities, consequences of improper use or damage by the purchaser or a third person, damage,
that can be attributed to external circumstances or caused by the batteries.

13
Rozdział 1 Montaż urządzenia
Nazwy elementów
Przycisk ON/OFF
Przycisk trybu
Przednia pokrywa
Przycisk uwalniania
szczotki
Ekran LED
Zbiornik na czystą wodę
Pokrywa szczotki
Szczotka
Końcówka natrysku
Przycisk natrysku
Uchwyt
Akumulator
Pokrywa akumulatora
Zbiornik na brudną
Baza ładująca Szczotka
czyszcząca
Szczotka na dywan Płyn czyszczący Adapter
Zaczep 1 Zaczep 2

14
Zawartość zestawu
Montaż urządzenia
Odłącz urządzenie od zasilania przed montażem i
demontażem.
Montaż i demontaż uchwytu
Podłącz uchwyt do pionowo głównego elementu
aż usłyszysz kliknięcie. Upewnij się, że uchwyt jest
bezpiecznie założony. Aby demontować uchwyt, włóż
twarde narzędzie do otworu zwalniającego na uchwycie
i pociągnij uchwytem w górę (rys. 1).
Montaż i demontaż szczotki podłogowej
Podłącz końcówkę pionowo do głównego elementu,
aż usłyszysz kliknięcie. Upewnij się, że końcówka jest
bezpiecznie zablokowana. Aby demontować końcówkę,
naciśnij przycisk zwalniający i pociągnij końcówką w dół
(rys. 2).
Montaż akumulatora
Wciśnij i przytrzymaj pokrywę akumulatora i wyjmij
ją. Przesuń następnie akumulator wzdłuż otworu aż
na spód. Załóż z powrotem pokrywę i dociśnij ją, aż
usłyszysz kliknięcie. Aby usunąć akumulator, otwórz
pokrywę i przesuń go w odwrotnym kierunku (rys. 3).
Montaż bazy ładującej/zaczepu
Wciśnij zaczep 1 oraz zaczep 2 do bazy ładującej
aż usłyszesz kliknięcie. Upewnij się, czy zaczepy są
stabilnie założone (rys. 4).
Włóż urządzenie do bazy ładującej
Aby umieścić maszynę z powrotem w bazie ładującej,
należy chwycić za uchwyt maszyny, aby ją podnieść,
skierować gniazdo ładowania na spodzie maszyny
do gniazda ładowania w bazie ładującej i umieścić
maszynę w bazie ładującej. Aby użyć maszyny, należy
przytrzymać uchwyt maszyny i wyjąć ją z podstawy
ładującej. (Rys. 5).
3
2
Uwalnianie
końcówki
Zaczep
pokrywy
akumulatora
Pokrywa
akumulatora Akumulator
Pokrywa
akumulatora
Port ładowania
Pin ładowania
Zaczep 1
Zaczep 2
5
1
Uchwyt Otwór
zwalniający
4
Nazwa
elementu Główny element Uchwyt Szczotka
podłogowa Akumulator Baza ładująca Adapter
Ilość 1 1 1 1 1 1
Nazwa
elementu
Płyn do
czyszczenia
Szczotka do
czyszczenia
urządzenia
Zaczep 1 Zaczep 2 Szczotka do
dywanów
Instrukcja
obsługi
Ilość 1 1 1 1 1 1

15
8
pociągnij pokrywę szczotek do góry
Zaczep
Pokrywa szczotki
7
Uchwyt zbiornika na czysta wode
Zbiornik na czystą wodę
Montaż i demontaż zbiornika na
brudną wodę
Aby zdjąć zbiornik na brudną wodę, przytrzymaj
maszynę jedną ręką, a drugą ręką przytrzymaj zbiornik,
naciśnij przycisk zwalniający, aby zdjąć zbiornik. Aby
zmontować zbiornik na brudną wodę, należy umieścić
dno zbiornika na brudną wodę w korpusie głównym,
popchnąć zbiornik na brudną wodę w kierunku korpusu
głównego, aż do usłyszenia kliknięcia. (Rys. 6)
Montaż i demontaż zbiornika na
czystą wodę
Aby zdjąć zbiornik na czystą wodę, należy przytrzymać
uchwyt i wyciągnąć zbiornik. Aby zamontować zbiornik
na czystą wodę, włóż go z powrotem do dyszy i ustaw
w jednej linii z oknem szczotki. (Rys. 7)
Demontaż i montaż pokrywy szczotki
oraz szczotki
1.Aby zdjąć pokrywę szczotki, przytrzymaj zaczep
pokrywy i pociągnij ją w górę. Aby założyć pokrywę
z powrotem, dopasuj ją do zaczepów i dociśnij do
otworu, aż usłyszysz kliknięcie (rys. 8).
2.Aby zdjąć szczotkę, pociągnij pokrywę szczotki w górę. Aby założyć szczotkę, przytrzymaj jej pokrywę i
następnie wsuń szczotkę nad cylinder aż do końca (rys. 8).
6
Przycisk uwalniania
zbiornika na brudną wodę
Uchwyt zbiornika
na brudną wodę

16
Rozdział 2 Obsługa urządzenia
Uwaga: przed pierwszym użyciem, należy naładować urządzenie do pełna.
Ekran LED
Wskaźnik suszenia szczotki
Diody
(wskazują poziom mocy)
Wskaźnik błędu
Obecny tryb Ikona akumulatora
Battery power
percentage display
Wskaźnik
samoczyszczenia
Ostrzeżenie o
pełnym zbiorniku na
brudną wodę
Ostrzeżenie o
pustym zbiorniku
na czystą wodę
1.Światła: Podczas ładowania, diody zmieniają kolor na niebieski i obracają się. Urządzenie jest w pełni
naładowane, gdy diody się świecą i nie obracają już. Po 1 minucie, jasność zostanie zmniejszona o połowę i
barwa zmieni się na niebieską. W trybie Max, światła pokazują jasnoczerwony i ekran wyświetla tryb Max; w
trybie Auto i Eco, światła pokazują niebieski i ekran wyświetla Auto lub tryb Eco (urządzenie automatycznie
przełączy się na tryb Eco, gdy moc jest niższa niż 20%).
2.Tryb: Wyświetlany jest obecny tryb urządzenia.
3. Wyświetlanie w %: Wyświetlany jest poziom mocy akumulatora.
4. Ikona akumulatora: Ostrzega o niskim poziomie mocy (kolor jest czerwony jeśli moc jest poniżej 20%).
5. Ostrzeżenie o pełnym zbiorniku na brudną wodę: Gdy poziom wody osiągnie linię MAX, dioda będzie migać
przypominając o opróżnieniu zbiornika.
6. Ostrzeżenie o pustym zbiorniku na czystą wodę: Gdy zbiornik na wodę jest pusty, dioda będzie migać by
przypomnieć o konieczności uzupełnienia wody.
7. Dioda samo-czyszczenia: Gdy urządzenie w trybie samoczyszczenia, dioda będzie migać i wyświetli się
odliczanie do zakończenia tego trybu.
8. Wskaźnik suszenia szczotki: Po zakończeniu procesu samo-czyszczenia, urządzenie automatycznie
wejdzie w tryb suszenia szczotki. Dioda zaświeci się, by przypomnieć o tym, że urzadzenie akurat suszy
szczotkę.

17
10
Spust natrysku
Przycisk wł./wył.
Przycisk trybu
9
Czyszczenie wtyczki
zbiornika na czystą wodę
Uchwyt
zbiornika na
czystą wodę
11
Napełnianie zbiornika na czystą wodę
1.Chwyć uchwyt zbiornika aby go zdjąć.
2.Wyciągnij wtyczkę zbiornika na czystą wodę, otwórz
wtyczkę do wlotu zbiornika, obróć go na bok (ok. 90
stopni) by odsłonić otwór. Wlej do otworu czystą wodę
oraz płyn.
3.Zakręć zamknięcie zbiornika na czystą wodę i
upewnij się, że jest dokładnie zamknięty.
4.Załóż zbiornik na czystą wodę na szczotkę i dociśnij,
aż usłyszysz kliknięcie. (rys. 9)
Uwaga: Możesz dodawać płyn w czasie wlewania
wody. Proporcje wynoszą 1 butelka płynu na pełny
zbiornik z czystą wodą.
Obsługa urządzenia
1.Przycisk Wł./Wył. urządzenia znajduje się na górze
uchwytu. Naciśnij Wł./Wył. aby rozpocząć pracę.
Domyślnie odkurzacz zostanie włączony w trybie
Auto. Można przełączać się pomiędzy Auto, Eco oraz
Max poprzez naciskanie przycisku i można tak samo
wyłączyć urządzenie.
2.Naciśnij przycisk Wł./Wył. aby rozpocząć odkurzanie.
Naciśnij na spust natrysku aby nawilżyć powierzchnie
wodą. Puść spust aby woda przestała być wydzielana
(rys. 10).
Uwaga:
1.Spust natrysku nie może być naciskany razem z przyciskiem wł./wył ani przyciskiem trybu.
2.Jeśli zbiornik na brudną wodę jest pełny, dioda brudnej wody na ekranie będzie migać i pojawi się
powiadomienie dźwiękowe.
3.Gdy zbiornik czystej wody jest pusty, należy nacisnąć przycisk spryskiwania wodą. Jeśli woda nie jest
rozpylana, wskaźnik pustego zbiornika czystej wody będzie migać i pojawi się powiadomienie dźwiękowe
przypominające o konieczności uzupełnienia czystej wody.
4.Kiedy zbiornik brudnej wody zostanie wyjęty podczas pracy maszyny, wskaźnik zapełnienia zbiornika
brudnej wody na ekranie LED będzie migał. Silnik odkurzacza i silnik wałka szczotkowego natychmiast
przestaną pracować.
5.Po zakończeniu odkurzania, załóż odkurzacz pionowo do bazy ładującej, aby naładować go i tym samym
przygotować do kolejnej pracy.
6.Zalecamy dodawać do urządzenia dołączony do zestawu płyn. Nie należy dodawać płynu generującego
sporą ilość piany – może ona przeciekać do wnętrza urządzenia i go uszkodzić.
Ładowanie urządzenia
1.Podłącz jeden koniec adaptera do bazy lądującej, a drugi koniec do gniazdka z zasilaniem;
2.Włóż urządzenie do bazy ładującej, aby rozpocząć ładowanie. Na ekranie wyświetli się poziom mocy
akumulatora w procentach. Gdy na ekranie wyświetli się 100%, oznacza to że ładowanie jest ukończone (rys.
11).
Uwaga:
1. Jeśli produkt jest długo nieużywany po zakupie, należy go ładować przynajmniej raz na 3 miesiące.
2. Nie zostawiaj ładowarki w gniazdku przez cały czas, aby zapobiec przypadkowemu dotknięciu jej przez
dzieci.
3. Zachowaj wtyczkę ładowarki i ręce suche przed włożeniem urządzenia do bazy ładującej.
4. Przed pierwszym użyciem, należy w pełni naładować akumulator, a przed drugim ładowaniem, należy
wykorzystać akumulator, aby zachować jego wydajność.

18
12
Zbiornik z wodą powinien być
przynajmniej do połowy pełny
Przytrzymaj
przycisk trybu
Czyszczenie szczotki
13
14
Wyczyść
zbiornik na
brudną wodę
Górna
pokrywa
Filtr
Rama ltra
Zbiornik na
brudną wodę
Wyczyść
ramę na ltr
Wyjmij okienko szczotki Wyjmij szczotkę
Przechowywanie
szczotki
Przechowywanie
szczoteczki do
czyszczenia
urządzenia
Przechowanie
HEPA/Adaptera
15
Samo-czyszczenie oraz suszenie
szczotki
Przed przystąpieniem do samo-czyszczenia, opróżnij
zbiornik na brudną wodę i włóż urządzenie na
bazę ładującą oraz podłącz ładowarkę do gniazdka
zasilania. Zbiornik z czystą wodą powinien być
wypełniony przynajmniej do połowy.
Przytrzymaj przycisk trybu przez 5 sekund i
urządzenie wejdzie w tryb samo-czyszczenia. Dioda
samoczyszczenia na ekranie LED będzie migać. Aby
przerwać proces samo-czyszczenia, naciśnij przycisk
wł./wył. i urządzenie przerwie czyszczenie i przejdzie
w tryb ładowania (rys. 12).
Po zakończeniu procesu samo-czyszczenia,
urządzenie automatycznie przejdzie w tryb suszenia
szczotki. Dioda suszenia wyświetli się na ekranie i
urządzenie będzie się również ładować; Aby przerwać
proces suszenia, naciśnij przycisk wł./wył. i odkurzacz
przełączy się na tryb ładowania.
Uwaga:
1.Opróżnij zbiornik na brudną wodę przed i po
zakończeniu samo-czyszczenia.
2.Jeśli poziom mocy jest mniejszy niż 10%, urządzenie
nie może rozpocząć samoczyszczenia.
Rozdział 3 Czyszczenie i
konserwacja
Czysty zbiornik na brudną wodę
1.Jeśli zbiornik na brudną wodę jest pełny, dioda
pełnego zbiornika zaświeci się na ekranie. Urządzenie
też wtedy natychmiast przerwie pracę.
2.Po zakończeniu pracy, wyjmij zbiornik na brudną wodę i zdejmij z niego górną pokrywę. Oczyść ltr oraz
opróżnij zbiornik z brudnej wody. Przemyj zbiornik oraz ltr za pomocą czystej wody.
3.Jeśli we wnętrzu zbiornika znajdują się ciężkie do usunięcia zabrudzenia, należy pozbyć się ich za pomocą
szczotki.
4.Wysusz zbiornik po umyciu go i załóż go z powrotem. Dociśnij zbiornik w czasie zakładania, tak by
słyszalne było kliknięcie (rys. 13).
Czyszczenie szczotki
Zdejmij okienko szczotki i wyjmij szczotkę. Za pomocą suchej ścierki wytrzyj obudowę i pozbądź się włosów
lub zabrudzeń zablokowanych na mini-szczotce. Przemyj okienko szczotki oraz samą szczotkę w czystej
wodzie. Po umyciu, załóż je z powrotem (rys. 14). Szczotkę można też włożyć do zaczepu na akcesoria, aby
go wysuszyć(rys. 15).
Uwaga:
1.Nie należy przemywać całej końcówki w wodzie, aby nie uszkodzić elementów.
2.Jeżeli urządzenie nie będzie używane zaraz po czyszczeniu, należy całkowicie wysuszyć zbiornik na brudną
wodę, pokrywę, ltr, ramę ltra, wałek szczotki, okno wałka szczotki, urządzenie, a następnie zmontować
urządzenie w celu przechowywania, aby zapobiec rozmnażaniu się bakterii w wilgotnym środowisku i
wytwarzaniu nieprzyjemnego zapachu.
Table of contents
Languages:
Other Jimmy Vacuum Cleaner manuals