Jimmy HW8 User manual

Instruction Manual Cordless Vacuum&Washer
Istruzioni per l'uso Aspirapolvere e lavatrice
senza li
Gebrauchsanweisung Akku-Staubsauger
Инструкция по эксплуатации Беспроводной пылесос-
поломоечная машина
Mode d'emploi Aspirateur sans l
Instrucciones de uso Aspiradora sin cable
HW8/HW8 Pro


1
Contents
English 2
русский язык
70
Français 56
Italiano
42
Español
28Deutsch
15

2
Products Installation
Parts Name
On/off button
Indicator
Mode button
LED screen
Brushroll window
Brushroll
Brushroll(HW8 Pro)
Spray mouth
Accessory holder
Charging base
Dirty water tank release
Dirty water tank
Spray trigger
Handle
Back cover
Battery pack
Clean water tank
Cleaning brush
Cleaning shampoo
Adaptor
Packing List
Mainbody Handle Charging
base Adaptor Cleaning
brush Cleaning
Shampoo Battery
pack Brushroll User
instruction
HW8 1 1 1 1 1 1 1 / 1
HW8 Pro 1 1 1 1 1 1 1 1 1

3
2
Battery
pack
Back cover
Product assembly and
disassembly
Note: Cut off electricity before product assembly and
disassembly.
Handle assembly and disassembly
Insert the handle into the mainbody vertically until
a“click”sound is heard. Make sure handle is rmly
locked. To remove the handle, press back cover
latch to open back cover, use a tool like screw
driver to insert into the hole and pull out the handle
upward.(Fig 1)
Note:
1.Do not move the machine by dragging the looped wire to
avoid damaging the wire.
2.During assembly, the handle metal tube side with latch
need to face machine back.(Fig 1)
Assemble battery pack
Remove back cover, slide battery pack along the
slot into mainbody until to the bottom. Clip back
cover left and right clips into back body slots. Push
back cover latch to lock back cover until a “click”
sound is heard.(Fig 2)
Pick and place machine
To put machine back to charging base, hold
machine handle to lift the machine, let floorhead
drop down, aim charging slot on bottom of machine
to the charging pins on charging base and put the
machine into charging base. To use the machine,
hold machine handle and lift out machine from
charging base.(Fig 3)
Disassemble and assemble dirty water
tank
To take off dirty water tank, hold machine with one
hand and hold dirty water tank with another hand,
press dirty water tank release button to remove
dirty water tank. To assemble dirty water tank, place
dirty water tank bottom into mainbody, push dirty
water tank towards mainbody until a “click” sound is
heard.(Fig 4)
4
Dirty water tank
release button
Take out dirty
water tank
5
Dirty water tank
release button
Clean water tank
bottom cap
6
Pull brushroll
upward
Lift brushroll
handle
Charging slot
Charging pin
3
1
Handle
release
hole
Back cover latch
Looped wire
Metal tube latch

4
Disassemble and assemble clean water tank
To take off clean water tank, press clean water tank release button and clean water tank will
pop out from back body, remove water tank. To assemble clean water tank, Place cap on clean
water tank bottom into the water inlet slot on back body, press clean water tank until a “click”
sound is heard.(Fig 5)
Disassemble and assemble brushroll window and brushroll
1.To take off brushroll window, put nger on brushroll window holder position and pull upward to
remove brushroll window. To assemble brushroll window, align the clips on two sides of brushroll
window with the slots on two sides of oorhead. Press brushroll window until a “click” sound is
heard.
2.Disassemble/assemble brushroll: Pull out brushroll left cap with nger to take brushroll out.
Hold brushroll cap, slide brushroll left side into gear , place brushroll into nozzle.(Fig 6)
1.Lights: White colour, shows machine Max and Standard mode(Full lights in Max/Half lights in
Standard).
HW8: Brushroll rotating speed is different in Max and Standard mode.
HW8 Pro: Vacuum suction power is different in Max and Standard mode.
2.Battery power digital and percentage display: Displays current battery power left.
3.Battery power icon display: Battery power warning(Lights are white when battery power is
higher than 20%, lights turn red and blinks when battery power is lower than 20%).
LED screen
Products USE
Lights
Battery power digital display
Battery power icon display
Battery power
percentage display
Dirty water
tank full indicator
Clean water tank empty indicator Self cleaning indicator

5
4.Dirty water tank full indicator: When water in tank reaches MAX line, the indicator will blink to
remind user to drain dirty water tank.
5.Clean water tank empty indicator: When water tank is empty, the indicator will blink to remind
user to add clean water.
6.Self cleaning indicator: When machine is in self cleaning mode, the indicator will blink to
remind user that the machine is under self cleaning.
Fill up clean water tank
1.Press clean water tank release button to take
off clean water tank.
2.Turn clean water tank upside down, turn the
cap clockwise to open, ll in clean water(Below
50℃)until MAX line.
3.Tighten clean water tank cap and make sure it
is tight.
4.Assemble clean water tank into mainbody
until a “click” sound is heard.(Fig 7)
Operation of machine
1.Machine on/off button is located on top of
handle, press on/off button to start working,
indicator turns green. The machine can switch
between Max and Standard mode by pressing
mode button. Press on/off button to stop
working.
2.Press the water spray button to spray fan
shape water flow from front of floorhead,
release the water spray button and water will
stop spray.(Fig 8)
Note:
1.During use, brushroll rotates normally, when the
machine is in upright position, brushroll will stop
rotating for protection.
2.Propose to only use Max mode in very dirty area or
place with much water stain.(Fig 9)
3.When dirty water tank is full, the green working
indicator will blink and the dirty water tank full indicator
on LED screen will also blink. Vacuum motor and
brushroll motor will not stop working immediately.
4.After the machine nishes using, put it vertically on
the charging base.
5.When the clean water tank is empty, press water
spray button, there is no water spray out, and clean
water tank empty indicator blinks to remind user to add
water.
6.Do not use this product to pick up foam liquid. Do not
put high foam detergent into clean water.
7
Clean water tank
release button
Clean water
tank MAX link
Clean water tank cap
Fill in clean
water
8
Water spray button
On/off button
Working indicator
Mode button
Max modeStandard mode
9
10
Keep 1/2 water inside clean
water tank
Keep pressing mode
button to start self-cleaning

6
Machine charging
Put the machine into the charging stand, connect one end of the adapter to the charging stand,
and the other end to the power socket (when charging, the indicator light at the handle is red,
the display screen shows the percentage of battery power, and the light rotates in a circle; When
the charging is completed, the indicator light on handle is green, the display screen shows
100% electricity, and the light at the same time is always on white). When charging, the machine
should be placed on the charging base, close to the corner to avoid tripping and other injuries.
Note:
1. If the product is long idled after purchase, please use the adapter to charge the battery about every three
months, to avoid affecting the battery life.
2. Do not leave the charger on power socket all the time to prevent children from touching it by mistake.
3. When using for the rst time, the capacity of the battery pack of the oor washer may not be full. Please
fully charge the battery, fully discharge the battery pack, and then charge it for the second time, to improve the
life of the battery.
4. For the rst three times of use, it is recommended to charge the oor washer for 12 hours each time. After
complete charging and discharging for three times, the oor washer can be charged according to the normal
charging time.
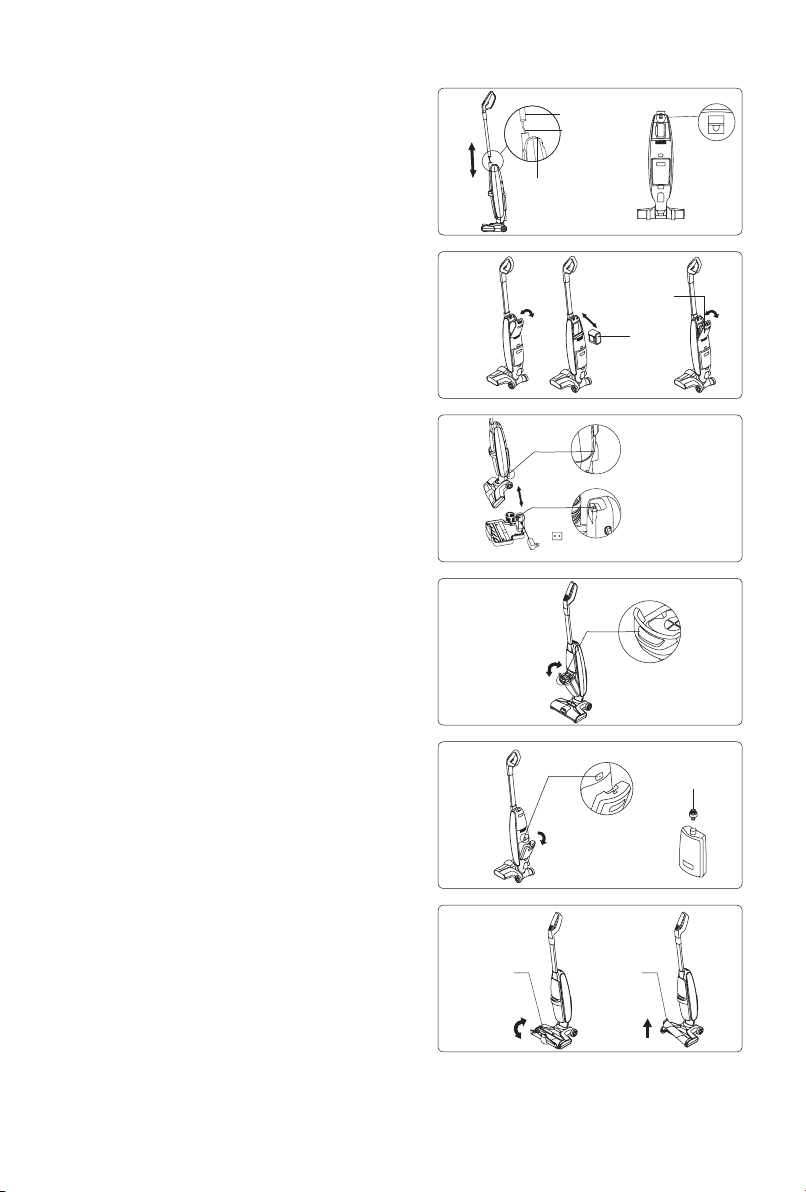
Brushroll self cleaning
Before self-cleaning, Drain the dirty water tank, place the machine on the charging base, insert
the charger into the socket, keep at least 1/2 of the water in the clean water tank, press the
mode button for 3 seconds, the machine will enter self-cleaning mode, the self-cleaning indicator
on the LED display will blink, the front nozzle will spray water continuously for 5 seconds, then
the brushroll will rotate continuously for 10 seconds for self-cleaning, and nally the machine will
run continuously for 30 seconds to pick up dirty
water into dirty water tank , the machine will
repeat this cleaning process for three time to
complete self cleaning. And the machine enters
charging mode (Fig 10)
Note:
Drain the dirty water tank before and after self-
cleaning.
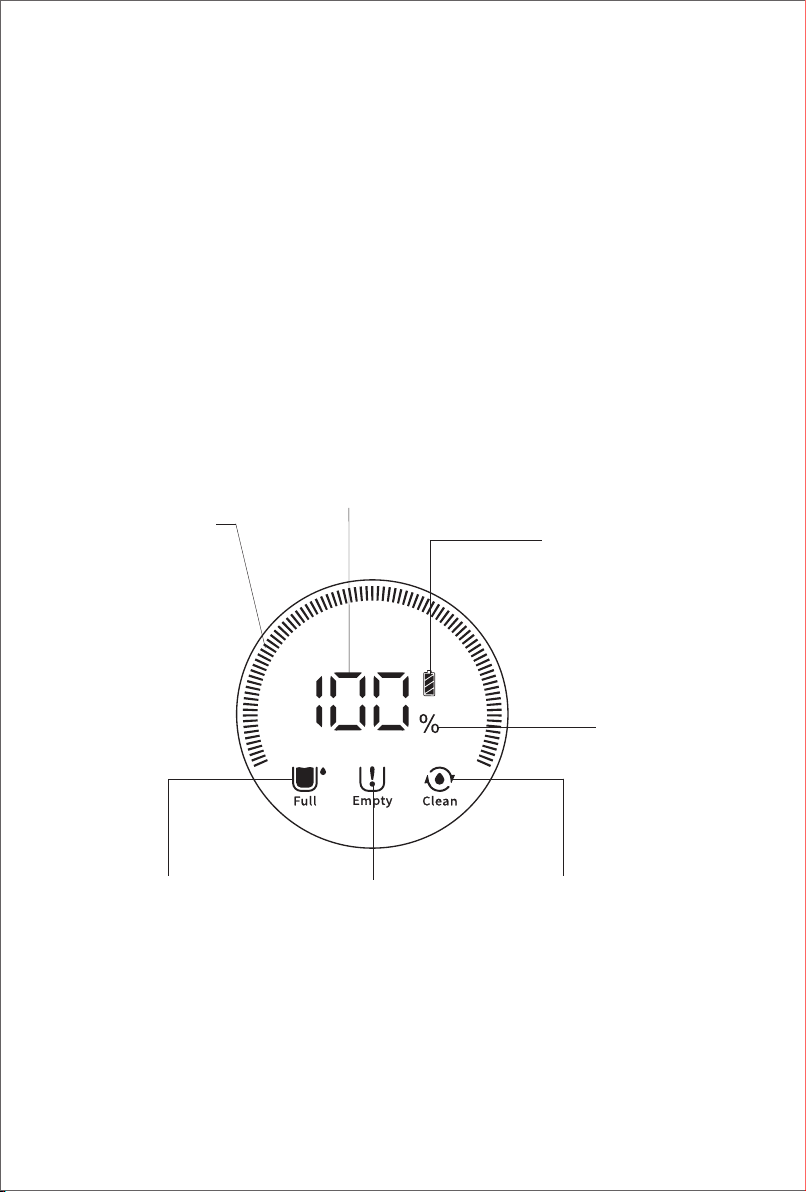
Cleaning and Maintenance
Clean dirty water tank
When the dirty water tank is full, the water level
detecting float is activated, the indicator light
stays green, and the water full indicator on the
display screen blinks continuously. The cleaner
stops working to remind the user to clean the
dirty water tank as soon as possible. After
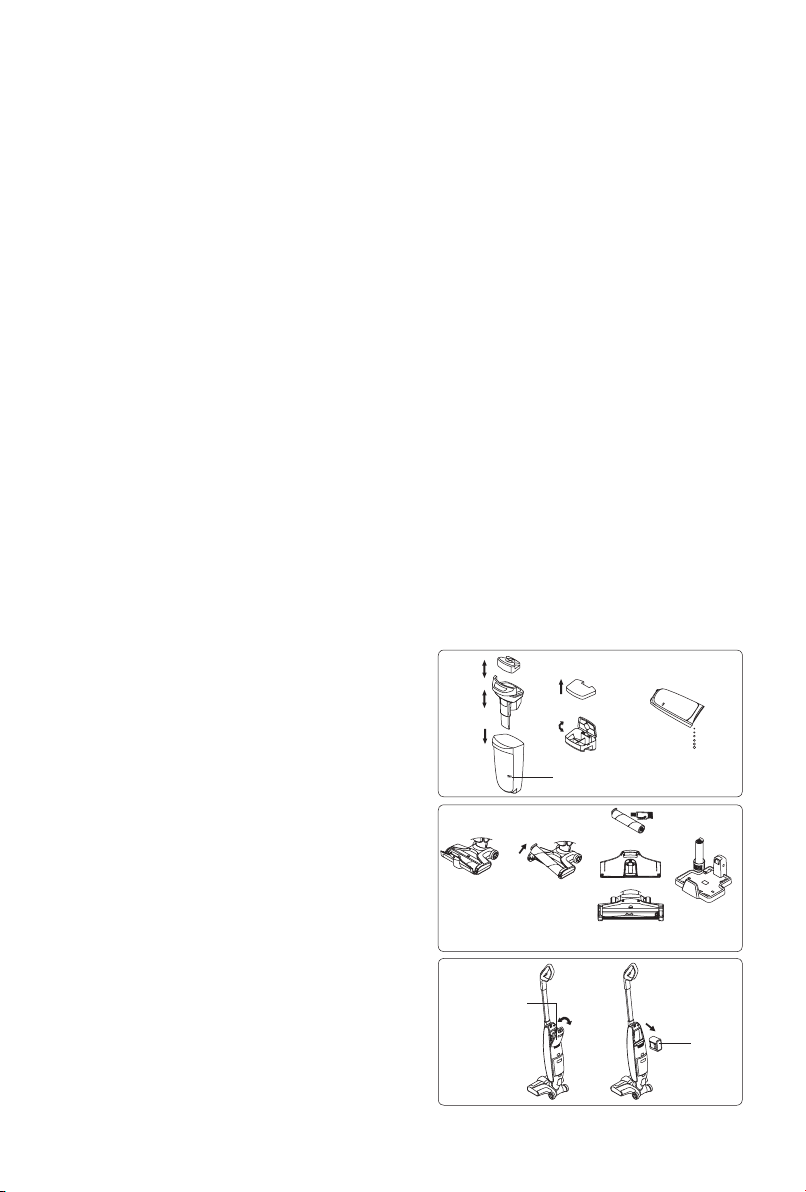
Take off
brushroll window
Take off
brushroll
Clean brushroll12
11
Clean dirty water tank
Dirty water tank MAX line tank
13
Battery
Pack
Back cover

7
stopping work, remove dirty water tank upper cover, pour out the dirty water and dirt in the dirty
water tank, wash the dirty water tank, support frame, oat, lter frame and lter foam with clean
water. Dry the above parts after washing, then put them back into the dirty water tank, and then
assemble the dirty water tank into the machine to continue to use. (Fig 11)
Brushroll cleaning
Hold brushroll window with nger and pull upward to take it out. Pull left side of brushroll to
take it out. Use dry cloth to wipe brushroll housing and cut off the hair tangled around brushroll.
Wash the brushroll window and brushroll in clean water. After cleaning, assemble brushroll and
brushroll window back to machine. (Fig 12)
Note:
If the cleaner will not be used soon after cleaning,completely dry the dirty water tank, dirty water tank cover,
lter, lter frame, brushroll, brushroll window, machine and then assemble the machine for storage, in order to
prevent the bacteria from breeding in the humid environment and producing odor.
Maintenance and Storage
1. it is recommended to clean the dirty water tank, lter, brushroll and brushroll window after
each use. If the dirty water reaches MAX line, please drain the dirty water tank immediately
otherwise the machine cannot operate normally. After the accumulated use time of the filter
reaches 30-50 hours (various basing on lter status),replace the lter to avoid affecting machine
performance. Filter can be bought from local distributor.
2. After the use of this product, place it on charging base and ensure the product standing
upright to reduce accidental contact and tilt.
3. when pack and store the machine, if it is necessary to disassemble battery pack, remove
back cover, hold the battery pack and pull to take it out. (Fig 13)
4. when the machine is long idled, place it in a cool and dry place, avoid direct sunlight or wet
environment.

8
Important Safety Instructions
Read all instructions and warnings before using this appliance. Failure to follow the
warnings and instructions may result in electric shock, re or serious injury.
Warning
1.The appliance is only for household use.
2.Before use the product, check whether the local voltage is consistent with the voltage marked
on the power adaptor.
3.Inspect the product before use, stop use if the product or adaptor is damaged.
4.Use only as described in this manual.
5.This appliance cannot be used by children and persons with reduced physical, sensory
or mental capabilities or lack of experience and knowledge unless they have been given
supervision or instruction concerning use of the appliance in a safe way and understand the
hazards involved.
6.Do not use this product as a toy. Keep this product away from the reach of children. Take care
of children and make sure they will not regard this product as a toy.
7.Do not touch plug with wet hand.
8.Use extra care when cleaning on stairs to prevent falling.
9.Do not use or disassemble or replace any component if there is damage on power cord, plug,
battery or conductive parts. Disassembly or replacement of the components by yourself may
cause electric shock or re. JIMMY will not take responsibility. Once damaged, the product need
to be repaired or replaced by JIMMY, JIMMY’s distributor or qualified person designated by
JIMMY to avoid injury.
10.Recharge only with the adaptor specied by JIMMY.
11.Only to use the battery pack specied by JIMMY. Use of any other battery pack may cause
explosion, injury and or product damage.
12.If the product does not operate in accordance with the instructions, is seriously impacted,
falls from a height, is damaged, or falls into the water, do not use it and contact JIMMY or
JIMMY distributor .
13.Only use JIMMY specied replacement parts or attachments.
14.Do not pull or press the cable. Keep cable away from heated surfaces. Do not place the

9
cable in a closed door or pull it through a sharp edge or corner. Keep the cable away from
walking area. Do not operate product across the cable.
15.Unplug the product when it is not used or before repairing.
16.Do not drag the cord or carry cord to move the product, or use cord as handle.
17.The product is a rechargeable electric appliance. Do not leave the machine to run
unattended.
18.Remove battery pack when the product is cleaned, repaired or long idled.
19.Do not get close to heating appliance or expose under sunshine longtime, to prevent over
heating causing housing deformation.
20.Keep objects that may obstruct air path from air inlet and outlet to prevent machine
overheating.
21.Product mainbody and oorhead have electric components, cannot be washed under water.
22.Do not clean or disassemble brushroll cover or brushroll when the machine is power on or
under working to prevent injury.
23.Do not use the product to pick up amming objects like burning charcoal or cigarette etc.
24.Do not use the product to pick up sharp objects like broken glass.
25.Do not use the product to pick up lime, cement, toner, gypsum powder, our and other ultra-
ne substances.
26.Do not use the product to pick up acid-base cleaning liquid, washing powder and other
corrosive liquids.
27.corrosive liquids.Do not use the product to pick up inammable and explosive objects like
gasoline, alcohol, perfume, paint, etc.
28.Do not disassemble the closed machine, and do not try to change the performance of the
machine. Only get help from the professional personnel of the manufacturer, its maintenance
department or similar departments, otherwise it will cause danger.
29.Turn off power and unplug charger if the products is long idled.
30.Product technical specication of this manual are based on results from lab tests of JIMMY
or designated third parties. The company reserves all rights for nal explanations.

10
About use of the product
1.This product is suitable for hard floor in indoor environment, including waxed floor, rubber
oor, tile oor and sealed wood oor, solid wood oor and other at surface, use of the product
on unat ground may not achieve the best effect.
2.Do not turn on the machine before dirty water tank and clean water tank are assembled in
place according to instruction.
3.Do not shake the product up and down or collide violently to prevent dirty water from owing
into the motor; when the product is turned on, do not lift or carry the machine up and down, and
do not tilt the product to one side or lay it at on the oor to prevent dirty water from owing into
the motor.
4.Do not run the product for a long time with the oat blocking the air inlet to avoid damage.
5.After using the product, clean the dirty water tank, suction nozzle, air path and store it in
ventilated and dry place. Wet place will affect the insulation and life of electrical appliances.
About Cleaning Solution
1.A large amount of cleaning solution entering into the motor may cause damage to the
appliance.
2.Mix the solution with clean water according to the instructions (the ratio of solution to clean
water is 1:50). It is recommended to use provided cleaning solution. Do not use cleaning
solution contains acid, alkali solution or substances harmful to the environment.
3.Keep cleaning solution out of reach of children. If any solution gets into the eyes, immediately
flush them with clean water. If any solution is swallowed by accident, see medical care
immediately.
4.Dirty water and solution disposal should comply with local environmental regulations.
About disposal of battery
1.The battery in the product contains materials harmful to the environment. Take out the battery
pack from the product before disposal.
2.Turn off the product and unplug adaptor before taking out battery pack.
3.Handle the waste battery pack safely and properly. Do not put it into re, water or soil.
4.If the disposed battery leakage causes pollution to skin or clothes, Wash with clean water and
see medical care immediately.

11
Troubleshooting
Please check the following points before contacting the after sale service.
Problem Possible cause Solution
Machine does not work Low battery power Recharge battery
Machine does not work On/off button is not pressed
down Press down on/off button
Machine does not work Brushroll is entangled Clean brushroll
Machine does not work Water in dirty water tank
achieves MAX line Clean dirty water tank
Machine does not work On/off button or mode button
is pressed at the same time
with water spray button
Release water spray button,
press on/off button or mode
button separately
Machine does not work The product is in upright
position Release the oorhead and
then brushroll can work
Weak suction Water in dirty water tank
achieves MAX line Clean dirty water tank
Weak suction Brushroll window and dirty
water tank not assembled
properly
Reassemble brushroll
window and dirty water tank
Weak suction Brushroll entangle Clean brushroll
Weak suction Filter gets dirty Clean or replace lter
Weak suction Lower battery power Recharge battery
Abnormal noise Suction inlet blocked Clean suction inlet
Abnormal noise Water in dirty water tank
achieves MAX line Clean dirty water tank

12
Floorhead does not spray
water Clean water tank empty Fill clean water tank
Floorhead does not spray
water
Water spray button not
pressed Press water spray button
Floorhead does not spray
water
Clean water tank not
assembled properly Reassemble clean water tank
Floorhead does not spray
water
Clean water tank is lled with
dirty water and blocked water
path.
Do not ll clean water tank
with dirty water
Water spray out from air
exhaust Filter is not dry after washing Dry the lter after washing
Water spray out from air
exhaust
Water in dirty water tank
achieves MAX line Clean dirty water tank
Water spray out from air
exhaust
The product was heavily
shaked or hits the wall with
big force Clean dirty water tank
Water spray out from air
exhaust Filter is not assembled Assemble lter
Water spray out from air
exhaust Float is not assembled Assemble oat
Water spray out from air
exhaust
Filter is put to use without
fully dry Dry the lter after washing
before use
Note: If the above troubleshooting guide fails to provide a solution, please contact after service or local
distributor for support.

13
Product Specication
Technical specication
Model No HW8 HW8 Pro
Adaptor Input 100-240V ~50/60Hz 100-240V ~50/60Hz
Rated Voltage 28.8V 28.8V
Rated Power 220W 300W
Battery Capacity 2500mAh 3000mAh
Clean Water Tank Capacity 0.45L 0.45L
Dirty Water Tank Capacity 0.35L 0.35L
Charge Time 5h 5h
Circuit diagram
Lithium battery
PCB
100-240V ~ 50/60Hz
Charging
base
Adaptor
8 Lithium battery
Transfer PCB
Upright switch
Switch button
PCB
LED screen
PCB
Vacuum motor
Floorhead motor
Pump motor
M
M
M
······

14
Manufacturer Information
Manufacturer Kingclean Electric Co., Ltd
Address No.1 Xiangyang Road, Suzhou New District, Jiangsu Province
215009, China
Disposal
The machine, accessories and packaging should be sorted for environmental-friendly recycling.
Do not dispose of the machine into household waste!
Only for EC countries:
According to the European Guideline 2012/19/EU, machine that are no longer usable, and
according to the European Guideline 2006/66/EC, defective or used battery packs/batteries,
must be collected separately and disposed of in an environmentally correct manner.
Battery packs/batteries:
Integrated batteries may only be removed for disposal by qualied personnel.
Opening the housing shell can damage or destroy the machine.
Do not dispose of battery packs/batteries into household waste, re or water. Battery
packs/batteries should, if possible, be discharged, collected, recycled or disposed of in an
environmental-friendly manner.
Subject to change without notice.
Warranty Information
This product enjoys two years warranty from the date of purchase.
Excluded from the guarantee is normal wear, commercial use, alterations to the appliance as
purchased, cleaning activities, consequences of improper use or damage by the purchaser
or a third person, damage, that can be attributed to external circumstances or caused by the
batteries.

15
Nome delle parti
Pulsante On/off
Indicatore
Pulsante modalità
Schermo LED
Finestra spazzola in rotolo
Spazzola in rotolo
Bocca spruzzo
Porta accessori
Base di ricarica
Sblocco del serbatoio
dell'acqua sporca
Serbatoio dell'acqua sporca
Pulsante spruzzo d'acqua
Maniglia
Copertina posteriore
Pacco batteria
Serbatoio dell'acqua pulita
Spazzolino di pulizia
Liquido detergente
Adattatore
Lista imballaggio
Corpo
principale Maniglia Base di
ricarica Adattatore Spazzolino
di pulizia Liquido
detergente Pacco
batteria Spazzola
in rotolo Istruzioni
per uso
HW8 1 1 1 1 1 1 1 / 1
HW8 Pro 1 1 1 1 1 1 1 1 1
Spazzola in rotolo(HW8 Pro)

16
Montaggio e smontaggio del
prodotto
Nota: tagliare l'elettricità prima del montaggio e dello
smontaggio del prodotto.
Montaggio e smontaggio della maniglia
Inserire la maniglia verticalmente nel corpo
principale nché non si sente un "clic". Assicurarsi
che la maniglia sia ben bloccato. Per rimuovere la
maniglia, premere il fermo della copertina posteriore
per aprire la copertina posteriore, utilizzare uno
strumento duro come un cacciavite per inserirlo nel
foro ed estrarre la maniglia verso l'alto. (Fig 1)
Nota:
1.Non spostare la macchina trascinando il lo ad anello per
evitare di danneggiare il lo.
2.Durante l'assemblaggio, il lato della maniglia del tubo
metallico con il fermo deve essere rivolto verso la parte
posteriore della macchina (Fig 1).
Montare il pacco batteria
Rimuovere la copertina posteriore, far scorrere il
pacco batteria lungo lo slot nel corpo principale no
al fondo. Agganciare le clip del coperchio posteriore
sinistra e destra negli slot del corpo posteriore.
Spingere il fermo del coperchio posteriore per
bloccare il coperchio posteriore nché non si sente
un "clic". (Fig 2)
Scegliere e posizionare la macchina
Per riportare la macchina sulla base di ricarica,
tenere la maniglia della macchina per sollevare la
macchina, lasciare cadere la testa del pavimento,
puntare la fessura di ricarica sul fondo della
macchina ai perni di ricarica sulla base di ricarica
e inserire la macchina nella base di ricarica. Per
utilizzare la macchina, afferrare la maniglia della
macchina e sollevare la macchina dalla base di
ricarica. (Fig 3)
Smontare e montare il serbatoio
dell'acqua sporca
Per rimuovere il serbatoio dell'acqua sporca, tenere la
macchina con una mano e tenere il serbatoio dell'acqua
sporca con l'altra mano, premere il pulsante di rilascio
del serbatoio dell'acqua sporca per rimuovere il serbatoio
4
Pulsante di rilascio del
serbatoio dell'acqua
sporca
Estrarre il serbatoio
dell'acqua sporca
5
Pulsante di rilascio del
serbatoio dell'acqua
sporca
Tappo inferiore
del serbatoio
dell'acqua pulita
6
Tirare la spazzola
in rotolo verso l'alto
Sollevare la
maniglia della
spazzola in rotolo
2
Pacco
batteria
Copertina
posteriore
Fessura di ricarica
posteriore
Perno di ricarica
3
1
Foro di
rilascio
della
maniglia
Fermo della
copertina posteriore
Filo ad anello
Fermo a tubo
metallico

17
dell'acqua sporca. Per montare il serbatoio dell'acqua sporca, posizionare il fondo del serbatoio dell'acqua
sporca nel corpo principale, spingere il serbatoio dell'acqua sporca verso il corpo principale nché non si
sente un "clic". (Fig 4)
Smontare e montare il serbatoio dell'acqua pulita
Per rimuovere il serbatoio dell'acqua pulita, premere il pulsante di rilascio del serbatoio
dell'acqua pulita e il serbatoio dell'acqua pulita uscirà dal corpo posteriore, rimuovere il serbatoio
dell'acqua. Per montare il serbatoio dell'acqua pulita, posizionare il tappo sul fondo del serbatoio
dell'acqua pulita nella fessura di ingresso dell'acqua sul corpo posteriore, premere il serbatoio
dell'acqua pulita nché non si sente un "clic".(Fig 5)
Smontare e montare la nestra della spazzola in rotolo e la spazzola in rotolo
1.Per rimuovere la nestra del rullo della spazzola in rotolo, mettere il dito sulla posizione del
supporto della nestra della spazzola in rotolo e tirare verso l'alto per rimuovere la nestra della
spazzola in rotolo. Per assemblare la nestra della spazzola in rotolo, allineare le clip su due
lati della nestra della spazzola in rotolo con le fessure su due lati della testata del pavimento.
Premere la nestra della spazzola in rotolo nché non si sente un "clic".
2.Smontare / montare la spazzola in rotolo: Estrarre il cappuccio sinistro della spazzola in rotolo
con il dito per estrarlo. Tenere il cappuccio della spazzola in rotolo, far scorrere la spazzola in
rotolo sul lato sinistro nell'ingranaggio, posizionare la spazzola in rotolo nell'ugello. (Fig 6)
Schermo LED
Utilizzo del prodotto
Nota: prima dell'uso, controllare se la macchina di lavaggio a secco veloce ha elettricità. Se non c'è elettricità,
caricarla in tempo e usarla dopo averla caricata completamente.
Luci
Display digitale con alimentazione a
batteria
Visualizzazione dell'icona di carica
della batteria
Visualizzazione della
percentuale di carica
della batteria
Indicatore di serbatoio
dell'acqua sporca pieno
Indicatore di serbatoio dell'acqua
pulita vuoto
Indicatore di autopulizia

18
1.Luci: colore bianco, mostra la modalità Max e Standard della macchina (luci piene in luci Max
/ Metà in Standard).
HW8: La velocità di rotazione delle spazzole è diversa in modalità Max e Standard.
HW8 Pro: la potenza di aspirazione del vuoto è diversa in modalità Max e Standard.
2.Visualizzazione digitale della carica della batteria e percentuale: Visualizza la carica della
batteria attuale rimasta.
3.Visualizzazione dell'icona di carica della batteria: avviso di carica della batteria (le luci
sono bianche quando la carica della batteria è superiore al 20%, le luci diventano rosse e
lampeggiano quando la carica della batteria è inferiore al 20%).
4.Indicatore di serbatoio dell'acqua sporca pieno: quando l'acqua nel serbatoio raggiunge la
linea MAX, l'indicatore lampeggia per ricordare all'utente di svuotare il serbatoio dell'acqua
sporca.
5.Indicatore di serbatoio dell'acqua pulita vuoto: quando il serbatoio dell'acqua è vuoto,
l'indicatore lampeggia per ricordare all'utente di aggiungere acqua pulita.
6.Indicatore di autopulizia: quando la macchina
è in modalità di autopulizia, l'indicatore
lampeggia per ricordare all'utente che la
macchina è in fase di autopulizia.
Riempire il serbatoio dell'acqua pulita
1.Premere il pulsante di rilascio del serbatoio
dell'acqua pulita per rimuovere il serbatoio
dell'acqua pulita.
2.Capovolgere il serbatoio dell'acqua pulita,
ruotare il tappo in senso orario per aprirlo,
riempire con acqua pulita (inferiore a 50℃) no
alla linea MAX.
3.Stringere il tappo del serbatoio dell'acqua
pulita e assicurarsi che sia ben stretto.
4.Montare il serbatoio dell'acqua pulita nel
corpo principale finché non si sente un "clic".
(Fig 7)
Funzionamento della macchina
1.Il pulsante on/off della macchina si trova
sulla parte superiore della maniglia, premere
il pulsante maniglia per iniziare a lavorare,
l'indicatore diventa verde. La macchina
può passare dalla modalità Max a quella
Standard premendo il pulsante modalità.
Premere il pulsante on / off per interrompere il
funzionamento.
2.Premere il pulsante dello spruzzo d'acqua per
spruzzare il usso d'acqua a forma di ventaglio
dalla parte anteriore della testata del pavimento,
rilasciare il pulsante dello spruzzo d'acqua e
7
Pulsante di rilascio
del serbatoio
dell'acqua pulita
Linea MAX
serbatoio acqua
pulita
Tappo del serbatoio
dell'acqua pulita Riempire con
acqua pulita
8
Pulsante spruzzo
d'acqua
Pulsante on/off
Indicatore di
funzionamento
Pulsante modalità
Modalità Max
Modalità standard
9
10
Tenere 1/2 acqua all'interno del
serbatoio dell'acqua pulita
Tenere premuto il pulsante
modalità per avviare l'autopulizia
Other manuals for HW8
1
This manual suits for next models
1
Table of contents
Languages:
Other Jimmy Vacuum Cleaner manuals