manuals.online logo
Brands
  1. Home
  2. •
  3. Brands
  4. •
  5. JKS
  6. •
  7. Automobile Accessories
  8. •
  9. JKS 2944 User manual

JKS 2944 User manual

Installation
Instructions
JKS Rear Lower Shock Extension Installation PN 2944 Page 1 of 2
Product: Rear Lower Shock Extensions
Part Number: PN 2944
Application: Jeep Wrangler TJ, 1997-06
Welcome
CONGRATULATIONS on your purchase
of new JKS Rear Lower Shock Extensions! At
JKS Manufacturing, we are committed to
providing you with the best products available
and your satisfaction is our first priority.
PLEASE READ these Installation Instructions
carefully, and save them for future reference,
as they contain important installation and
maintenance information.
Important
INSTALLATION OF SHOCK EXTENSIONS
relocates the rear lower shock mounts
1-3/4” away from the axle housing for
additional clearance.
Tools Required
Metric/Standard Socket Wrench Set
1/2” Open End Wrench
Torque Wrench
Factory Service Manual (recommended)
* Asterisk denotes tools that are not required for some
applications. Thoroughly read instructions first to
determine which tools will be required for your
application.
Parts
DESCRIPTION QTY
A Extension Brackets 2
B Steel Sleeves 2
C 5/16” x 7/8” Bolts 2
D 5/16” SAE Flat Washers 4
E 5/16” Nylock Nuts 2
F 1/2” x 2-1/2” Bolts 2
G 1/2” SAE Flat Washers 4
H 1/2” Ovalok Nuts 2
JKS Rear Lower Shock Extension Installation PN 2944 Page 2 of 2
Installation
1. REMOVE SHOCK ABSORBERS
Remove the nut and bolt that secures the rear
shock absorber to the axle. Retain hardware
for re-installation.
Remove shock absorber from the lower mount
and move it out of the way.
2. INSTALL EXTENSION BRACKET
Slide narrow end of Shock Extension (A) into
factory lower shock mount on axle.
Align the small hole in the bracket with the small
hole on the factory shock mount and insert a
5/16” x 7/8” Bolt (C) with 5/16” Flat Washer (D)
HINT: Insert bolt from bracket side so that
threaded end points forward.
Install a 5/16” Nylock Nut (E) with another
5/16” Flat Washer (D) onto bolt, but do not
tighten yet.
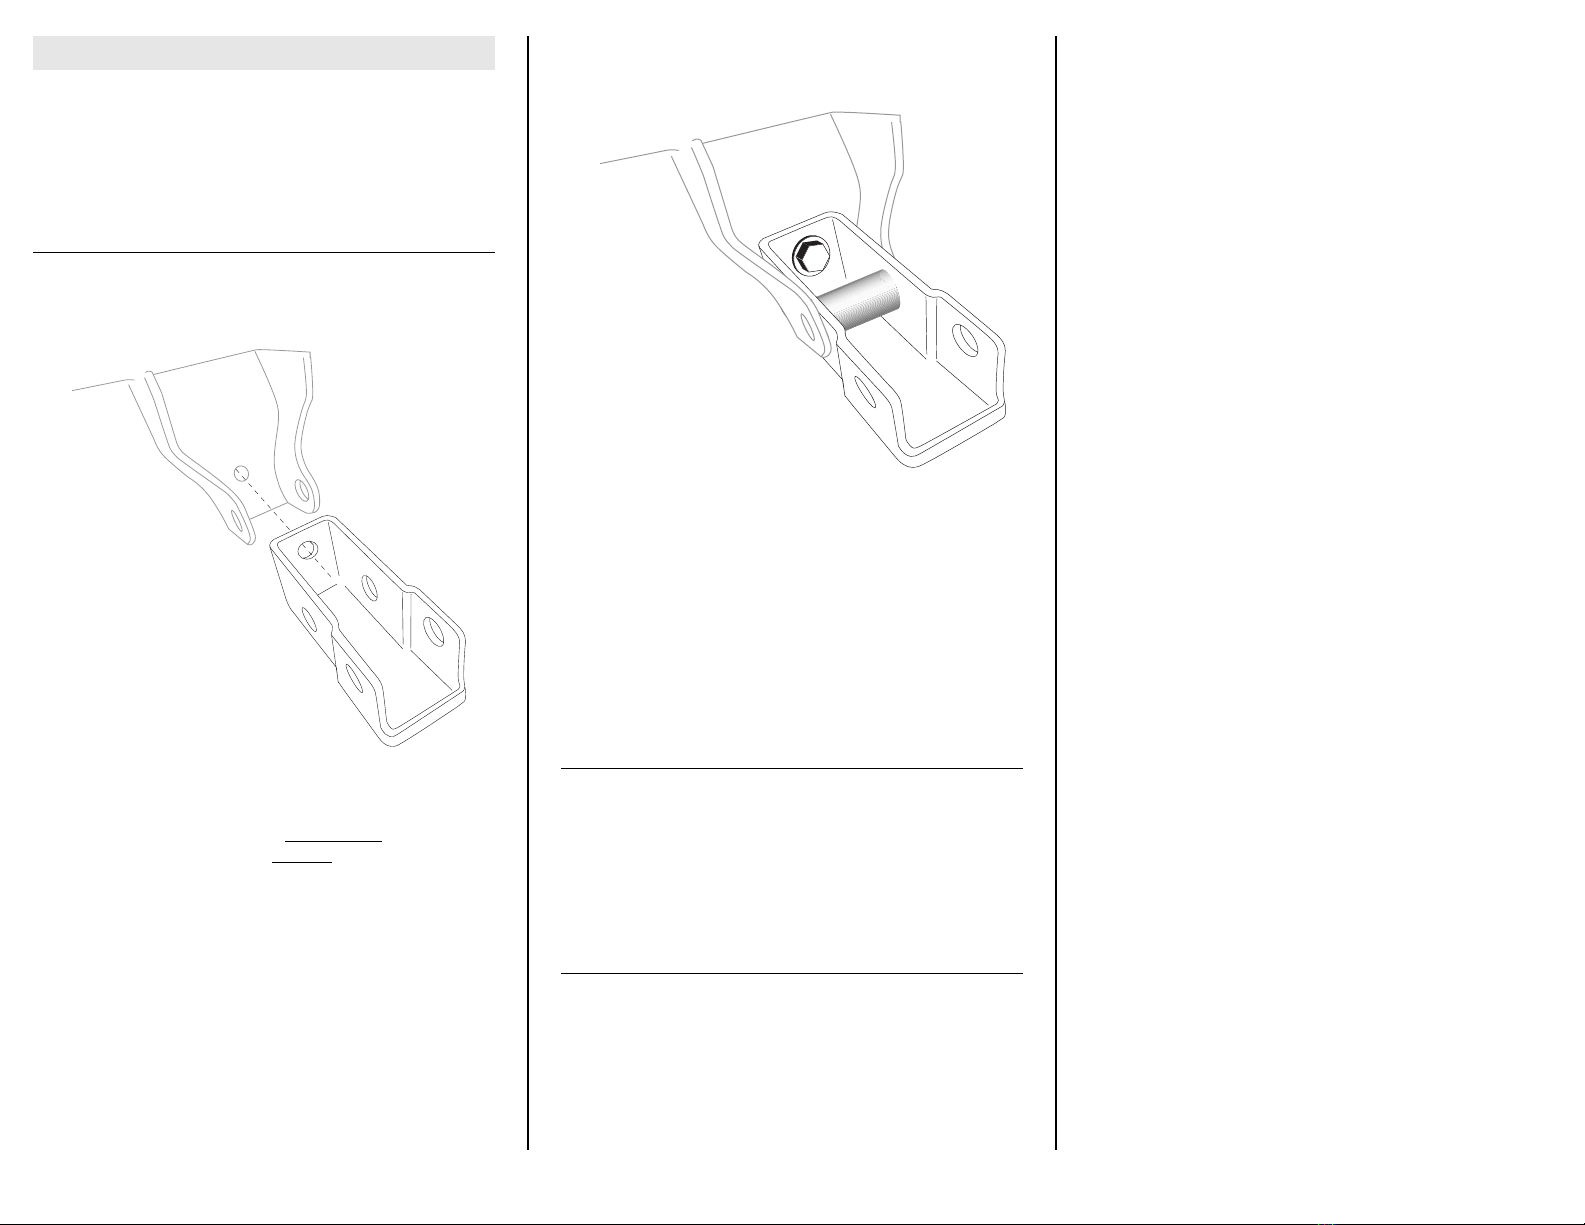
Slide the supplied Steel Sleeve (B) into the
Extension Bracket (A) and align with the original
shock mounting holes.
Insert 1/2” x 2-1/2” Bolt (F) with 1/2” Flat
Washer (G) into the original shock mounting
hole and through the Extension Bracket (A) and
Steel Sleeve (B). HINT: Sleeve prevents shock
mount and bracket from collapsing when 1/2”
bolt is tightened.
Secure bolt to shock mount by installing a
1/2” Ovalok Nut (H) with 1/2” Flat Washer (G)
on other end.
Using a torque wrench, tighten the 1/2” Bolt (F)
to 65 ft-lbs. Then tighten the 5/16” Bolt (C) to
35 ft-lbs.
3. RE-INSTALL SHOCK ABSORBERS
Slide the shock absorber into the wide end of
Extension Bracket (A) and secure with the
original shock mounting hardware.
Using a torque wrench, tighten original shock
mounting bolt to 65 ft-lbs.
©2006 JKS Manufacturing, Inc & Aftermarketing, LLC
Revision Date 12/2/2006

Other JKS Automobile Accessories manuals

JKS OGS125 User manual

JKS

JKS OGS125 User manual

JKS PN 2400 User manual

JKS

JKS PN 2400 User manual

JKS JKSOGS122 User manual

JKS

JKS JKSOGS122 User manual

JKS ACOS Pro JKS2770 User manual

JKS

JKS ACOS Pro JKS2770 User manual

JKS SuperNerfs OGS825 User manual

JKS

JKS SuperNerfs OGS825 User manual

JKS PAC2112K User manual

JKS

JKS PAC2112K User manual

JKS HD X-Member User manual

JKS

JKS HD X-Member User manual

JKS JKS1610 User manual

JKS

JKS JKS1610 User manual

JKS JKSOGS960 User manual

JKS

JKS JKSOGS960 User manual

JKS PAC2151 User manual

JKS

JKS PAC2151 User manual

JKS PN 6155 User manual

JKS

JKS PN 6155 User manual

JKS Steering Brace System User manual

JKS

JKS Steering Brace System User manual

JKS Quicker Disconnects User manual

JKS

JKS Quicker Disconnects User manual

Popular Automobile Accessories manuals by other brands

AutoMaxi Super Rider quick start guide

AutoMaxi

AutoMaxi Super Rider quick start guide

Subaru H001ssC800 installation instructions

Subaru

Subaru H001ssC800 installation instructions

Alexo Sweden 645-102 Series Installation and operating instructions

Alexo Sweden

Alexo Sweden 645-102 Series Installation and operating instructions

iDataLink maestro Rr install guide

iDataLink

iDataLink maestro Rr install guide

Privacy Shades CIT-XSPI-5-A installation instructions

Privacy Shades

Privacy Shades CIT-XSPI-5-A installation instructions

Yakima KayakStackers quick start guide

Yakima

Yakima KayakStackers quick start guide

Feniex CANNON H-2209 instruction manual

Feniex

Feniex CANNON H-2209 instruction manual

ALLIANCE BCK-001 installation guide

ALLIANCE

ALLIANCE BCK-001 installation guide

Fiamma 98655-713 Installation instruction

Fiamma

Fiamma 98655-713 Installation instruction

Safe Fleet PRIME DESIGN PRR-6001 manual

Safe Fleet

Safe Fleet PRIME DESIGN PRR-6001 manual

GoBerce E201 Q-CUP user manual

GoBerce

GoBerce E201 Q-CUP user manual

Aries S223044-2 installation manual

Aries

Aries S223044-2 installation manual

Scosche GM1503 Nstallation instructions

Scosche

Scosche GM1503 Nstallation instructions

Lund Industries SSTB-TAH15 Mounting instructions

Lund Industries

Lund Industries SSTB-TAH15 Mounting instructions

Rightline Gear 100B90 Setup guide

Rightline Gear

Rightline Gear 100B90 Setup guide

Cartft FLEETPC-8-I7BPOE user manual

Cartft

Cartft FLEETPC-8-I7BPOE user manual

GROM Audio VLINE installation manual

GROM Audio

GROM Audio VLINE installation manual

Vangear Woody-Pod instruction manual

Vangear

Vangear Woody-Pod instruction manual

manuals.online logo
manuals.online logoBrands
  • About & Mission
  • Contact us
  • Privacy Policy
  • Terms and Conditions

Copyright 2025 Manuals.Online. All Rights Reserved.