JOBE Addict The POD User manual

Care and Maintenance
I. Be sure to check and tighten all fasteners and connections prior to every use.
II. Remove the pod when you put the boat on a trailer.
III. Use soap and water or general cleaners to clean the Pod. Avoid abrasive materials that might scratch the Pod.
IV. Always rinse the Pod after contact with salt (brackish) water.
JOBE Addict the POD Warranty
Jobe Sports Europe warrants this product (not including other 3rd party accessories) against manufacturers defects. Anodizing and powder coated surfaces as
well as all hardware corrosion are specically excluded as their care and use cannot be controlled by Jobe Sports Europe. Any modications or improper use
shall void this warranty. Jobe Sports Europe is not responsible for personal injury or damage to the boat caused by the use of the Pod. JOBE’s obligation under
this warranty shall not include any transportation charges or costs of installation or any liability for direct, indirect or consequential damages resulting from
delay or improper installation. No dealer, retailer or manufacturer is the agent of Jobe Sports Europe and may not assume for Jobe Sports Europe any liability in
connection with this warranty. This warranty is in lieu of all.
Distributed by:
Jobe Sports Europe
Heerewaardensestraat 30
6624 KK Heerewaarden
The Netherlands
WWW.JOBESPORTS.COM
The POD
Check WWW.JOBESPORTS.COM for other languages of this manual
IMPORTANT NOTES ON INSTALLING AND USING YOUR NEW POD
◆ Note that this installation guide is only a guideline. Each boat is different and improvisation is
needed to mount the Pod on your boat.
◆ We advise you to have the Pod mounted by a professional who has experience in
boatconstructions and mounting other Pods.
◆ Do not use top of the Pod for waterskiing. It was not designed to handle the side pulls created by hard slalom
turns. However, if you wish to water ski without disassembling the Pod, simply use the Pod’s built-in “Ski Eye”
WARNING
FAILURE TO ADHERE TO ALL WARNINGS COULD CAUSE DAMAGE TO EQUIPMENT OR VEHICLE, PERSONAL
INJURY OR EVEN DEATH. DO NOT USE TO PULL TUBES, KITES, PARA SAILORS OR STRANDED BOATS • BE SURE TO
CHECK ALL HARDWARE FOR WEAR AND PROPER INSTALLATION PRIOR TO EACH USE • ONLY ONE PERSON AT A TIME
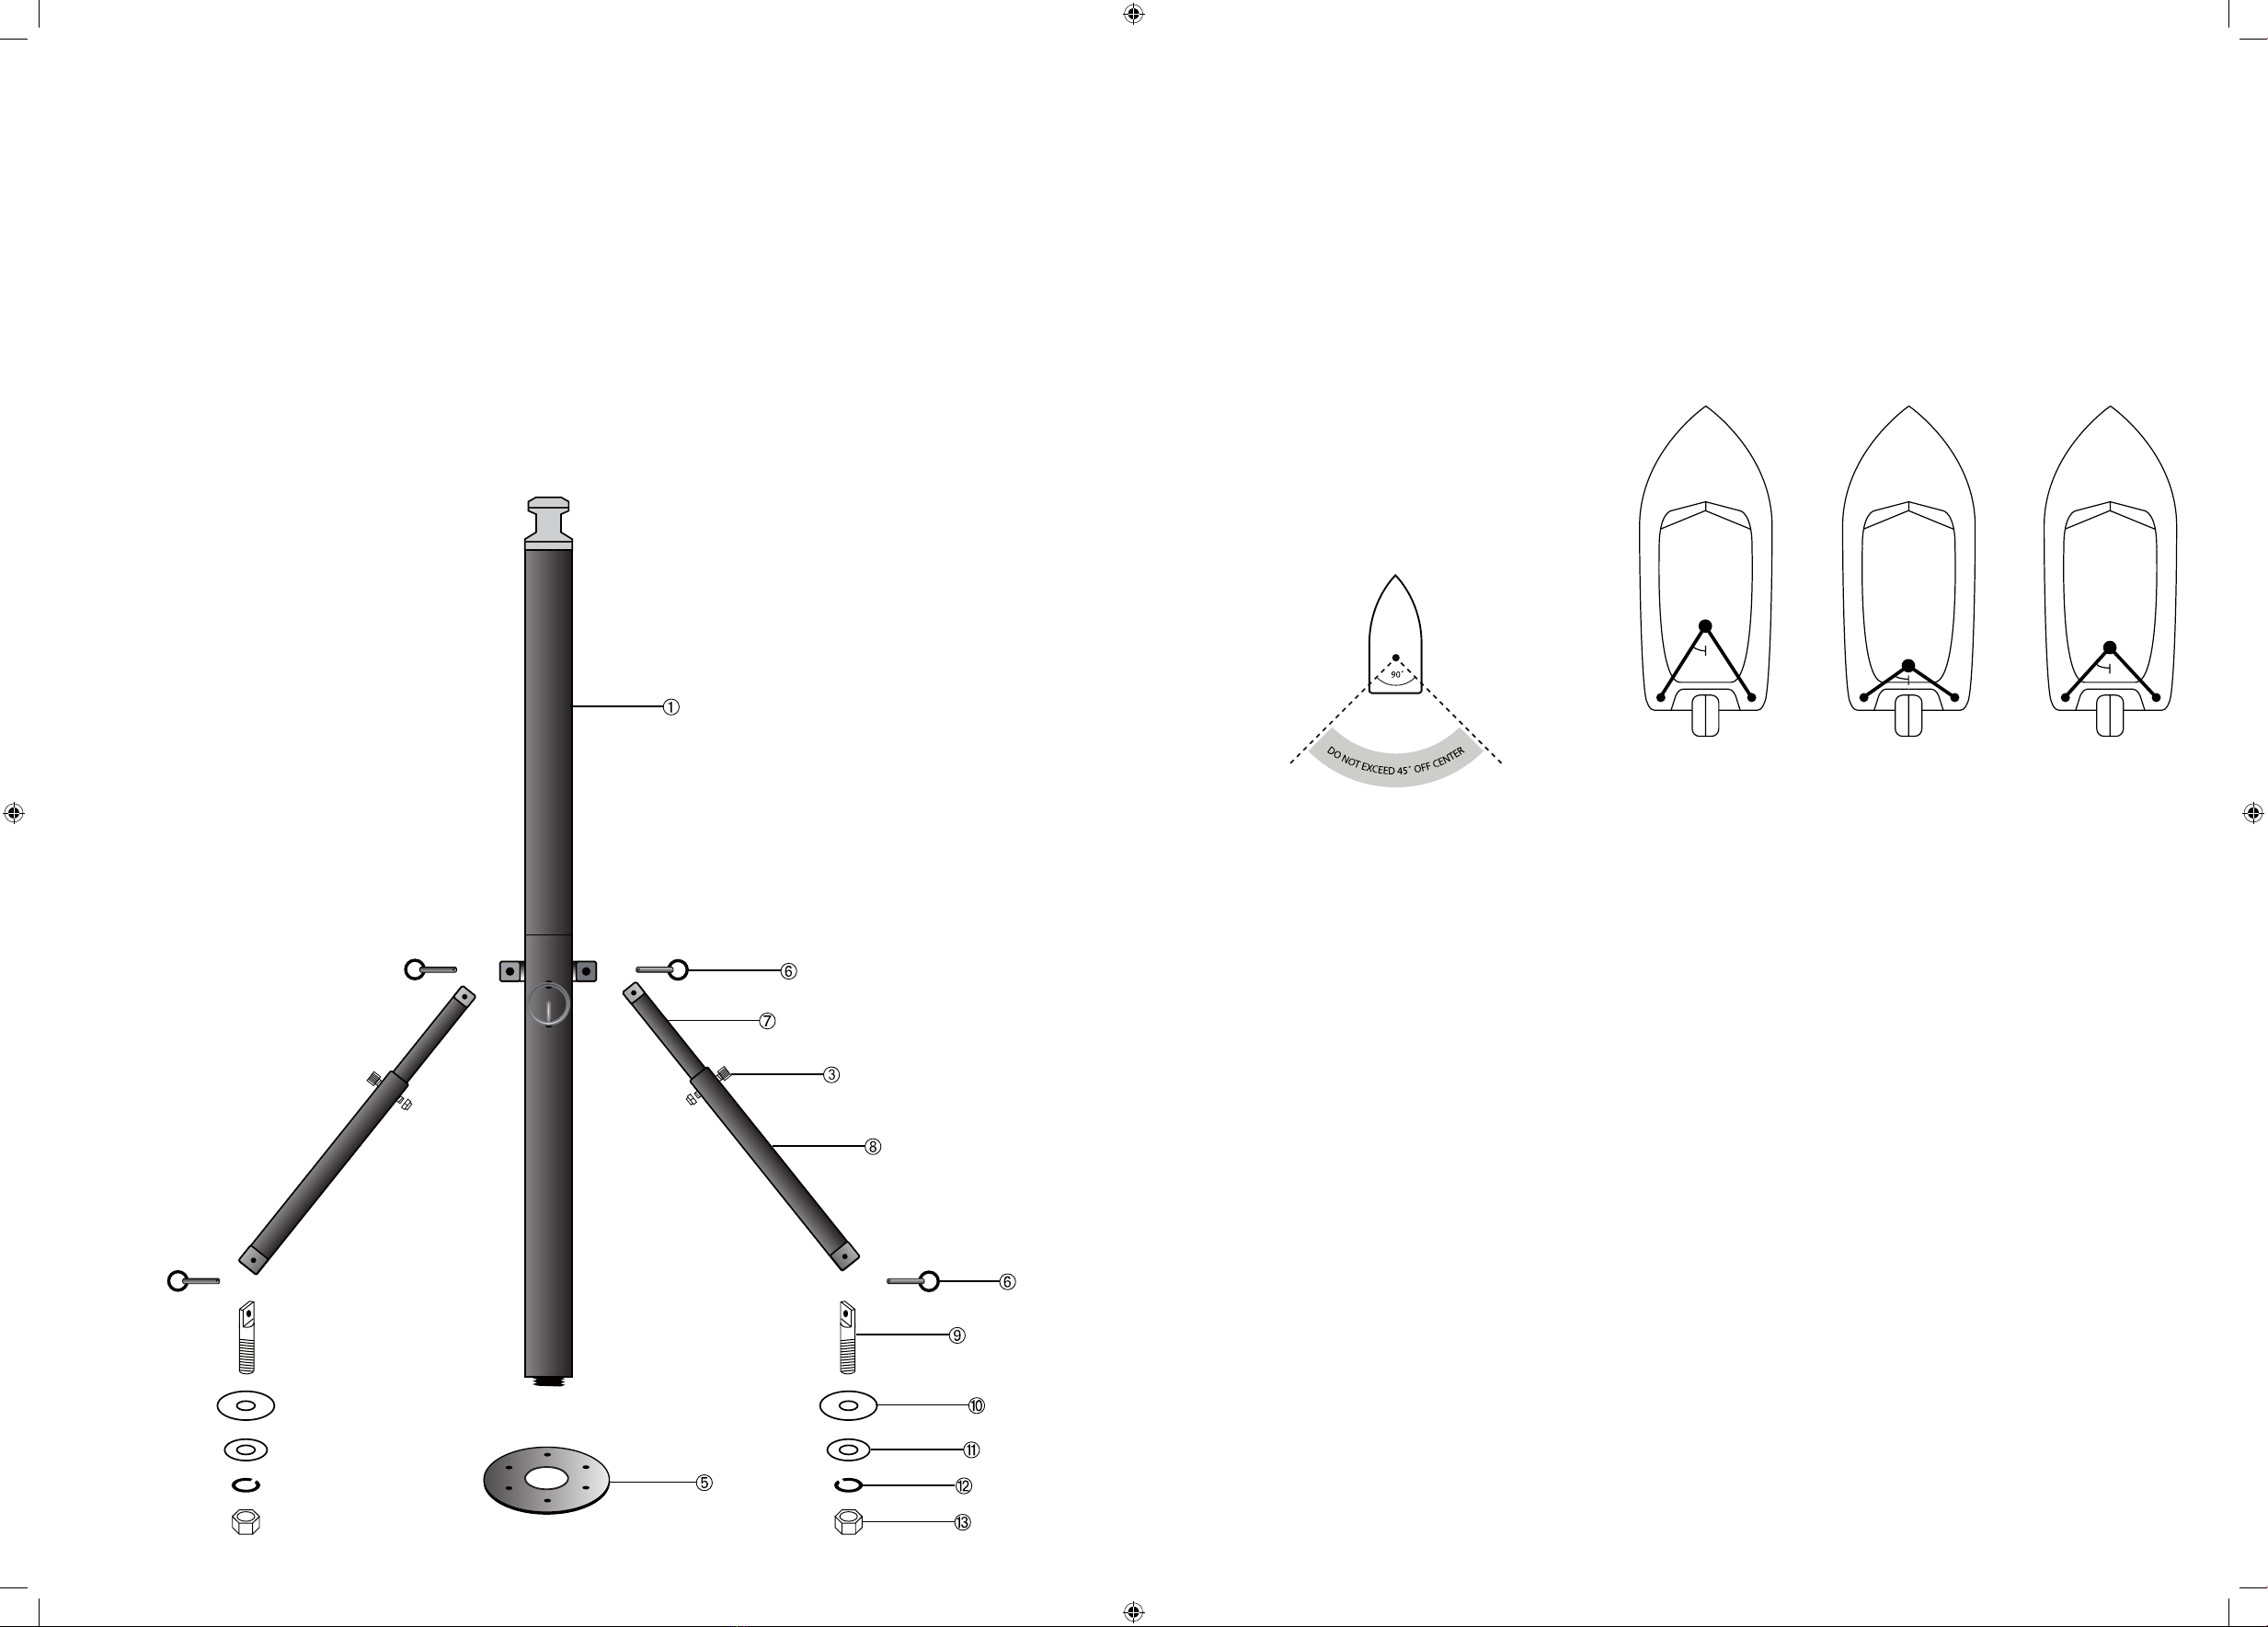
CAN USE THE POD • DO NOT EXCEED 45˚ DEGREE ANGLE FROM CENTER WHEN USING THE POD AS IT IS DESIGNED TO
HANDLE REAR PULL • AVOID SHARP TURNS WHEN USING THE POD • DO NOT USE TO SKI AROUND BOAT.
WARNING
THE USE OF THIS PRODUCT INVOLVES INHERENT RISKS OF INJURY OR DEATH. TO REDUCE THESE RISKS THE
INDIVIDUAL MUST ALWAYS STAY WITHIN THEIR LIMITS AND AT SPEEDS THAT DO NOT EXCEED THEIR LEVEL OF SKILL.
01-2010
ZIP TIE
CABLE PROTECTOR
RATCHET ASSEMBLY
SNAP HOOK
BOW STRAP
CLEVIS JOINT
BOLT AND NYLON NUT
SUPPORT BRACE
CLEVIS JOINT
POD BASE PLATE
GOOD ANGLE
GOOD ANGLE
KEEP INSIDE ANGLE
BETWEEN 45º AND 60º
45º
GOOD ANGLE
GOOD ANGLE
KEEP INSIDE ANGLE
BETWEEN 45º AND 60º
60º
BAD ANGLE
BRACES TOO CLOSE TOGETHER.
NO SIDE STRENGTH.
INSIDE ANGLE SHOULD
NEVER BE LESS THAN 30º
30º
OM-ThePODUK(2010).indd 2-3 27-01-2010 09:35:42
Installation of the Pod is quite simple. It is designed to t on most I/O and outboard boats. It is important that you read and familiarize yourself with these
instructions before beginning installation.
1) Identify all parts and hardware. If anything is missing contact your dealer
2) Screw the base plate (#5) on to the bottom of the Pod.
3) Position the Pod and attached base plate on the center line of your boat. The center line runs from the center of the bow to the center of the stern.
Choose a location on the center line that makes the most sense for your interior conguration.
Make sure that the build-in “Ski Eye” is facing straight backwards.
4) Secure the base plate to the bottom of the boat with 1/4-20 SS bolts (not supplied). If access to the bottom is not possible, use 5/16” SS Lag screws and
seal the holes with silicone to prevent moisture from entering the holes.
5) Extend the attached telescoping support arms towards the back of
the boat and outward to the gunnels to a position approximately 45
to 60 degrees from the Pod. This is also the recommended pulling
area behind your boat. Braces too close together will allow the Pod
to be pulled over when towing a wakeboarder or skier outside the
recommended brace area.
6) Mark the spots for the deck clevis stud (#9) by placing the large SS Washer (#10) on a at surface on the top rear sides or corners of your gunnels. Once
you have the washer in place, mark the center of the holes with a marker. After both sides have been marked, make sure they are in the same position on
each side and you can access the bottom side of each gunnel with a washer (#11) lock washer (#12) and nut (#13) before drilling.
7) On the marked locations predrill the holes with a 1/8” bit followed by a 5/8” bit.
8) Preassemble the deck clevis (#9) with the large stainless washer (#10). Push the clevis assembly through the drilled hole. Place the small galvanized washer
(#11) lock washer (#12) and nut (#13) on the threaded side of the deck clevis and tighten rmly. Note: if the deck is not 1/2” thick at the drilled holes, you
will need to add a block of plywood or similar material to the bottom side of gunnels to distribute the load.
9) Attach the braces to the deck clevis stud by connecting them with the 1/4”x1” hitch pin’s (#6). With forward pressure to the Pod. Drill a 1/4” hole through
the predrilled pilot holes of each larger brace (#8). Once drilled bolt each brace through the drilled holes using 1/4” x 1¼” bolt and nylon nut(#3)
10) Pull the 6ft Bow Strap through your boat’s Bow Eye. Center the 6ft Bow Strap so that it cradles up and around each side of your boat’s rub rails.
11) Using the Snap Hook, attach each side of the 6ft Bow Strap to the Black Ratchet Strap.
12) Once attached, pull all the slack out of the Black Ratchet Strap until it is tight. Then, using the Ratchet, continue to tighten the ratchet strap until the
desired ‘preload’ is achieved.
13) Slide down the Pod Cable Protector until it is over the Black Ratchet Strap. Once positioned, pull the Plastic Zip Tie to secure the t.
You can easily disassemble the Pod by sliding the Cable Protector up the White Cable and then releasing the Ratchet. This will loosen all straps, which will
allow the 6ft Bow strap to be unhooked. Release the 2- 1/4”x1” hitch pins and your Pod can be stored.
Contents of Box
Please take time to carefully read the following operation and installation instructions along with the limited warranty governing the product before using
your new Pod.
You can use your new Pod to: • Wakeboard • Kneeboard • Barefoot Ski. Use the build-in “Ski Eye” to waterski.
The Pod was designed to give all wakeboarders and kneeboarders… MORE AIR and LONGER AIR… and it delivers every time! But the fun doesn’t stop there.
Barefoot skiers have discovered that the Pod creates a “WEIGHTLESS” feel that must be experienced! This is helpful for wake cross training, learning surface
tricks and improving jumping skills. Also, the upward pull that the Pod creates helps to facilitate deep water backward starts.
2 pieces with Bow Strap attached (1)
6’ Bow Strap (1)
Cable Protector (1)
Snap Hook (1)
1/4”x1” Clevis Hitch Pin (4)
1/4” x 11/4” bold and nylon nut (2)
7/8” OD Stainless Brace (2)
1” OD Stainless Brace w/hole (2)
Deck Clevis Stud (2)
Deck Clevis Washer (Large Stainless) (2)
Deck Clevis Washer (Small Galvanized) (2)
Deck Clevis Lock Washer (2)
Deck Clevis Nut (2)
Base Plate
ZIP TIE
CABLE PROTECTOR
RATCHET ASSEMBLY
SNAP HOOK
BOW STRAP
CLEVIS JOINT
BOLT AND NYLON NUT
SUPPORT BRACE
CLEVIS JOINT
POD BASE PLAT E
GOOD ANGLE
GOOD ANGLE
KEEP INSIDE ANGLE
BETWEEN 45º AND 60º
45º
GOOD ANGLE
GOOD ANGLE
KEEP INSIDE ANGLE
BETWEEN 45º AND 60º
60º
BAD ANGLE
BRACES TOO CLOSE TOGETHER.
NO SIDE STRENGTH.
INSIDE ANGLE SHOULD
NEVER BE LESS THAN 30º
30º
OM-ThePODUK(2010).indd 4-5 27-01-2010 09:35:43
Other JOBE Boating Equipment manuals


Popular Boating Equipment manuals by other brands


Dowco
Dowco V322 CC - 2019 installation instructions

Humphree
Humphree HCS-5 installation manual

Vetus
Vetus BOW4512D Operation manual and installation instructions

Dock Doctors
Dock Doctors SLIDING BOARDING STEP Assembly instructions

Mastervolt
Mastervolt Mass Combi 12/2000-100 Quick installation

Zattini Group
Zattini Group bamar BOXTRON E14S Use and maintenance instruction manual


