John Shearer CONNOR SHEA 8000 Series Installation and maintenance instructions

SOWING THE SEEDS OF YOUR SUCCESS
SERIES 8000
PASTURE DRILL
OPERATOR’S MANUAL
PARTS CATALOGUE
Eff. Date Serial No. Part No. 8000PB
CSN AUSTRALIA (JOHN SHEARER LTD) ACN 007 871 472
SHARE ST Phone ………………..… +61 8 8268 9555
KILKENNY, S.A. 5009 Fax (Spare Parts)……... +61 8 8268 1103
Email…….…spares@johnshearer.com.au

TABLE OF CONTENTS
WARRANTY CARD / PRE-DELIVERY CHECK LIST
SUGGESTED OWNERS SERVICE PARTS…………………………………………………………… 1
INTRODUCTION………………………………………………………………………………………… 2
ORDERING SERVICE PARTS…………………………………………………………………………. 2
ACCEPTING DELIVERY………………………………………………………………………………. 3
STANDARD MACHINE SPECIFICATIONS…………………………………………………………. 3
SAFETY FIRST………………………………………………………………………………………….. 4
ASSEMBLY INSTRUCTIONS…………………………………………………………………………. 5
OPERATING INSTRUCTIONS………………………………………………………………………… 5
CALIBRATION………………………………………………………………………………………….. 7
SOWING CHART……………………………………………………………………………………….. 8
GATE SETTING…………………………………………………………………………………………. 9
CLEANING……………………………………………………………………………………………….. 10
SERVICE POINTS……………………………………………………………………………………….. 10
TYRE PRESSURES………………………………………………………………………………………. 11
LUBRICATION POINTS…………………………………………………………………………………11
PAINT………………………………………………………………………………………………………11
SERVICE HISTORY…………………………………………………………………………………….. 12
MAINFRAME AND AXLE……………………………………………………………………………… 14
HYDRAULIC COULTER BAR & MAINFRAME……………………………………………………. 18
HITCH AND OPTIONAL DRAWBAR………………………………………………………………… 20
DRIVE WHEEL AND PRESSURE ARM ……………………………………………………………… 22
DRIVE CONTROLS AND TORQUE LIMITERS…………………………………………………….. 26
ROLLER CLUTCH BOX…………………………………………………………………………………30
DISTRIBUTION MECHANISM………………………………………………………………………… 32
COIL TYNE ASSEMBLY……………………………………………………………………………….. 36
COULTER ASSEMBLY…………………………………………………………………………………. 38
MACHINE IDENTIFICATION…………………………………………………………………………. 40
SEEDER CUP POSITION……………………………………………………………………………….. 42
HYDRAULIC COULTER BAR ADD-ON KIT………………………………………………………… 44
INDEX………………………………………………………………………………………………………46

JOHN SHEARER LIMITED
CUSTOMER’S WARRANTY REGISTRATION CARD
(Please retain for your records)
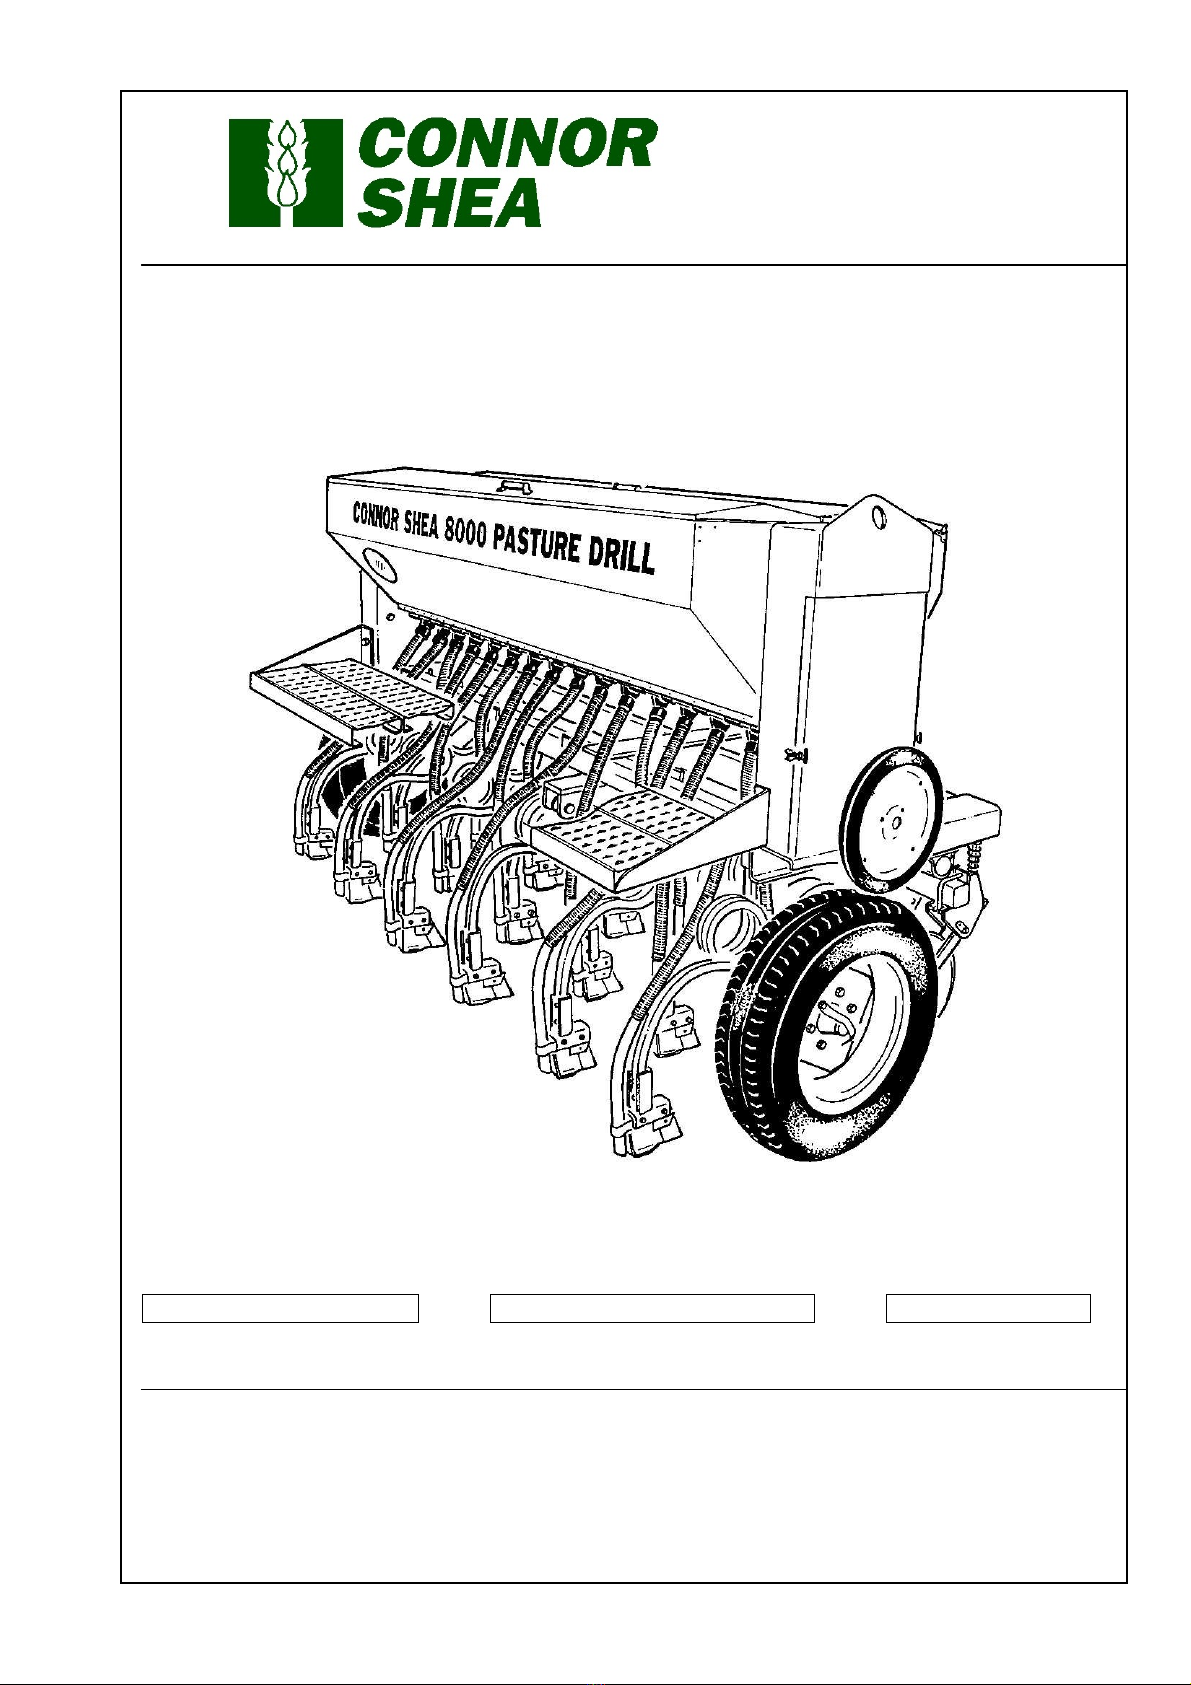
IMPLEMENT TYPE: SERIAL No.
SELLING DEALER: DATE PURCHASED:
PLEASE READ OPERATOR’S MANUAL TO ENSURE CORRECT APPLICATION, OPERATION AND MAINTAINANCE FOR THIS
MACHINE.
THANK YOU FOR BUYING JOHN SHEARER
WARRANTY REGISTRATION CARD
DEALER COPY
DEALER NAME: …………………………………… DEALER TOWN: …………………………….
IMPLEMENT MODEL: ……………………………. SIZE: ………………………………………….
PRODUCT No. (as per price book) SERIAL No.
DEALER’S PRE DELIVERY IMPLEMENT CHECK WHEN DONE SIGNATURE
PURCHASERS NAME (Full)
ADDRESS (Full)
DATE OF PURCHASE: IMP.RECEIVED IN GOOD ORDER & CONDITION
PURCHASER ACKNOWLEDGES THAT THE PURCHASERS ATTENTION HAS BEEN DRAWN TO THE TERMS AND CONDITIONS OF
THE JOHN SHEARER LIMITED WARRANTY POLICY ENDORSED HERE-ON.
PURCHASERS SIGNATURE…………………………………………………………………………………
WARRANTY REGISTRATION CARD
IMPORTANT:- TO ENSURE YOUR CLIENTS ARE COVERED UNDER WARRANTY YOU MUST FILL OUT THIS
PORTION OF THE CARD AND RETURNWITHIN 7 DAYS TO JOHN SHEARER LIMITED
P.O. BOX 32, WELLAND, S.A. 5007
JOHN SHEARER LIMITED AREAMANAGER:
DEALER’S NAME: …………………………………… DEALER TOWN: …………………………….
DEALER A/C No.: ………………………………….
IMPLEMENT MODEL: ……………………………. SIZE: ………………………………………….
PRODUCT No. (as per price book) SERIAL No.
DEALER’S PRE DELIVERY IMPLEMENT CHECK WHEN DONE SIGNATURE
PURCHASERS NAME (Full)
ADDRESS (Full)
DATE OF PURCHASE: IMP.RECEIVED IN GOOD ORDER & CONDITION
PURCHASER ACKNOWLEDGES THAT THE PURCHASERS ATTENTION HAS BEEN DRAWN TO THE TERMS AND CONDITIONS OF
THE JOHN SHEARER LIMITED WARRANTY POLICY ENDORSED HERE-ON.
PURCHASERS SIGNATURE…………………………………………………………………………………
CUSTOMER’S MACHINERY REGISTER
We ask for your assistance in registering your holdings of equipment. This information can assist us
greatly in after sales service, development of new products and customer awareness of Shearer
products.
1. Name:………………………………………………………………………………………………………….……..
Address:……………...………………………………………………………………………………………………
…………………………………………………….State: ……..………………………..Postcode: ……..……….
2. Type of purchaser (please tick) Owner / Manager Share Farmer Contractor
3. Major activities (please number in order of importance)
Sheep and cereal grain Vegetables Sugar
Sheep only Poultry Tobacco
Cereal Grain Only Pigs Oilseeds
Meat Cattle Vineyards Others (please list)
Milk Cattle Fruit ………………………..
4. What is the size of your holding (hectares)? ……………………………………………..
What is the total area of your crop (hectares)? ……………………..
What is your area under cereal crop (hectares)? …………………………
5. In what town is your associated Shearer dealer? (i.e. either the dealer with whom you normally trade or
the one who is closest)
6. What John Shearer machines do you currently have on your property?
Serial No. Implement type Size Date Delivered Comments
……………………………………………………………………………….…/…../………………………………
……………………………………………………………………………….…/…../………………………………
……………………………………………………………………………….…/…../………………………………
……………………………………………………………………………….…/…../………………………………
……………………………………………………………………………….…/…../………………………………
……………………………………………………………………………….…/…../………………………………
Thank you for your assistance; please feel free to use the back of this form to make any comments you wish.


Congratulations on the purchase of your new JOHN SHEARER LIMITED
implement. You have just joined the growing number of John Shearer
customers and we trust that your implement will give you many years of
satisfaction. The following information contained in this manual is provided
with regards to your implement's operation, maintenance and warranty;
however, should you require further assistance, contact your registered John Shearer Dealer.
WARRANTY POLICY
JOHN SHEARER LIMITED (JSL) warrants to purchaser that in normal use if any part of goods
manufactured by JSL is proved to be defective material such part will be replaced or repaired by
JSL if returned to Dealer at cost of customer within 12 months of delivery of goods, but such
warranty shall to the extent permissible by law cease to apply forthwith if goods are misused or
used contrary to recommendations of JSL and/or Dealer or if any unauthorised alterations,
modifications or substitution of any part of goods is made or there is any breach by customer of
the terms and conditions.
Customer agrees that JSL shall not be liable for any claim for damages due to loss of time in
use of goods or loss of profits due to defective goods or for any other consequential damages
whatsoever except to the extent that such exclusion of liability is prohibited by law.
All failures must be reported immediately by the purchaser to the Dealer (or in the event of the
Dealer ceasing to hold the JSL franchise, then to the Dealer nominated by John Shearer
Limited).
The only parts which would be replaced or repaired under warranty are those which are proven
to be of defective materials by persons in authority in the JSL Field Service Department.
It is the policy of JSL to continually strive to improve their products whenever possible. Therefore,
JSL reserves the right at all times to modify it's products or parts without notification and
undertakes no liability to modify products sold, to conform with any such modifications.
Travelling and kilometre charges are not accepted by JSL as JSL has no control where equipment is
sold.
Nothing in this warranty policy and instructions shall purport to exclude or limit any liability the
exclusion or limitation of which is prohibited or rendered void by the Trade Practices Act 1974 as
amended or any other Federal or applicable State Legislation.
All pre-delivery checks must be done by the Dealer and signed when completed on the Warranty
Registration Card.
FREIGHT: The JSL policy does not extend to cover freight charges.
SERVICE & MAINTENANCE: It is the responsibility of the owner to read the Operator's Manual
and to maintain and operate the implement in a safe and correct manner within the manufacturer's
specified capacity and operating limitations. Using the implement for purposes other than those for
which it is designed voids all warranty.
Regular service to your implement can save costly repairs and save valuable time lost because of
breakdown.
Resultant damage or failures originating from neglect of machine is not covered under warranty. For
your spare part requirements contact your John Shearer Dealer.

PRE-DELIVERY CHECK
1. On delivery of the 8000 SERIES DRILL ensure there are no shortages.
2. Check implement equipment, to ensure as ordered.
3. Check for trans-shipping damage.
4. Refer to pages 10 and 11, for lubrication and routine check points.
5. Check and tighten bolts and nuts (including wheel nuts).
6. Check tyne spacing. (see page 36)
7. Ensure that implement is fully assembled and operating correctly.
8. Demonstrate and explain operation to the client.
9. Explain terms and conditions of Warranty to client.

Series 8000 Pasture Drill Page 1
SUGGESTED OWNER’S SERVICE PARTS:
This is a listing of suggested Service Parts that the owner of a Series 8000 Pasture Drill
should keep, to avoid unnecessary delays during sowing.
Qty Part No. Description
1 13833 Bush
1 18350 Eye Bolt
1 22108 Spring
1 22180 Cap
1 18071 Bearing
2 23727 Seal
2 18067 Housing
5 957-613 Bolt
5 936-702 Nut
1 23667 Sowing Boot
1 23671 Sowing Boot
2 989-881 Baker Boot
These parts and current prices are available from your Connor Shea Dealer.
To order Service Parts correctly, refer to the relevant section in this manual on Page 2.
Remember to supply all the information to ensure accurate and timely supply.
CSN Pty Limited, the manufacturer
of farm machinery, reserves the right
to make changes in design or
construction of any part or
component without incurring the
obligation to install such changes to
any unit previously supplied.

Series 8000 Pasture Drill Page 2
INTRODUCTION:
This manual was developed specifically for the machine you have purchased, the Series
8000 Pasture Drill. The information within is for your assistance in preparing, adjusting,
operating and servicing your machine. Major points for safe operation are detailed under
safety in this manual.
Connor Shea asks that you read and understand the contents of this manual completely,
before attempting to operate your Pasture Drill.
The Connor Shea dealer network is capable of providing you with any assistance you
may require and carries a range of genuine Connor Shea service parts. All parts should
be obtained from, or ordered through your Connor Shea dealer.
Throughout this manual, “Right” and “Left” are determined from a position standing
behind the machine, facing in the direction of travel. From this position, the Jockey
Wheel is on the right hand side of the machine.
Connor Shea reserves the right to make changes or improvements in the design or
construction of any part without incurring the obligation to install such changes on any
unit previously delivered.
ORDERING SERVICE PARTS:
All parts should be obtained from, or ordered through your Connor Shea Dealer. Give
complete information about the part and include the Model and Serial number of your
machine. Use the illustrated parts section of this manual to supply Part No. and
Description of items required.
The Serial Number for the Series 8000 Pasture Drill is on an aluminium plate, located
on the top of the front beam of the machine. (Refer Page 40).
It is suggested, that you correctly record the Serial Number in this manual, as a handy
record for quick reference.

Series 8000 Pasture Drill Page 3
ACCEPTING DELIVERY:
Carefully check your Pasture Drill for damage that may have occurred during
transportation. Report any damage and lodge a claim for repairs with the transport
company concerned before accepting delivery.
STANDARD MACHINE SPECIFICATIONS:
Series 8000 Pasture Drill
Model 8013 8016 8019 8022
No. of Rows 13 16 19 22
Sowing Width m. 1.95 2.4 2.85 3.3
ft. 6’5” 7’10” 9’4” 10’10”
Transport Width m. 2.4 2.8 3.2 3.7
ft. 7’9” 9’2” 10’8” 12’2”
Linkage Attachment Category 2
Hopper Capacity
Seed m30.23 0.29 0.35 0.41
Seed (wheat) kg 185 230 280 330
Fertilizer m30.23 0.29 0.35 0.41
Fertilizer (super) kg 265 335 400 470
Ranks of Tynes 3
Row Spacing 150mm
Tyne Type 25mm (1”) Square Coil Tyne
Points Cast Baker Boots with AG Tuff
Coulters 335mm (13.2”) Diameter
Seed metering Three row fluted rollers with restrictors for low sowing rates
Infinitely variable speed drive
Fertilizer Metering Pegged tooth rollers
Infinitely variable speed drive
Wheels LT 195 / 70 R15

Series 8000 Pasture Drill Page 4
SAFETY FIRST:
Before you attempt to operate this equipment, read and understand the following Safety
information:
Accidents are inevitably the result of carelessness. Avoid injury to yourself and others
by adopting the following safety rules and recommendations, and by being safety
conscious at all times.
Before and During Transport:
•Check and inflate tyres to the pressures recommended in this manual.
•Check tension on wheel nuts.
•During transport ensure that all Transport Department Regulations are complied
with.
•It is good practice to keep travel speed to a minimum. Speeds in excess of 20 k.p.h.
are likely to result in damage to your equipment. If conditions are not optimal, a
lower speed may be necessary.
During Operation:
•Never allow anyone to ride on the implement when it is moving.
•Do Not Operate the machine with faulty hydraulic equipment. Always maintain
the hydraulic systems of both tractor and implement in good working order.
•Never attempt to adjust the Pasture Drill whilst in motion.
Maintenance:
•Before working beneath the machine:
oSupport the machine on mechanical props. Do not rely on the hydraulic
system to support the machine.
oDisconnect the hydraulic circuits from the tractor to prevent inadvertent
operation of the machine.

Series 8000 Pasture Drill Page 5
ASSEMBLY INSTRUCTIONS:
Generally the series 8000 Pasture Drill will be supplied in a condition where very little
assembly is required.
1. Remove any components from within the hopper. Also remove any packing
from around the machine.
2. Fit convoluted seeding hoses between the hopper and seeding boots. (hoses
packed in hopper)
3. Check tyre pressures.
4. Ensure that all nuts and bolts are tight and lubrication procedures have been
followed.
In the case of a trailed machine, some additional assembly is required.
1. Unpack pull assembly and secure to front of machine with attaching pins.
2. Replace ratchet link with hydraulic cylinder supplied.
3. Fit hydraulic hoses to the cylinder and attach along the pull assembly using
appropriate clamps.
OPERATING INSTRUCTIONS:
Before the machine is operated, ensure that all items mentioned in the Pre-delivery
Check have been inspected and the procedures carried out.
Levelling the Pasture Drill
•Attach the machine via the three point linkage to the tractor.
•Fore and aft level can be adjusted by using the top link of the tractor attachment.
This should be checked at the desired operating depth.
Note: On trailed versions of this machine, the Trimming Screw of the Drawbar serves
the same purpose.
Setting the Depth:
•Operating depth can be set by placing packers underneath the tyres and adjusting
the Ratchet Link to achieve the desired seeding depth.
Note: On trailed versions, the hydraulic cylinder is fitted with a mechanical depth stop.
It consists of a screw adjustment on the cylinder rod, which enables the machine to be
set at any depth within a specified range.

Series 8000 Pasture Drill Page 6
Setting the Coulters:
•Coulters should be adjusted so that they are approximately 25mm lower than the
blade points. This can be achieved by loosening the large, square headed setscrews
and raising or lowering the Coulter Carrying Bar. This is made easier by using the
turnbuckle.
Note: The coulters should be inspected to ensure that they are not badly feathered or
burred as a result of transport damage. If this is the case, touch up with a 100mm
angle grinder.
Drives:
•Ensure that all parts that have been packed in the hopper are removed and that
there are no obstructions in the metering units.
•Check that the seeder drives are free to operate by slightly raising the Pasture Drill
and rotating the wheel. On new machines this may require a small amount of
pressure, but less will be required after the machine is run in.
•Having set the depth of the drill, the pressure between Jockey Wheel and Ground
Wheel can be adjusted. To achieve this, alter the position of the nut above the
Pressure Arm Spring. This pressure will vary depending on conditions, and should
be set to avoid slippage between Ground Wheel and Jockey Wheel (Refer Diagram
1).
•On trailed machines, there is an adjustable stop that limits the downward travel of
the Jockey Wheel when the machine is raised. This should be set so that as the
tynes come out of the ground, the drive is disengaged. (Refer Diagram 1).
Diagram 1

Series 8000 Pasture Drill Page 7
Initial Inspection:
In order for the Series 8000 Pasture Drill to perform correctly and accurately, it must
be set up properly. The seeder units have been checked at the factory, prior to dispatch,
however before taking the unit in field, follow these steps to ensure proper operation.
CALIBRATION:
Seed – Rear Box:
The Sowing Rate Chart was developed for various seeds in kgs per Ha. Variations in
seed size and moisture content will affect the sowing rate. Since the metering device
measures volume, not weight, variation in seed size, type and variety make it
impossible to accurately predict seeding rates. Therefore, the seeder settings should be
used only as a guideline or approximate settings.
Fertilizer – Front Box:
The Series 8000 Pasture Drill has been designed for use with good quality dry
granulated fertilizers. No responsibility for faulty distribution, operational difficulties,
blockage or corrosion will be accepted by the manufacturer if other materials are used.
DO NOT USE RESTRICTORS WITH FERTILIZER
Seed Restrictors:
These restrictors are fitted as follows:
1. Lift roller cover flap.
2. Place restrictor into position around the seed roller with either fine or course
side of the roller exposed.
3. Release cover flap.
Note: See Sowing Chart for seeds requiring restrictors and fine or course positions
Roller Blank Off: (Seed or fertilizer)
The roller blank off is fitted as follows
1. Lift roller cover flap
2. Place blank off into position.
3. Release cover flap.
Hectaremeter Calibration:
For calibration information see the included Farmscan 1100 Areameter manual.
You will need to enter the width of the machine (H2) (see below or specifications
page) and the wheel circumference (H1) in the calibration process. With the wheel
circumference in particular, it will be more accurate to measure as guided in the
Farmscan 1100 manual.
Widths: 13R – 1.95m 19R – 2.85m
16R – 2.40m 22R – 3.30m
Wheel circumference = 1514mm (Approx)

Series 8000 Pasture Drill Page 8
SOWING CHART

Series 8000 Pasture Drill Page 9
Seeding Rate Check for Machine with Jockey Wheel on Ground Wheel:-
For accuracy, it is desirable to catch the output from a number of seeding units in a plastic bag and
weigh the amount of seed dispensed after pulling the machine over a known area. This is achieved
by the following procedure:
1. Raise the machine so that the Jockey Wheel can be rotated,
2. Place a small quantity of seed in the hopper until material flows through.
3. Set the seeders at the approximate setting given by the Seed Rate Charts.
4. Disconnect Seeder Hoses from several metering devices and place suitable containers under
each unit.
5. Rotate the Jockey Wheel for 20 revolutions in the direction of travel. (Anticlockwise –
looking at the end of the shaft)
Sowing Rate (in Kgs per Ha) = Total Weight Collected (in grams) x 2.32
(Jockey Wheel) No. of Samples
(To convert to lbs per Acre, multiply by 0.89)
GATE SETTING:
The seed and fertilizer metering rollers have an adjustable gate at the metering point under the
roller. This adjustment allows for the diversity in size of seed and types of fertilizer. To ensure
accurate metering of material, it is essential that these gates be correctly adjusted and zeroed in
accordance with the information supplied in Diagram 2.
Gauges for setting gap
- Fluted roller, P/N: 29939 (3mm)
- Peg tooth roller, P/N: 23470 (1.5m)
- (optional) Broad bean roller, P/N: 33657 (4mm)
Diagram 2

Series 8000 Pasture Drill Page 10
CLEANING:
Remove the bulk of seed / fertilizer by hand.
To remove the remainder of the seed / fertilizer, move the adjustment levers at the front of the
hopper to clean out position.
Before carrying out the above operation a suitably sized tarpaulin or hessian may be laid on the
ground and the machine towed onto it to catch any material released. To simplify catching the
material, sweeping it to one area of the hopper means a much smaller area will be needed to catch
it.
At the end of the planting operation it is advisable to flush the fertilizer with a water hose and
allowed to dry. The seed hopper can be cleaned out with a brush or pressure air hose.
Be aware that leaving seed in the hopper could attract pests.
FERTILIZER CORROSION DAMAGE:
The hopper must be “COMPLETELY AND THOROUGHLY CLEANED OUT” after use, to help
prevent corrosion. It is especially important that the hopper is not left overnight with any fertilizer
remaining in it. Particular attention should be paid to keeping the area around the critical
distributor/bearing/gate components free of fertilizer.
This recommendation is applicable irrespective of the kind of fertilizer in use, but is more important
with the higher analysis, high nitrogen fertilizers.
SERVICE POINTS:
After the initial 50 Hectares of work have been completed, check all nuts and bolts on the Pasture
Drill are tight.
Daily Check:
•Grease the implement
•Rotate the drive wheel in the direction of travel to ensure the seeder drives are free to turn
and that there are no blockages in the seed metering devices.
•Check tyre pressures.

Series 8000 Pasture Drill Page 11
TYRE PRESSURES:
195 / 70 R15 Light Truck Tyres Max: 450 kPa (65 psi)
13R 275 kPa (40 psi)
16R 325 kPa (47 psi)
19R 350 kPa (51 psi)
22R 400 kPa (58 psi)
The minimum tyre pressure is dependant on the weight of the implement. If the weight
increases (due to additional equipment) the tyre pressure may need to be increased to suit.
Please note that the maximum speed of the implement is 25km/h.
LUBRICATION POINTS
Mainframe:
Ratchet Link (Linkage Only) 2 Places End of Season
Wheel Bearings 2 Off Check at End of Season
Drawbar:
Trimming Screw 2 Places End of Season
Jack 1 Place End of Season
Drive Wheel:
Pressure Arm Bearing 1 Place Weekly
Drives: Seeder Shaft Bearing 1 Place Weekly
Seed Adjuster Oil Lightly Weekly
Coulter Assembly:
Carry Bracket Pivot --- Daily
Coulter Bearings Pre-lubricated and sealed
Gearbox:
Gearbox Oil 2 litres
(Recommended: Shell Helix 20W50 Motor Oil)
PAINT
It is recommended that any scratches or chips be touched-up before storing your machine at the end
of each season. This will help prevent corrosion and improve the life of the machine.
The following paints are available:
Order P/N: 989-785 (1 litre, Deep Bottle Green)
Order P/N: 989-792 (4 litres, Deep Bottle Green)
Order P/N: 989-786 (1 litre, Chartruse) – for lids
Order P/N: 989-791 (4 litres, Chartruse) – for lids

Series 8000 Pasture Drill Page 12
SERVICE HISTORY
DATE PART No. COMMENT
NOTES

Series 8000 Pasture Drill Page 13
ILLUSTRATED
PARTS SECTION

Series 8000 Pasture Drill Page 14
This manual suits for next models
1
Table of contents
Other John Shearer Farm Equipment manuals
Popular Farm Equipment manuals by other brands

MacDon
MacDon D65 Operator's manual

HANMEY
HANMEY Power Harrow instruction manual

Amazone
Amazone Catros 4003-2TS Original operating manual

KLUNDER
KLUNDER KL 2000 Operating and maintenance instructions

Degelman
Degelman ROCK DIGGER RD320 Operator's & parts manual

Worksaver
Worksaver UBH-2072R Owner's/operator's manual