Jole Armour C2005B User manual

INSTALLATION
IN A VEHICLE
IMPORTANT: KEEP THIS INSTRUCTION BOOKLET IN THE PLACE
PROVIDED AT THE BACK OF THE CHILD RESTRAINT
MODEL C2005B
instruction manual
IM-000726C
Armour
TM
USE WITH A
CHILD
IMPORTANT: KEEP THIS INSTRUCTION BOOKLET IN THE PLACE
PROVIDED AT THE BACK OF THE CHILD RESTRAINT
MODEL C2005B
instruction manual
Armour
TM

2
1
CONTENTS
WARNINGS ....................................................................................................... 3
ADDITIONAL WARNINGS .......................................................................... 4 & 5
Features ....................................................................................................... 6 & 7
REAR FACING INSTALLATION
Recline Angle ................................................................................................... 8
Installing the Restraint ............................................................................... 9 - 12
CHECKLIST .....................................................................................................13
FORWARD FACING INSTALLATION
Recline Angle ................................................................................................. 14
Installing the Restraint ............................................................................ 15 - 18
CHECKLIST .................................................................................................... 19
TOP TETHER WARNINGS .............................................................................. 20
Top Tether Features ........................................................................................ 21
Tether Anchorage Installation .................................................................. 22 - 24
Read the whole of these instructions carefully and if there is any doubt about the
method of installation, consult the child restraint manufacturer or agent, or a child
restraint tting station authorized by the relevant transport authority, or in New
Zealand an agent for the vehicle.
DO NOT USE THIS CHILD RESTRAINT UNTIL YOU HAVE READ AND UNDERSTOOD THE
INSTRUCTIONS IN THIS USER GUIDE AND IN YOUR VEHICLE OWNERS MANUAL
IMPORTANT:
Before installation and use of this child restraint check that it is
suitable for the size of your child.
Refer to the shoulder height label information on pages 9 and 19
of the USE Instructions.
Which way to face the restraint?
FRONT OF VEHICLE
Install facing the back of the vehicle
for babies and small toddlers.
Install facing the front of the vehicle
for bigger toddlers and small children.
Keep these Instructions for future reference.
Distributed by Nuna Baby Australia Pty Ltd
ACN: 642 240 140
Unit 1, 35 Lyn Parade Prestons, NSW Australia 2170
For after-sales & warranty service, contact: 1800 951 070
customerservice@nunababy.com.au

4
3
ADDITIONAL WARNINGSWARNINGS
GENERAL
WARNINGS
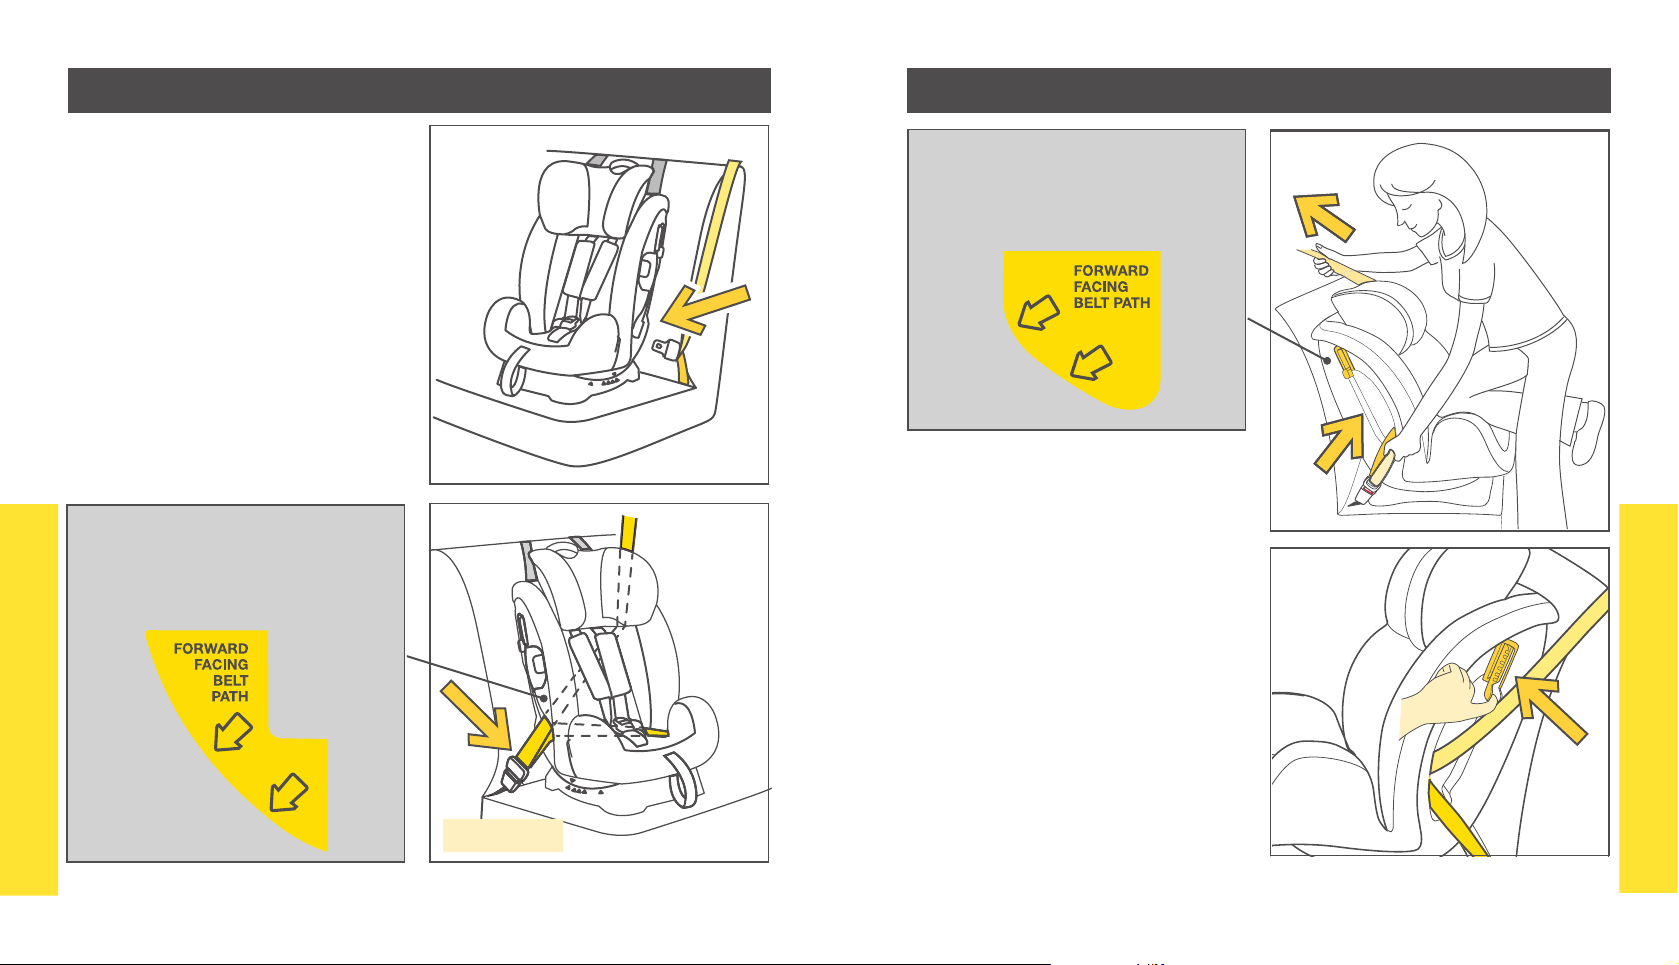
• Use the restraint exactly as shown in the instructions.
• Do not alter or modify this restraint.
• Repairs must only be done by the manufacturer or agent.
• Do not allow the restraint to come into contact with pol-
ishes, oils, bleach and other chemicals.
• Destroy the restraint if it has been in a severe crash, even if
no damage is visible.
• A loose harness or restraint is dangerous.
• Fit the restraint rmly to the car seat.
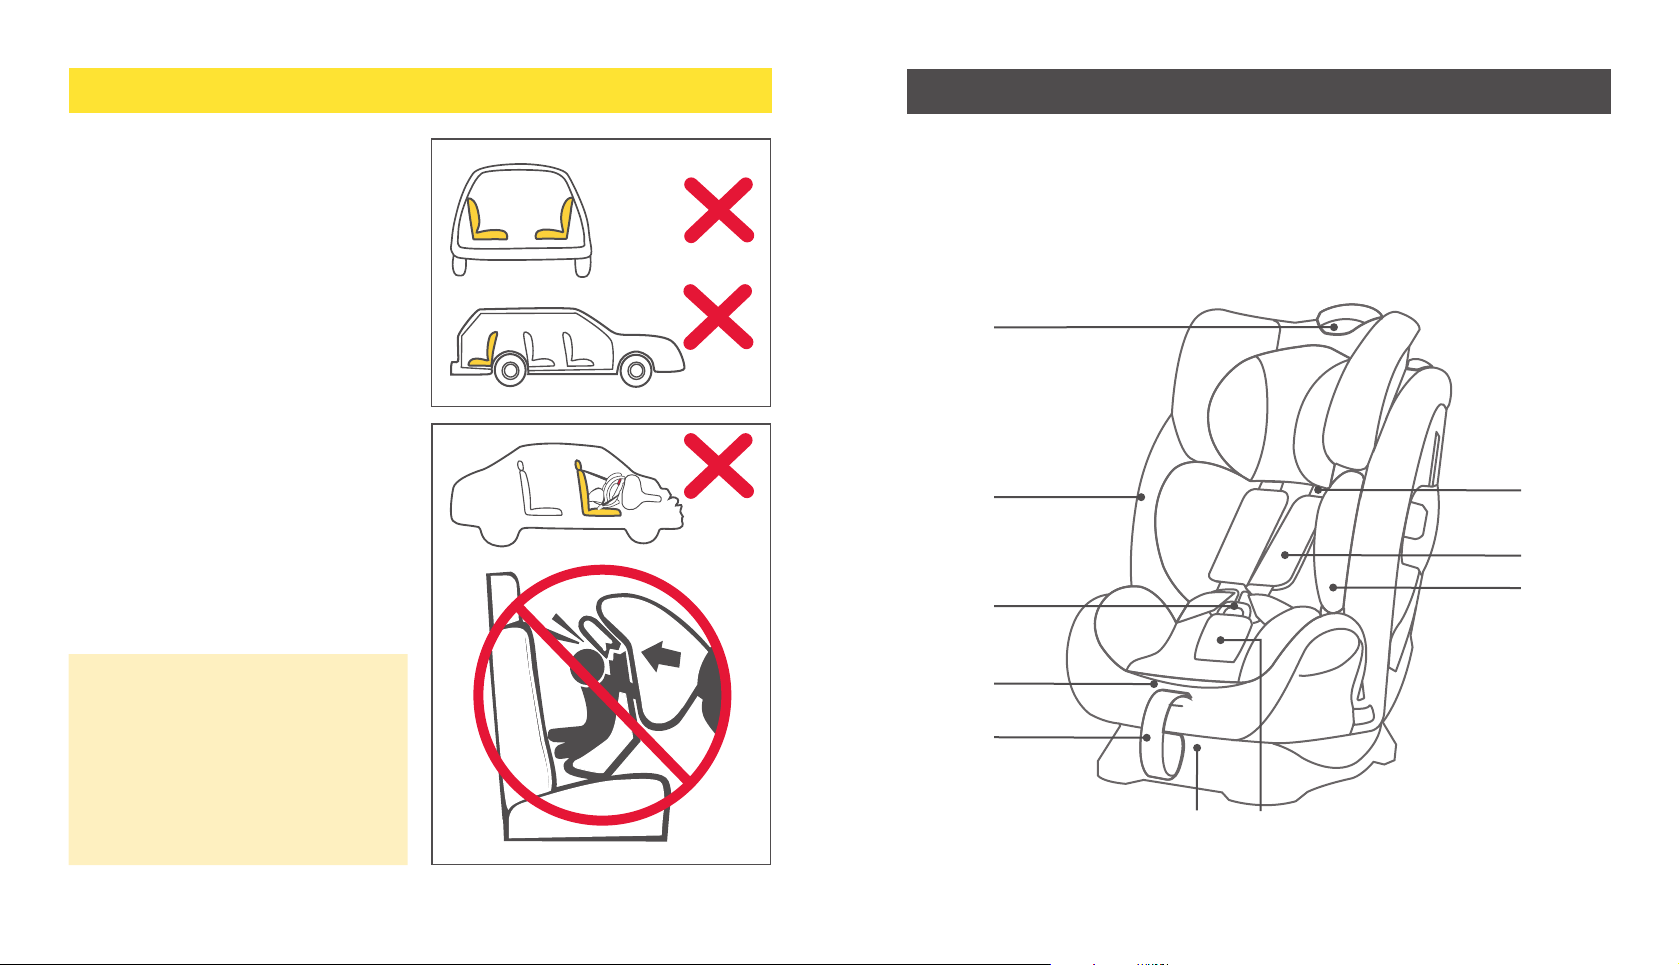
• DO NOT USE A REAR FACING CHILD RESTRAINT WHERE
AN AIRBAG IS FITTED IN FRONT OF THE SEATING POSI-
TION.
• DO NOT LEAVE CHILDREN UNATTENDED IN THE CAR
This child restraint is not approved for use with any connec-
tors that connect to the car’s ISOFIX low anchorages.
NOTE: The warnings on this page are required by the Austra-
lian and New Zealand Standard AS/NZS 1754 for this type of
child restraint.
Other warnings specic to this child restraint will be found on
the following pages and throughout these instructions.
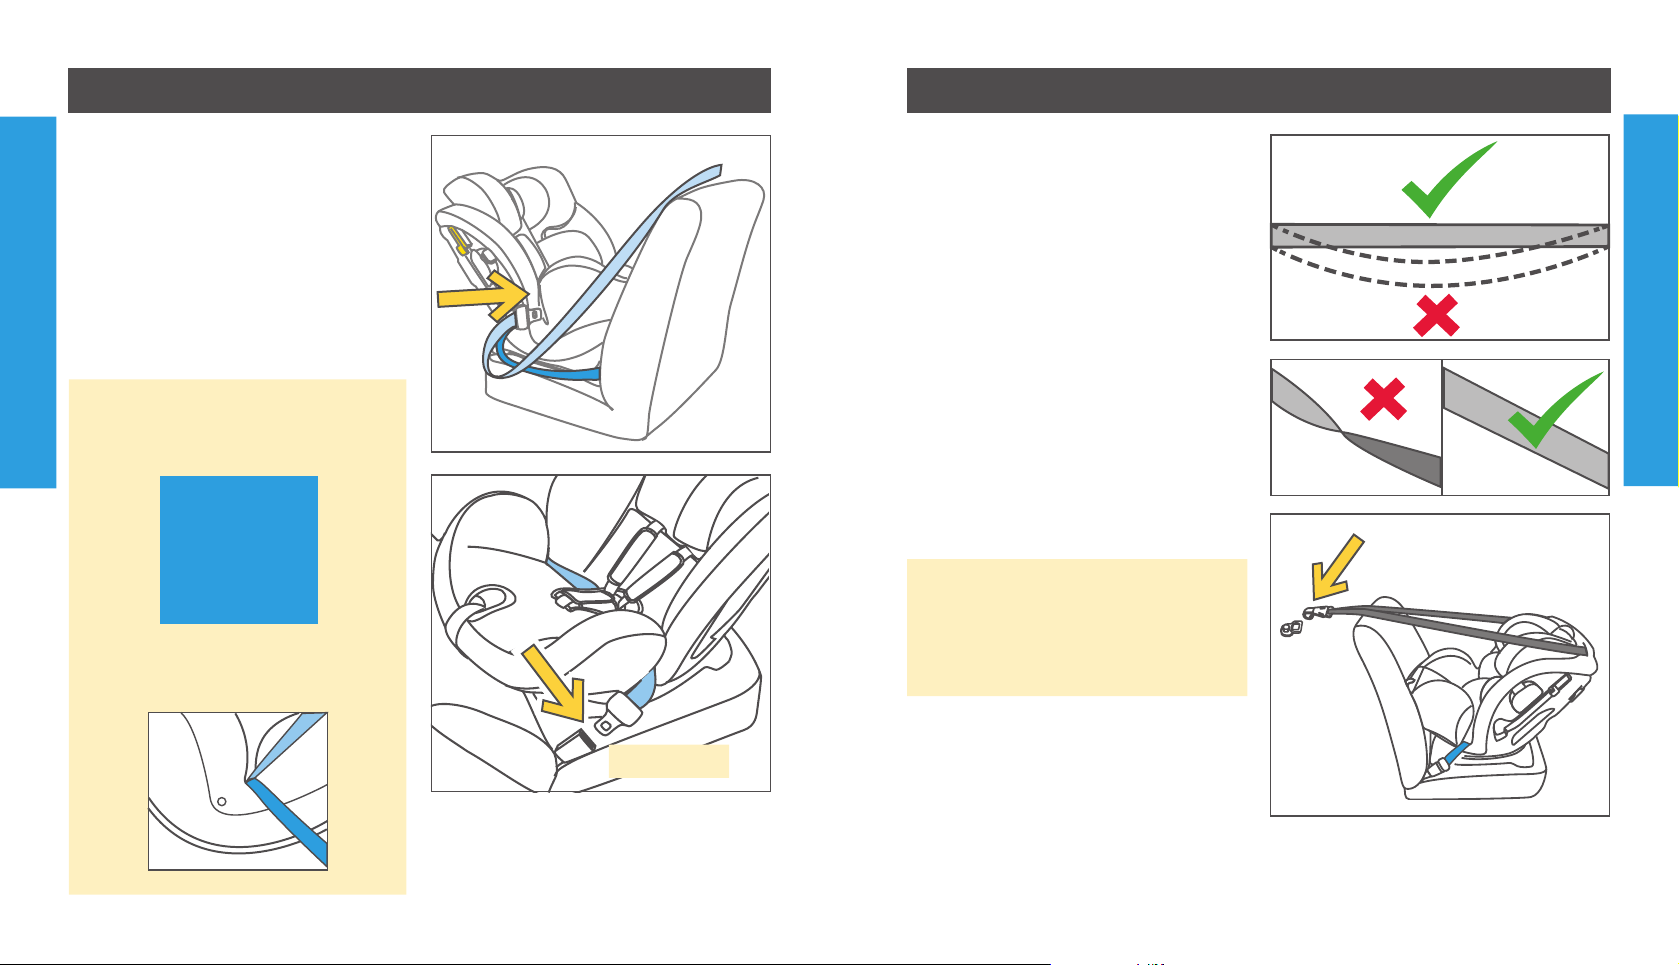
TO BE USED WITH A LAP-SASH/LAP ONLY SEAT BELT IN THE BACK OF MOST
CARS WITH FORWARD FACING SEATS.
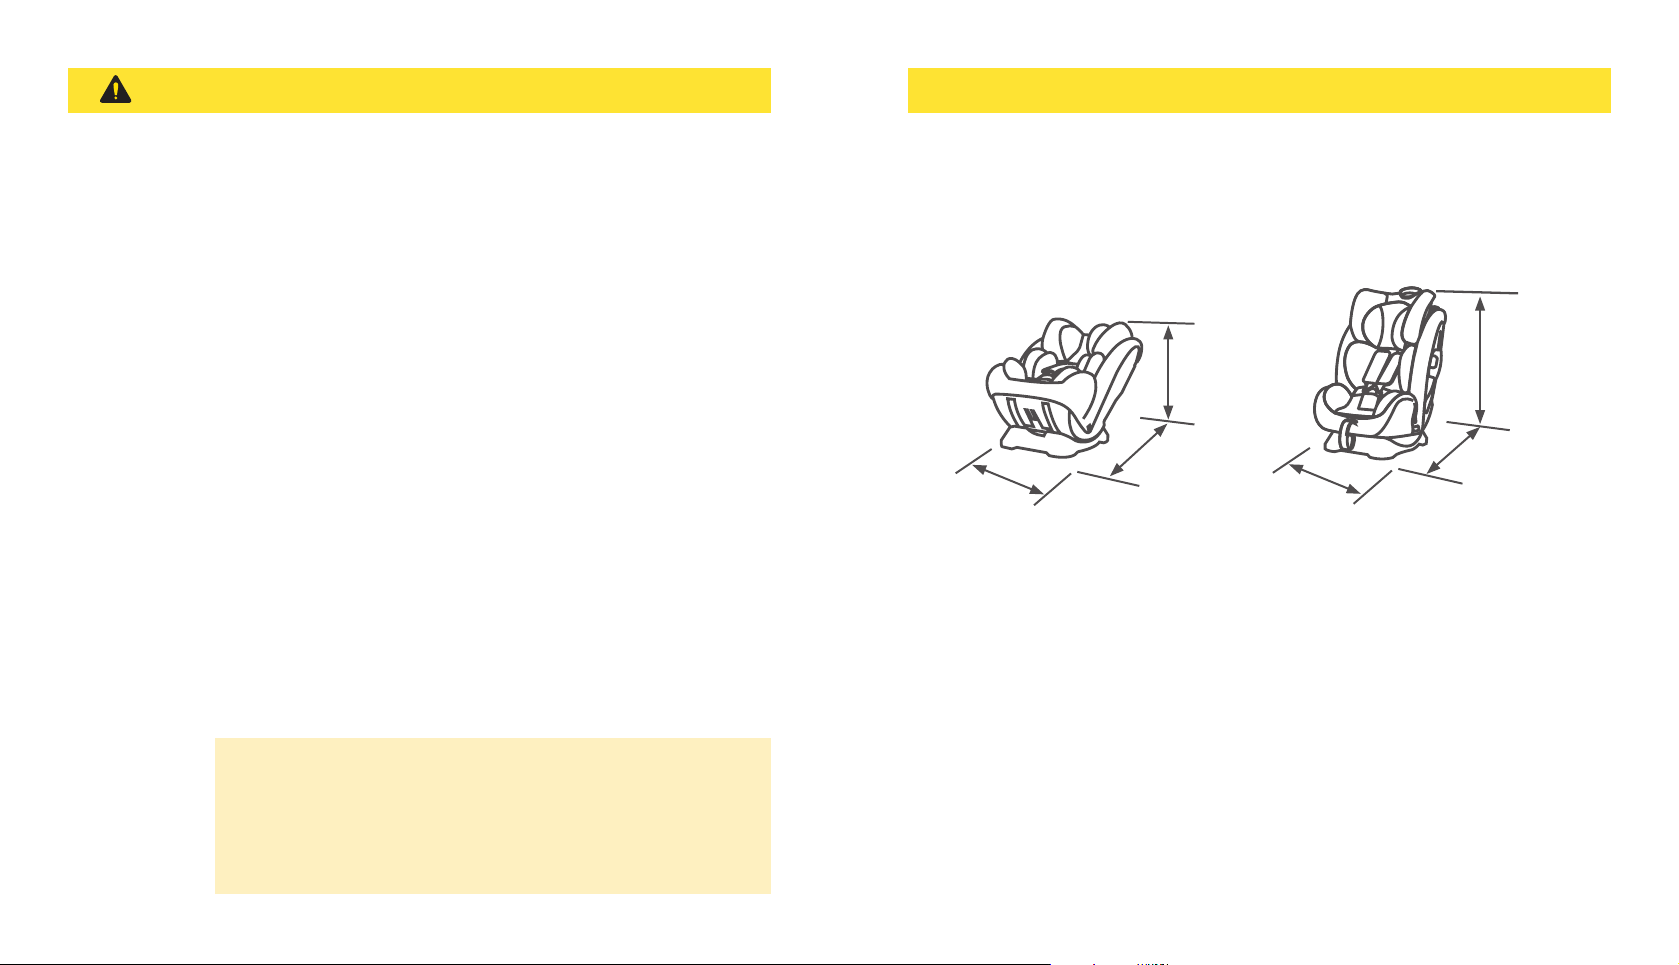
• When installed rearward facing this restraint is 710 mm long, 500 mm wide and 515
mm high. Check the measurement between the front of the seat back of the rear seat
and all front seats in the car in which the restraint is intended to be used to ensure the
space available is sufcient.
• Do not use seat belt extenders if the car seat belt is not long enough to secure the
child restraint. If the vehicle seat belt is not long enough to secure the restraint seek
advice from a child restraint tter.
• Read carefully the whole of the instructions for the installation, and in the event of
doubt about the method of installation, consult the child restraint manufacturer or
agent, or a child restraint tting station authorized by the relevant transport authority, or
in New Zealand, consult the agent for the vehicle.
• Aftermarket accessories (i.e. items not provided in the box with the child restraint),
may not have been tested for use with this child restraint and if used, may lower the
level of protection offered possibly leading to injury or death.
• Any aftermarket accessory used should be compliant with AS/NZS 8005 (Accesso-
ries for child restraints for use in motor vehicles) and stated as suitable for use with this
child restraint.
515 mm
710 mm
500 mm 500 mm 490 mm
850 mm
620 mm

6
5
ADDITIONAL WARNINGS
Only install child restraint in a forward facing
vehicle seat. Never install in a seat that faces
the rear or the side of the vehicle.
Never install the Child Restraint in a seat
with a front airbag. DEATH or SERIOUS
INJURY may occur. Refer to your vehicle
Owners Manual for airbag warnings and
information.
IMPORTANT
Some vehicles have airbags at-
tached to the sash belt.
DO NOT install the restraint using
using this type of belt.
If in doubt refer to the vehicle own-
ers manual or an approved child
restraint tter.
Features
1
2
3
4
5
67
8
9
10
1 Headrest height Adjustor
2 Seat Cover
3 Harness QR Buckle
4 Harness Adjuster (under cover)
5 Harness Adjuster Webbing
6 Recline Angle Adjustment Handle
7 Crotch Pad
8 Shoulder Harness Strap
9 Shoulder Harness Strap Cover
10 Infant Body Support

8
REAR FACING INSTALLATION
7
Features
17 20
19 21
12 13 15
18
14
11 Top Tether Anchorage
12 Top Tether Snap Hook
13 Top Tether
14 Headrest Adjuster
15 Sash Belt Lock-off Device
16 Extra side impact protection
17 Instructions Storage
18 Base
19 Tether End Storage Bag
20 Seat Shell
21 Forward-Facing Vehicle Belt Slot
22 Rear-Facing Vehicle Belt Slot
22
11
Recline Angle
This restraint should be installed in the
rear seat.
Correct Recline Angle
When used rear facing the restraint must
always be fully reclined.
The white arrow on the shell must be
above the blue arrow on the base.
To Adjust:
1. Pull the release handle on the shell fully
forward.
2. Rotate the shell until the white arrow is
above the blue arrow.
IMPORTANT: A correct recline angle is
essential for your baby’s safety.
2
1
16
TR TIONS
SAT REAR
OF SEAT
4
5
INSTRUCTIONS
STOREDAT REAR
OFSEAT

10
9
REAR FACING INSTALLATION
Installation
Place the restraint on the vehicle seat rear
facing.
See page 5 for recommended positions in
the vehicle.
1. Pull the vehicle lap/sash belt out and
pass through the slot in the restraint.
Pass the vehicle belts over the restraint
seating surface and out the other side.
2. Engage the vehicle belt buckle. Lap
Belt
Sash Belt
REARWARD FACING
BELT PATH
Look for this label showing the cor-
rect path for the vehicle belts
“CLICK”
REARWARD
FACING BELT
PATH
2
IMPORTANT: the vehicle belts
must be fully down in the slots in
the side wings
1
5. Connect the top tether strap.
4
3
Installation
3. Pull the vehicle belts tight.
4. Ensure there are no twists in the belts.
5
NOTE: many vehicles have built-in top
tether connection points.
If your vehicle does not have these re-
fer to page 22 for information on tting
the anchorage supplied.

12
11
REAR FACING INSTALLATION
Installation
Increase tether tension by pulling web
out.
Reduce tension by pressing release but-
ton and pulling web out.
6
6. Store end of web in bag on back of
cover.
Tether Strap General Information
Always connect the snap hook securely to
the anchorage tting.
Adjust the tether tension until the
tether is pulled tight.
Do not adjust so tight that it lifts the
child restraint off the vehicle seat.
Straps must not be twisted.
Pull straps pulled tight.
Installation
Also refer to page 21 for more Top
Tether information.
PULL
Pull web
to increase
tension
PULL
PRESS
Press button
to reduce
tension

14
FORWARD FACING INSTALLATION
13
REAR FACING INSTALLATION
Checklist
Recline adjustment
- restraint must be fully
reclined
Tether Strap - check tension.
Ensure there are no twists in
the webbing. End of tether in
storage bag
Side Flaps - these can be
opened to provide extra
side impact protection.
Open on the car door side
only.
Sash Belt - fully down in the
side slots
Vehicle Belt - latched
securely and pulled tight
Tether Strap - securely
attached to anchorage
Recline Angle
Correct Recline Angle
When used forward facing the restraint
must always be correctly reclined. The
white arrow on the shell must be above
one of the yellow arrows on the base.
Select a position that gives the most com-
fort for your child.
To Adjust:
1. Pull the release handle on the shell fully
forward.
2. Rotate the shell until the white arrow is
above one of the yellow arrows.
IMPORTANT A correct recline angle is
essential for your child’s safety.
DO NOT use the position marked by
the blue arrow when the restraint is
forward facing.
2
1
REAR FACING ONLY FORWARD FACING ONLY
12 3 4 5
INSTRUCTIONS
STORED AT REAR
OF SEAT

16
15
FORWARD FACING INSTALLATION
Installation
See page 5 for recommended positions in
the vehicle.
Place the restraint on the vehicle seat
forward facing.
1. Pull the vehicle lap/sash belt out and
thread it through the vehicle belt slots at
the back of the child restraint.
2. Engage the vehicle belt buckle.
Look for this label showing the cor-
rect path for the vehicle belts
FORWARD-FACING
BELT PATH
“CLICK”
1
2
3. While pressing the child restraint down
firmly into the vehicle seat, pull the vehicle
sash belt until both lap and sash belts are
tight.
Look for this marking showing the cor-
rect path for the vehicle sash belts
FORWARD-FACING
BELT PATH
Installation
3
4
4. Secure the sash belt in the belt
lock off.

18
17
FORWARD FACING INSTALLATION
7
7. Connect the top tether strap.
8. Store end of web in bag on back
of cover. 8
Installation
6
5
5. Pull the vehicle belts tight.
6. Ensure there are no twists in the belts.
NOTE: many vehicles have built-in
top tether connection points. If your
vehicle does not have these refer to
page 22 for information on tting the
anchorage supplied.
Installation
Pull web to increase tension
Increase tether tension by pulling web
out.
Reduce tension by pressing release but-
ton and pulling web out.
Press button to reduce tension
Web pulled tight.
No twists in web.
Always connect the snap hook securely to
the anchorage tting.
Tether Strap General Information
Also refer to page 21 for more Top
Tether information.

20
REAR FACING INSTALLATION
FORWARD FACING INSTALLATION
19
FORWARD FACING INSTALLATION
Tether Strap - securely attached to anchor-
age and pulled tight.
Ensure there are no twists in the webbing.
End of tether in storage bag
Checklist
Vehicle Belts - must always
be secure and pulled tight.
Base Recline adjustment -
restraint must be reclined
only use postions 2- 5
Sash Belt Lock-off -
firmly locked onto vehi-
cle sash belt
TOP TETHER
THIS RESTRAINT MUST BE ATTACHED TO A CHILD RESTRAINT UPPER
ANCHORAGE POINT IN THE CAR.
REFER TO CAR OWNERS HANDBOOK FOR LOCATION OF UPPER AN-
CHORAGE POINTS.
REFER TO A CHILD RESTRAINT FITTING STATION IF NO ANCHORAGE
POINTS ARE IN THE MOTOR CAR.
THIS RESTRAINT IS NOT SUITABLE FOR USE WHERE THE TOP TETHER
STRAP MAY FALL INTO A SPLIT IN THE SEAT BACK OR OFF THE SIDE OF
THE SEAT.
Always secure the loose end of the top tether strap to prevent it hanging out
of the car or being accessible by the child. Store it in the bag attached to the
back of the cover.
Do not use the child restraint where this strap may fall into a split in the seat
back or off the side of the seat.
ALWAYS ATTACH HOOK AND REMOVE SLACK.
CAUTION: CHILDREN CAN BE INJURED OR RESTRAINTS AND TOP
TETHER STRAP DAMAGED BY UNSECURED CARGO IN A COLLISION.
SECURE OR REMOVE HAZARDOUS CARGO BEFORE USING THIS CHILD
RESTRAINT.
WARNINGS

22
21
REAR FACING INSTALLATION
FORWARD FACING INSTALLATION
REAR FACING INSTALLATION
FORWARD FACING INSTALLATION
Top Tether - Features
This child restraint has a tether strap permanently attached to the back of the seat.
Always use this tether strap.
Connect the tether strap to the built-in anchorage tting in the vehicle, or if there is
not one available, install the anchor tting supplied with this restraint by following the
instructions at the end of this section.
Top Tether Strap
Top Tether Snap
Hook
Tether
Anchorage
Tether Adjustor
Top Tether End
Storage Bag
Tether Adjustor
- faces inward when restraint
is rear facing
FORWARD FACING
REARWARD FACING
Top Tether
Snap Hook
Tether
Anchorage
The anchor tting must be aligned as
shown unless stated otherwise in the
vehicle owners handbook.
If drilling a new hole, select a position on
the centre line of the seating position,
and no closer than 100 mm from the front
edge of the parcel shelf.
Tether Anchorage Installation
Most cars have several threaded holes to
t the tether anchorage to.
Refer to the vehicle owners handbook
for information on the location of these
points.
Using the bolt provided attach the anchor
tting to the mounting point behind where
the child restraint is to be installed.
See more detailed information on the next
page.
The threaded hole for the
anchorage bolt may have a
plastic cover over it
centre-line of
seating position
100 mm

24
23
REAR FACING INSTALLATION
FORWARD FACING INSTALLATION
REAR FACING INSTALLATION
FORWARD FACING INSTALLATION
Tether Anchorage Installation
If the car is fitted with a child restraint
anchorage point:
Locate the upper anchorage point behind
the rear seating position (consult the
vehicle owners handbook for location of
the upper anchorage point). Remove the
thread plug from the parcel shelf/oor/
roof and install the attachment bolt as
shown opposite.
CAUTION:
DO NOT OVERTIGHTEN THE ATTACH-
MENT BOLT. MAXIMUM TORQUE 20Nm.
Attachment
Bolt
Lock Washer
Spacers
(if required)
Anchor Fitting
Vehicle Metal
Structure
Vehicle Trim
FRONT OF VEHICLE
In some vehicles without a xed
parcel shelf an extension tether
strap may be required. These are
available in several different lengths
and can be obtained from child
restraint retail outlets.
CHILD RESTRAINTS MUST NOT BE ATTACHED TO UNSOUND METAL OR
WOOD OR SYNTHETIC STRUCTURES. WHEN DRILLING THE 9 MM HOLE DO
NOT DRILL THROUGH FUEL LINES, FUEL TANKS, ELECTRICAL WIRING, OR
RADIO SPEAKERS. WEBBING STRAPS MUST BE PROTECTED FROM SHARP
CORNERS AND EDGES.
THE ANCHOR FITTING MUST BE USED ONLY AS DESCRIBED ABOVE. IT
MUST NOT BE HOOKED ONTO ANY OTHER OBJECT.
Tether Anchorage Installation
If the car is not fitted with a child re-
straint upper anchorage point:
For sedans only - drill a 9 mm hole in the
parcel shelf on the centre line of the seat-
ing position as shown on page 22.
Install the anchor bolt as shown opposite.
It is recommended that this installation be
carried out by a child restraint tting sta-
tion or licenced motor mechanic.
For vehicles other than sedans:
In Australia, consult your nearest child re-
straint tting station or trafc authority for
vehicle inspection to nd the best, correct
position for the placement of the upper
anchorage point, and for the correct at-
tachment bolt length and use of spacers.
In New Zealand, consult the agent for the
vehicle.
Attachment
Bolt
Spacers
(if required)
Anchor
Fitting
Vehicle
Metal
Structure
Vehicle Trim
FRONT OF VEHICLE
Lock Washer
Nut
Reinforcing
Washer
WARNING

REAR FACING USE
FORWARD FACING USE
Maintenance
HARNESS BUCKLE
To clean the buckle: rinse using warm
water. DO NOT use any soaps, solvents
or lubricants. Using anything other
than water can cause the buckle to
malfunction. Air dry.
When the buckle is operating correctly the
tongues will push in easily and the second
tongue will CLICK when it latches into
place.
If the buckle does not appear to be
working correctly get it checked or
replaced by contacting the retailer from
where it was purchased, or by contacting
Australia's Power Brands.
STORAGE
Remove the child restraint from the vehicle
seat if not in use for a long period of time.
Put the child restraint in a cool, dry place
where your child cannot access it.
SEAT COVER
Wash with cold water at less than 30
degrees C.
Do not iron.
Do not bleach or dry clean.
Do not twist the soft goods to dry with
great force. It may leave the seat cover with
wrinkles.
Hang dry the seat cover in the shade. Do
not tumble dry.
PLASTIC AND METAL PARTS
Use only mild detergent, water and a soft
cloth to clean the car seat shell, handle
and harness straps. Air dry.
Do not use undiluted detergent, or other
solvents to clean - these may cause
damage.
HARNESS STRAPS
Shoulder harness straps are not remov-
able.
Clean with mild detergent, water and a
soft cloth only.
29

28
FORWARD FACING USE
The Next Restraint
This restraint is suitable for a child of av-
erage size up to approximately four years
of age.
When the child has outgrown this re-
straint, the next suitable types of restraint
are a bigger harnessed seat or a booster
seat.
Some harnessed seats are suitable for
children up to approximately 8 years of
age.
Booster seats are available for children up
to approximately 8 or 10 years of age.
Illustrated: Joie Trillo
IMPORTANT: Children are at risk of seri-
ous injury if they move to booster seats
too early.
REAR FACING USE
FORWARD FACING USE
Refit Cover
4
3
3
2
3
3
To Refit
Seat Cover
1. Place the main cover into the seat.
2. Thread the QR buckle through the slot
in the cover, and move the harness lap
straps into the slots in the cover.
3. Secure the press studs inside and
outside the shell.
4. Replace the infant Insert and crotch
pad if using these items.
1
Headrest Cover
5. Pull the headrest cover over the
headrest from the front.
6. Locate the elastic loops and thread
these under the headrest and reattach to
the lugs at the back of the headrest.
66
5
27

REAR FACING USE
FORWARD FACING USE
Cover Removal
To Remove
1. Remove the Infant Insert, Shoulder
Pads and Crotch Pad if fitted,
Headrest cover
2. Detach elastic loop fasteners at back
of headrest and remove the head support
cover by pulling forward over the
headrest.
1
5
5
3
Seat Cover
3. Press the red button down to disen-
gage the QR buckle and remove webbing
and spread outwards,
4. Detach the press studs on sides of
seat pad.
5. Detach the press studs inside the
cover.
6. Pull the QR buckle through the slot in
the seat pad and then remove seat pad
from seat shell.
22
4
4
6
26
FORWARD FACING USE
Checklist
Shoulder Straps - must
always be at correct height
and pulled tight.
Harness Straps - must
not be twisted.
Quick Release Buckle -
must always be securely
fastened.
Harness Tension-
pull harness tight.
Head Liners and Infant
Insert - only use for smaller
children who require more
support.
Child position - child
must be in full contact
with back of restraint.
Shoulder Height -
shoulders must
not be above the
upper marker line
Suitable clothing - child’s clothing must
allow the harness to securely grip the
child.
Recline angle - use
positions 2 - 5.
Do not use position
1.
25

FORWARD FACING USE
FORWARD FACING USE
Securing a Child in the Restraint - Adjusting the Harness
8. Correct strap tension.
Put a nger under each strap and pull
gently outwards.
There should be no gap between your n-
ger and the child.
Put nger
under strap
and pull out
NO
GAP
Put nger
under strap
and pull out
GAP
Securing a Child in the Restraint - Adjusting the Harness
7. Tighten harness by pulling on the ad-
juster strap at the front of the restraint.
WARNING
DO NOT LEAVE CHILDREN
UNATTENDED IN THE CAR
6
Note: the lower harness webbing may
not pull freely through the harness buckle
tongues.
You may need to pull the webbing through
the buckle tongues up towards the child’s
shoulder then pull on the adjuster strap
again.
This may need to be repeated several
times to get the webbing tting snugly.
5
6. Recheck shoulder strap height.
5. Make sure there are no twists in the
straps.
Pull strap at
front to tighten
shoulder straps
24
23

22
FORWARD FACING USE
FORWARD FACING USE
3 Place child in restraint in
seated position rmly against both the
back and bottom of the restraint.
4 Place buckle tongues into the quick
release buckle.
Securing a Child in the Restraint - Securing the Harness
IMPORTANT:
The buckle tongue pushed in last
should “CLICK” when it locks into
place. If it does not click, try again or
try cleaning the buckle.
IMPORTANT
Children need to be securely held
by the harness. Children must be
dressed in clothing that allows the
harness to firmly grip them.
Do not wrap the child in a blanket
or similar. Only place such covering
over the child after they are
strapped in.
3
4
Securing a Child in the Restraint - Securing the Harness
FIRST CHECK SHOULDER STRAP
HEIGHT AND ADJUST IF NECESSARY.
1 Loosen harness by pressing on
adjuster button A while pulling on the har-
ness straps B.
2 Press button to open the
quick release buckle.
Spread harness straps apart.
1
A
B
21
“CLICK”
22

FORWARD FACING USE
Securing a Child in the Restraint - Shoulder Strap height
Requirement:
The shoulder straps must be posi-
tioned near to the child’s shoulders, but
not more than 25 mm below the child’s
shoulders.
To Check:
With child placed in the restraint, note
where the shoulder straps are positioned
relative to the shoulders.
To Adjust:
If adjustment is needed squeeze the
headrest adjustor handle and raise or
lower the headrest and shoulder straps as
required.
Correct positioning of the shoulder straps
is essential for your child's safety.
IMPORTANT: Always adjust the
height of the shoulder straps as the
child grows
Note: the shoulder strap height re-
quirement forward facing is different
to rear facing.
Headrest adjustor
handle at top of
headrest
Squeeze release handle to
adjust headrest and shoulder
straps
20
FORWARD FACING USE
Securing a Child in the Restraint - Shoulder Strap height labels
This restraint has a shoulder
height level label.
Use this label to decide if the
restraint should be rear or for-
ward facing.
If your child’s shoulders are
below the bottom dotted line A
the restraint must be rearfac-
ing.
Once your child’s shoulders
pass the line Athey can be
either rearfacing or forward
facing.
Once your child's shoulders
reach the dotted line Bthe re-
straint must be forward facing.
Once your child passes line
Cthey are too big for this
restraint and need to move to a
Booster Seat.
IMPORTANT: Joie recommends that children re-
main rear facing until their shoulders reach line B.
B
A
C
19

FORWARD FACING USE
Securing a Child in the Restraint - Recline Angle
Correct Recline Angle
When used forward facing the restraint
must always be correctly reclined. The
white arrow on the shell must be above
one of the yellow arrows on the base.
Select a position that gives the most com-
fort for your child.
To Adjust:
1. Pull the release handle on the shell fully
forward.
2. Rotate the shell until the white arrow is
above one of the yellow arrows.
IMPORTANT
A correct recline angle is essential for
your child’s safety.
DO NOT use position 1 marked by
the blue arrow when the restraint is
forward facing.
2
1
18
REAR FACING USE
Forward Facing
The liner should be used for small chil-
dren only.
It should be removed when they grow
older than about 6 months.
DO NOT use the liner if the child is so big
that it is preventing them having some
movement.
Liner
17
REAR FACING ONLY FORWARD FACING ONLY
12 3 4 5
INSTRUCTIONS
STORED AT REAR
OF SEAT
Table of contents
Other Jole Car Seat manuals

Jole
Jole every stage R129 User manual

Jole
Jole Centra C2109A User manual

Jole
Jole Spin 360 User manual

Jole
Jole every stage fx User manual

Jole
Jole i-Snug 2 User manual

Jole
Jole transcend 1 User manual

Jole
Jole Spin 360 GTi User manual

Jole
Jole Spin 360 GTi User manual

Jole
Jole signature i-Gemm 3 User manual

Jole
Jole STAGES FX C1719 User manual