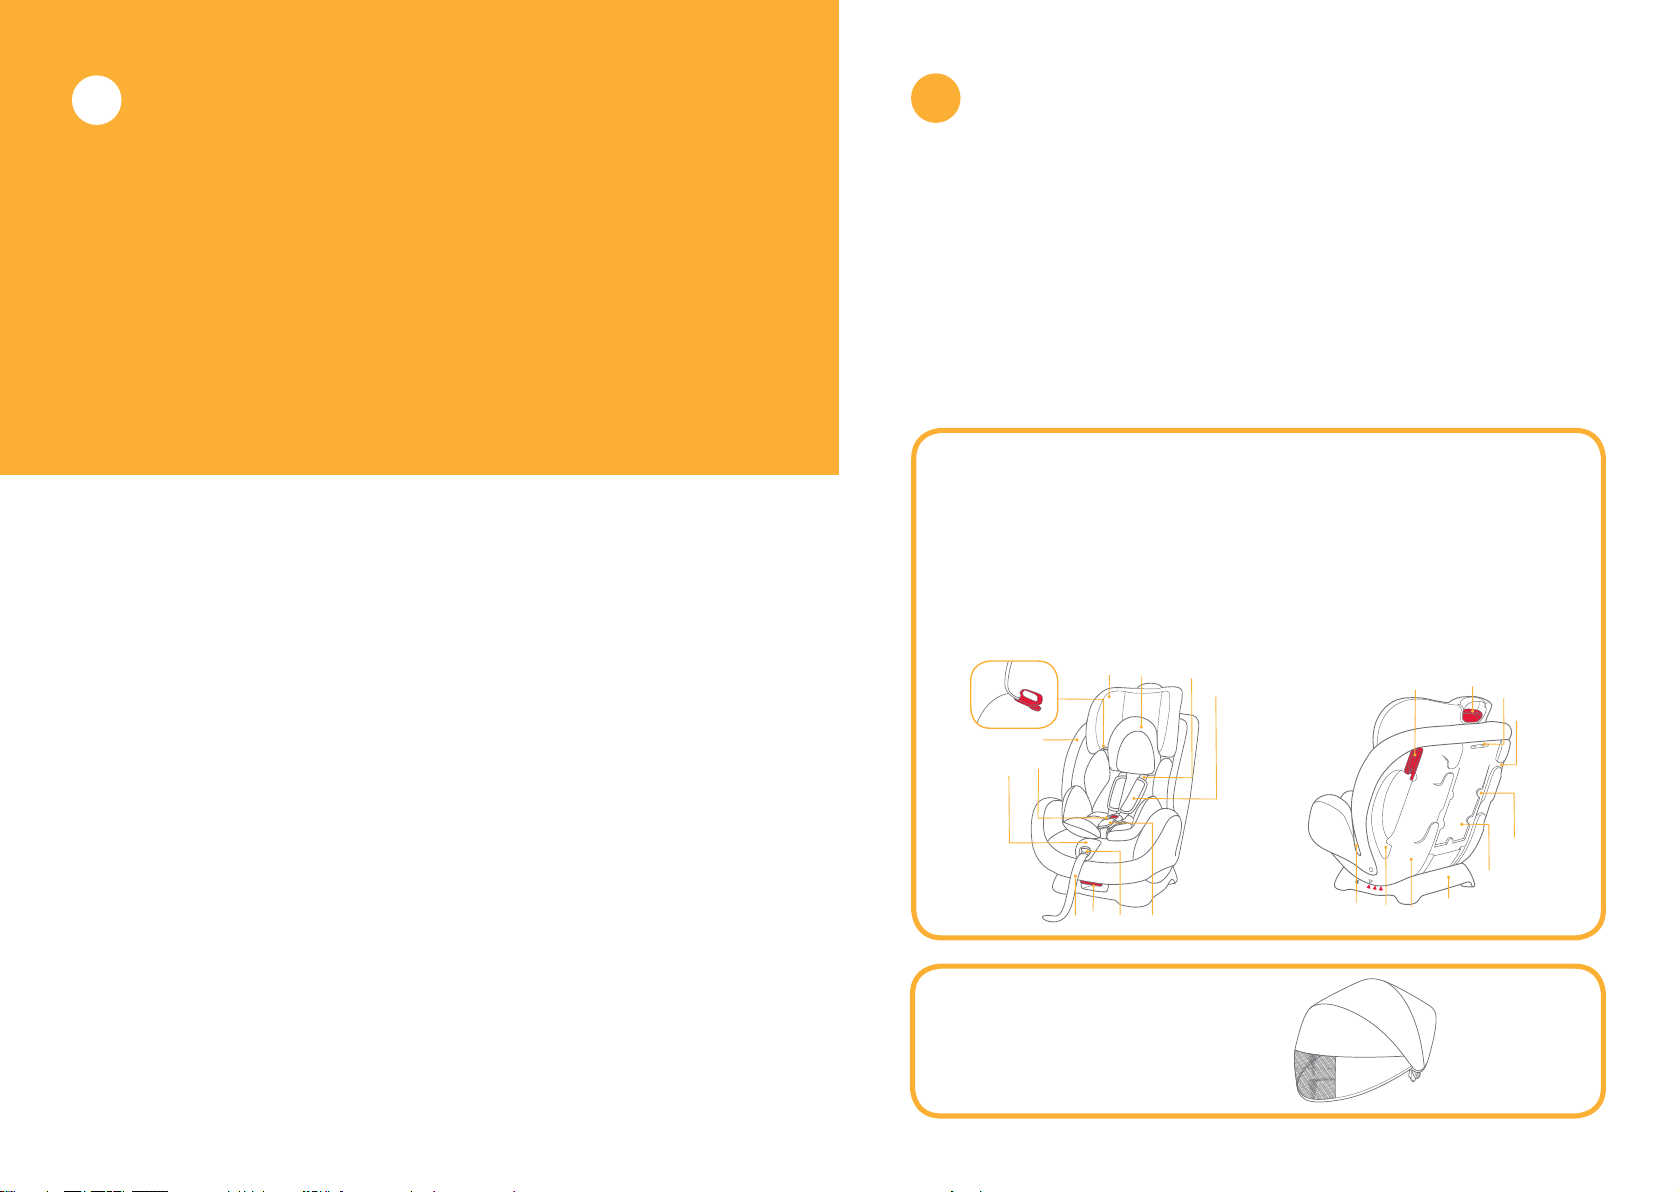
Jole Stages User manual

stages
0+/1 /2 (0-25kg)
Instruction Manual
Manual de instrucciones
Manuel d’instructions
Handleiding
Bedienungsanleitung
Libretto di istruzioni
Návod k použití
Instrukcja obsługi
Manual de Instruções
사용설명서
Εγχειρίδιο Οδηγιών
Руководство по
эксплуатации
Kurulum Kılavuzu
GB
ES
FR
NL
DE
IT
CZ
PL
PT
TR
KR
EL
RU

1
1 - 3
2
4 - 6
1
2
1
3
2
2
1
3
32
1
4
45
2
1
6
123

3
7 - 11
4
12 - 16
89
3
2
1
12
2
1
10 11
13 14
71
2
1
1
15 16
2

5
17 - 21
6
22 - 25
21
18
17
19
22
23
1
2
3
20 24 25

7
FIGURE 1 - 3
8
29 - 31
26 - 28
26
28
29 30
27
1
2
45
1
1
2
31 1
3
2
4
1
2
3
21

32 - 37
36
3332
3534
37
910
Use Accessories (May not be included in purchase)
Accessories may be sold separately or may not be available depending on region.

Contents
Warning 13
Installation Mode 14
Installation Concerns 14
Reclining Adjustment 15
Height Adjustment for Head Support and Shoulder Harness Straps 15
Infant Mode 15
For Child under 18kg / Newborn – 4 years old
i Installation for Rearward-Facing Infant Mode 15
ii Securing your Child in the Car Seat 16
Toddler Mode 17
For Child between 9-18kg / 1– 4 years old
i Installation for Forward-Facing Toddler Mode 17
ii Securing your Child in the Car Seat 18
Youth Mode 18
For Child between 15 –25kg / 3 –7 years old
i Converting from Toddler Mode to Youth Mode 18
ii Installation for Forward-Facing Youth Mode 19
Soft Goods Assembly 19
Use Accessories 20
Care and Maintenance 20
Congratulations
You have purchased a high quality, fully certified child safety car seat. This product is suitable for
the use of children weighing up to 25 kg (approximately 7 years old or under). Carefully read this
Instruction Manual and follow the installation steps. This is the ONLY way to protect your child
from serious injury or death in the case of an accident and to provide comfort to your child while
using this product.
Please Confirm
Make sure that your vehicle is equipped with a 3-point retractor safety belt. Seat belts may be dif-
ferent in design and length according to maker, manufacturing date, and the type of vehicle. This
car seat is only suitable for use in vehicles fitted with 3-point retractor safety belt and approved to
European UN/ECE Regulation No. 16 or other equivalent standards.
Please keep the Instruction Manual in the storage compartment of the rear cover for future
reference.
Emergency
In case of emergency or accident, it is most important to have your child taken care of with first aid and
medical treatment immediately.
11
GB
12
Product Information
Read all the instructions in this manual before using this product. If you have any further questions, consult the
retailer directly.
This is a "Universal" child restraint. It is approved to European Regulation No. 44, 04 series of amendments, for
general use in vehicles and it will fit most, but not all, vehicle seats.
Product Group 0+/1/2 Car seat
Model C0925
Suitable for Child weighing up to 25kg (approximately 7 years old or under)
Mass Group 0+/ 1 / 2
Materials Plastics, metal, fabrics
Patent No. Patents pending
Brand Name Joie
Website www.joiebaby.com
Manufacturer Joie Children's Products (UK) Limited
Outer soft goods include Seat Pad, Crotch Pad, Head Support and Infant Body Support. Please make sure
there are no missing parts. Please contact the retailer if anything is missing.
Parts List
GB
Accessories
(May not be included)
Hood (on certain models)
1
2
3
4
5678
9
11
10
21
17
19 18
20
12 13
14
15
16
22
1 Adjustable Head Support
2 Seat Pad
3 Buckle
4 Harness Adjustment Cover
5 Adjustment Webbing
6 Reclining Adjustment Handle
7 Webbing Lock
8 Crotch Pad
9 Shoulder Harness Strap
10 Shoulder Harness Strap Covers
11 Infant Body Support
12 Lock-off Device
13 Head Support Adjustment Handle
14 Rear-Facing Vehicle Shoulder Belt Slot
15 Rear Cover
16 Instruction Manual Storage Compartment
17 Base
18 Seat Shell
19 Forward-Facing Vehicle Belt Slot
20 Vehicle Waist Belt Slot
21 Vehicle Shoulder Belt Guide
22 Soft Goods Attachment Piece
Accessories may be sold separately or may
not be available depending on region.

Warning
!NO car seat can guarantee full protection from injury in an accident. However, proper use of this car seat
will reduce the risk of serious injury or death to your child.
!This car seat is designed ONLY for a child weighing up to 25kg (approximately 7 years old or under).
!DO NOT use or install this car seat until you read and understand the instructions in this manual and in your
vehicle owner's manual.
!DO NOT install or use this car seat without following the instructions and warnings in this manual or you
may put your child in serious risk of injury or death.
!DO NOT make any modifications to this car seat or use it along with component parts from other
manufacturers.
!DO NOT use this car seat if it has damaged or missing parts.
!NEVER leave your child unattended in this car seat.
!DO NOT have your child in large/oversized clothes when using this car seat. This may prevent your child
from being properly and securely fastened by the harness straps.
!DO NOT leave this car seat, or other items, unbelted or unsecured in your vehicle. Unsecured items can shift
or move around and may injure occupants in a sharp turn, sudden stop, or crash. Remove car seat from
vehicle if not in regular use.
!Do not place this car seat in seating positions where an active frontal airbag is installed If your child is still in
rear facing mode.
!NEVER use a second-hand car seat or a car seat whose history you do not know because it may have
structural damage that could endanger your child's safety.
!NEVER use ropes or any other substitutes to secure car seat in vehicle or to secure child into car seat. Only
use vehicle belt to secure car seat in vehicle.
!The parts of this car seat should never be lubricated in any way.
!Always secure child in car seat while in the vehicle, even on short trips, as this is when most accidents occur.
!DO NOT use this car seat in Group 0+, 1 for more than 7 years after the date of purchase and do not use this car
seat in Group 2 for more than 10 years after the date of purchase, as parts may degrade over time, or from
exposure to sunlight, and may not perform adequately in a crash.
!DO NOT use this car seat as a regular chair as it may fall down and injure the child.
!Please keep this car seat away from sunlight, otherwise it may be too hot for the child's skin. Always touch
test seat before placing child in it.
!DO NOT use this car seat without the soft goods.
!The soft goods should not be replaced with any besides those recommended by the manufacturer. The soft
goods constitute an integral part of the car seat performance.
!DO NOT put anything other than the recommended inner cushions in this car seat.
!DO NOT carry this car seat with a child in it.
!DO NOT continue to use this car seat after it has suffered any type of crash, even a minor one. Replace
immediately as there may be invisible, structural damage from the crash.
!Consult the retailer for issues concerning maintenance, repair and part replacement.
!DO NOT install this car seat under the following conditions:
1. Vehicle seats with 2-point vehicle belts.
2. Vehicle seats facing sideways or rearward with respect to the running direction of the vehicle.
3. Vehicle seats unstable during installation.
!Be sure that the car seat is installed in such a way that no part of it interferes with movable seats or in the
operation of vehicle doors.
13
GB
Installation Modes
Child's
Weig ht
Installation
Mode
Figure for
Installation
Reference
Age
SeatSeat pad
PositionInstructions
18 kg
9 -18 kg
15- 25
kg
4years
1 year
to
4 years
3 years
to
7 years
Group
0+/1
1
2
Rearward-
facing mode
Forward-
facing
mode/
Toddler
mode
Forward-
facing
mode/
Youth mode
Infant
Body Support
shall not be
used for child
over 6 months
Remove
Crotch Pad
and Infant Body
Support and store
harness in proper
storage locations
Infant Body
Support must
be used from
0-6 months
to help restrain
the child tightly
Necessary
(0-6 Months)
Position 4:
Positions
1-3:
Positions
1-2:
1 2 3
4
1 2
Less
Than
Less
Than
Important
1. DO NOT use car seat forward-facing in Toddler or Youth mode before the child's weight exceeds 9kg.
Car seat in Toddler or Youth mode is dangerous for a child under 9kg.
2. When the child is suitable for both forward and rearward-facing modes, it is recommended to install
this car seat in the rearward-facing mode as it is safer.
Installation Concerns
! DO NOT install this car seat on vehicle seats with 2-Point Retractor Vehicle Belts. 1
! This car seat is only suitable for vehicle seats with 3-Point Retractor Vehicle Belts. 2
! DO NOT install this car seat on vehicle seats that face sideways 3or rearward 3with
respect to the moving direction of the vehicle.
! Do not place this car seat in seating positions where an active frontal airbag is installed If your child is
still in rear facing mode. Death or serious injury may occur 3. Please reference vehicle owner's
manual for more information.
! It is recommended to install this car seat on a rear vehicle seat. 3
14

INFANT MODE
INFANT MODE
i. Installation for Rearward-Facing Infant Mode
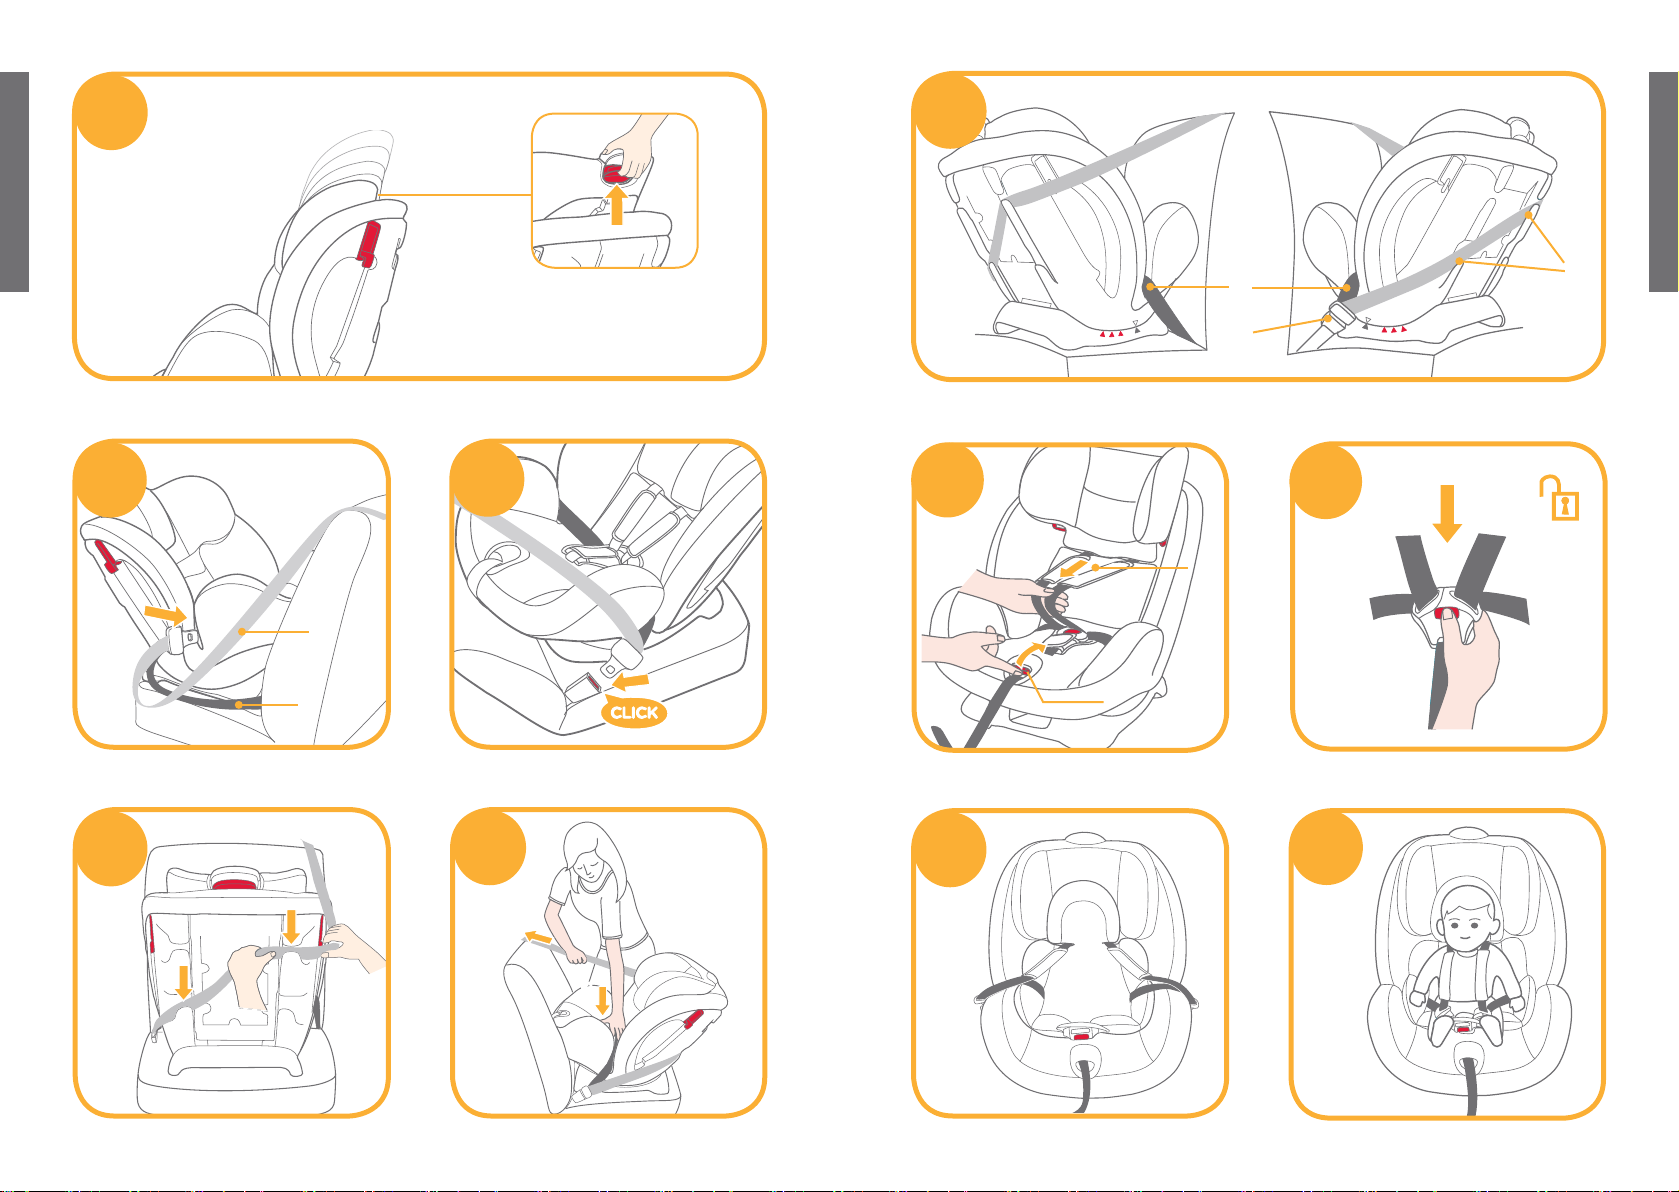
1. Remove infant body support.
! Vehicle waist belt must pass underneath infant body support.
Reclining Adjustment
Squeeze the reclining adjustment handle 4- 1, and adjust the car seat to the proper position 4- 2.
The recline positions are shown in 5.
There are three recline positions (1-3) for forward-facing Toddler mode and two recline positions (1-2) for
forward-facing Youth mode 5. The recline position 4 is for rearward-facing Infant mode 5.
Angle indication: with top and bottom triangles aligned 5.
15
Height Adjustment
(for Head Support and Shoulder Harness Straps)
Please adjust the head support and shoulder harness straps to the proper height according to the child's
height.
! When used in rearward-facing Infant mode, the shoulder harness slots must be even with or just
below the child's shoulders. 6- 1
! When used in forward-facing Toddler mode, the shoulder harness slots must be even with or just
above the child’s shoulders. 6- 2
! When used in forward-facing Youth mode, the shoulder belt guides must be even with or just
above the child’s shoulders. 6- 3
If the shoulder harness straps are not at proper height, the child may be ejected from the car seat during
a crash.
Squeeze the head support adjustment handle 7- 1 and pull up or push down the head support until it
snaps into one of the five positions.
The head support positions are shown in 7.
Infant Mode
(for Child under 18kg / Newborn -4 years old)
Reference age Newborn -4 years old
Seat position Position 4 (with top triangle and blue triangle aligned, as shown in 5).
! Please install the car seat on the vehicle seat first, and then place the child in the car seat.
1. First adjust the car seat to recline Position 4. Angle indication: With top triangle and blue triangle
aligned 5. Please refer to Page 13 (Reclining Adjustment).
2. Make sure the shoulder harness straps are adjusted to the proper height before installing this car
seat. Please refer to Page 13 (Height Adjustment for Head Support and Shoulder Harness Straps).
3. When installing and adjusting the vehicle belts, make sure that both the vehicle shoulder belt and the
vehicle waist belt are not twisted or the belts may not function properly.
Note
16
2. Pass the vehicle waist belt 8-1through the vehicle waist belt slots and then engage the vehicle
buckle tongue into the buckle 9.
3. Install the vehicle shoulder belt 8-2in the two rear-facing vehicle shoulder belt slots at the back of
the seat shell 10 .
! Vehicle shoulder belt must pass through the rear-facing vehicle shoulder belt slots.
4. While pressing the car seat down firmly into the vehicle seat 11 - 1, pull the vehicle shoulder belt to
fasten the car seat tightly and securely 11 - 2.
! Please check if car seat is installed tightly by moving the car seat back and forth at the vehicle
belt path. Please reference vehicle owner's manual for more information.
(Car Seat should not move more than 25mm/1").
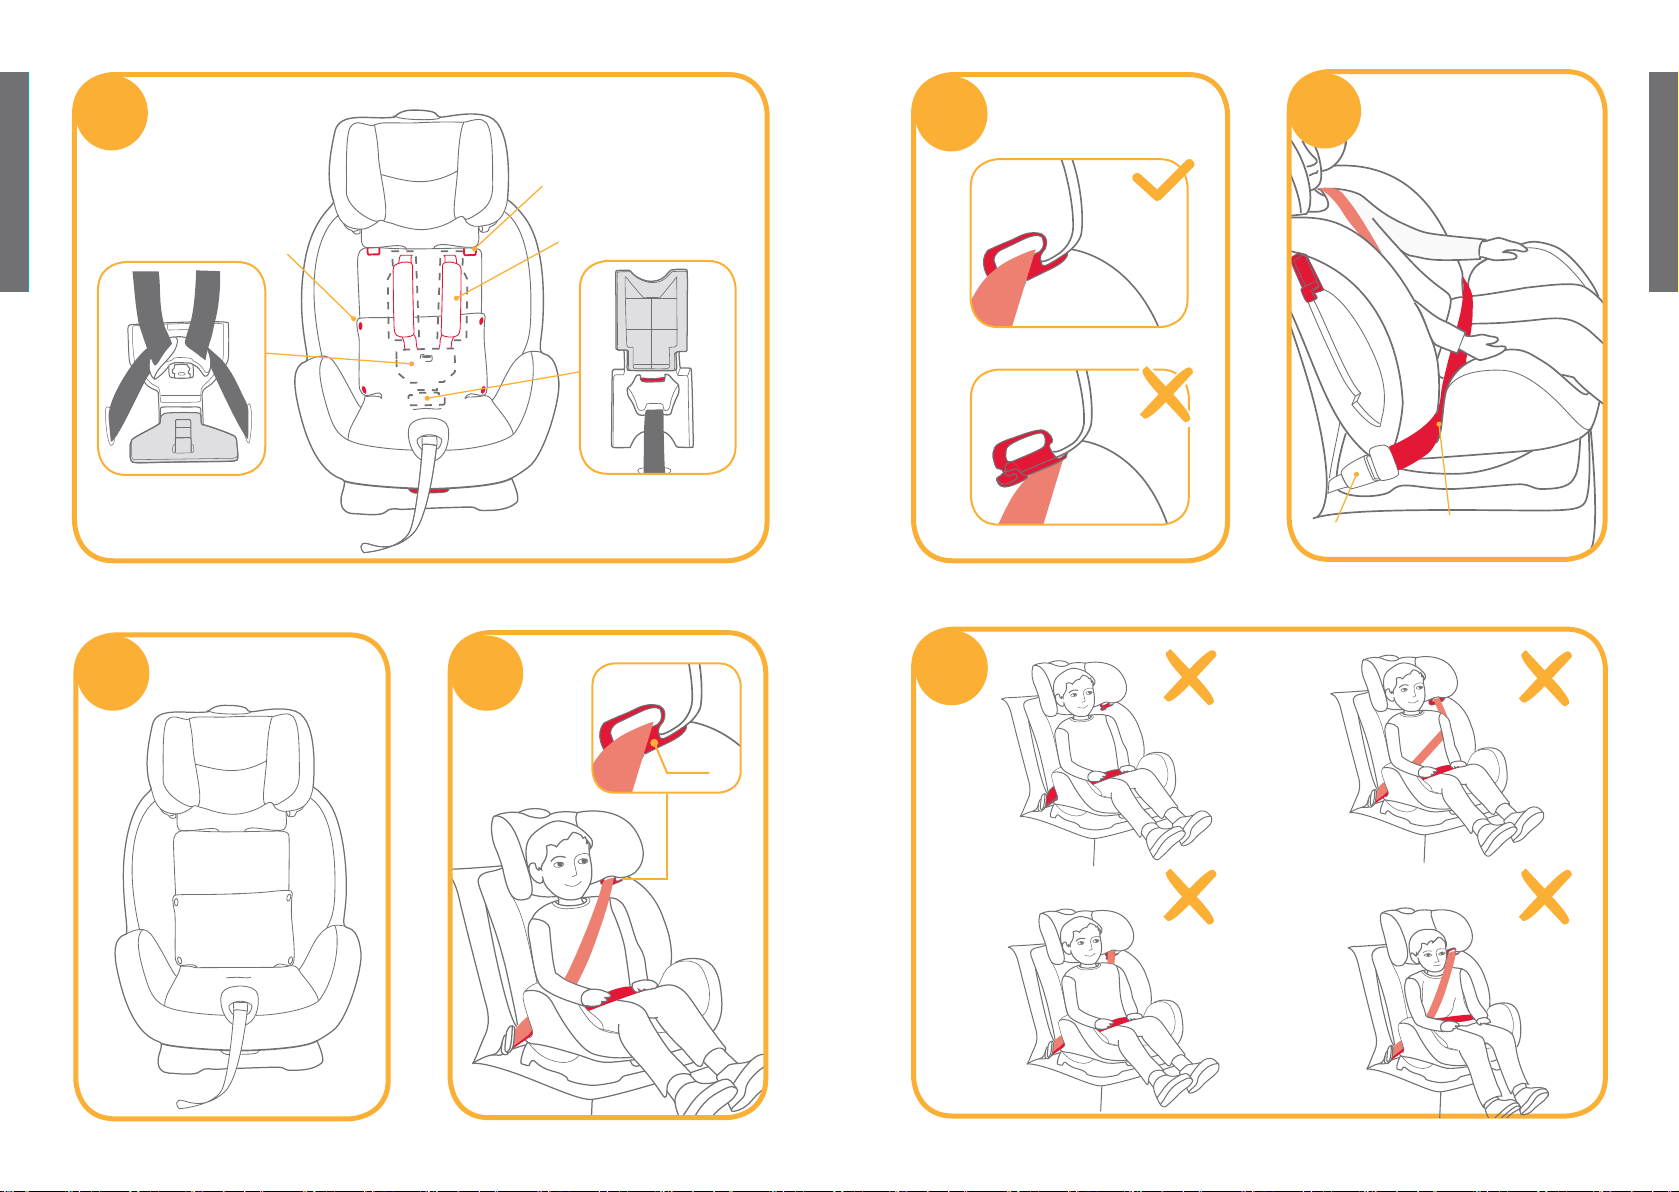
Correctly assembled vehicle belt is shown in 12 .
!Vehicle waist belt passes through the vehicle waist belt slots, as show in 12 - 1.
! Vehicle shoulder belt must pass through the rear-facing vehicle shoulder belt slots,
as shown in 12 - 2.
!The vehicle buckle tongue is engaged with the buckle correctly, as shown in 12 - 3.
ii. Securing your Child in the Car Seat
1. Pull up the webbing lock 13 - 1, while pulling out the shoulder harness straps to the proper
length. 13 - 2
2. Press the red button down to disengage the buckle. 14
3. Place the infant body support in the car seat, and then leave the harness straps on the left and right
sides of the car seat. 15
4. Place the child in the car seat and pass both arms through the harness straps. 16
!After the child is seated, double check whether the shoulder harness straps are at the proper
height. Please refer to Page 13 (Height Adjustment for Head Support and Shoulder
Harness Straps).
5. Engage the buckle. 17
6. Pull down the adjustment webbing and adjust the harness so that your child is snugly secured. 18
! Make sure the space between the child and the shoulder harness strap is about the thickness of
one hand. 18
Note
1. Infant body support is for child's protection. Child 0-6 months must use infant body support.
2. Please install the car seat on the vehicle seat, and then place the child in the car seat.
3. After the child is placed into the car seat, check whether the shoulder harness straps are at the
proper height. Please refer to Page 13 (Height Adjustment for Head Support and Shoulder
Harness Straps).

YOUTH MODE
TODDLER MODE
17
Toddler Mode
(for Child between 9-18kg / 1–4 years old)
Reference age 1-4 years old
Seat position Positions 1-3 (with top triangle and a red triangle aligned 5).
!Please install the car seat on the vehicle seat first, and then place the child in the car seat.
i. Installation for Forward-Facing Toddler Mode
1. Thread the vehicle belt through the two forward-facing vehicle belt slots at the back of the
car seat. 19
2. Engage the vehicle buckle tongue into the buckle. 20
3. While pressing the car seat down firmly into the vehicle seat, pull the vehicle shoulder belt to fasten
the car seat tightly and securely. 21
4. Open the lock-off device and insert the shoulder safety belt. 22
! Please check if the car seat is installed tightly by moving the car seat back and forth at the
vehicle belt path. (car seat should not move more than 25mm/1").
The assembled vehicle belt is shown in 23 .
!Vehicle Shoulder belt passes through Lock-off Device. 23 - 1
! Vehicle Waist belt passes through the forward-facing vehicle belt slots. 23 - 2
! The vehicle buckle tongue is engaged with the buckle correctly shown in. 23 - 3
Note
1. Please adjust the car seat to the proper recline position (3 positions for forward-facing Toddler mode).
Angle indication: With top triangle and a red triangle aligned 5. Please refer to Page 13 (Reclining
Adjustment).
! Recline position must be selected before car seat is installed in the vehicle. Recline is not
intended to be adjusted while car seat is installed in vehicle. Adjusting the recline while car seat
is installed in vehicle may loosen installation of car seat leading to death or serious injury in a crash.
2. Please adjust the shoulder harness straps to the proper height before installing the car seat. Please
refer to Page 13 (Height Adjustment for Head Support and Shoulder Harness Straps).
3. When installing and adjusting the vehicle belts, make sure that both the vehicle shoulder belt and the
vehicle waist belt are not twisted or the belts may not function properly.
! Although not recommended, if installing car seat forward-facing on a front vehicle seat with airbag,
turn airbag off or move vehicle seat back as far away from airbag as possible. Please reference
vehicle owner's manual for more information.
ii. Securing your Child in the Car Seat
1. Pull up the webbing lock 13 - 1, while pulling the shoulder harness straps to proper length. 13 - 2
2. Press the red button down to disengage the buckle. 14
3. Leave the harness straps on the left and right sides of the car seat. 24
4. Place the child in the car seat and engage the buckle. 17
! After the child is seated, double check whether the shoulder harness straps are at the proper
height. Please refer to Page 13 (Height Adjustment for Head Support and Shoulder
Harness Straps).
5. Pull down the adjustment webbing and adjust the harness so that your child is snugly secured. 25
! Make sure the space between the child and the shoulder harness straps is about the thickness of
one hand. 25
1. When installing the car seat in the forward-facing Toddler mode, do not use the infant body support.
2. Please install the car seat on the vehicle seat, and then place the child in the car seat.
3. After the child is placed into the car seat, double check whether the shoulder harness straps are
at the proper height. Please refer to Page 13 (Height Adjustment for Head Support and Shoulder
Harness Straps).
Note
Youth Mode
(for Child 15–25kg / 3–7 years old)
Reference age 3-7 years old
Seat position Positions 1-2 (with top triangle and a red triangle aligned 5).
i. Converting from Toddler Mode to Youth Mode
1. Press the red button down to disengage the buckle. 14
2. Remove the infant body support and crotch pad.
3. Detach the snaps 26 -1and the hook and loop fastener on the seat pad. 26 - 2
4. Lift the upper flap of seat pad upward and pull the lower flap forward. Then store the shoulder straps
26 - 3 and buckle tongues in their storage compartments. 26 - 4
5. Pull the buckle through the slot in the seat pad and then store the buckle in its storage
compartment. 26 - 5
6. Reattach the snaps 26 -1and the hook and loop fastener 26 - 2 to recover the seat shell. 27
!To convert back to Toddler mode from Youth mode, please reverse the above steps.
18

YOUTH MODE
ii. Installation for Forward-Facing Youth Mode
1. Place your child in the car seat. Check whether the shoulder belt guides are at proper height. Please
refer to Page 13 (Height Adjustment for Head Support and Shoulder Harness Straps).
2. Install vehicle shoulder belt through vehicle shoulder belt guide 28 - 1 and pass vehicle waist belt
through vehicle waist belt slots shown in 28 - 2. Engage vehicle belt tongue into buckle.
!Shoulder belt must pass through shoulder belt guide. 29 - 1
! Waist belt must pass through seat slots. 30 - 1
!The vehicle buckle tongue is engaged with the buckle correctly shown in. 30 - 2
!Never use a 2-point vehicle belt across front of child. 31 - 1
! Do not use vehicle shoulder belt loose or positioned under child's arm. 31 - 2
! Do not use vehicle shoulder belt behind child’s back. 31 - 3
! Do not allow child to slide down in the car seat. 31 - 4
Soft Goods Assembly
1. Remove the infant body support and crotch pad.
2. Press the red button down to disengage the buckle. 14
3. Detach hook and loop fasteners 26 - 2 on the head support from slots in vehicle shoulder belt guides,
and then remove the head support cover.
4. Detach the snaps on sides of seat pad. 26 - 1
5. Detach elastic tabs, located behind head support, from the seat shell.
6. Detach the fabric attachment piece from the upper rear of seat shell.
7. Pull the buckle through the slot in the seat pad and then remove seat pad from seat shell.
The soft goods can be re-assembled by reversing the above steps.
!Please reference Page 16 (Converting from Toddler Mode to Youth Mode) for proper routing of harness
through seat pad.
19
Note
1. Only use the vehicle seat belt when installing the car seat in the forward-facing Youth mode. Do not
use the infant body support, shoulder straps or crotch strap. Please store the shoulder straps, buckle
and buckle tongues in their storage compartments. 26
! Although not recommended, if installing car seat forward-facing on a front seat with airbag, turn
airbag off or move vehicle seat back as far away from airbag as possible. Please reference vehicle
owner's manual for more information.
2. Please adjust the shoulder harness straps to the proper length before storing the shoulder straps and
buckle in their storage compartments. 13
3. Please adjust the car seat to the proper recline position (Only positions 1-2 are acceptable for
forward-facing Youth mode). Angle indication: With top triangle and a red triangle
aligned 5. Please refer to Page 13 (Reclining Adjustment).
4. When installing and adjusting the vehicle belts, make sure that both the vehicle shoulder belt and the
vehicle waist belt are not twisted or the belts may not function properly.
Use Accessories
Accessories may be sold separately or may not be available depending on region.
Use Hood
see images 32
-37
!Use this hood only with the stages car seat.
!The hood can be used for both front facing and rear facing modes.
Care and Maintenance
!When using the car seat in Toddler or Youth mode, please remove the infant body support and store it
somewhere that the child cannot access it.
!Please machine wash the soft goods with cold water under 30°C.
!Do not iron the soft goods.
!Do not bleach or dry clean the soft goods.
! Do not use undiluted neutral detergent, gasoline or other organic solvent to wash the car seat. It may
cause damage to the car seat. Use only mild detergent, water and a soft cloth to clean car seat shell,
harness and shoulder harness strap covers.
!Shoulder harness straps are not removable. Clean with mild detergent, water and a soft cloth only.
!Do not twist the soft goods with great force to dry. It may leave the soft goods with wrinkles.
!Please line-dry the soft goods in the shade only. Do not use a clothes dryer to dry the soft goods.
!Please remove the car seat from the vehicle seat if not in use for a long period of time. Store the car
seat in a cool, dry place where your child cannot access it.
! Remove foam insert from infant body support before machine washing.
Please reference the Illustration when re-inserting foam insert
into infant body support.
20
This manual suits for next models
1
Table of contents
Other Jole Car Seat manuals

Jole
Jole i-Snug 2 User manual

Jole
Jole every stage fx User manual

Jole
Jole i-Bold User manual

Jole
Jole every stage R129 User manual

Jole
Jole STAGES FX C1719 User manual

Jole
Jole trillo eco User manual

Jole
Jole Steadi R129 User manual

Jole
Jole bold R User manual

Jole
Jole i-Juva User manual

Jole
Jole Armour C2005B User manual