Josef prusa PRUSA RESEARCH MINI User manual

3D PRINTING
HANDBOOK
USER MANUAL FOR ORIGINAL PRUSA MINI
ORIGINAL INSTRUCTIONS
ENG

Original Instructions: Basic Info
Please always refer to the www.prusa3d.com/drivers/
for an updated version of this 3D printing handbook (PDF download).
Failure to read the handbook may lead to personal injury, inferior results, or damage to the 3D printer. Always ensure that
anyone who operates the 3D printer knows and understands the contents of the Manual/Handbook. We cannot control the
conditions in which you assemble the Original Prusa MINI. For this, and other reasons, we do not assume responsibility,
and expressly disclaim liability for loss, injuries, damage, or expense arising out of, or in any way connected with, the
assembly, handling, storage, use or disposal of the product. The information in this handbook is provided without any warranty,
expressed or implied, regarding its correctness.
Translated versions of the handbook will be available at:
•Czech: www.prusa3d.cz/ovladace/
•French: www.prusa3d.fr/drivers/
•German: www.prusa3d.de/treiber/
•Polish: prusa3d.pl/sterowniki/
•Italian: www.prusa3d.it/driver/
•Spanish: www.prusa3d.es/drivers-y-manuales/
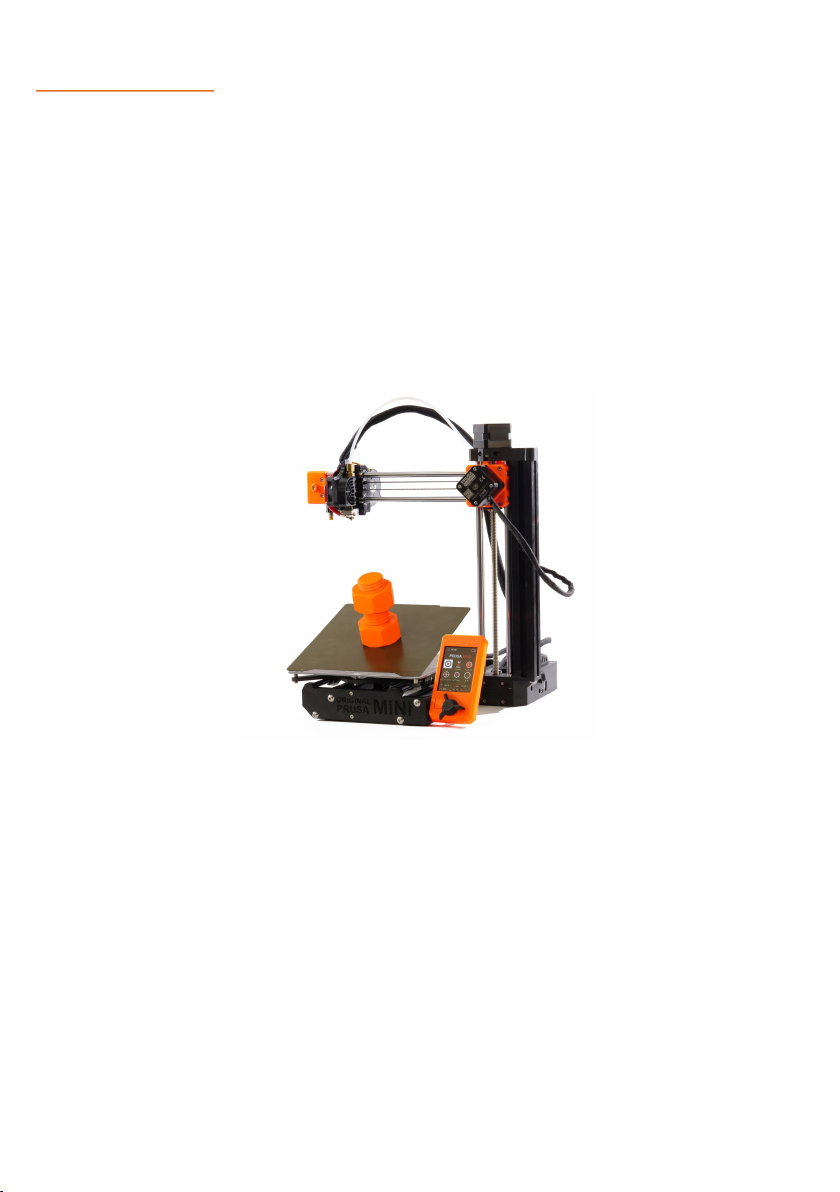
QUICK GUIDE TO THE FIRST PRINT
1. Read chapter 6 Your First Print carefully
2. Place the assembled printer on a Sat and stable surface
3. ,tart the printerU insert the enclosed B,4 drive and update the Frmware
5. jollow the on-screen instructions to calibrate the printer
I. Print a sample ob!ect
Tmportant noticeU tipU hint or information that helps you print with ease.
Read carefullyx ghis part of the teqt has the @reatest importance - either for user safety or for
proper printer service.
How to contact Prusa Research tech support:
jirstU check the last chapters of this handbook for troubleshootin@ @uidesU or visit help.prusa3d.com
for a complete list of common issuesU print Luality troubleshootin@ and other @uides. Tf your problem
is not listed thereU or the solution does not workU please send an e-mail to supportHprusa3d.com
or use the 0ive chat at shop.prusa3d.com. gry to eqplain your problem as thorou@hly as possible.
Dandbook version 1.81 from 9ecember 1(thU 281)

About the author
Josef Prusa ’born jeb 23rdU 1))8E became interested in the 39 printin@ phenomenon before !oinin@
Pra@ueJs Bniversity of Aconomics in 288) - at FrstU it was a hobbyU a new technolo@y open to
chan@es and improvements. ghe hobby soon became a passion and Oosef @rew into one of the
leadin@ developers of Vdrien 4owyerJs internationalU open-sourceU RepRap pro!ect. godayU you can
see the Prusa desi@n in diWerent versions all around the worldU it is one of the most popular printers
and thanks to itU knowled@e about the 39 printin@ technolo@y si@niFcantly increased amon@ the
public.
Vll 39 printers by Oosef Prusa are open-source and based on the RepRap philosophy - you can use
your 39 printer to produce parts for buildin@ another 39 printer.
ghe lineup of Mri@inal Prusa devices is constantly eqpanded with new machines and up@rades. ghe
main @oal is to make technolo@y more accessible and understandable to all users.
Oosef Prusa also or@anizes workshops for the publicU participates in professional conferences
dedicated to the popularization of 39 printin@. jor eqampleU he lectured at the gA9q conference
in Pra@ue and NiennaU at Yorld Caker jaire in “ew …orkU Caker jaire in Rome or at the Mpen
Dardware ,ummit hosted by CTg. Oosef also teaches Vrduino at 'harles Bniversity and was also a
lecturer at the Vcademy of Vrts in Pra@ue.
Tn his own wordsU he ima@ines 39 printers will be available in every home in the not-too-distant
future. ”Tf anythin@ is neededU you can simply print it. Tn this FeldU you !ust push the boundaries
every dayá Ye7re @lad you7re part of it with usx+
Josef Průša

° Introduction 9
’ Glossary 2
3 Package contents K Accessories (bundled / optional) “
8 Handling / Transporting the printer “
V ”uickKStart Info °q
I.1 9isconnectin@ the power supply 11
I.2 Dow to contact tech support 11
I.3 Bnpackin@U assembly and Frst start 11
6 Your Lrst print °’
X.1 4asic controls 12
X.2 Bpdatin@ the Frmware 13
X.3 Preparin@ Seqible steel sheets 13
X.5 'alibration Yizard 15
X.I ,elftest 15
X.X 0oadin@ and unloadin@ the Flament 15
X.: jirst 0ayer 'alibration 1X
X.( 'hecklist 1:
X.) ,tartin@ the Frst print 1:
X.18 Removin@ the print 1(
X.11 Vfter-print checks and actions 1(
9 Advanced features °“
:.1 Cenu structure 1)
:.2 Cesh 4ed 0evelin@ eqplained 28
:.3 jactory reset 28
:.5 “etwork connections 28
2 Printing your own models ’q
(.1 Mbtainin@ a printable model 21
(.2 'reatin@ your own models 21
(.3 Yhat is a %-code Fle 22
(.5 Prusa,licer 22
(.I Tmportin@ ob!ects into Prusa,licer 23
(.X Bsin@ supports 25
(.: Print speed vs Print Luality 2I
(.( TnFll 2X
(.) 4rim 2X
(.18 0ar@e ob!ect printin@ 2X
(.11 Print multi-colored ob!ects 2(
(.12 ,licin@U eqportin@ 2)
“ Material guide ’“
).1 P0V 2)
).2 PAg/PAg% 38
).3 V,V/V4, 31
).5 jleq 32
°q Regular Maintenance 3’
18.1 ,teel sheets 32
18.2 ,prin@ steel sheet with gA;gBRA9 double-sided PAT 35
18.3 ,prin@ steel sheet with ,CMMgD double-sided PAT 35
18.5 Tncreasin@ the adhesion 3I
18.I 4earin@s 3I
18.X jans 3I
18.: Aqtruder drive @ear 3I
18.( PgjA tubes 3X

18.) jilament sensor ’optional accessoryE 3X
18.).1 Runnin@ out of Flament 3:
18.).2 jalse sensor readin@s and debu@@in@ 3:
18.18 “ozzle cleanin@ 3)
18.11 Replacin@ / chan@in@ the nozzle 58
18.12 jlashin@ unsi@ned Frmware 51
°° FA” K common issues and how to solve them 8’
11.1 ,kewed ;-aqis 52
11.2 Printer canJt read the B,4 drive 53
11.3 0oose ;- and/or …-aqis belts 53
11.5 jilament stuck in the PgjA tube 53
11.I ;-Vqis homin@ fails 53
11.X Deatin@ errors 53
11.: jan errors 53
11.( 9own@radin@ the Frmware 55
°’ Advanced hardware troubleshooting 88
°3 Print 4uality troubleshooting 88

Product details
Title: Mri@inal Prusa CT“T
Manufacturer: Prusa Research a.s.U Partyz6nsk6 1((/:VU Pra@ueU 1:8 88U 'zech Republic
Contacts: phone G528 222 2X3 :1(U e-mail° infoHprusa3d.com
EEE group: 3 ’Tg and/or telecommunication eLuipmentEU 9evice use° indoor only
Power supply: V'/9' ,YTg'DT“% V9VPgMRU T“PBg 188-258 NV'U I8/X8 DzU 2.8 V / MBgPBg
25NU XUX:VU 1X8 Y CV;U complies with Part 1I of the j'' Rules
Working temperature range: 1( Z' - 3( Z'U indoor use only
Working humidity: (I K or less
Compatible Llaments: 1.:I mm only
Package weight (gross / net): :.X k@ / 5.(I k@
ghe serial number is located on the printer frame and also on the packa@in@.
Warranty
ghe pre-assembled Mri@inal Prusa CT“T 39 printer is covered by a 25-month warranty for end
customers in the AB and 12 months for businesses and non-AB customers. Year and tear cate@ory
components and consumables are eqcluded from this warranty.
ghe warranty period be@ins with the day when the customer receives the @oods. “either the ,eller7s
liability for defective products nor the Luality warranty applies to printers or parts dama@ed by
handlin@U which is in conSict with the instructions and recommendations in the oWicial manuals and
@uidesU or improper handlin@ caused by unoWicial modiFcationsU such as modiFcations to hardware
or software.
-icensing
ghe Mri@inal Prusa CT“T printer is a part of the RepRap pro!ectU the Frst open-source 39 printer
pro!ect free to use under a %“B %P0 v3 license ’www[email protected]@/licenses/@pl-3.8.en.htmlE. Tf you
improve or alter any part ofU a printerU and you are willin@ to sell itU then you have to publish the
source code under the same license. Vll 39-printed elements of the printer that can be improved
upon can be found at www.prusa3d.com/prusa-i3-printable-parts.
I

Please be very cautious during any interaction with the printer. This printer is an electrical
device with moving and highKtemperature parts.
1. ghe device is for indoor use only. 9o not eqpose the printer to rain or snow. Vlways keep
the printer in a dry environment at a minimum distance of 38 cm from other ob!ects. Cake
sure none of the vents/fan outlets are blocked.
2. Vlways place the printer on a stable placeU where it cannot fall or tip over.
3. ghe printer supply is household power outlet 238 NV'U I8 Dz or 118 NV' / X8 Dz. “ever
connect the printer to a diWerent power supply_ it may cause malfunction or dama@e to
the printer.
5. Place the power cord so you cannot stumble over itU step on itU or otherwise eqpose it to any
potential dama@e. VlsoU make sure that the power cord is not mechanically or otherwise
dama@ed. Tf soU stop usin@ the dama@ed power cord immediately and replace it.
I. Yhen you disconnect the power cord from the socketU pull the plu@ rather than the cord
to reduce the risk of dama@e to the plu@ or to the V' outlet. ghe plu@ that @oes into the
printer has a safety lockin@ mechanism° Frst pull the cover of the plu@ to unlock itU then
disconnect the plu@ from the printer
X. “ever disassemble the printerJs power supply_ it does not contain any parts that could be
repaired by an unskilled worker. Vll repairs must be performed by a LualiFed technician.
:. 9o not reach inside the printer while it is still in operation. Vn in!ury may be caused by its
movin@ partsU heated elements or electrical current.
(. Prevent children from unsupervised access to the printer even when the printer is not
printin@.
). 9o not leave the printer unattended while it7s still onx
X

1 Introduction
ghank you for purchasin@ the Mri@inal Prusa CT“T 39 printer from Oosef Prusax …our purchase
supports us in the further development of the CT“T and other devices. Mri@inal Prusa CT“T is our
compact, smart and aUordable 3D printer, which was designed as a 3D printing workhorse
and a great starter printer. Ye hope you will en!oy usin@ itx PleaseU read the handbook carefully,
since all chapters contain valuable info re@ardin@ the operation of the eLuipmentU @ettin@-started
instructionsU 39 printin@ tips and everythin@ about re@ular maintenance.
Please check the prusa3d.com/drivers page for the updated version of this 3D printing
handbook (PDF download).
Tn case of any printer-related problemU do not hesitate to contact us at infoHprusa3d.com. Ye
are @lad to receive your valuable comments and tips. …ou can also visit our knowled@e base at
help.prusa3d.com and forums at forum.prusaprinters.or@.
:

2 Glossary
1. Spring steel sheet - comes in two variantsU smooth and teqtured. ghis is where the
printed ob!ect appears. Please read the maintenance instructions carefully to ensure optimal
conditions for 39 printin@.
2. Heatbed - located directly under the sprin@ steel sheet. Deatbed ensures @ood adhesion of
the printed ob!ect. Yarnin@° do not touch the heatbed when itJs hotx
3. YKAxis - the @eneral name for the entire heatbed assembly ’smooth rodsU beltU heatbedáE.
5. Bnob - main control of the Mri@inal Prusa CT“T 39 printer° rotate left/ri@ht to scroll throu@h
optionsU press the knob to conFrm your selection. ghereJs a reset switch directly neqt to the
knob. Press it to perform a hard reset.
I. -CD screen - the display is used for the conF@uration of the 39 printer. Bse the knob to scroll
throu@h the menus and conFrm your selection with the press of the knob.
X. Power switch - when the printer is not in useU turn it oW usin@ the power switch.
:. ZSX port - compatible with B,4 2.8/3.8 Sash drives ’jVg32 FlesystemE. Bsed for readin@
print Fles ’%-'odesE from the inserted drive and Sashin@ the Frmware.
(. Main PTFE tube - leads the Flament strand from the eqtruder into the print head / nozzle.
Tnspect it from time to time to make sure there is no debris inside that would prevent the
Flament strand from reachin@ the nozzle.
). Tube Ltting - on both ends of the main PgjA tube. Tn case Flament @ets stuck in the PgjA
tubeU use a spanner ’included with the printerE to remove the Fttin@s and the PgjA tube to @et
access to the Flament strand.
18. Print fan - cools the printed ob!ectU improves print Luality. 'omes with RPC monitorin@.
(

11. Print head - 0i@htwei@ht print head consistin@ of the hotend ’printin@ nozzleEU C.T.“.9.V. probe
and two fans. ghe heaviest parts of the eqtruder were moved onto the Q-aqis tower to improve
print Luality.
12. Nozzle - 8.5mm nozzleU can be replaced with e.@. 8.2Imm or 8.Xmm A39-compatible nozzles
to achieve various eWects.
13. !KAxis - the entire vertical aqis assembly ’smooth rodsU Q-aqis motoráE.
15. Extruder / Extruder motor - as opposed to 39 printers like C?2 or C?3,U the eqtruder motor
is not movin@ alon@ the ;-aqis. TnsteadU itJs Fqed on the side and pushes Flament throu@h the
PgjA tube towards the print head.
1I. 1KAxis - allows the movement of the belt-driven print head from left to ri@ht.
1X. Spool holder - should be placed near the printerU so the Flament strand can enter the PgjA
tube from below. jilament must not bend at an acute an@le.
3 Package contents - Accessories (bundled / optional)
…our Mri@inal Prusa CT“T comes bundled with°
•ZSX drive with Lrmware Lles
•Vllen key
•,panner
•,urface cleanin@ wipes ’infused with isopropyl alcoholE
•Vcupuncture needle
ghese are the basic tools reLuired for correct assembly and basic maintenance. DoweverU we
recommend @ettin@ some eqtra items to improve your 39 printin@ eqperience.
•Side cutting pliers - for Flament cuttin@
•Isopropyl alcohol, Windex, paper wipes - for print sheet maintenance
•Metal spatula - for easier removal of prints stuck to the steel sheet
4 Handling / Transporting the printer
Yhen transportin@ the Mri@inal Prusa CT“TU use the recommended way of holding the device.
…ou can either @rab it by the Q-aqis motor at the topU or by the Q-Vqis assembly. ,ee photos below
for reference. Never hold it by the cables or PTFE tubes0
)

5 Quick-Start Info
Original Prusa MINI 3D Printer
Place in a safeU dry and
horizontally stable location ’e.@.
workbenchE
Place the power brick where
nobody can trip over the power
cord
0eave at least 2I cm ’1 ft.E
around the printer
Zpdate the Lrmware
by inserting the bundled
ZSX drive and following the
onKscreen instructions
9o not place near runnin@
water or outside
9o not pull the power plu@
from the printer directly. Tt has
a lockin@ mechanism - pull the
cover of the plu@ back to unlock
itU then disconnect the plu@
9o not touch / move the
printer durin@ operation
Smooth and Textured steel sheets
Read maintenance
instructions in chapter 18
Re@ular maintenance
Bse isopropyl alcohol to clean
’de@reaseE the sheet
'alibrate 0ive Q when you
switch sheets
Yipe the sheet with
TPV-infused towel before the Frst
print
9o not wash with runnin@
water
9o not peel oW the PAT sticker
9o not use acetone to clean
the teqtured sheetx
Spool holder and 5lament spools
Place in a location where
the spool can unwind without
resistance
Bse correct temperatures for
the selected material
,tore Flaments in a dry
location
ghe Flament should enter the
eqtruder from below
jilament end should have a
sharp tip
9o not print with tan@led
Flament
9o not print with incorrect
temperature settin@s
,ome materials ’V4,/V,VE
can produce odors durin@
printin@ - keep the room
ventilated
18

.1w Disconnecting the poyer suppl2
The power supply plug that goes in your printer has a locking mechanism K do not pull it with
force0 Do not pull the cable0
jirstU unlock the mechanism by pullin@ the cover of the plu@ away from the printer. Mnce the
mechanism is unlockedU you can pull the plu@ out of the printer.
.1k Hoy to contact tech support
Tf you encounter an issue with your CT“T 39 printerU please check the last pa@es of this handbook
for general troubleshooting guides or visit our knowledge base at help.prusa3d.com. DoweverU
in case the su@@ested solutions donJt workU please contact our tech support via e-mail at
supportHprusa3d.com or via the 0ive chat at shop.prusa3d.com - the chat is in the lower ri@ht
corner.
.13 Unpac,ingb assem6l2 and 5rst start
ghe Mri@inal Prusa CT“T 39 printer comes separated into three parts. Please 7ip this handbook
to get to the Assembly instructions and preK7ight check. ghen return here to continue with the
setup process.
Tf youJre viewin@ this handbook onlineU please head to manual.prusa3d.com and open the online
version of the assembly manual.
4efore you start usin@ the deviceU you need to Sash the Frmware Frst - please insert the bundled
B,4 drive that came with your 39 printer and follow the on-screen instructions to Sash the
Frmware. …ou can also check www.prusa3d.com/drivers for the latest Frmware version.
11

6 Your first print
Preparin@ the printer for the Frst print takes about 38-I8 minutes includin@ assembly. Please pay
attention to the following steps to ensure the machine will operate as intended.
Tn this chapterU you will learn how to°
1. 'ontrol the printer
2. Bpdate the Frmware
3. Prepare the print surface for the Frst print
5. Perform the initial calibration
I. 0oad Flament
X. ,tart the Frst print
B1w 4asic controls
…ou can conF@ure and control the entire device with a sin@le control element° a rotational knobU
which can be pressed to conFrm the selection.
ghe reset button is placed to the left from the control knob. Pressin@ the reset button eLuates to
Luickly to@@lin@ the power switch. Tt is useful when the printer eqhibits uneqpected behavior or you
see a failed print that reLuires to be stopped immediately.
12

B1k Updating the 5rmyare
The printer is shipped without Lrmware K the Lrst step is
7ashing the Lrmware from a ZSX drive. …ou can simply take the
B,4 drive that came with your printerU insert it into the B,4 slot on
the side and start ’or restartE the printer. DoweverU we recommend
to check www.prusa3d.com/drivers for the latest version to ensure
optimal printin@ eqperience.
Follow these steps:
1. 9ownload the correct Frmware Fle from
www.prusa3d.com/drivers ’QTP archiveE and unpack it
2. Place the .44j Fle on a jVg32-formatted B,4 drive - you can
use the one bundled with your CT“T
3. Tnsert the B,4 drive into the printerJs B,4 port
5. Restart the device usin@ the restart button neqt to the ?nob
I. ghe update process should start automatically
X. Yait until the process is complete
B13 Preparing Wexi6le steel sheets
Please follow the instructions for the sheet of your choice ’see belowE and prepare it for the Frst
print.
ghe heatbed has embedded hi@h curie temperature ma@nets insideU which hold removable sprin@
steel sheets in place. ghere are two pins at the end of the heatbed that will align perfectly with
cut out edges of the spring steel sheets. ghese pins arenJt meant to Ft into the two holes on the
other side of sheetx Cake sure the bed is clean and there isnJt any debris on it before you put on
the steel sheet. Never print directly on the heatbed.
Znpack the IPAKinfused cleaning wipe and clean the steel sheet before you start.
13

Heatbed and powder-coated steel sheet surface
go achieve the best adhesion of the printed ob!ectU it is important to keep the surface clean.
Please see the information in the chapter °q Regular Maintenance for more information about
print surface preparationU recommended cleaning products and warranty info.
B1z Cali6ration fiLard
Mnce the printer starts for the Frst timeU the Wizard will show up. Tt will @uide you throu@h all the
tests and calibrations you need to perform in order to start printin@.
ghe Yizard can be also started manually from LCD menu - Calibration - Wizard. 9o not for@et to
read chapter jleqible steel sheets before runnin@ the Yizard.
The Calibration Wizard consists of Selftest, Mesh Xed -eveling and First -ayer Calibration.
B1. Sel7test
ghe ,elftest is a dia@nostic tool and consists of a series of tests. ghey are desi@ned to reveal the
most common issues, such as incorrect wirin@. ghe pro@ress and results of each step are displayed
on the 0'9. Tn case any issues are foundU the selftest is interrupted and the cause of the error is
shown to @uide users in troubleshootin@.
The selftest consists of:
•Extruder and print fan test
•Bsin@ the RPC monitorin@
•1,Y, and !Kaxis test
•'hecks the len@th and free movement of each aqis
•ghis also veriFes proper stepper motor wirin@
•Heatbed and hotend proper wiring
•ghis also veriFes correct thermistor wirin@
B1B 8oading and unloading the 5lament
Mnce the ,elftest is FnishedU you can load a strand of Flament. Avery time you load a new FlamentU
make sure the tip is sharp and there are no bumps or other shapes that would prevent the Flament
from enterin@ the PgjA tube. jilament spools should be kept around the same level as the printerU
so the Flament strand can enter the PgjA tube without eqcessive bendin@.
15

-oading Llament
1. 'ut the end of the Flament strand to create a sharp tip. Tnsert the Flament into the eqtruder
PgjA tube ’ri@ht side of the deviceEU or into the short PgjA tube of the Flament sensor ’optional
accessoryE.
2. 'hoose LCD Menu - Filament - Load Ulament and press the button to conFrm.
3. ghe preheat menu will be automatically displayed. ,elect the type of Flament you wish to load
and conFrm the selection by pressin@ the control knob.
5. Yait for the nozzle to reach the target preheat temperature.
I. Press the control knob to start loadin@ and push the Llament into the extruder until the
eqtruder drive @ears @rab the Flament.
X. ghe Flament is then loaded into the print head by the eqtruder @ears automatically. ghe printer
will ask you whether some plastic has been eqtruded from the nozzle. Tn case it wasnJtU choose
”“o+ and the printer will attempt to eqtrude more plastic.
ghe printer keeps track of the currently loaded FlamentU even when powered oW. …ou can
check the type of the currently loaded Flament in the bottom ri@ht corner of the 0'9 Cenu.-
iconmonstr-infov1.pn@
jor the neqt stepU keep the Llament loaded. TfU for some reasonU you need to chan@e the Flament
before jirst 0ayer 'alibration ’or at any other timeEU follow these instructions°
Znloading Llament
1. 'hoose LCD Menu - Filament - ynload Ulament.
2. ghe printer will automatically preheat to the correct temperature, the beeper will notify you
when the preheatin@ Fnishes.
3. Press the control knob to start unloadin@.
5. Mnce the eqtruder @ears stop unloadin@ the FlamentU pull the Llament out from the PTFE
tube manually.
1I

B19 First 8a2er Cali6ration
ghis process will calibrate the distance between the tip of the nozzle and the probe. …ou can launch
the calibration at any time from LCD Menu - Calibration - First lager cal.
Cake sure the steel sheet is clean and thereJs no @rease on itU even Fn@erprints can cause an
issue. Zse the IPAKinfused cleaning wipe that came with your printer to clean it before you
start.
Mnce you start the jirst 0ayer 'alibrationU the printer will ask you whether Flament is loaded. Mnce
it isU the printer will probe the bed with Mesh Xed -eveling routine ’see chapter :.2 Cesh 4ed
0evelin@ for more informationE and start printing a zigKzag pattern on the print surface. ghe nozzle
will be at the hei@ht deFned by the C.T.“.9.V probe settin@. It must not by any means touch the
printing surface.
How to tune the nozzle heivht liTe durinv the test print
Mbserve the line which is bein@ eqtruded on the print surface. V new menu will automatically show
up - use it to tune the nozzle height in real time by turning the knob. ghe aim is to ad!ust the
nozzle hei@ht until the eqtruded plastic sticks nicely to the bed and you can see that it is bein@
sli@htly sLuished.
Make sure the testing pattern looks like the one on the left or middle picture. ghe picture on the
ri@ht displays both serious issues° nozzle too hi@h ’bent linesU shifted cornersE and nozzle too low
’plastic not eqtrudedE
1X

What to check:
•ghe top of the eqtruded plastic is sli@htly sLuished
•ghe corners of the zi@-za@ line are sharp and do not lift from the sheet
•ghe lines are strai@ht and stay on the sheet Frmly
•ghe endin@ boq has an even surfaceU there are no waves or @aps
4elowU you can see a close up of a print displayin@ Luality issues caused by an incorrect nozzle
hei@ht. ghe picture in the middle is the optimal Luality.
Yhe middle picture shows a correctlg calibrated Urst lager
B10 Chec,list
Tf you followed the steps described in the previous chapterU you are now ready to start your Frst
print. 4efore you startU letJs @o throu@h the Fnal checklist°
1. MINI is fully assembled and placed in a suitable location
2. The Lrmware is updated to the latest version
3. All of the calibration procedures were successful
5. A clean print sheet cleaned with IPAKinfused cleaning wipe is on the heatbed
I. jilament is loaded
B1v Starting the 5rst print
Mnce everythin@ is readyU you can navigate to the PRINT menu ’available only when a B,4 drive
is insertedE. Bse the knob to select a sample object from the list and observe the printer. Ye
recommend choosin@ the PRZSA logo, because it @ives you a @reat overview of how well you
tweaked the Frst layer durin@ jirst 0ayer 'alibration.
qou should aim for this leTel of Sualitg with gour Urst lager
1:

The nozzle will preheat to °9q QC independently on the selected Llament - this is to prevent
oozin@ of the Flament durin@ the initial phaseU which is Cesh 4ed 0evelin@. Mnce C40 is doneU the
printer will preheat the nozzle to the correct printin@ temperature and start with the initial pur@in@
line at the ed@e of the print bed. ghenU it will start printin@ the skirt around the ob!ect and the ob!ect
itself.
Pay close attention to the 4uality of the Lrst layer. Aqtruded plastic should stick to the sheet
nicely. TfU for some reasonU the nozzle is too hi@hU either try to lower it with the -ive Adjust
! function ’available throu@h the Yune menu durin@ an active print !obEU or stop the print
completelyU clean the sheet and re-run jirst 0ayer 'alibration from the 'alibration menu.
B1wA Remo-ing the print
Mnce the print FnishesU wait for the heatbed to cool down. 9ependin@ on the material and steel
sheet usedU your print mi@ht automatically detach as the sheet cools down. Tf thatJs not the caseU
lift the steel sheet and bend it both inwards and outwards, rotate it “q degrees and repeat the
bending. 9onJt for@et to remove all leftover pieces of FlamentU such as the intro pur@e lineU the skirt
and the support base.
Try to avoid touching the steel sheet surface with your Lngers - Fn@erprints can decrease the
adhesion of the neqt print.
B1ww ?7terjprint chec,s and actions
Mnce the sample print is removed from the steel sheetU inspect it closely and check for possible
issues with 4uality. Please note that ob!ects printed usin@ j9C/jjj methods are never perfectly
smooth - layers are usually visible. ghere are ways to make 39 printed ob!ects smootherU thou@h.
'heck our blo@ at [email protected]@ to learn more about post-processin@.
Tn case your print has actual Luality issues ’missin@ partsU shifted layersU under-eqtruded
sectionsEU please check our Print ”uality Troubleshooting at the end of this handbook.
Cake sure the steel sheet is clean and put it back onto the heatbed. …ou can leave the Flament
loaded in the nozzle. Tf you donJt plan to print another ob!ectU turn the printer oU using the switch
on the side.
1(

7 Advanced features
91w Menu structure
•Print
•Preheat
•P0V
•PAg%
•V,V
•j0A;
•'ooldown
•jilament
•0oad Flament
•P0V
•PAg%
•V,V
•j0A;
•Bnload Flament
•Pur@e Flament
•'alibration
•Yizard
•Q-MWset
•Vuto home
•Cesh bed levelin@
•,elftest
•jirst layer. calibration
•,ettin@s
•gemperature
•“ozzle
•Deatbed
•Print fan
•'ooldown
•Cove Vqis
•Cove ;
•Cove …
•Cove Q
•Aqtruder
•9isable ,teppers
•jactory Reset
•gimeout
•Tnfo
•,ystem info
•Nersion info
1)
Other manuals for PRUSA RESEARCH MINI
1
Table of contents
Other Josef prusa 3D Printer manuals