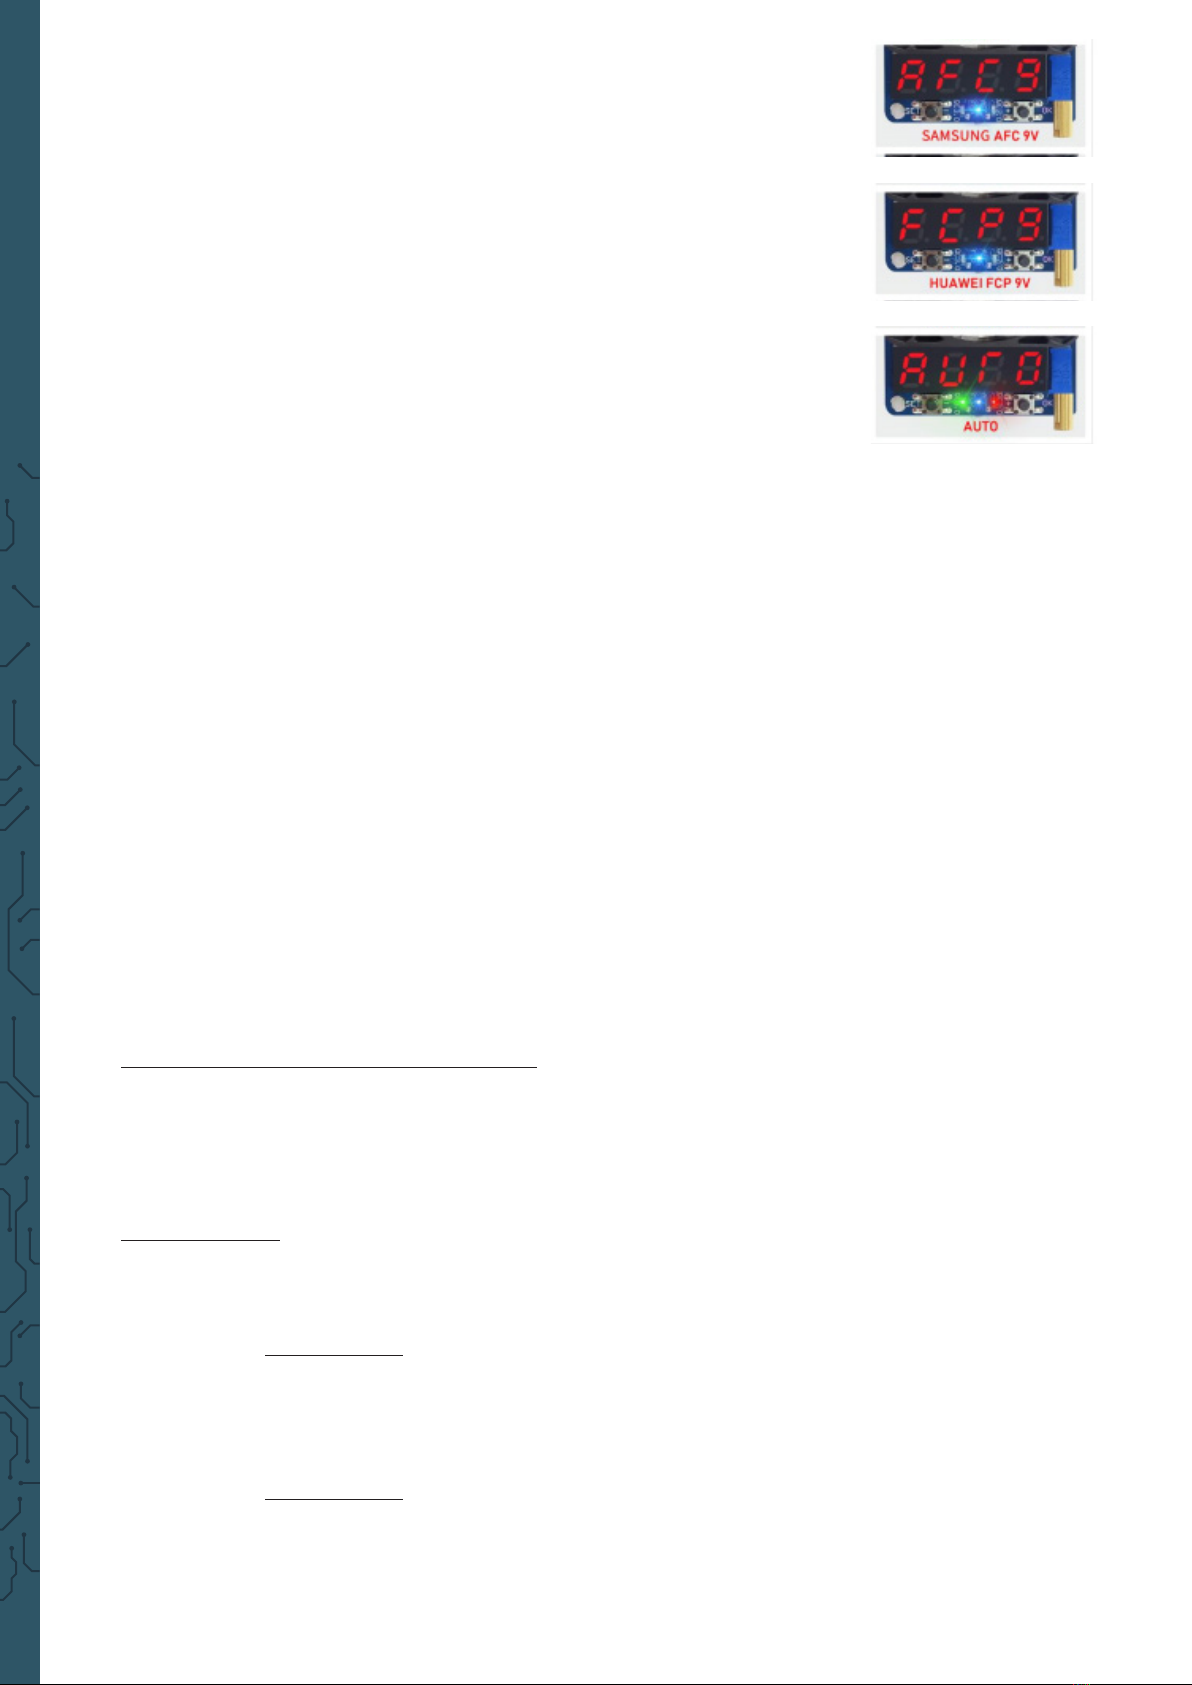
Joy-it JT-HD35 User manual

JT-HD35
USB load resistance
1. GENERAL INFORMATION
Dear customer,
thank you for choosing our product. In the following, we will show you how
to use your product.
Should you encounter any unexpected problems during use, please do not
hesitate to contact us.
This USB load resistance suits perfectly for example to test how much power
your USB charging unit really has. The load resistance can be powered with
up to 35 W. The current can be adjusted with a built-in trimmer.
On the LCD display, the current current is shown. With the help of the
buttons, the load can be switched on and o.
Moreover, the load resistance is capable to simulate and to recognize
automatically dierent charging electronics (QC2.0( 5 V, 9 V, 20 V), QC3.0,
FCP, AFC 9 V).

2. TECHNICAL DETAILS
operating voltage 4 - 25 V
operating current 0.25 - 5 A
power
display mode
35 W
4 digit
segment display
fan speed 8000 RPM ± 10 %
connections USB2.0, micro-USB,
USB Typ-C
dimensions 81 x 41 x 28 cm
weight 52 g
3. PIN ASSIGNMENT
USB 2.0
USB - C
micro-USB
Aluminium
heatsink
Fan
LED segment
display
Set / - button
QC3.0 LED
FCP LED Trigger button
QC2.0 LED
OK / + button
Potentiometer

4. FUNCTIONS
1. Functions for protection:
OVP (over voltage protection): over voltage protection by 25 to 30 V,
the LED display shows “OVP“ like the picture below.
OTP (over temperature protection): with a temperature of over 80 °C
the LED display shows “OTP“.
OPP (over power protection): With a power of over 35 W the
LED display shows “OPP“.
Aer the load is in the protection mode, you have to set the
recovery mode for the output.
Display of voltage, current and power
Intelligent fan, with a power of 10 W or a temperature of 40 °C the
fan starts automatically to cool the device
Precise multiloop potentiometer to adjust the current accurately up
to 0.01 A.
You can set the standard start status freely.
2. Trigger function:
The device can trigger QC2.0, QC3.0, Huawei FCP, Samsung AFC 9V
and other quick charger modes.
3. Detection of quick charger function :
You can use the Auto mode to identify if your quick charger has the
quick charger function.
4. Power-On automatic trigger function:
With this function you can trigger the quick charger aer the start
of the device and activate the load automatically. It suits either for
batch tests by older charging units.

5. USAGE OF DEVICE
1. Adjusting of current
Through the spinning clockwise of the regulator, the current
increases and with spinning counterclockwise, the current
decreases.
2. Adjust the status of the LED display
Press “SET“ to adjust the status of the LED display. Press again
“SET“ to display the current (0.00 A), power (00.0 P) and voltage
(00.0 V).
3. Load output open and close
Press “OK“ to open and close the load output.
4. Adjusting the load output at the start
Hold down the “OK“ button to switch the load output with the next
start on or o.
display for activated load
at the start
display for deactivated
load
6. TRIGGER FUNCTION
The trigger / decoy function is the function to start the quick charger of the
charging unit. In this mode the load can not be switched on or o but the
current of the load can still be adjusted with the potentiometer
(except in the AUTO mode because all other modes are sending only trigger
instructions and do not evaluate if the trigger is successful or not).
This mode complies the dierent display statesin the trigger mode:
QC2.0 5V: display shows “-05.0“ (red LED glows)
QC3.0: display shows current voltage (green LED glows)

Samsung AFC 9V: display shows “AFC9“ (blue LED glows)
Huawei FCP: display shows “FCP9“ (blue LED glows)
AUTO: dispaly shows “AUTO“ (all LEDs glow)
SET / - button:
press:
Initiate the voltage of the current quick charger mode to
trigger or to switch.
hold down:
Record current quick charger status and closes and opens
AUTO
OK / + button:
press:
Initiate the voltage of the current quick charger mode to
trigger or to switch.
trigger button:
press:
Shiing of the trigger mode
hold down:
Shiing to the load mode
Starting and Stopping of the trigger mode
Hold down the trigger button to switch between trigger and load
mode. If you switch from the trigger mode to the load mode, the
trigger state remains unchanged.
Changing mode
Press the trigger button to change between 4 modes (QC2.0, QC3.0,
FCP / AFC and AUTO)
QC2.0 trigger:
With the QC2.0 mode, press “OK“ aer 2 seconds the red
LED lights up. With the “+“ and “-“ buttons, it is possible to
switch between 5, 9, 12 and 20 Volt.
QC3.0 trigger:
Like the QC2.0, shows the display the current voltage and
you can increase and decrease the voltage with “+“ and “-“.

FCP / AFC trigger:
As the other triggers, it is possible to change between FCP
and AFC with the buttons “+“ and “-“.
AUTO trigger:
In the AUTO mode the support of quick charger protocoll of
the charging unit is tested. Press “OK“ in the AUTO mode to
determine the automatic charging detection. Wait about 25
seconds, aer that the LED should show the supported quick
charger protocoll of the charging unit.
7. OTHER INFORMATION
Our infomation and take-back obligations according to the electrical and electronic
equipment act (ElektroG)
Symbol oN electrical and electronic devices:
This crossed out bin means that electrical and electronic devices do not
belong into the household waste. You must hand over your old appliance to
a registration oice.
Before you hand over the old appliance, you must remove used batteries
and accumulator which are not enclosed of the device.
Return options:
As the end user, you can with the purchase of a new device hand over your
old appliance (which has essentially the same functions as the new one)
free of charge for disposal.
-Possibility of restitution at our company location during our opening
hours:
Simac GmbH, Pascalstr. 8, D-47506 Neukirchen-Vluyn
-Possibility of restitution nearby :
We send you a parcel stamp with which you can send us your device free of
telephone.
Information about package:
Please package your old appliance safe during transport. Should you not
have a suitable packaging material or you do not want to use your own, you
can contact us and we send you an appropiate package.
2
1

8 . SUPPORT
If any questions remain open or problems arise aer your purchase, we are
available by email, telephone and ticket support system to answer these.
E-Mail: servic[email protected]
Ticket-System: http://support.joy-it.net
Telephone: +49 (0)2845 98469 – 66 (10 - 17 o‘clock)
For more information visit our website:
www.joy-it.net
www.joy-it.net
Simac Electronics Handel GmbH
Pascalstr. 8 47506 Neukirchen-Vluyn
Published: 30.07.2019
Table of contents
Other Joy-it Test Equipment manuals
Popular Test Equipment manuals by other brands

IMG STAGE LINE
IMG STAGE LINE DMX-1TEST instruction manual

Unit
Unit UT590 Series operating manual

B+K precision
B+K precision 575A Operator's manual

Delta OHM
Delta OHM HD2060 operating manual

barfield
barfield DPS1000 User instruction manual

Agilent Technologies
Agilent Technologies 85052C User's and service guide