Joy Sport CT-Advanced User manual

Fitness-Import
Timmermannsweg 46
5813 AP Ysselsteyn (LB)
www.joysport.nl
Joy Sport
The Choice Of The Experts
Joy Sport
TheChoice Of The Experts
CT-Advanced
CT-Advanced

TABLE OF CONTENTS
WARNINGDECALPLACEMENT………………………………………………………………………………………1
JOYSPORTIIMPORTER/IMPORTANTSAFTY………………………………………………………………..2‐3
HARDWARE PACKAGE CONTENTS…………………………………………………………………………….4‐5
HARWARDKIT………………………………………………........………………………………………………………….6
ASSEMBLYINSTRUCTIONS……………………………..………………………………………………..……….7‐12
CONSOLEMANUAL……………………………………………......................................................................…13‐20
EXPLODEDVIEW…………………………………………………............................................................................‐21
PARTSLIST……………………………………………………….…………………………………………………..…22‐23
TRANSPORTANDSTORAGES……………….……………………………………...………………………………..24
WARNING DECAL PLACEMENT
JOY SPORT
1

Joy Sport Importer
Fitness-Import
Timmermannsweg 46
5813 AP Ysselsteyn (LB)
www.joysport.nl
Dear customer,
We want to thank you for having chosen a JOY SPORT product, and wish you
a lot of fun and success during training with your JOY SPORT exercisers.
Please note and follow the enclosed safety and assembly instructions carefully.
If you have questions please do not hesitate to contact us.
Guarantee,
This guarantee covers all manufacturing and material flaws on JOY SPORT
products purchased from an authorized JOY SPORT dealer for a period of 24
months from purchase.
If you wish to make a claim under the guarantee, JOY SPORT shall be entitled
to repair or replace the defective unit or part at its discretion.
The owner of the unit must pay for the transport costs and any dealer's
workshop costs.
To make a claim under the guarantee, take your guarantee card to your dealer.
The dealer will then take the necessary action.
If this is not possible, contact your national JOY SPORT importer.
The following are not covered by the guarantee : normal wear and tear and the
consequences of improper treatment or damage caused by the purchaser or
third persons and faults which are due to other circumstances.
Claims may not be made under the guarantee if modifications have been made
to the original construction or equipment or if JOY SPORT original parts were
not used to repair the unit.
In no event the manufacturer shall be liable for incidental or
consequential losses, damages or expenses in connection with exercise
products.
Fitness-Import
Timmermannsweg 46
5813 AP Ysselsteyn (LB)
www.joysport.nl
JOY SPORT
2

IMPORTANT SAFETY INSTRUCTIONS
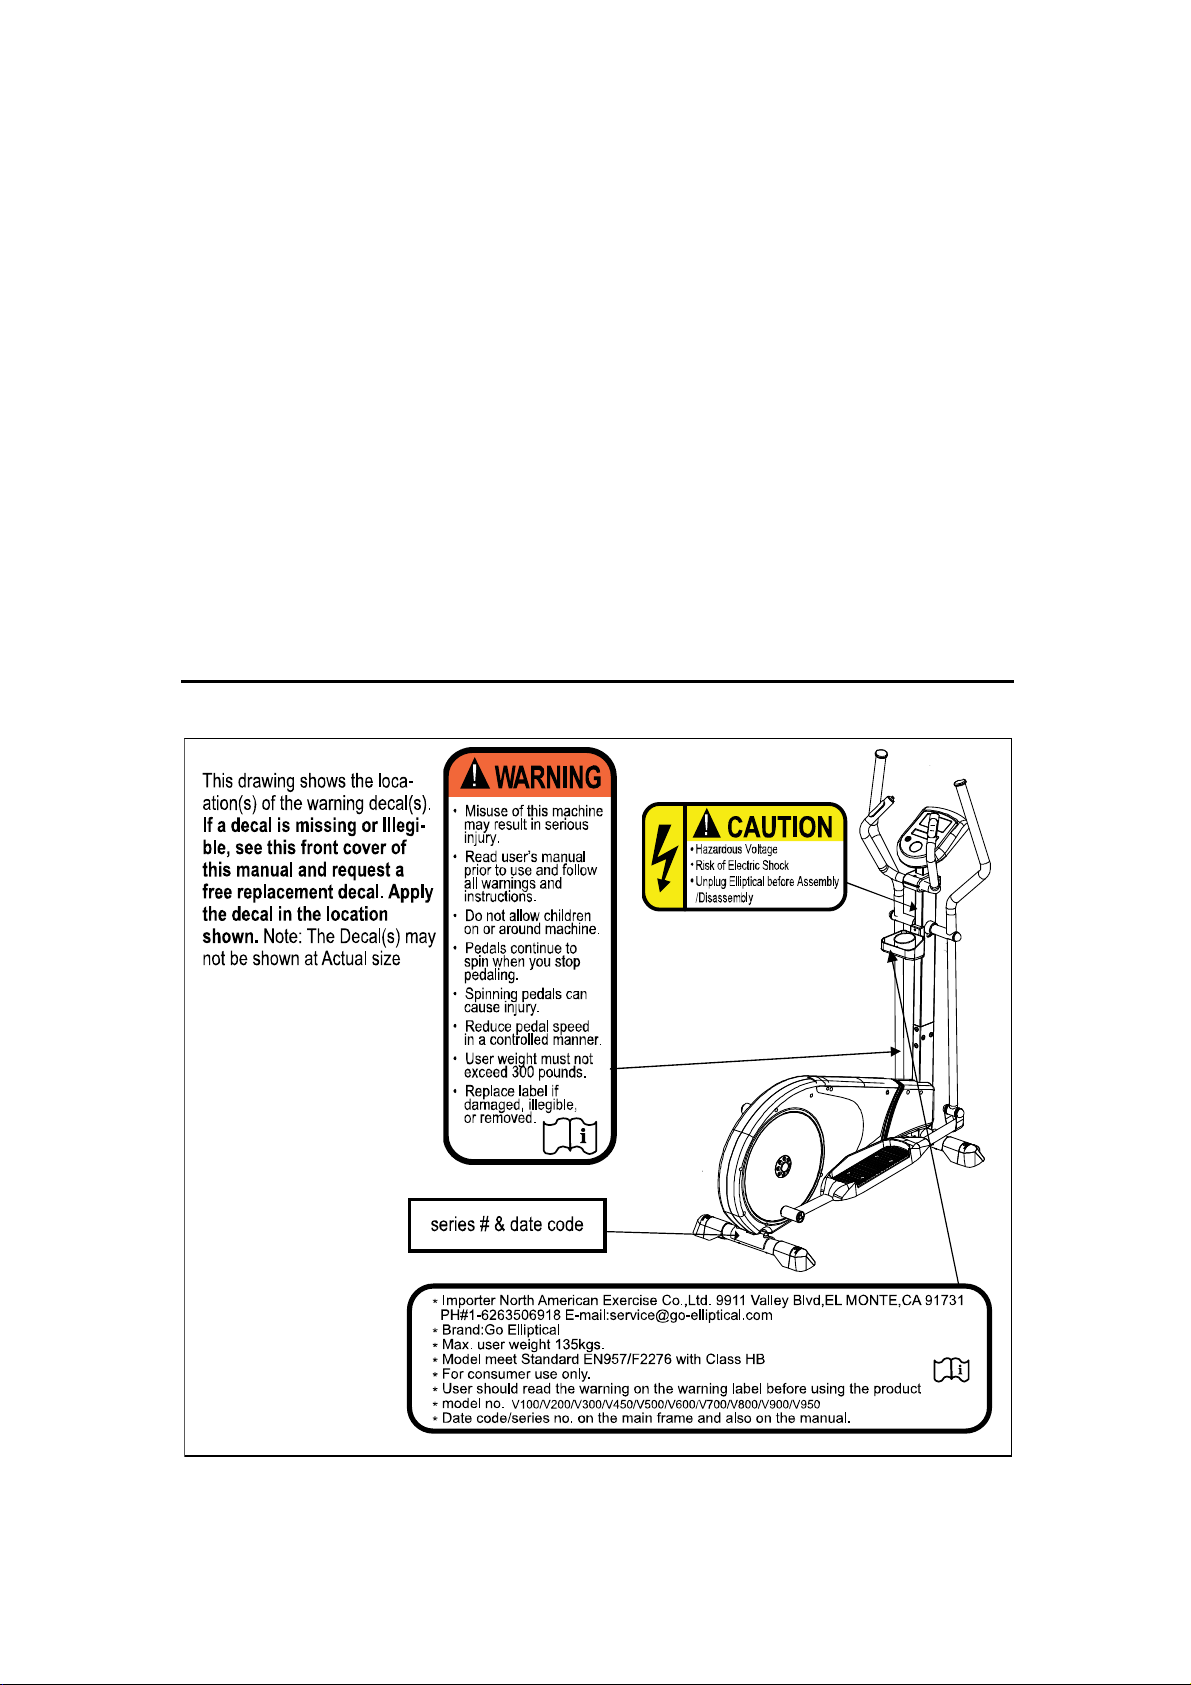
IMPORTANT ELLIPTICAL EXERCISER WARNINGS AND CAUTIONS
READ AND UNDERSTAND THESE WARNINGS AND CAUTIONS
WARNING:Inordertoreducetheriskofinjurytoanyandallpersons,READandUNDERSTANDthefollowing
importantPRECATIONSandinformationbeforeoperatingorallowingotherstooperatetheellipticalexerciser.
1. Theownerhastheresponsibilityofensuringthatallusersoftheellipticalexerciserareadequatelyinformedof
allwarningsandprecautions
2. Thisellipticalexercisershouldnotbeusedby,on,ornearchildren,invalids,ordisabledpersons.
3. Thisellipticalexercisermustonlybeusedasdescribedinthemanual.Attachmentsthatarenotrecommended
bythemanufacturermustnotbeused.
4. Neveroperatetheellipticalexerciserwiththeairopeningsblocked,Keeptheairopeningsfreeoflint,hairand
thelike.Neveroperatetheellipticalexerciseronasoftsurfacesuchasabedoracouchwheretheairopenings
maybeblocked.
5. Neverdroporinsertanyobjectintoanyopening.
6. Placetheellipticalexercisernalevelsurface.Toprotectthefloorandcarpetfromdamage,placeamatunder
theellipticalexerciser.
7. DONOTusesorstoretheellipticalexerciseroutdoors,inagarageorcoveredpatio,keeptheellipticalexerciser
awayfrommoistureanddust.Theellipticalexercisershouldbeusedindoors.Heat,moistureanddirtcan
adverselyaffecttheoperationofthisellipticalexerciser.
8. DONOToperatetheellipticalexerciserwhereaerosolproductsarebeingusedorwheremedicaloxygenisbeing
administered.
9. Therecommendedminimumfreespaceforaccessaroundtheellipticalexerciseris20”ateachsideand40”at
therearoftheellipticalexerciser.Thisistoallowforanemergencydismountandpassagearoundtheelliptical
exerciser.
10. Keepchildrenundertheageof12andpetsawayfromtheellipticalexerciseratalltimes.
11. Nopersonweighingover150KGSshouldusethisellipticalexerciser.
12. NEVERallowmorethanonepersonontheellipticalexerciseratatime
13. Wearappropriateclothingwhenusingtheellipticalexerciser.DOnotwearlooseclothingthatcouldbecome
caughtintheellipticalexerciser.Appropriateathleticsupportclothingisrecommendedforbothmenand
women.Alwayswearathleticshoesintendedforwalkingwithanon‐slipsole.NEVERusetheellipticalexerciser
withbarefeet,whilewearingstockingsonlyorinsandals.
14. Thepulsemonitorisnotamedicaldevice.Variousfactors,includingtheuser’smovement,mayaffectthe
accuracyofpulseratereadings.Thepulsemonitorisintendedonlyasanaidtoexerciseindeterminingheart
ratetrendsingeneral.
15. Donotattempttoraiselowerormovetheellipticalexerciseruntilitisproperlyassembled,(SeeASSEMBLY
INSTRUCTIONS.)Youmustbeabletosafelylift100pounds(46KGS)inordertoraise,lowerormovethe
ellipticalexerciser.
16. Donotplaceobjectundertheellipticalexerciserinanattempttochangetheinclineoftheellipticalexerciser.
17. Inspectandtightenallpartsoftheellipticalexercisereverythreemonths.
18. Thisellipticalexerciserisintendedforin‐homeuseonly.Donotusethisellipticalexerciserinanycommercial,
rentalorinstitutionalsetting.Useinanycommercial,rentalorinstitutionalsettingvoidsthewarranty.
SAVE THESE INSTRUCTIONS
WARNING:Consultyourphysicianbeforebeginningthisoranyexerciseprogram.Thisisespeciallyimportant
foranypersonovertheageof35oranypersonwithanypre‐existinghealthproblems.Readallinstructions
beforeusing.NorthAmerican/LMXGroupassumesnoresponsibilityforpersonalinjuryorpropertydamage
sustainedb
y
orthrou
g
htheuseofthis
p
roduct.
JOY SPORT
3

Handle bar (L) Handle bar ( R )
Pedal(L/R) post joint cover
Pedal tube cover top (L) Pedal tube cover bottom (L)
Pedal tube cover top (R) Pedal tube cover bottom (R)
Top step foot cover Bottom step foot cover
AC Adaptor Base Frame
Pedal tube(R) Pedal tube(L)
HARDWARE PACKAGE/PARTS/TOOLS
JOY SPORT
4

HARDWARE PACKAGE/PARTS/TOOLS
hardware box CT-Advanced Rear cover for upright tube X450
Fix handle bar Up right tube
Front cover for upright tube X450 Bottle holder
Front stabilizer Rear stabilizer
Arm cover front Arm cover rear
Console
Advanced
JOY SPORT
5

KEY NO PARTS LIST QTY STEP KEY NO PARTS LIST QTY STEP
#19 2 STEP 1 #18 4 STEP 7
#65 2 STEP 1 #65 4 STEP 7
#20 2 STEP 1 #A 4STEP 7
#21 4 STEP 1 #29 12 STEP 8
#19 2 STEP 2 #104 4 STEP 8
#65 2 STEP 2 #6 2 STEP 9
#20 2 STEP 2 #61 1 STEP 9
#21 2 STEP 2 #88A/B 1 STEP 9
#18 6 STEP 3 E4
STEP 10
#29 4 STEP 4 #18 8 STEP 11
#30 2 STEP 4 #106 1 STEP 12
#12 2 STEP 5 *1
TOOL
Screw
Driver
#17 2 STEP 5 *1
TOOL
Wrench
#29 8 STEP 5 *1
TOOL
Lubrication
Grease Ba
g
#18 4 STEP 6 *1
TOOL
Socket
Hardwarekitcontents
JoySportCT‐Advanced
JOY SPORT
6

STEP:1 FRONGSUPPORT(FrontStabilizer)ASSY.
NO
PARTS LIST QUANTITY
STEP:2 REARSUPPORT(RearStabilizer)ASSY
NO
PARTS LIST QUANTITY
STEP:3 UPRIGHTTUBEASSY.TOTHEFRAME NO PARTS LIST
QUANTITY
STEP:4 PEDALCOVERASSY(一) NO PARTS LIST QUANTITY
STEP:5 PEDALCOVERASSY(二)&PEDALTUBEASSY.(一) NO PARTS LIST
QUANTITY
#17
#12
2
Asphotoshown
1)inordertofacilitateassembly,useoneofthelagerstyroformsetunderthe
Frame(asphotoshown)
2)Attachthefrontsupportwithtransportationwheelstotheframewithtwo
bolts(#19)washers(#65)nuts(#20)
3)lockingsleeveswithtoolandcoverthenutwithtwocaps(#21)。
4)ForV‐950twoextracaps(#21)tocoverthefrontrollerscrewhead.(asdrawing
shown)
Asphotoshown
1)Inordertofacilitateassembly,useoneofthelagerstyroformsetunderthe
Frame(asphotoshown)
2)Attachtherearsupporttotheframewithtwobolts(#19)washers(#65)
nuts(#20)
3)lockingsleeveswithtoolandcoverthenutwithtwocaps(#21)
Asphotoshown
Insertthepostjointcover(#5)ontotheuprighttube(#68)then
1)placeuprighttubeontopofachair(orbyasecondpersontoassist
holding)closetothemainframebefacilitatedtoconnectthecables.
2)checkthedirectionofuprighttubebeforeconnecttheTop/Bottom
pre‐assembledcablesasphotoshown.
3)keepthepostcoverwithupperpartoftheuprighttube,fixingsixscrews(#18)
withfingerlockingfirstthentightenallfirmly.
Note!tightentwoscrewsonthelabel"①"screwholdfirstandthen
tightenuptherestoffourscrewstoavoidtheholdalignment
matchproblem.
Asphotoshown
1)Setbothpedaltubeassy(#74/#75)(left/right)onthefloor,indentify
(right/left)tube.
2)Assemblythetopstep(#97/#98)withscrews(#29)
Asphotoshow
1)Setthepedaltubeleft&right(#74/#75)tothemainframe,securethepedal
tubewithmainframewithwasher(#17)andM10locknut(#12)tightenfirmly.
2)Settherightpedaltubecover,top"R"(#101)andbottom"R"(#102)with
screws(#29).
3)Dothesametotightenupthepedaltubecover,top"L"(#101)andbottom
(#102)totheleftpedaltube(#74)
#21 4
2
#19 2
#65 2
#20
2
#21 2
2
#20
#19
4
#30 2
#65 2
2
#29
8
#18 6
#29
JOY SPORT
7

JOY SPORT
8

STEP:6 PEDALTUBEASSY.(二 )
NO PARTS LIST
QUANTITY
STEP:7 UPPERSWINGARMASSY. NO PARTS LIST QUANTITY
#18 4
#65 4
#A 4
STEP:8 CENTERCOVER&BOTTLEHOLDERASSY
NO PARTS LIST
QUANTITY
STEP:9 FIXHANDLEBARASSY.
NO PARTS LIST QUANTITY
Asphotoshown
1)Fitthefixedhandlebar(#71)withscrews(#6)andthruthebracketholdof
uprighttubewithscrewdriver.
2)SetbothEKGcablesthruthesmallholesunderthefixhandlebar(#71)onthe
uprighttube,pickupcablesfromtopoftheuprighttube.
3)Securethefixhandlebarcovers(#88A/#88B)withscrew(#61)
Note:Bottomcover(#88B)gotanutinjectinthebar.
Asphotoshown
1)Pre‐assembletherearcover(#94)withbottleholderGrey(#105)with
screws(#104)
2)tightenupthefrontcover(#95)withrearcover(#96)withscrews(#29)forboth
right&leftside.FinallysecurethefontcoverA(#93)withrearcoverA(#94)
withscrew(#29)
Asphotoshown
1)Insertbothswiveltubes(#85/#86)intotheconnectingtubes(#69/#70),secure
bothtubeswiththeknobscrews(#44).
2)Threelocationsontheswiveltubeavailableadjusttolockwiththemiddleholes
forbothright/lefttubes.
Asphotoshown
1)SettheswingarmhandlebarsR/L(#72/#73),inserttobothswiveltubes
(#69/#70).
2)Turnandmatchthehandlebarswiththealignedholes,secureparts(#72/#69)
also(#73/#70)withscrew(#18)andspecialspringwasher(#A)thenflat
washer(#65),tightenupbothtotally.
#18 4
#44 2
#29 12
#104
#6 2
4
1
#88A/B 1
#61
JOY SPORT
9

JOY SPORT
10

STEP:10 CONSOLEASSEMBLY
NO PARTS LIST
QUANTITY
STEP:11 PLASTICPEDALASSY.
NO PARTS LIST QUANTITY
STEP:12 POWERADAPTOR
NO PARTS LIST
QUANTITY
Aphotoshown
1)Connectcablecomesoutfromconsole(#43)alsocablesfromtheuprighttube
firmly.
Note:check&plugcables,samecolortoplugtogether,blackcolor
canplugwithblacknoneedtoselectspecialplug.
2)Insertallpluggedcablesintotheuprughttube,setconsole(#43)onthetopof
uprighttube,securewithforscrews(E)
Asphotoshown
1)Setbothpedaltube(#74/#75)&plasticpedals(#52)onthefloor,Thereisno
differencebetweentheleft/rightpedals(#52),securebothpedal(#52)tothe
pedaltubeassy.(#74/#75)withscrew(#18)fromthetop.
Note!thepedalhasleft/rightlabel,checkthedirectionofpedal
forfrontandfootprotectionedgeofpedalasdrawingshown)
2)Thereisastridelocationadjustablebar(#55)cansetwith8differentlocations
forthestridelength,ithastosetbothleft&rightbaratthesamelocation
(numbershownontheplasticpedals)
Note!Threesetsofholdsonthetubeplate,usermaychoiceone
settouse,eashsetwillgiveoneinchvariationpedal
distancetoselect,makesurebothpedaslselectthesame
locationofholes
Asphotoshown
1)Plugthepowercordwithpoweradaptor(#34)intoanappropriateoutlet
IMPORTANT:Theellipticalexerciserisnotcompatiblewith
GFCI‐equippedoutlets.
2)Theotherendoftheaccessholeintherearofthebaseframe
Note!beforeplugin,pleasecheckthevoltagespecifications
onthelabel.
#18 8
E4
#106 1
JOY SPORT
11

JOY SPORT
12

Joy Sport CT-Advanced
Ⅰ. Power Modes
1. Power On: Plug in the power cord with power adaptor into an appropriate outlet. Next, locate and switch
“on” the reset/off button on the frame, near the power cord . A loud beep will sound and the display will
then light (Fig. 1) and enter User Set Up & Selection mode in a few seconds (Fig. 2)
2. Power Off: The console will automatically switch to “sleep” mode after 4 minutes of inactivity.
Fig. 1 Fig. 2
Ⅱ. Instructions for User Set Up & Program Selection
1. USER SET UP
Begin your personal set up by choosing USER 0, USER 1, USER 2, USER 3, or USER 4:
When console displays “U0”, press + or - to select “U0”, “U1”, “U2”, “U3”, or “U4”.
Press ENTER to confirm USER.
2. GENDER SET UP
The console will now flash “SEX” on the upper right-hand corner of the display.
Press + or - to select male or female.
Press ENTER to confirm GENDER.
3. .AGE SET UP
The console will now flash “AGE” on the upper right-hand corner of the display.
Press + or - to select your age.
Press ENTER to confirm AGE.
JOY SPORT
13

4. .HEIGHT SET UP
The console will now flash “H.t” on the upper right-hand corner of the display.
Press + or - to select your height.
Press ENTER to confirm HEIGHT.
5. .WEIGHT SET UP
The console will now flash “W.t” on the upper right-hand corner of the display.
Press + or - to select your weight.
Press ENTER to confirm WEIGHT.
6. You have finished User Set Up! Now, you are ready to select a work out program.
The console is now in Program Selection mode.
Press + or - to select a preset workout program:
Press ENTER to confirm your PROGRAM SELECTION.
MANUAL→PROGRAM→FITNESS→PERSONAL→H.R.C.→RANDOM
●MANUAL ●PROGRAM ●FITNESS
●PERSONAL ●HRC ●RANDOM
JOY SPORT
14

6. PERSONALIZE PROGRAM SETTINGS
For each preset program, you can further personalize the level of work that you desire.
(1) If you pressed ENTER on MANUAL…
You can now set up resistance LEVEL
Press + or - to adjust setting then press ENTER to confirm LEVEL set up.
You can now set up TIME
Press + or - to adjust target then press ENTER to confirm TIME set up.
You can now set up DISTANCE
Press + or - to adjust target then press ENTER to confirm DISTANCE set up.
You can now set up CALORIES
Press + or - to adjust target then press ENTER to confirm CALORIES set up.
You can now set up PULSE
Press + or - to adjust target heart rate then press ENTER to confirm PULSE set up.
(2) If you pressed ENTER on PROGRAM (P1 to P12)…
You can now select a program from P1 to P12
Press + or - to select a program then press ENTER to confirm.
You can now set up resistance LEVEL
Press + or - to adjust setting then press ENTER to confirm LEVEL set up.
You can now set up TIME
Press + or - to adjust target then press ENTER to confirm TIME set up.
You can now set up DISTANCE
Press + or - to adjust target then press ENTER to confirm DISTANCE set up.
You can now set up CALORIES
Press + or - to adjust target then press ENTER to confirm CALORIES set up.
You can now set up PULSE
Press + or - to adjust target heart rate then press ENTER to confirm PULSE set up.
(3) If you pressed ENTER on FITNESS, ,press START/STOP to begin your fitness evaluation.
(4) If you pressed ENTER on PERSONAL program profile you desire
Press + or - to adjust Brake Resistance Level then press ENTER to confirm WHOLE
PROFILE you desire set up
You can now set up TIME
press ENTER for 3 seconds to keep the profile you design in memory then press ENTER to
confirm TIME set up.
You can now set up DISTANCE
Press + or - to adjust target then press ENTER to confirm DISTANCE set up.
You can now set up CALORIES
Press + or - to adjust target then press ENTER to confirm CALORIES set up.
You can now set up PULSE
Press + or - to adjust target heart rate then press ENTER to confirm PULSE set up.
JOY SPORT
15

(5) If you pressed ENTER on H.R.C. (55%, 75%, 90%, Tag)…
You can now select a preset target heart rate control program
Press + or - to select a program then press ENTER to confirm.
You can now set up TIME
Press + or - to adjust target then press ENTER to confirm TIME set up.
You can now set up DISTANCE
Press + or - to adjust target then press ENTER to confirm DISTANCE set up.
You can now set up CALORIES
Press + or - to adjust target then press ENTER to confirm CALORIES set up.
(6) If you pressed ENTER on RANDOM…
You can now set up TIME
Press + or - to adjust target then press ENTER to confirm TIME set up.
You can now set up DISTANCE
Press + or - to adjust target then press ENTER to confirm DISTANCE set up.
You can now set up CALORIES
Press + or - to adjust target then press ENTER to confirm CALORIES set up.
You can now set up PULSE
Press + or - to adjust target heart rate then press ENTER to confirm PULSE set up.
JOY SPORT
16

Ⅲ.
Preset Program Diagrams
PROGRAM(P1-P12)
●P1 ●P2 ●P3
●P4 ●P5 ●P6
●P7 ●P8 ●P9
●P10 ●P11 ●P12
HRC(55%, 75%, 90%, Tag)
●HRC(55%) ●HRC(75%) ●HRC(90%)
●HRC(Tag)
JOY SPORT
17

IV.
Fitness Evaluation Features
1. Body Fat Evaluation
Press BODY FAT to begin evaluation (Put your hand on the EKG grips for the machine to detect your
heart rate.) If no heart rate is detected after 10 minutes have lapsed, “ERROR” will appear on the display.
If a heart rate is detected, body fat evaluation will begin and take about 25 seconds. The result will then be
shown as demonstrated below:
Note : (Body fat is different for men and women, also for people with different activity levels)
Body Fat Body Type
FAT ≦10% Underweight
10% < FAT ≦20% Average
20% < FAT ≦30% Slightly Overweight
30% < FAT ≦40% Overweight
40% < FAT ≦50% Obese
(
Body Fat Index from American
Council on Exercise
Classification Women (% Fat) Men (% Fat)
Essenti l Fat 10-12 2-4
Athletes 14-20 6-13
Fitness 21-24 14-17
Acceptable 25-31 8-25
Obese >31 >25
JOY SPORT
18

2. Recovery Heart Rate Evaluation
A recovery heart rate is a measurement taken to help determine how well your heart is functioning. It refers to the heart's
ability to return itself to a normal rhythm after being elevated during exercise.
Press RECOVERY to begin the test. (Place your hand on the EKG grips for the machine to detect your
heart rate). If no heart rate is detected within 10 seconds, the test will be terminated. If a heart rate is
detected, the recovery heart rate test will begin and take about 60 seconds.
Value Recovery Heart Rate
F1 Excellent
F2 Very Good
F3 Good
F4 Satisfactory
F5 Poor
F6 Ver y P oor
V.
Key Console Buttons
1. RESET
(1). Return to USER SET UP.
(2). Return to PROGRAM SELECTION when pressed during a short pause in between work outs.
(3). Return to POWER ON mode when pressed and held for 3 seconds.
2. START/STOP
During exercise, you can use this button to pause then restart your work out.
3. QUICK START
After turning the power on, pressing this button will allow you to directly go into the MANUAL program
and start your work out on default settings.
4. + & -
These buttons are used to adjust gender (SEX), AGE, HEIGHT (H.t), Weight (W.t), TIME, DISTANCE,
CALORIES, Target Heart Rate (H.R.C.), and resistance level (LEVEL) selections.
NOTE!That the heart rate displayed may be inaccurate and used for reference
JOY SPORT
19
Table of contents
Languages:
Other Joy Sport Fitness Equipment manuals

Joy Sport
Joy Sport Basic Pro User manual

Joy Sport
Joy Sport CT-Economic User manual

Joy Sport
Joy Sport CT-Unicum User manual

Joy Sport
Joy Sport Classic User manual

Joy Sport
Joy Sport Concept User manual

Joy Sport
Joy Sport Concept User manual

Joy Sport
Joy Sport VIPER 2 User manual

Joy Sport
Joy Sport CT SUPERIEUR User manual

Joy Sport
Joy Sport CT-Explorer User manual