JUKI MEB-3810N Series User manual

COVERI
MEB-3810N
INSTRUCTION MANUAL

CONTENTS
1. SPECIFICATIONS.............................................1
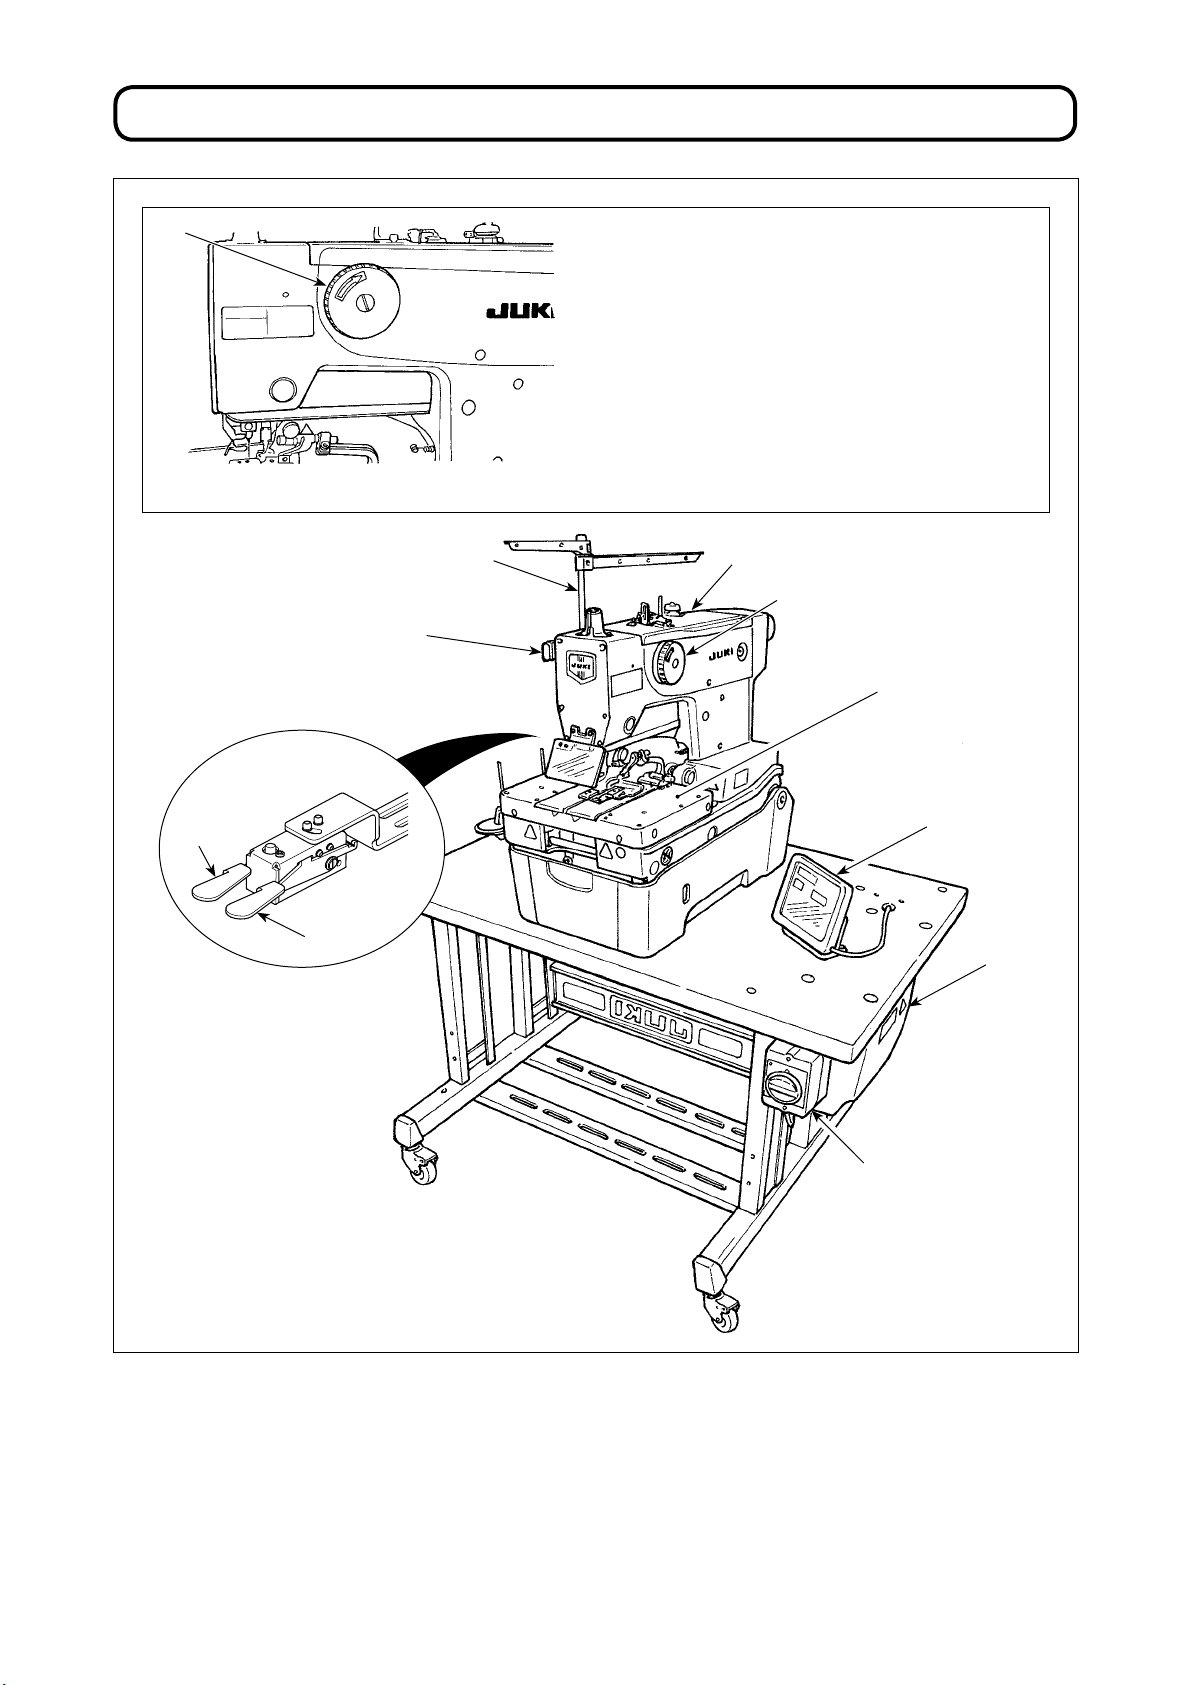
2. NAME OF EACH COMPONENT ......................2
3. INSTALLATION.................................................3
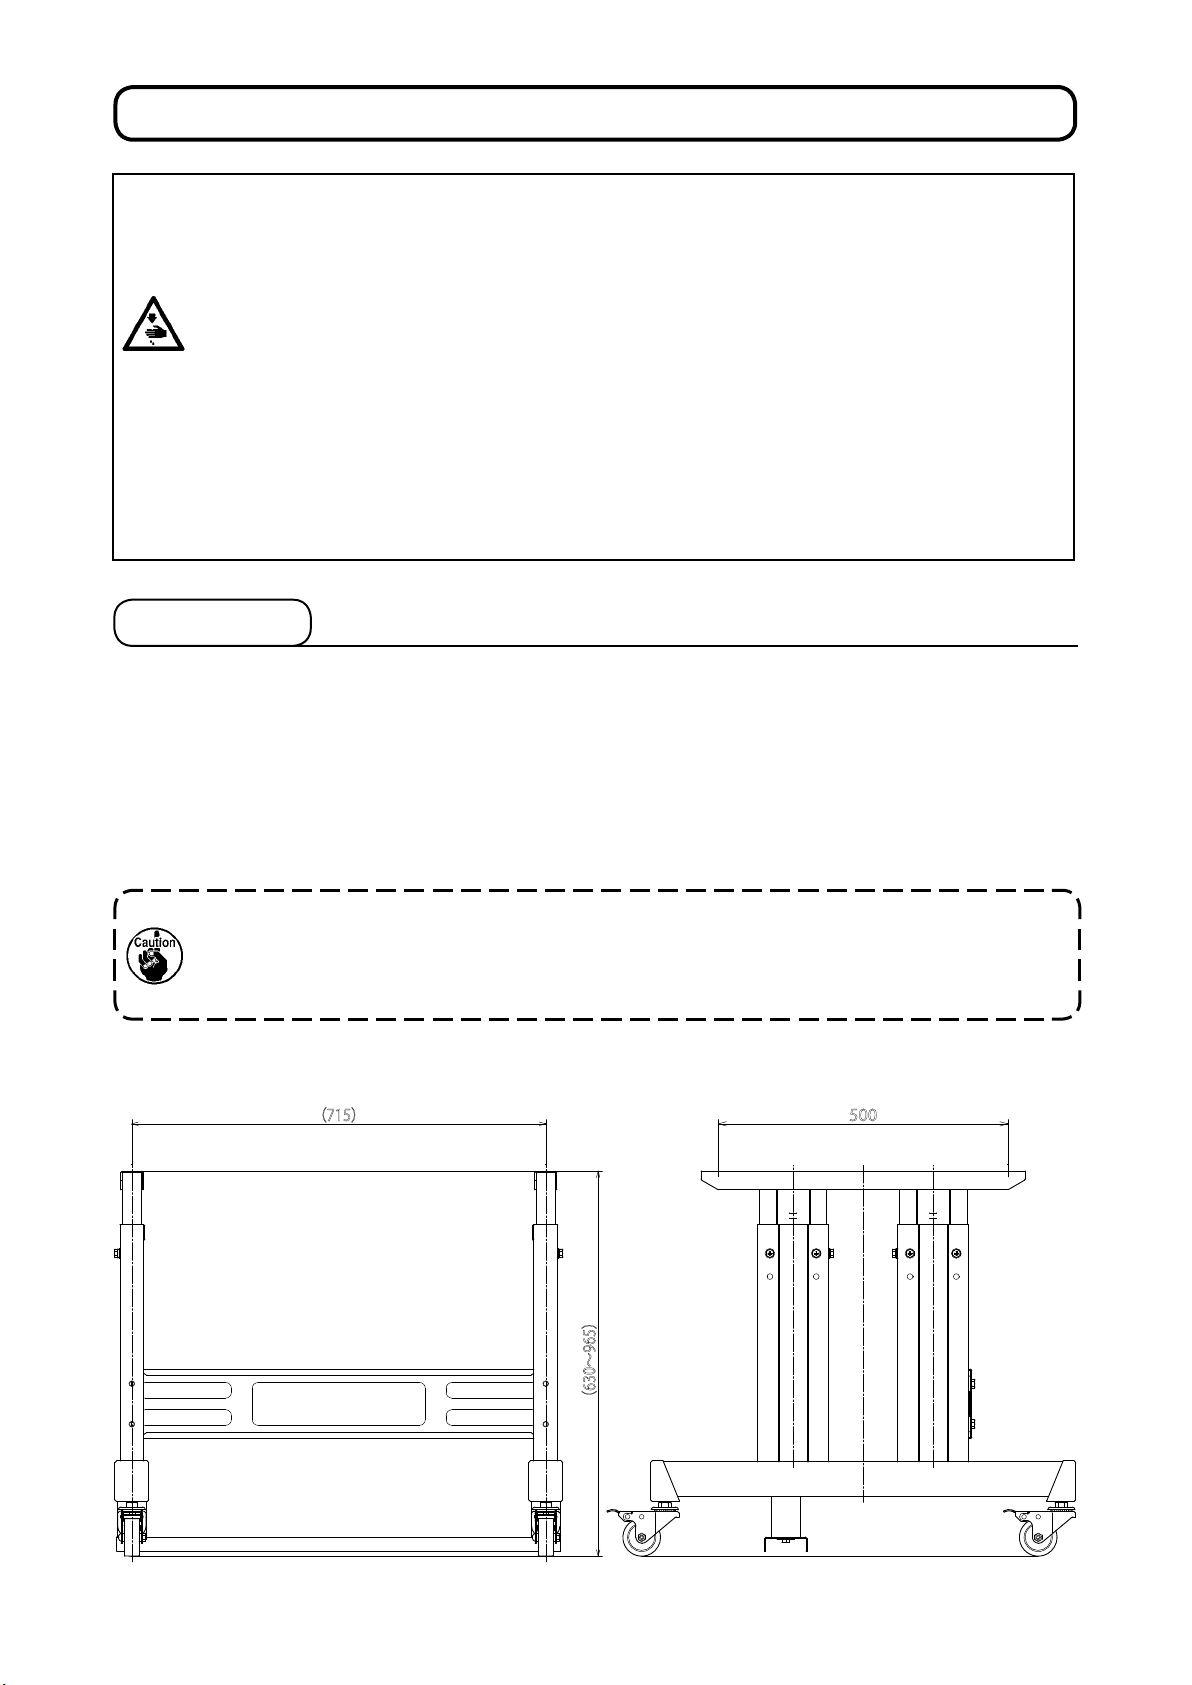
3-1. Table.............................................................................3
(1) Drawing of the stand....................................................... 3
(2) Drawing of the table(Table-xed type) .......................... 4
(3) Drawing of the table (Semi-sunken type)...................... 5
3-2. Installing the control box ...........................................6
3-3. Installing and connecting the power switch ............ 6
3-4. Taking out the sewing machine................................. 8
3-5. Installing the sewing machine................................... 9
(1) In the case of the table-xed type machine head......... 9
(2) In the case of the semi-sunken type machine head....11
3-6. Raising and returning the sewing machine............ 16
3-7. Installing the poly oiler............................................. 19
3-8. Installing the operation panel.................................. 19
3-9. Installing the regulator and the manifold ............... 20
3-10. Connecting the cords............................................. 22
3-11. Handling the cords..................................................23
3-12. Installing the foot pedal switch (optional)............ 24
3-13. Connecting the air supply...................................... 25
(1) Connecting the regulator and the manifold................ 25
(2) Connecting the air tubes .............................................. 26
3-14. Installing the air hose............................................. 27
3-15.
Cautions for the compressed air supply (source
of supply air) facility................................................. 28
3-16. Installing the thread stand .....................................29
3-17. Installing the thread guides ...................................30
3-18. Installing the eye protection cover and the
nger guard ............................................................. 31
3-19. Installing the cloth chip bag ..................................32
3-20. Installing/removing the presser unit..................... 33
4. PREPARATION BEFORE OPERATION.........34
4-1. Lubrication of the machine and how to lubricate.. 34
(1) Lubricating the arm oil tank ......................................... 34
(2) Lubricating the bed oil tank ......................................... 34
(3) Lubricating the looper and spreader components .... 35
(4) Lubricating the looper bracket oil tank....................... 35
(5) Lubricating the needle bar and the gear section ....... 36
4-2. Attaching the needle................................................. 37
4-3. Threading the machine head ...................................38
(1) Threading the upper thread (needle thread)............... 38
(2) Threading the lower thread (looper thread)................ 39
(3) Threading the machine with gimp ............................... 40
4-4. How to set the cloth on the sewing machine ......... 40
5. STRUCTURE OF THE OPERATION
SWITCH ..........................................................41
5-1. Structure of the operation panel ............................. 41
5-2. Temporary stop switch.............................................43
5-3. Hand switch............................................................... 43
5-4. Foot switch (optional)............................................... 43
6. HOW TO USE THE OPERATION PANEL ......44
6-1. Basic operation of the sewing machine ................. 44
6-2. Setting the thread tension........................................ 44
6-3. Temporarily stopping the sewing machine ............ 45
6-4. Performing re-sewing............................................... 46
6-5. Performing threading ...............................................47
6-6. How to use the counter ............................................47
6-7. When dropping of the knife is temporarily not
desired .....................................................................48
6-8. Changing the operation mode................................. 48
6-9. Changing procedure of the sewing pattern............ 50
6-10. Conrming the pattern shape................................ 50
7. SETTING PROCEDURE OF THE SEWING
DATA ...............................................................51
7-1. Setting the knife No. .................................................52
7-2. Setting the cut length ...............................................52
7-3. Setting the cut-before/cut-after knives ................... 53
7-4. Setting the number of stitches of the parallel
section...................................................................... 53
7-5. Setting the number of stitches of the eyelet .......... 53
7-6. Setting the cut space................................................ 54
7-7. Setting the eyelet space........................................... 54
7-8. Knife position compensation................................... 54
7-9. Number of stitches of sewing end compensation. 55
7-10. Turning angle compensation ................................. 55
7-11. Turning angle compensation at the parallel sec-
tion............................................................................ 55
7-12. Compensation of eyelet in lateral direction ......... 56
7-13. Compensation of eyelet in longitudinal direction 56
7-14. Compensation of eyelet, left in longitudinal
direction ...................................................................56
7-15. Compensation of left parallel section of a but-
tonhole .....................................................................57
7-16. Compensation of cutting space, left..................... 57
7-17.
Setting the needle throwing width of the
right bottom of eyelet .........................................57
7-18.
Setting the needle throwing width of the left
bottom of eyelet .................................................58
7-19. Setting the needle throwing width ........................ 58
7-20. Setting the type of bartack..................................... 58
7-21. Setting the length of taper bar............................... 59
7-22. Setting the number of stitches of taper bar ......... 59
7-23. Setting the offset of taper bar................................ 59
7-24. Setting the number of stitches of slant section
of taper bar .............................................................. 60
7-25. Compensation of the number of stitches of the
right side taper bar.................................................. 60
7-26. Setting the straight bar length............................... 60
7-27. Setting the number of stitches of straight bar..... 61
7-28. Setting the overlapping amount of straight bar... 61
7-29. Setting the needle throwing width of straight bar61
7-30. Setting the number of stitches of round bar........ 62
7-31. Setting the number of overlapping stitches of
round bar 2 .............................................................. 62
7-32. Setting the needle throwing width of the round
bar............................................................................. 62
7-33. Setting the needle throwing width at the upper
section of eyelet bar ............................................... 63
7-34. Setting the reduced sewing speed for straight/
round bar ................................................................. 63
7-35. Setting the sewing speed....................................... 63
7-36. Setting the reduction speed of eyelet................... 63
i

7-37. Setting the soft start............................................... 64
7-38.
Setting the number of stitches at the beginning of
sewing of thread tension .................................................. 64
7-39.
Setting the number of stitches at the end of sew-
ing of thread tension ................................................. 64
8. ADJUSTMENT OF EACH PART ....................65
8-1. Adjusting the pressure of the cloth trimming
knife..........................................................................65
8-2. Adjusting the stitch bite width................................. 66
8-3. Adjusting the presser ...............................................67
8-4. Adjusting the presser opening amount .................. 68
8-5. Adjusting the needle thread drawing amount........ 69
8-6. Adjusting the thread take-up thread guide............. 69
8-7. Adjusting the remaining amount of the gimp......... 70
8-8. Adjusting the gimp thread tension.......................... 70
8-9. Needle thread clamp unit (optional)........................ 71
8-10. Adjusting the brightness of the hand lamp.......... 72
9. HOW TO USE THE VARIOUS FUNCTIONS ..73
9-1.
Operating procedure of thread tension compensa-
tion of each section ................................................... 73
9-2. Changing the setting position of cloth ................... 76
9-3. Changing over the mode of the start switch.......... 76
9-4. Changing over the presser movement ................... 76
9-5. Changing over the counter (DOWN counting) ....... 76
9-6. Changing over to the mode of the stop before
cloth cut ................................................................... 76
9-7. Copying the pattern data.......................................... 77
9-8. Deleting the pattern data.......................................... 78
10. MAINTENANCE............................................79
10-1. Looper thread trimming (overall thread trimmer
type).......................................................................... 79
10-2. Timing between the needle and the looper .......... 79
10-3. Height of the needle bar......................................... 82
(1) Adjusting the needle bar height................................... 82
(2) Reference height of the needle bar ............................. 82
10-4. Adjustment to prevent triangular stitch skip-
ping in the case of a narrow needle throwing
width.........................................................................83
10-5. Clearance between the needle and the looper..... 84
10-6. Adjusting the needle guard.................................... 84
10-7. Clearance between the spreader and looper
and the opening timing of the spreader................ 85
10-8. Height of the throat plate ....................................... 87
(1) Height of the throat plate.............................................. 87
(2) Adjusting the height of the throat plate ...................... 87
10-9. Position of the presser foot ...................................88
10-10. Adjusting the knife dropping position ................ 88
10-11. Installing position of the needle thread trim-
ming knife ................................................................ 89
10-12. Cleaning................................................................. 90
10-13. Draining ................................................................. 90
10-14. Replacing consuamables..................................... 91
(1) Worn-out of the hammer face ...................................... 91
(2) Replacing the cloth cutting knife and the hammer.... 92
(3) Replacing the looper thread trimming knife (overall
thread trimmer type) ..................................................... 93
(4) Replacing the needle thread trimming knife .............. 94
(5) Changing the thread trimmer retaining plate (needle
thread trimmer type) ..................................................... 94
(6) Standard of replacing time of the gas spring............. 94
(7) Replacing the gas spring ............................................. 95
11. EXCHANGING GAUGE PARTS AND OP-
TIONAL ...........................................................96
11-1. Throat plate..............................................................96
11-2. Presser set............................................................... 96
11-3. Presser holding plate..............................................97
11-4. Cloth cutting knife................................................... 97
11-5. Hammer.................................................................... 98
11-6. Others.......................................................................98
12. TROUBLES AND CORRECTIVE MEA-
SURES IN SEWING........................................99
13. MEMORY SWITCH .....................................101
13-1. Operating procedure ............................................101
13-2. Memory switch list................................................ 102
14. ERROR LIST...............................................104
15. STANDARD PATTERN LIST ......................107
16. SEWING DATA ENTRY SHEET..................108
ii

– 1 –
1. SPECIFICATIONS
Specications J type C type
1 Application Jeans Cotton pants, working pants
2Operating temperature
range 5°C to 35°C
3 Operating humidity range 35 % to 85 % (with no condensation)
4Number of patterns that
can be stored in memory 99 (1 to 99) (standard patterns have been factory-numbered 90 to 99)
5 Input power Single-/3-phase 200 to 240 V 50/60 Hz
Supply voltage uctuation: Rating ± 10 %
6Sewing speed 400 to 2,500 sti/min (in 100 sti/min steps)
7 Thread trimmer type Needle thread
trimmer type (00)
Overall thread
trimmer type (01)
Needle thread
trimmer type (00)
Overall thread
trimmer type (01)
8 Sewing length 10 to 38 mm 10 to 34 mm 10 to 38 mm 10 to 34 mm
9 Buttonhole length 10 to 38 mm *1 10 to 28 mm 10 to 38 mm *1 10 to 28 mm
10 Needle throwing width 2.0 to 4.0 mm (factory-setting at the time of delivery: 2.5 mm)
[1.5 to 5.0 mm by compensation on the feed panel]
11 Length of buttonhole with
taper bar 3 to 15 mm *2
12 Lift of presser foot Standard 13 mm
13 Change of stitch shape Selection by program
14 Buttonhole cutting Cut-before knife + Cut-after knife, without knife
15 Cloth cutting knife drive
method Driven by air cylinder
16 Feed method Intermittent feed by stepping motor
17 Needle used DO x 558 Nm90 to 120 (Needle count attached at the time of delivery: Nm110)
18 Safety device Pause switch & automatic stop function at the time of detection of a trouble
19 Lubricating oil JUKI MACHINE Oil No. 18
20 Air pressure Main regulator: 0.5 MPa
Hammer pressure regulator: Standard 0.35 MPa (max. 0.4 MPa)
21 Air consumption 49.5 ℓ/min (11.6 cycles/min)
22 Machine dimensions
Machine head: 382 mm (width) x 656 mm (length) x 584 mm (height)
Complete unit (Table-xed type)
: 1050 mm (width) x 700 mm (length) x 1248 mm (height) *3 (excluding the thread stand)
Complete unit (Semi-sunken type)
: 1060 mm (width) x 790 mm (length) x 1096 mm (height) *3 (excluding the thread stand)
23 Power consumption 200 VA
24 Mass Machine head: Approx. 110 kg; Operation panel: Approx. 0.3 kg
Control box: Approx. 4.5 kg
25 Noise
-
Equivalent continuous emission sound pressure level (LpA) at the workstation :
A-weighted value of 82.0 dB; (Includes KpA = 2.5 dB); according to ISO 10821-
C.6.3 -ISO 11204 GR2 at 2,500 sti/min for the sewing cycle, 3.8 sec. (Pattern :
No.90).
-
Sound power level (LWA) ;
A-weighted value of 92.5 dB; (Includes KWA = 2.5 dB); according to ISO 10821-
C.6.3 -ISO 3744 GR2 at 2,500 sti/min for the sewing cycle, 3.8 sec. (Pattern :
No.90).
*1 : For the machine provided with the optional needle thread clamp unit, the buttonhole length is 10 to 28 mm.
*2 : Parallel section: Taper length can be set to such a value that does not exceed the total of the eyelet section and the
bartacking section.
*3 : The height of the completed unit differs with the height of the table stand.

– 2 –
2. NAME OF EACH COMPONENT
❶Temporary stop switch
❷Presser switch
❸Start switch
❹Operation panel
❺Control box
❻Power switch
❼Hand pulley
❽Machine head
❾Thread stand
Feed base
• Hand pulley ❼
The needle bar can be lifted or lowered by hand
with the hand pulley.
❶
❹
❺
❻
❼
❽
❾
❷
❸
❼
This manual suits for next models
2
Table of contents
Other JUKI Sewing Machine manuals

JUKI
JUKI TL-98P perfection User manual

JUKI
JUKI LBH-781 User manual

JUKI
JUKI PS-800SB-2850 Series User manual

JUKI
JUKI AK-154 User manual

JUKI
JUKI MO-134 User manual

JUKI
JUKI SC-922 User manual

JUKI
JUKI TL-2000Qi User manual

JUKI
JUKI SADE User manual

JUKI
JUKI LU-2210N-7 User manual

JUKI
JUKI LZ-2290A Series User manual

JUKI
JUKI SC-510 Quick start guide

JUKI
JUKI MF-7900 Series User manual

JUKI
JUKI SC-922 User manual

JUKI
JUKI DDL-9000BHS User manual

JUKI
JUKI MO-6900J Series Quick start guide

JUKI
JUKI HZL-F series User manual

JUKI
JUKI MP-200NS User manual

JUKI
JUKI LK1903B/BSS302 User manual

JUKI
JUKI HZL-70 series User manual

JUKI
JUKI MO-634DEV User manual