Jura ENA Micro 9 One Touch User manual

pt
es
pt
es
fr
ru
en
de
Instructions for use for ENA Micro 9 One Touch
micro 9
KFor your safety: read and understand manual before use.
E

2
Table of contents
Your ENA Micro 9 One Touch
IMPORTANT SAFEGUARDS 4
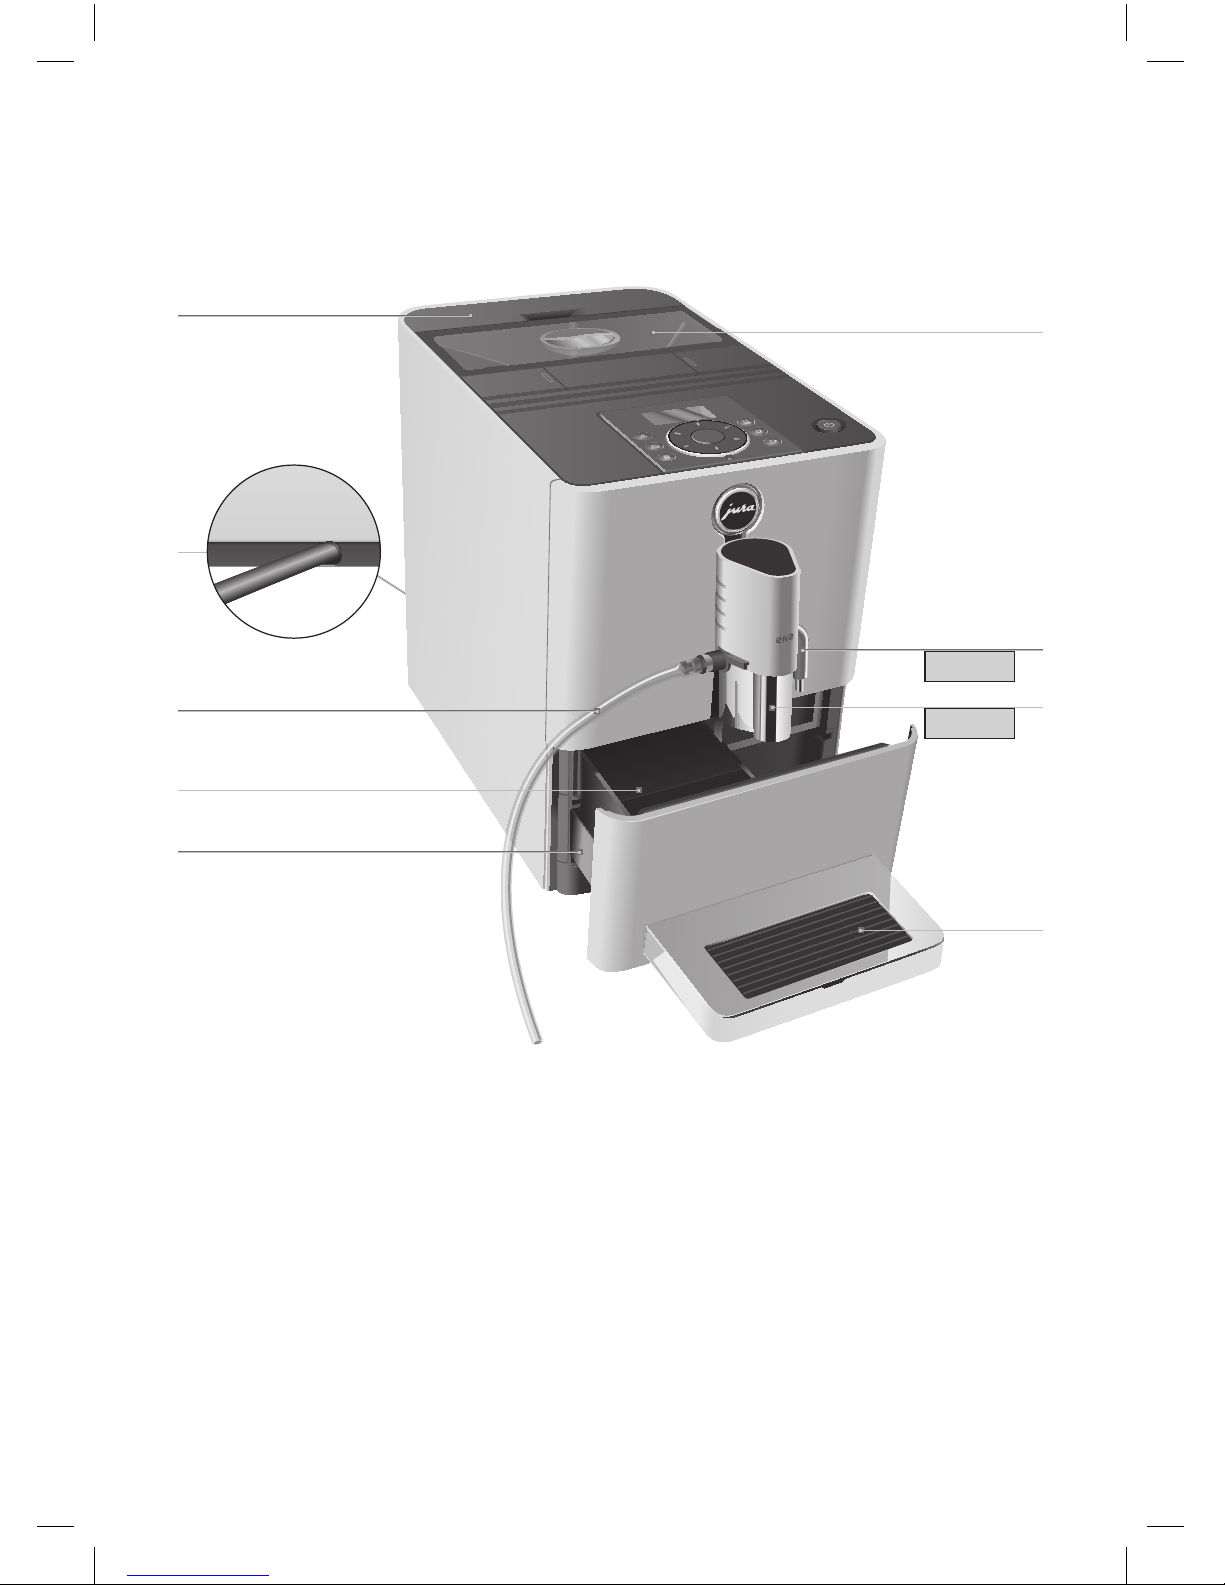
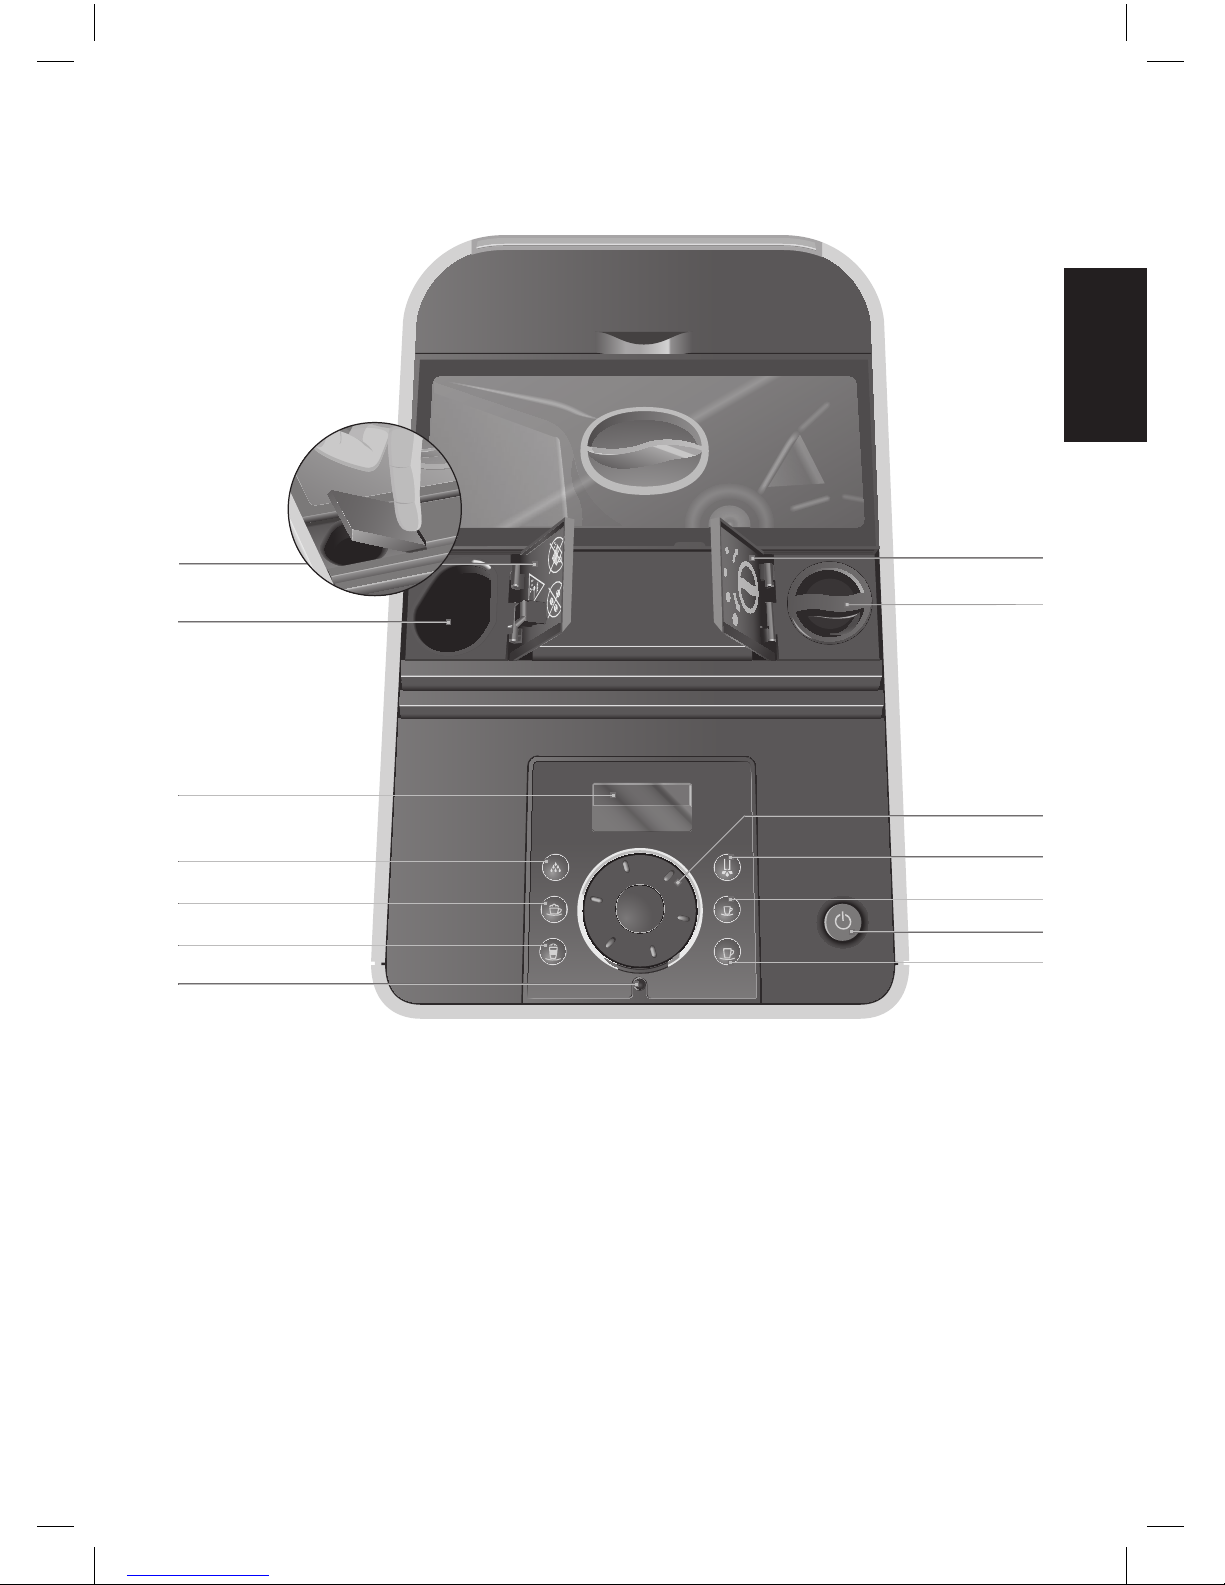
Control elements 8
1 Preparing and using for the first time 10
JURA on the Internet ............................................................................................................................................. 10
3-color plain text display...................................................................................................................................... 10
Setting up the machine........................................................................................................................................ 10
Filling the bean container .................................................................................................................................... 10
First-time use.......................................................................................................................................................... 10
First-time use with filter cartridge activation.................................................................................................... 11
First-time use without filter cartridge activation..............................................................................................12
Determining the water hardness.........................................................................................................................13
Adjusting the grinder............................................................................................................................................ 14
Filling the water tank ............................................................................................................................................ 14
2 Preparation 14
Espresso, coffee.......................................................................................................................................................15
Latte macchiato, cappuccino................................................................................................................................15
Permanently setting the amount of water for the cup size........................................................................... 16
Ground coffee......................................................................................................................................................... 16
Hot water..................................................................................................................................................................17
3 Daily operation 17
Switching on the machine ....................................................................................................................................17
Daily maintenance..................................................................................................................................................17
Switching off the machine....................................................................................................................................17
4 Permanent settings in programming mode 18
Products .................................................................................................................................................................. 18
Setting the water hardness.................................................................................................................................. 18
Energy-saving mode............................................................................................................................................. 19
Automatic switch-off............................................................................................................................................. 19
Rinses...................................................................................................................................................................... 20
Unit for amount of water .................................................................................................................................... 20
Language................................................................................................................................................................. 21
5 Maintenance 21
Rinsing the machine ............................................................................................................................................. 21
Rinsing the milk system.......................................................................................................................................22
Cleaning the milk system.....................................................................................................................................22
Dismantling and rinsing the dual spout............................................................................................................23
Inserting and activating the filter.......................................................................................................................24
Changing the filter.................................................................................................................................................24
Cleaning the machine...........................................................................................................................................25
Descaling the machine ........................................................................................................................................26
Descaling the water tank......................................................................................................................................27
Cleaning the bean container ...............................................................................................................................27

3
pt
es
nl
it
fr
ru
en
de
Table of contents
Symbol description
Warnings
This is the safety alert symbol. lt is used to alert you to potential personal injury
hazards. Obey all safety messages that follow this symbol to avoid possible injury or
death.
DANGER indicates a hazardous situation which, if not avoided, will result in death or
serious injury.
J WARNING WARNING indicates a hazardous situation which, if not avoided, could result in death
or serious injury.
J CAUTION CAUTION, used with the safety alert symbol, indicates a hazardous situation which, if
not avoided, could result in minor or moderate injury.
NOTICE NOTICE is used to address practices not related to personal injury.
Symbols used
TPrompt to take action. This symbol means that you are being prompted to perform
some action.
EInformation and tips to make it even easier to use your ENA.
READY Display message
J
J DANGER
6 Display messages 28
7 Troubleshooting 29
8 Transport and environmentally friendly disposal 30
Transport / Emptying the system .......................................................................................................................30
Disposal...................................................................................................................................................................30
9 Technical data 30
10 Index 31
11 JURA contact details / Legal information 33

4
IMPORTANT SAFEGUARDS
SAVE THESE INSTRUCTIONS.
Pass them on to any subsequent user.
When using electrical appliances, basic safety precautions shall always
be followed, to reduce the risk of fire, electric shock, and/or injury to
persons, including the following:
ZRead all instructions.
ZDo not touch hot surfaces. Use handles or knobs.
ZTo protect against fire, electric shock and injury to persons, do not
immerse power cord, plugs, or body of machine in water or other
liquid.
ZClose supervision is necessary when any appliance is used by or
near children.
ZUnplug from outlet when not in use and before cleaning. Allow to
cool before putting on or taking off parts, and before cleaning the
appliance.
ZDo not operate any appliance with a damaged cord or plug or
after the appliance malfunctions, or has been damaged in any
manner. Return appliance to the nearest authorized service
facility for examination, repair or adjustment.
ZThe use of an accessory attachment not recommended by the
appliance manufacturer may result in fire, electric shock, or injury
to persons.
ZDo not use outdoors.
ZDo not let the cord hang over the edge of a table or counter, or
touch hot surfaces.
ZDo not place on or near a hot gas or electric burner, or in a heated
oven.
ZTo disconnect, turn any control to ‘OFF’ then remove plug from
wall outlet.
ZDo not use appliance for other than intended use.
ZUse extreme caution when dispensing hot steam, hot water or
hot coffee.
ZFor household use only.
Follow the basic safety
precautions

5
IMPORTANT SAFEGUARDS
pt
es
nl
it
fr
ru
en
de
The appliance is designed and intended for household use only. It shall
only be used for coffee preparation and to heat milk and water, accord-
ing to these instructions. Use for any other purpose will be deemed
improper. JURA Elektroapparate AG cannot accept any responsibility for
the consequences of improper use.
People, including children, who
Zdo not have the physical, sensory or mental capabilities to use
the appliance safely or
Zare inexperienced or lack knowledge in how to use the appliance
safely
must be supervised by a responsible person when using it, or must be
instructed in how to use it correctly.
ZThe power cord is provided to reduce the risk resulting from
becoming entangled in or tripping over a long cord.
ZThe cord shall be arranged so that it will not drape over the
counter top or table top where it can be pulled on by children or
tripped over.
ZThis appliance has a 3-pin grounded plug.
ZDo not modify the plug in any way.
Do NOT use extension cords.
If the user chooses to use an extension cord,
Zthe marked electrical rating of the extension cord shall be at least
as great as the electrical rating of the appliance, and
Zif the appliance is of the grounded type, the extension cord shall
be a grounding type 3-wire cord, and
Zthe longer cord shall be arranged so that it will not drape over the
counter top or tabletop where it can be pulled on by children or
tripped over.
To reduce the risk of fire or electric shock, DO NOT remove any service
covers. DO NOT modify the appliance in any way that is not described
in these instructions. NO user serviceable parts included. Repair MUST
be done by authorized personnel only.
In the event of signs of damage, for example if there is a smell of
burning, unplug the machine immediately from outlet and contact
JURA customer service.
Intended use
Special power cord set
instructions
J WARNING

6
IMPORTANT SAFEGUARDS
This appliance is for household use. Any servicing other than cleaning
and user maintenance shall be performed by an authorized service rep-
resentative:
ZDo not immerse base in water or try to disassemble.
ZDo not put the appliance or any individual parts in the dishwasher.
ZCheck voltage to be sure that the voltage indicated on the name
plate complies with your voltage.
ZNever use warm or hot water to fill the water container. Use cold
water only.
ZKeep your hands and the cord away from hot parts of the appli-
ance during operation.
ZNever clean with scouring powders or hard implements.
ZEnsure that the ventilation slots are not covered.
ZNever pull out the drip tray during the brewing process. Only pull
the drip tray when the display instructs you or when the appliance
is ready for use.
ZNever fill instant coffee, chocolate mix etc. into the bean container
or ground coffee funnel (filler funnel for ground coffee). It will
damage the functioning of the brewing chamber.
ZNever fill sugar coated coffee beans into the bean container. In
case of doubt, call your dealer.
ZNever fill anything other than coffee beans into the bean con-
tainer (no chocolate, no rice, no nuts, no spices, nothing other
than roasted coffee beans).
ZNever fill frozen beans into the bean container. If you store beans
in the freezer, let them thaw 3 to 4 hours before filling them into
the bean container.
ZNever fill anything but fresh, cold and clean water into the water
tank, except when decalcifying.
ZNever use mineral or carbonated water. You can use tap water,
bottled water, spring water and reverse osmosis water.
ZNever do anything with the machine which is not described in
these instructions. In case of doubt, call your dealer.
JCAUTION
NOTICE
micro 9
NEVER DO
(or you will void your
warranty protection):

7
pt
es
nl
it
fr
ru
en
de
– intentionally blank –

8
Control elements
Control elements
micro 9
2
3
5
4
6
7
1
9
8
J HOT
J HOT
1 Water tank
2 Power cord (back of the machine)
3 Milk pipe
4 Coffee grounds container
5 Drip tray
6 Bean container with aroma preservation
cover
7 Hot-water spout
8 Height-adjustable dual spout
9 Cup platform
Figure: Your machine may look different to the one shown.

9
Control elements
pt
es
nl
it
fr
ru
en
de
8
10
12
3
4
1
2
5
6
7
9
11
14
13
1 Cover for powder chute for ground coffee
2 Powder chute for ground coffee
3 Display
4 cMaintenance button
5 /Cappuccino button
6 (Latte Macchiato button
7 Rotary Switch status display
8 Cover cap for grinder adjustment switch
9 Grinder adjustment switch
10 gRotary Switch
11 mHot Water button
12 <Espresso button
13 QOn/Off button
14 >Coffee button

10
1 Preparing and using for the first time
1 Preparing and using for the
first time
This chapter provides you with the information
you need to use your ENA without any problems.
You will prepare your ENA step-by-step to enjoy
your first perfect cup of coffee.
JURA on the Internet
Visit us on the Internet.
On the JURA website (www.jura.com) you will find
interesting and up-to-date information on your
ENA and on every aspect of coffee.
3-color plain text display
Your ENA features a 3-color plain text display. The
colours of the display texts have the following
meanings:
UGreen: The ENA is ready for use.
URed: The ENA is prompting you to perform
some action.
UYellow: You are in programming mode.
Setting up the machine
When setting up your ENA, please note the
following:
UPlace the machine on a horizontal surface that
is not sensitive to water.
UChoose a spot for your ENA which protects the
machine against overheating. Ensure that the
ventilation slots are not covered.
micro 9
Filling the bean container
NOTICE
Coffee beans which have been treated with
additives (e.g. sugar), ground coffee or freeze-dried
coffee will damage the grinder.
TOnly use untreated coffee beans to refill the
bean container.
TRemove the aroma preservation cover of the
bean container.
TRemove any dirt or foreign objects from
inside the bean container.
TFill the bean container with coffee beans.
TClose the bean container.
First-time use
When using the machine for the first time, you can
choose whether you want to operate the ENA with
or without the CLEARYL Blue filter cartridge. If the
water hardness is 10° dH or more, we recommend
using the filter cartridge. If you do not know the
hardness of your water, you can find this out first
(see Chapter 1 ‘Preparing and using for the first
time – Determining the water hardness’).
EThe On/Off button also acts as a power
switch. When the ENA is switched off, the
machine does not consume standby energy.
J WARNING
If the machine is operated with a defective power
cord, there is a danger of potentially fatal electric
shock.
TNever use a machine which is damaged.
TNever use a machine which has a defective
power cord.
EThe water volume is given as standard in
OZ. You can change this setting to ML in
programming mode (see Chapter 4 ‘Perma-
nent settings in programming mode – Unit
for amount of water’).

11
1 Preparing and using for the first time
pt
es
nl
it
fr
ru
en
de
Precondition: Bean container is filled.
TInsert the power plug into a power socket.
QTPress the On/Off button to switch the
machine on.
LANGUAGE ENGLISH
EYou can select another language by turning
the Rotary Switch.
kTPress the Rotary Switch to confirm the
language setting.
OK, the language is set.
FILTERp / YESp
ENow decide whether you want to operate
your ENA with or without a CLEARYL Blue
filter cartridge.
First-time use with filter cartridge
activation
kTPress the Rotary Switch.
OK
INSERT FILTER
TRemove the water tank.
TOpen the filter holder.
TInsert the filter cartridge into the water tank,
exerting slight pressure.
TClose the filter holder. It will click into place
audibly.
EAfter two months, the filter will cease to
work. Set the date on the date plate on the
filter holder in the water tank.
TFill the water tank with fresh, cold water and
reinsert it.
TPlace a receptacle (at least 17 oz or 500 ml)
under the hot-water and dual spout.
kTPress the Rotary Switch.
FILTER RINSING, water flows out of
the hot-water spout.
EYou can interrupt rinsing of the filter at any
time by pressing any button. Press the
Maintenance button c, to continue with
rinsing of the filter.
EThe water may be slightly discolored. This is
not harmful to health and does not affect
the taste.
Rinsing of the filter stops automatically.
SYSTEM FILLING, water flows out of
the dual spout.
HEATING
RINSING, the system rinses itself. The
operation stops automatically.
READY
micro 9

12
1 Preparing and using for the first time
First-time use without filter cartridge
activation
gTTurn the Rotary Switch until
FILTER- / NO- is displayed.
kTPress the Rotary Switch.
OK
16°dH
gTTurn the Rotary Switch to change the water
hardness setting, e.g. to 25°dH.
kTPress the Rotary Switch.
OK
FILL WATER TANK
TRemove the water tank.
TFill the water tank with fresh, cold water and
reinsert it.
PRESS RINSE
TPlace a receptacle under the dual spout.
cTPress the Maintenance button.
SYSTEM FILLING, the system fills up
with water.
HEATING
RINSING, the system rinses itself. The
operation stops automatically.
READY

13
1 Preparing and using for the first time
pt
es
nl
it
fr
ru
en
de
Determining the water hardness
The harder the water is, the more frequently the
ENA needs to be descaled. It is therefore important
to adjust the water hardness.
The water hardness can be adjusted on a continu-
ous scale between 1° dH and 30° dH.
Level Display German
Degree (°dH)
Degrees of general
hardness (°dGH)
Parts per
million (ppm)
Indicator Strip number
of ‘reddish’ fields
Not active – – – –
Very soft water <3 <3 < 53.4 None
Soft water > 4 > 4 > 71 1
Hard water > 8.4 > 8.4 > 150 2
Very hard water > 14 > 14 > 250 3
You can find out what the water hardness is by
using the Aquadur® test strip supplied as standard.
THold the test strip briefly (for one second)
under running water.
TShake off the water.
TWait for about one minute.
TYou will then be able to read the degree of
water hardness from the discoloration of the
Aquadur® test strip and the description on
the packaging.
The water hardness can now be adjusted.

14
2 Preparation
Adjusting the grinder
You can adjust the grinder on a continuous scale to
suit the degree of roast of your coffee.
NOTICE
If you adjust the consistency of grind when the
grinder is not operating, the grinding wheel could
be damaged.
TOnly adjust the consistency of grind when
the grinder is running.
The consistency of grind setting is correct if the
coffee flows regularly from the dual spout. In
addition a fine, thick crema forms.
Example: Change the consistency of grind during
the preparation of an espresso.
TPlace a cup under the dual spout.
TOpen the cover cap of the grinder adjustment
switch.
<TPress the Espresso button to start
preparation.
TTurn the grinder adjustment switch to the
desired position while the grinder is
running.
The preset amount of water flows into the
cup. Preparation stops automatically.
READY
Filling the water tank
Daily maintenance of the machine and hygiene
when handling milk, coffee and water are key to a
perfect coffee result in the cup every time. You
should therefore change the water daily.
NOTICE
Milk, sparkling mineral water or other liquids can
damage the water tank or the machine.
TOnly fill the water tank with fresh, cold water.
TRemove the water tank and rinse with cold
water.
TFill the water tank with fresh, cold water and
reinsert it.
2 Preparation
J WARNING
Hot coffee, hot steam and hot water can cause
scalding. Scalding is a serious burn.
TUse extreme care when handling hot liquid
or steam.
TAllow liquid to cool down before drinking.
TIn the event of scalding, rinse affected area
with cold water and seek medical attention.
TKeep children AWAY.
For a summary of the different temperatures,
please refer to Chapter 4 ‘Permanent settings in
programming mode – Products’.
EYou can interrupt preparation at any time
while a specialty coffee, specialty coffee with
milk or hot water is being prepared.
Just press any button.
EBefore and during the grinding operation
you can select the coffee strength of
espresso <, coffee >, cappuccino /and
latte macchiato (: NORMAL, STRONG.

15
2 Preparation
pt
es
nl
it
fr
ru
en
de
EDuring preparation, you can change the
preset amounts (e.g. amount of milk foam
or water) by turning the Rotary Switch g.
EYou can follow the current status of
preparation on the progress bar.
EThe water volume is given as standard in
OZ. You can change this setting to ML in
programming mode (see Chapter 4 ‘Perma-
nent settings in programming mode – Unit
for amount of water’).
Coffee tastes best served hot. A cold porcelain cup
cools the beverage – and impairs the taste. We
therefore recommend prewarming the cups. The
full coffee aroma can develop only in prewarmed
cups. You can purchase a JURA cup warmer from
your specialised dealer.
You can make permanent settings for all products
in programming mode (see Chapter 4 ‘Permanent
settings in programming mode – Products’).
Espresso, coffee
Preparation of espresso <and coffee >follows
this model.
Example: Proceed as follows to prepare one coffee.
Precondition: READY is displayed.
TPlace a cup under the dual spout.
>TPress the Coffee button to start preparation.
COFFEE, the preset amount of water
flows into the cup.
Preparation stops automatically.
READY
Latte macchiato, cappuccino
Your ENA can prepare a latte macchiato or
cappuccino at the touch of a button. There is no
need to move the glass or cup.
Preparation of latte macchiato (and
cappuccino /follows this model.
Example: Proceed as follows to prepare one latte
macchiato.
Precondition: READY is displayed.
TPlace a glass under the dual spout.
TRemove the protective cover of the dual
spout.
TConnect the milk pipe to the dual spout.
TImmerse the other end of the milk pipe in a
receptacle with milk (figure: optional JURA
0.4 liter (14 oz) stainless steel vacuum milk
container).
EEnsure that the filling height of the milk is
no higher than the milk pipe connection on
the dual spout.
(TPress the Latte Macchiato button.
LATTE MAC., the milk foam is prepared.
Preparation stops automatically when the
preset amount of milk is reached.
PAUSE
EThere is a short interval while the hot milk
separates from the milk foam. This allows
the typical layers of a latte macchiato to
form. You can choose the length of this
interval in programming mode (see
Chapter 4 ‘Permanent settings in program-
ming mode – Products’).
LATTE MAC., coffee preparation starts.
The preset amount of water flows into the
glass.
micro 9
micro 9

16
2 Preparation
Preparation stops automatically.
READY
Permanently setting the amount of water
for the cup size
It is easy to make permanent settings for the
amount of water for all specialty coffees and hot
water according to the cup size. Adjust the amount
once as shown in the following example. Every
time you prepare a drink in the future, this amount
of water will be dispensed.
Example: Permanently adjust the amount of
water for one coffee to the cup size.
Precondition: READY is displayed. Milk is
connected to the dual spout.
TPlace a cup under the dual spout.
/TPress and hold the Cappuccino button.
CAPPUCCINO
/TContinue to hold the Cappuccino button
down until ENOUGH MILK? appears.
/TRelease the Cappuccino button.
The milk foam is prepared.
TPress any button as soon as there is
sufficient milk foam in the cup.
OK
ENOUGH COFFEE?, the coffee flows
into the cup.
TPress any button as soon as there is
sufficient coffee in the cup.
OK, CAPPUCCINO, the set amounts for
one cappuccino are permanently stored.
READY
EYou can alter this setting at any time by
repeating the above procedure.
Ground coffee
You can choose to use a second coffee variety, for
example decaffeinated coffee, with the powder
chute for ground coffee.
ENever add more than one level measuring
spoon of ground coffee.
EUse ground coffee which is not ground too
finely. Very fine coffee can block up the
system so that the coffee only comes out in
drips.
EIf you did not fill the machine with a
sufficient amount of ground coffee, NOT
ENOUGH POWDER is displayed and the
ENA stops the operation.
EThe desired specialty coffee must be
prepared within approximately one minute
after filling with the ground coffee.
Otherwise the ENA stops the operation and
is once more ready for use.
The preparation of coffee, espresso, cappuccino
and latte macchiato with ground coffee follows
this model.
Example: Prepare a cup of coffee using ground
coffee.
Precondition: READY is displayed.
TPlace a cup under the dual spout.
TOpen the powder chute for ground coffee.
FILL POWDER
TPlace the filler funnel for ground coffee on
the powder chute.
TPlace one level measuring spoon of ground
coffee into the filler funnel.
TClose the powder chute for ground coffee.
SELECT BUTTON
>TPress the Coffee button to start preparation.
COFFEE, the preset amount of water
flows into the cup.
Preparation stops automatically.
READY

17
3 Daily operation
pt
es
nl
it
fr
ru
en
de
Hot water
JCAUTION
There is a danger of scalding from hot water
splashes.
TAvoid direct contact with the skin.
Precondition: READY is displayed.
TPlace a cup under the hot-water spout.
mTPress the Hot Water button.
WATER, the preset amount of water flows
into the cup.
Preparation stops automatically.
READY
3 Daily operation
Switching on the machine
Daily maintenance of the machine and hygiene
when handling milk, coffee and water are key to a
perfect coffee result in the cup every time.
You should therefore change the water daily.
TPlace a receptacle under the dual spout.
QTPress the On/Off button to switch the
machine on.
HEATING
RINSING, the system rinses itself.
The operation stops automatically.
READY
Daily maintenance
To ensure that you get many years of reliable
service out of your ENA and to guarantee the
optimum coffee quality, the machine requires
daily maintenance.
TRemove the drip tray.
TEmpty the coffee grounds container and
drip tray and rinse with warm water.
TReinsert the coffee grounds container and
the drip tray.
TRinse the water tank with clean water.
TDismantle and rinse the dual spout (see
Chapter 5 ‘Maintenance – Dismantling and
rinsing the dual spout’).
TWipe the surface of the machine with a
clean, soft, damp cloth (e.g. microfiber
cloth).
EIn the interests of hygiene, we recommend
changing the milk pipe on a regular basis
(approx. every 6 months). Replacement
pipes are available from specialised dealers.
Switching off the machine
When the ENA is switched off, the system is
automatically rinsed if a specialty coffee has been
prepared. If cappuccino or latte macchiato has
been prepared, cappuccino frother rinsing also
takes place.
TPlace a receptacle under the dual spout.
QTPress the On/Off button.
RINSING, CAPPUCCINO
RINSING, the system rinses itself. The
operation stops automatically. Your ENA is
switched off.
EWhen the ENA is switched off with the
On/Off button, the machine does not
consume standby energy.

18
4 Permanent settings in programming mode
4 Permanent settings in
programming mode
Products
J WARNING
Hot coffee, hot steam and hot water can cause
scalding. Scalding is a serious burn.
TUse extreme care when handling hot liquid
or steam.
TAllow liquid to cool down before drinking.
TIn the event of scalding, rinse affected area
with cold water and seek medical attention.
TKeep children AWAY.
You can make the following permanent settings for
espresso and coffee:
UAmount of water: 0.5OZ – 8.0OZ
(25 ml – 240ml) (per cup)
UCoffee strength: NORMAL, STRONG
UTemperature: NORMAL, HIGH
You can make the following permanent settings for
latte macchiato and cappuccino:
UAmount of milk foam: 3SEC – 120SEC
UInterval: 0SEC – 60SEC
UCoffee strength: NORMAL, STRONG
UAmount of water: 0.5OZ – 8.0OZ
(25 ml – 240ml)
UTemperature: NORMAL, HIGH
You can make the following permanent setting for
hot water:
UAmount of water: 0.5OZ – 15.0OZ
(25 ml – 450 ml)
Permanent settings in programming mode always
follow the same model.
Example: Permanently change the coffee strength
(FLAVOUR) for espresso from STRONG to
NORMAL.
Precondition: READY is displayed.
kTPress and hold the Rotary Switch until
RINSE appears.
gTTurn the Rotary Switch until PRODUCT is
displayed.
kTPress the Rotary Switch to enter the
program item.
SELECT BUTTON
ENext select the button of the product for
which you would like to make settings.
No product is prepared at this point.
<TPress the Espresso button.
ESPRESSO
WATER
gTTurn the Rotary Switch until FLAVOUR is
displayed.
kTPress the Rotary Switch to enter the
program item.
STRONG
gTTurn the Rotary Switch until NORMAL is
displayed.
kTPress the Rotary Switch to confirm the
setting.
OK, the coffee strength is set.
FLAVOUR
gTTurn the Rotary Switch until EXIT is
displayed.
kTPress the Rotary Switch to exit the program
item.
PRODUCT
gTTurn the Rotary Switch until EXIT is
displayed.
kTPress the Rotary Switch to exit programming
mode.
READY
Setting the water hardness
EIf you are using the CLEARYL Blue filter
cartridge and have activated it in program-
ming mode, you will not be able to adjust
the water hardness.
The harder the water is, the more frequently the
ENA needs to be descaled. It is therefore important
to adjust the water hardness.
The water hardness can be adjusted on a continu-
ous scale between 1° dH and 30° dH.

19
4 Permanent settings in programming mode
pt
es
nl
it
fr
ru
en
de
Example: Change the water hardness setting from
16°dH to 25°dH.
Precondition: READY is displayed.
kTPress and hold the Rotary Switch until
RINSE appears.
gTTurn the Rotary Switch until HARDNESS
is displayed.
kTPress the Rotary Switch to enter the
program item.
16°dH
gTTurn the Rotary Switch until 25°dH is
displayed.
kTPress the Rotary Switch to confirm the
setting.
OK, the water hardness is set.
HARDNESS
gTTurn the Rotary Switch until EXIT is
displayed.
kTPress the Rotary Switch to exit programming
mode.
READY
Energy-saving mode
The energy-saving mode (Energy Save Mode,
E.S.M.©) helps you to prevent your machine from
consuming power unnecessarily and to actively
save energy:
UENERGYp
USoon after the last preparation, the ENA
stops heating up. After about 5 minutes the
message ENERGY ON is displayed.
UBefore you can prepare a specialty coffee,
specialty coffee with milk, or hot water, the
machine must heat up.
UENERGY-
UThe ENA is constantly ready for use.
UAll specialty coffees as well as hot water can
be prepared without having to wait.
Example: Change the energy-saving mode from
ENERGYp to ENERGY-.
Precondition: READY is displayed.
kTPress and hold the Rotary Switch until
RINSE appears.
gTTurn the Rotary Switch until ENERGYp is
displayed.
kTPress the Rotary Switch to enter the
program item.
ECONOMYp
gTTurn the Rotary Switch until ECONOMY-
is displayed.
kTPress the Rotary Switch to confirm the
setting.
OK, the energy-saving mode is set.
ENERGY-
gTTurn the Rotary Switch until EXIT is
displayed.
kTPress the Rotary Switch to exit programming
mode.
READY
Automatic switch-off
By instructing your ENA to automatically switch
itself off, you can cut down your energy consump-
tion. If this function is activated, your ENA switches
off automatically after the preset time following
the last action on the machine.
The automatic switch-off can be set to between
15 minutes and 9 hours.
Example: Change the switch-off time from
2HRS to 1HRS.
Precondition: READY is displayed.
kTPress and hold the Rotary Switch until
RINSE appears.
gTTurn the Rotary Switch until OFF AFTER
is displayed.
kTPress the Rotary Switch to enter the
program item.
2HRS
gTTurn the Rotary Switch until 1HRS is
displayed.
kTPress the Rotary Switch to confirm the
setting.
OK, the switch-off time is set.
OFF AFTER
gTTurn the Rotary Switch until EXIT is
displayed.

20
4 Permanent settings in programming mode
kTPress the Rotary Switch to exit programming
mode.
READY
Rinses
In the program item RINSES you can make the
following settings:
UINIT RINSE MANUAL
UThe switch-on rinse must be started
manually.
UINIT RINSE AUTOMATIC
UThe switch-on rinse is started automatically.
UC-RINSE AFTER10'
UYou are prompted to perform a cappuccino
rinse 10 minutes after preparation of a
specialty coffee with milk.
UC-RINSE NOW
UYou are prompted to perform a cappuccino
rinse immediately after preparation of a
specialty coffee with milk.
Example: Change the setting such that cappuccino
frother rinsing is performed immediately after
preparation of a specialty coffee with milk.
Precondition: READY is displayed.
kTPress and hold the Rotary Switch until
RINSE appears.
gTTurn the Rotary Switch until RINSES is
displayed.
kTPress the Rotary Switch to enter the
program item.
INIT RINSE
gTTurn the Rotary Switch until C-RINSE is
displayed.
kTPress the Rotary Switch to enter the
program item.
AFTER10'
gTTurn the Rotary Switch until NOW is
displayed.
kTPress the Rotary Switch to confirm the
setting.
OK
C-RINSE
gTTurn the Rotary Switch until EXIT is
displayed.
kTPress the Rotary Switch to exit the program
item.
RINSES
gTTurn the Rotary Switch until EXIT is
displayed.
kTPress the Rotary Switch to exit programming
mode.
READY
Unit for amount of water
The water volume is given as standard in OZ. You
can change this setting to ML in programming
mode.
Example: Change the unit for the amount of water
from OZ to ML.
Precondition: READY is displayed.
kTPress and hold the Rotary Switch until
RINSE appears.
gTTurn the Rotary Switch until DISPLAY is
displayed.
kTPress the Rotary Switch to enter the
program item.
OZ
gTTurn the Rotary Switch until ML is displayed.
kTPress the Rotary Switch to confirm the
setting.
OK, the unit for the amount of water is set.
DISPLAY
gTTurn the Rotary Switch until EXIT is
displayed.
kTPress the Rotary Switch to exit programming
mode.
READY
Other manuals for ENA Micro 9 One Touch
4
Table of contents
Languages:
Other Jura Coffee Maker manuals

Jura
Jura SUBITO User manual

Jura
Jura IMPRESSA Z5 User manual

Jura
Jura 762 User manual

Jura
Jura Z6 User manual

Jura
Jura ENA 9 One Touch User manual

Jura
Jura Giga X3 Professional User manual

Jura
Jura IMPRESSA XJ9 OT TFT Professional Manual

Jura
Jura Impressa TB-96 Instruction Manual

Jura
Jura ENA 4 User manual

Jura
Jura GIGA X8 Professional User manual