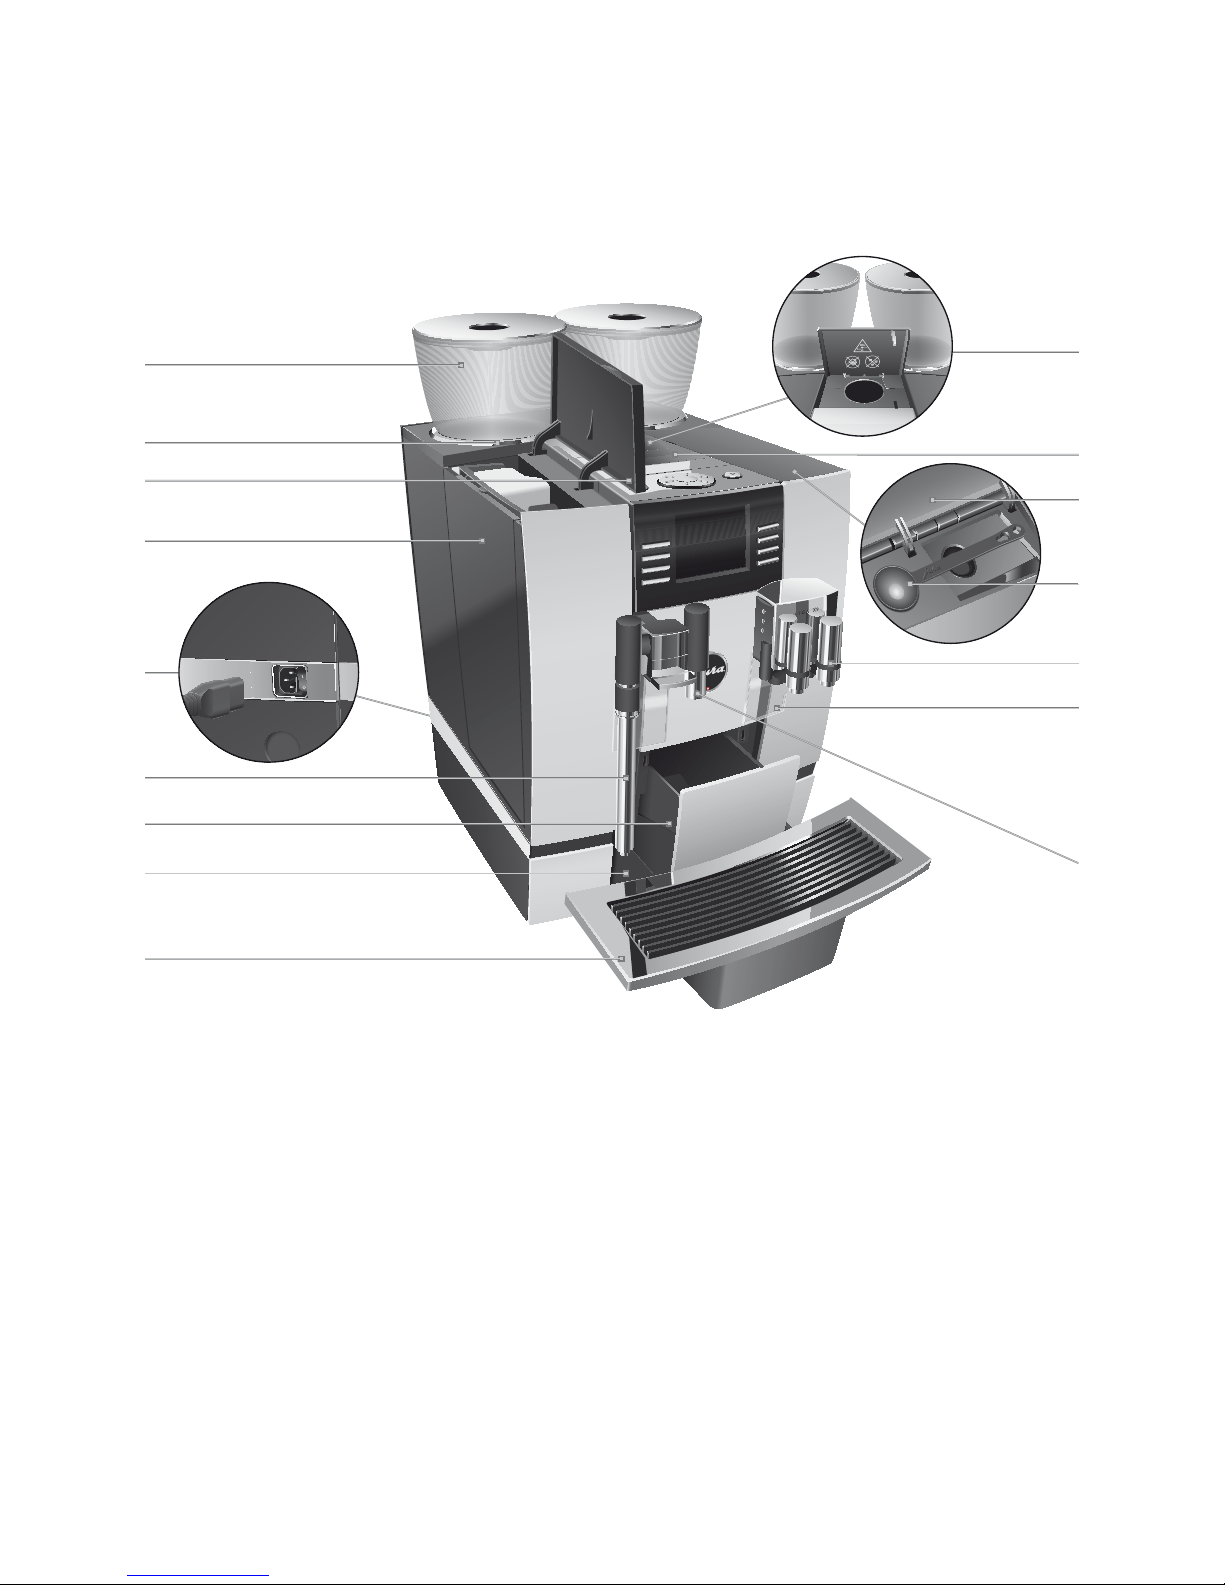
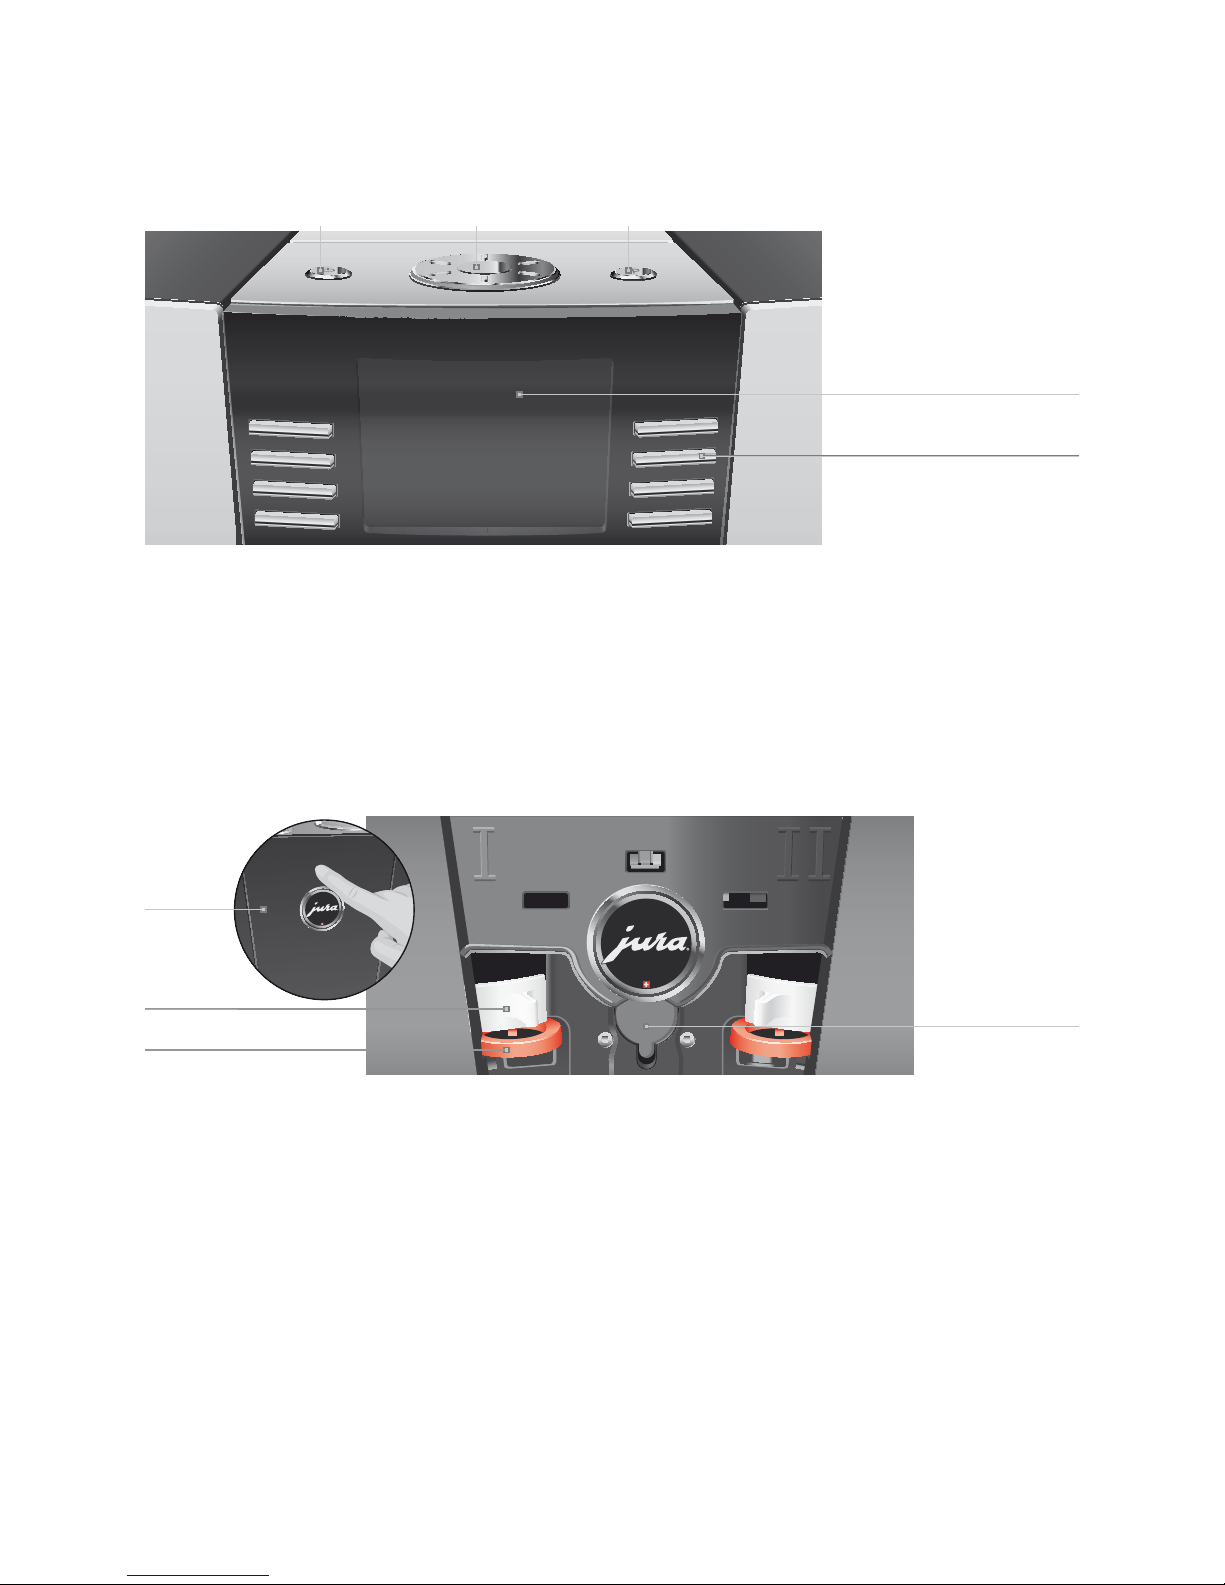
Jura GIGA X9c Professional User manual

GIGA X9c Professional Instructions for Use
JURA Type 682
KOriginal instructions for use
Before using the machine read the instructions for use.
E
The Instructions for use has been awarded the seal of approval by the
independent German Technical Inspection Agency, TÜV SÜD, due to
its easy-to-understand style, its thoroughness and coverage of safety
aspects.

2
Control elements 4
Important information 6
Proper use ......................................................................................................................................................6
For your safety...............................................................................................................................................6
1Preparing and using for the first time 9
JURA on the Internet.....................................................................................................................................9
Requirements for first-time use .................................................................................................................9
Setting up the machine ...............................................................................................................................9
Filling the bean container...........................................................................................................................10
First-time use................................................................................................................................................10
Settings by the JURA service technician...................................................................................................13
Determining the water hardness ..............................................................................................................14
Connecting milk...........................................................................................................................................14
2Preparation 15
Coffee, latte macchiato etc.– options for preparation .........................................................................15
Preparation at the touch of a button........................................................................................................16
Preparation using the product selector ...................................................................................................17
Ground coffee...............................................................................................................................................17
Permanently setting amounts for the cup size ......................................................................................18
Activating the grinder selection ................................................................................................................19
Activating simultaneous preparation......................................................................................................20
Hot water.......................................................................................................................................................21
Steam ............................................................................................................................................................22
3Daily operation 23
Switching on ................................................................................................................................................23
Daily maintenance......................................................................................................................................23
Switching off................................................................................................................................................24
4Permanent settings in programming mode 25
Possible settings in programming mode ...............................................................................................25
Product settings ..........................................................................................................................................26
Setting the consistency of grind ..............................................................................................................28
Maintenance settings.................................................................................................................................29
Setting the water hardness .......................................................................................................................30
Energy-saving mode ...................................................................................................................................31
Time and date..............................................................................................................................................32
Timer .............................................................................................................................................................32
Automatic switch-off..................................................................................................................................33
Units ..............................................................................................................................................................34
Restore factory settings.............................................................................................................................35
Language......................................................................................................................................................35
Display settings ...........................................................................................................................................36
Background ..................................................................................................................................................37
Querying information ................................................................................................................................37
Table of contents
Your GIGA X9c Professional

3
Table of contents
Warnings
JWARNING
JCAUTION
Always take note of any information marked with the words CAUTION or
WARNING and a warning sign. The signal word WARNING draws your attention to
potential serious injury, and the signal word CAUTION to potential minor injury.
CAUTION CAUTION draws your attention to potential damage to the machine.
Symbols used
TPrompt to take action. This symbol means that you are being prompted to
perform some action.
EInformation and tips to make it even easier to use your GIGA.
‘Espresso’ Display
Symbol description
5Maintenance 39
Rinsing the coffee system .........................................................................................................................39
Rinsing the milk system.............................................................................................................................40
Cleaning the milk system..........................................................................................................................40
Dismantling and rinsing the dual spout..................................................................................................41
Dismantling and rinsing the professional steam lance........................................................................44
Changing the filter......................................................................................................................................45
Cleaning the machine ................................................................................................................................45
Descaling the machine ..............................................................................................................................47
Cleaning the bean container.....................................................................................................................49
6Display messages 50
7Troubleshooting 52
8Transport and environmentally friendly disposal 54
Transport/ Emptying the system.............................................................................................................54
Disposal.........................................................................................................................................................54
9Technical data 55
10 Index 56
11 JURA contact details/ Legal information 60

4
Control elements
Control elements
5
7
2
3
9
8
11
16
15
14
10
12
13
4
1
6
1Bean container with aroma preservation
cover
2Bean container status indicator
3Water tank cover
4Water tank
5Power switch and plug-in mains
cable(back of the machine)
6Professional steam lance(pivoting)
7Coffee grounds container
8Drip tray
9Cup grille
10 Filler funnel for ground coffee
11 Ventilation slats (Venti Ports)
12 Storage compartment cover
13 Measuring spoon for ground coffee
14 Height- and width-adjustable dual spout
15 Splash guard
16 Height-adjustable hot-water spout

5
Control elements
!
"
#
$%
Top of the machine
1QOn/Off button
2gRotary Switch
3OP button (programming)
Front
4Display
5Multi-function buttons (button function
depends on what is shown in the display)
!
%
$
"
Back of the machine
1Service cover(open by pressing with your
finger)
2Locking device
3Sliding catch
4Service socket (underneath cover)

6
Important information
This machine is intended for use by specialist or trained staff in busi-
nesses, light industry and agricultural facilities or for commercial use
by non-professionals. It should only be used for coffee preparation
and to heat milk and water. Use for any other purpose will be
deemed improper. JURA Elektroapparate AG cannot accept any
responsibility for the consequences of improper use.
Before using the machine read these instructions for use thoroughly
and completely and comply with the instructions they contain. A
warranty service is not applicable for damage or defects caused by
non-compliance with the instructions for use. Keep these instruc-
tions for use close to the machine and pass them on to the next user.
The GIGA may only be operated by instructed persons. Non-profes-
sionals must be supervised during use.
Please carefully read and observe the important safety information
set out below.
To avoid danger of potentially fatal electric shock:
UNever use a machine which is damaged or has a defective
mains cable.
UIn the event of signs of damage, for example if there is a smell
of burning, unplug the machine immediately from the mains
supply and contact JURA service.
UIf the mains cable of this machine is damaged, it must be
repaired either directly by JURA or by an authorised JURA serv-
ice centre.
UMake sure that the GIGA and the mains cable are not located
close to hot surfaces.
UBe careful to ensure that the mains cable is not trapped and
does not rub against sharp edges.
UNever open and repair the machine yourself. Do not modify
the machine in any way that is not described in these instruc-
tions for use. The machine contains live parts. If opened, there
is a danger of potentially fatal injury. Repairs may only be car-
ried out by authorised JURA service centres, using original
spare parts and accessories.
Proper use
For your safety
J

7
Important information
UTo completely and safely disconnect the machine from the
power supply, first switch off the GIGA using the On/Off but-
ton and then at the power switch. Only then should you
remove the mains plug from the power socket.
There is a risk of scalds or burns on the spouts.
UPlace the machine out of the reach of children.
UDo not touch any hot parts. Use the handles provided.
A defective machine is not safe and could cause injury or fire. To
avoid damage and any associated risk of injury or fire:
UNever allow the mains cable to loosely hang down. The mains
cable could pose a tripping hazard or become damaged.
UProtect the GIGA from environmental influences such as rain,
frost and direct sunlight.
UDo not immerse the GIGA, mains cable or connections in
water.
UDo not put the GIGA or any individual parts in the dishwasher.
USwitch your GIGA off at the power switch before any cleaning
operation. Always wipe the GIGA with a damp cloth rather
than a wet one, and protect it from prolonged exposure to
water splash.
UThe GIGA is not suitable for installation on a surface where a
jet of water can be used.
UThe machine must not be cleaned with a jet of water.
UOnly connect the machine to the mains voltage in accordance
with the information on the rating plate. The rating plate is
located on the underside of your GIGA. Further technical data
is provided in these instructions for use (see Chapter 9‘Tech-
nical data’).
UPlease only use original JURA maintenance products. Use of
products that are not explicitly recommended by JURA could
damage the GIGA.
UDo not use any coffee beans treated with additives or caramel-
ised coffee beans.
USwitch the machine off at the power switch if you are going to
be absent for a longer period of time.

8
Important information
People, including children, who
Udo not have the physical, sensory or mental capabilities to use
the machine safely or
Uare inexperienced or lack knowledge in how to use the
machine safely
must be supervised by a responsible person when using it, or must
be instructed in how to use it correctly.
Safety when handling the CLARIS filter cartridge:
UFilter cartridges should be kept out of the reach of children.
UStore filter cartridges in a dry place in the sealed packaging.
UProtect cartridges from heat and direct sunlight.
UDo not use damaged filter cartridges.
UDo not open filter cartridges.

9
1Preparing and using for the first time
Visit us on the Internet.
On the JURA website (www.jura.com) you will find interesting and
up-to-date information on your GIGA and on every aspect of coffee.
A few preparations are necessary before the JURA service technician
can set up your GIGA in your home. The following preparations must
be carried out by a professionally qualified person:
UThe mains connection for the GIGA must be protected by a
residual current device (RCD).
UThere must be a power switch to disconnect the power supply
to the GIGA.
UThe permanent water connection must have a shut-off valve
with a non-return valve (type EA) and filter.
UThe permanent water connection must comply with the spec-
ified technical data (see Chapter 9‘Technical data’).
UThe drain hose must be connected to a siphon.
EThese preparations must be carried out by a qualified person.
EThe preparations must be carried out before the JURA service
technician sets up your GIGA in your home.
When setting up your GIGA, please note the following:
UPlace the GIGA on a horizontal surface that is not sensitive to
water.
UChoose a spot for your GIGA which protects the machine
against overheating. Ensure that the ventilation slats are not
covered.
UDismantle and rinse the professional steam lance before first
use (see Chapter 5‘Maintenance – Dismantling and rinsing
the professional steam lance’).
JURA on the Internet
Requirements for
first-time use
Setting up the machine

10
1Preparing and using for the first time
The bean containers have an aroma preservation cover. This will
ensure that your coffee beans retain their aroma for longer.
Coffee beans which have been treated with additives (e.g. sugar),
ground coffee or freeze-dried coffee will damage the grinders.
TOnly use untreated coffee beans to fill the bean containers.
TRemove the aroma preservation cover.
TRemove any dirt or foreign objects from inside the bean
container.
TFill the bean container with coffee beans and close the
aroma preservation cover.
EBefore the machine is used for the first time, the permanent
water connection must be installed by a JURA service techni-
cian.
During first-time use, you can choose between the ‘Quick installa-
tion’ and the ‘Standard installation’.
U‘Quick installation’: After setting the time and date, your GIGA
is ready for use.
U‘Standard installation’: Here, you can set the water hardness
of the water used. This setting influences when your GIGA
prompts you to perform descaling. If you do not know
the hardness of your water, you can find this out first (see
Chapter 1‘Preparing and using for the first time – Determin-
ing the water hardness’).
If the machine is operated with a defective mains cable, there is a
danger of potentially fatal electric shock.
TNever use a machine which is damaged or has a defective
mains cable.
Filling the bean container
CAUTION
First-time use
JWARNING

11
1Preparing and using for the first time
Precondition:The bean containers have been filled.
TConnect the mains cable to the machine.
TInsert the mains plug into a power socket.
3TSwitch on the GIGA using the power switch on the back of
the machine.
QTPress the On/Off button to switch the GIGA on.
‘Welcome to JURA’ appears on the display. The display then
shows the languages you can choose from.
ETo display more languages, press the ‘Next’ button (bottom
right).
TPress the button that corresponds to the language you want,
e.g. ‘English’.
‘Saved’ appears briefly on the display to confirm the setting.
‘First-time use’
ENow choose between ‘Quick installation’ and ‘Standard instal-
lation’.
TPress the ‘Quick installation’ button.
‘Time’
TPress the ‘+’ or ‘–’ button to set the hours.
TPress the ‘Save’ button.
TPress the ‘+’ or ‘–’ button to set the minutes.
TPress the ‘Save’ button.
‘Saved’ appears briefly on the display.
‘Date’
TPress the ‘+’ or ‘–’ button to set the day.
TPress the ‘Save’ button.
TPress the ‘+’ or ‘–’ button to set the month.
TPress the ‘Save’ button.
TPress the ‘+’ or ‘–’ button to set the year.
TPress the ‘Save’ button.
‘Saved’ appears briefly on the display.
‘Press the Rotary Switch.’, the Rotary Switch lights up.
Quick installation

12
1Preparing and using for the first time
TPlace a receptacle under the dual spout.
kTPress the Rotary Switch.
‘System is filling.’, the system fills up with water. The opera-
tion stops automatically. ‘Welcome to JURA’, ‘Machine is
heating.’, ‘Press the Rotary Switch.’ appears on the display.
kTPress the Rotary Switch.
‘Machine is rinsing.’, the machine rinses. The operation
stops automatically. ‘Please select product:’ appears on the
display. Your GIGA is ready for use.
TPress the ‘Standard installation’ button.
‘Time’
TPress the ‘+’ or ‘–’ button to set the hours.
TPress the ‘Save’ button.
TPress the ‘+’ or ‘–’ button to set the minutes.
TPress the ‘Save’ button.
‘Saved’ appears briefly on the display.
‘Date’
TPress the ‘+’ or ‘–’ button to set the day.
TPress the ‘Save’ button.
TPress the ‘+’ or ‘–’ button to set the month.
TPress the ‘Save’ button.
TPress the ‘+’ or ‘–’ button to set the year.
TPress the ‘Save’ button.
‘Saved’ appears briefly on the display.
‘Water hardness’
EIf you do not know the hardness of your water, you must find
this out first (see Chapter 1‘Preparing and using for the first
time – Determining the water hardness’).
TPress the ‘+’ or ‘–’ button to adjust the water hardness.
TPress the ‘Save’ button.
‘Saved’ appears briefly on the display.
‘Machine is heating.’, ‘Press the Rotary Switch.’, the Rotary
Switch lights up.
kTPress the Rotary Switch.
‘System is filling.’, the system fills up with water. The opera-
tion stops automatically.
Standard installation

13
1Preparing and using for the first time
TPlace a receptacle under the dual spout.
kTPress the Rotary Switch.
‘Machine is rinsing.’, the machine rinses. The operation
stops automatically. ‘Please select product:’ appears on the
display. Your GIGA is ready for use.
The following settings can only be made by the JURA service techni-
cian:
UCustomised layout of the products on the start screen (dis-
play) or in the product selector
UDisabling the product selector view (see Chapter 2‘Prepara-
tion – Preparation using the product selector’)
UDisabling ‘ground coffee’
UActivating special functions (e.g. ‘2x’, i.e. two servings of the
selected product are prepared one after the other)
USetting the filter capacity
UCodes: Four codes can be assigned. For each code, you can
define which programme items are available or disabled. Each
code corresponds to different authorisations. For instance,
you can define that initiation of the maintenance programmes
is disabled using a code.
You can also obtain the following optional accessories for your GIGA
from your JURA service partner:
USet for automatic discharging of coffee grounds
Settings by the JURA
service technician

14
1Preparing and using for the first time
You can find out what the water hardness is by using the Aquadur®
test strip supplied as standard.
THold the test strip briefly (for 1second) under flowing water.
Shake off the water.
TWait for about 1minute.
TYou will then be able to read the degree of water hardness
from the discolouration of the Aquadur® test strip and the
description on the packaging.
Your GIGA creates fine, creamy, feather-light milk foam with a per-
fect consistency. The most important requirement for frothing milk
is a milk temperature of 4– 8°C. We would therefore recommend
using a milk cooler (e.g. the JURA Compressor Cooler Pro, which is
available as an option).
TConnect the milk pipe to the dual spout.To do this, attach
the end of the milk pipe to the connector on the right-hand
side of the dual spout.
TConnect the other end of the milk pipe to a milk cooler.
Determining the water
hardness
Connecting milk

15
2Preparation
2Preparation
EWhile a product is being prepared, you can stop preparation
at any time. To do this, press the Rotary Switch kor the ‘!’
button.
EDuring preparation, you can change the preset amounts (e.g.
amount of milk foam or water) by turning the Rotary Switch g.
EYou can follow the current status of preparation on the display.
EWhile the machine is preparing 1ristretto, 2ristretti, 1espresso,
2espressi, 1coffee, 2coffees or a pot of coffee, you can prepare
hot water or steam at the same time. You can activate this
function in programming mode (see Chapter 2‘Preparation –
Activating simultaneous preparation’).
Coffee tastes best served hot. A cold porcelain cup cools the bever-
age – and impairs the taste. We therefore recommend prewarming
the cups. The full coffee aroma can develop only in prewarmed cups.
You can purchase a JURA cup warmer from your specialised dealer.
You can make permanent settings for all products in programming
mode (see Chapter 4‘Permanent settings in programming mode –
Product settings’).
The GIGA provides you with two options for preparing a speciality
coffee, milk or hot water.
UPreparation at the touch of a button: Simply press the cor-
responding preparation button for the product shown on the
display (start screen) that you want.
UPreparation using the product selector (Rotary Selection):
Only some of the products you can prepare are shown on the
start screen. As soon as you turn the Rotary Switch, more
products are displayed in a product selector.
UTurn the Rotary Switch to bring the product you want into
focus. Start preparation by pressing the Rotary Switch or the
‘Prepare’ button.
UThe product selector view disappears automatically after
5seconds if no preparation is started.
The two preparation options will now be described in more detail in
the following sections.
Coffee, latte macchiato
etc.– options for
preparation

16
2Preparation
On the display (start screen), you will see various products, which
you can prepare by simply pressing the corresponding button.
A speciality coffee displayed on the start screen is always prepared
in the same way.
Example:Proceed as follows to prepare one coffee.
Precondition:‘Please select product:’ is displayed.
TPlace a cup under the dual spout.
TPress the ‘Coffee’ button.
Preparation starts. ‘Coffee’ and the fill volume are displayed.
The preset amount of water for coffee flows into the cup.
Preparation stops automatically. ‘Please select product:’
appears on the display.
Two speciality coffees can always be prepared in the same way: Press
the preparation button you want twice within two seconds.
Your GIGA prepares latte macchiato, cappuccino and other speciality
coffees with milk at the touch of a button. There is no need to move
the glass or cup.
Example:Proceed as follows to prepare one latte macchiato.
Precondition:‘Please select product:’ is displayed, milk is connected
to the dual spout.
TPlace a glass under the dual spout.
TPress the ‘Latte macchiato’ button.
‘Latte macchiato’ and the various amounts are displayed.
‘Latte macchiato’, the preset amounts of milk and milk foam
flow into the glass.
Coffee preparation starts. The preset amount of water for
espresso flows into the glass. Preparation stops automati-
cally. ‘Please select product:’ appears on the display.
To ensure that the milk system in the dual spout always works prop-
erly, you must clean it daily (see Chapter 5‘Maintenance – Cleaning
the milk system’).
Preparation at the touch
of a button
Speciality coffees at the
touch of a button
Two speciality coffees at the
touch of a button
Speciality coffees with milk
at the touch of a button

17
2Preparation
As soon as you turn the Rotary Switch, more products are displayed
in a product selector.
EThe product selector view disappears automatically after
5seconds if no preparation is started.
Example:Proceed as follows to prepare a milky coffee using the
product selector.
Precondition:‘Please select product:’ is displayed, milk is connected
to the dual spout.
TPlace a cup under the dual spout.
gTTurn the Rotary Switch to view the product selector.
gTTurn the Rotary Switch until the ‘Caffè latte’ product is in
focus.
kTPress the Rotary Switch to start preparation.
The milky coffee is prepared.
Preparation stops automatically. ‘Please select product:’
appears on the display.
You can choose to use a second coffee variety, for example decaf-
feinated coffee, with the filter funnel for ground coffee.
ENever add more than two level measuring spoons of ground
coffee.
EUse ground coffee which is not ground too finely. Very fine
coffee can block up the system so that the coffee only comes
out in drips.
EIf you did not fill the machine with a sufficient amount of
ground coffee, ‘Not enough ground coffee.’ is displayed and
the GIGA stops the operation.
EThe desired speciality coffee must be prepared within approx-
imately one minute after filling with the ground coffee. Oth-
erwise the GIGA stops the operation and is once more ready
for use.
All speciality coffees with ground coffee are prepared following this
model.
Preparation using the
product selector
Preparation of a speciality
coffee using the product
selector
Ground coffee

18
2Preparation
Example:Proceed as follows to prepare one coffee using ground
coffee.
Precondition:‘Please select product:’ is displayed.
TPlace a cup under the dual spout.
TOpen the cover of the filler funnel for ground coffee.
‘Please add ground coffee.’
TPlace one level measuring spoon of ground coffee into the
filler funnel.
TClose the cover of the filler funnel.
‘Please select product:’, the speciality coffees you can pre-
pare with ground coffee are displayed.
TPress the ‘Coffee’ button.
Preparation starts. ‘Coffee’ and the fill volume are displayed.
The preset amount of water for coffee flows into the cup.
Preparation stops automatically. ‘Please select product:’
appears on the display.
It is easy to make permanent settings for the amounts (amount of
water, amount of milk etc.) according to the cup size for all products
except caffè latte. Adjust the amount once as shown in the following
example. Every time you prepare a drink in the future, this amount
will be dispensed.
The permanent settings for adapting the amounts to the cup size
for all products follow this model.
Example:Proceed as follows to permanently set the amount of
water for one coffee.
Precondition:‘Please select product:’ is displayed.
TPlace a cup under the dual spout.
TPress and hold the ‘Coffee’ button.
‘Coffee’ and the fill volume are displayed.
THold the ‘Coffee’ button down until ‘Enough coffee? Press
button.’ appears.
TRelease the ‘Coffee’ button.
Preparation starts and the coffee flows into the cup.
Permanently setting
amounts for the cup size

19
2Preparation
TPress any button as soon as there is sufficient coffee in the
cup.
Preparation stops. ‘Saved’ appears briefly on the display. The
set amount of water for one coffee is permanently stored.
‘Please select product:’ appears on the display.
EYou can alter this setting at any time by repeating the above
procedure.
EThe amount can be permanently adjusted to the cup size for
the products shown in the product selector too. To do this,
press and hold the Rotary Switch kuntil ‘Enough coffee?
Press button.’ appears.
EYou can also permanently set the amount for all speciality cof-
fees, milk and hot water in programming mode (see Chapter 4
‘Permanent settings in programming mode – Product set-
tings’).
You have the option of configuring the start screen such that the
grinder selection (‘beans à la carte’) is always displayed. Before each
preparation, you can select which grinder is to be used and therefore
which coffee beans are to be used.
EIf the grinder selection is activated, you can no longer set the
grinder for the individual products in programming mode (in
the ‘Product settings (2/5)’ programme item).
Example:Proceed as follows to activate ‘beans à la carte’ mode.
Precondition:‘Please select product:’ is displayed.
OTPress the P button.
‘Maintenance status (1/5)’
gTTurn the Rotary Switch until the programme item ‘Machine
settings (4/5)’ is displayed.
TPress the ‘Café à la carte’ button.
TPress the ‘Active’ button.
TPress the ‘Save’ button.
‘Saved’ appears briefly on the display.
‘Machine settings (4/5)’
OTPress the P button to exit programming mode.
‘Please select product:’
Activating the grinder
selection

20
2Preparation
Example:Proceed as follows to prepare a coffee with coffee beans
from the grinder on the left.
Precondition:‘Please select product:’ is displayed. ‘Beans à la carte’
mode is activated.
TPlace a cup under the dual spout.
TPress the ‘+’ button on the left-hand side several times until
the value is set to ‘100%’.
EThe grinder selection remains active until the setting is
changed by you, even if the GIGA is switched off in the mean-
time.
TPress the ‘Coffee’ button.
Preparation starts. ‘Coffee’ and the fill volume are displayed.
The preset amount of water for coffee flows into the cup.
Preparation stops automatically. ‘Please select product:’
appears on the display.
You have the option of activating the ‘simultaneous preparation’
function. When this function is activated you can prepare hot water
or steam at the same time as 1ristretto, 2ristretti, 1espresso,
2espressi, 1coffee, 2coffees or a pot of coffee.
Example:Proceed as follows to activate the ‘simultaneous prepara-
tion’ function.
Precondition:‘Please select product:’ is displayed.
OTPress the P button.
‘Maintenance status (1/5)’
gTTurn the Rotary Switch until the programme item ‘Machine
settings (4/5)’ is displayed.
TPress the ‘Prepare two products at once’ button.
‘Prepare two products at once’
TPress the ‘Active’ button.
TPress the ‘Save’ button.
‘Saved’ appears briefly on the display.
‘Machine settings (4/5)’
OTPress the P button to exit programming mode.
‘Please select product:’
Preparation of a speciality
coffee with grinder
selection
Activating simultaneous
preparation
Other manuals for GIGA X9c Professional
3
Table of contents
Other Jura Coffee Maker manuals

Jura
Jura IMPRESSA Z7 User manual

Jura
Jura GIGA 5 User manual

Jura
Jura ENA 7 User manual

Jura
Jura IMPRESSA X7-S User manual

Jura
Jura GIGA W3 Professional Technical specifications

Jura
Jura J8 User manual

Jura
Jura IMPRESSA XF70 User manual

Jura
Jura GIGA 6 User manual

Jura
Jura 741 User manual

Jura
Jura ENA 3 User manual

Jura
Jura Professional fine foam frother User manual

Jura
Jura Z6 User manual

Jura
Jura IMPRESSA A5 One Touch Manual

Jura
Jura X7 User manual

Jura
Jura IMPRESSA X9 User manual

Jura
Jura IMPRESSA XF50 Classic User manual

Jura
Jura IMPRESSA J9.3 One Touch TFT User manual

Jura
Jura IMPRESSA X9 User manual

Jura
Jura GIGA X7 Professional User manual

Jura
Jura D6 User manual