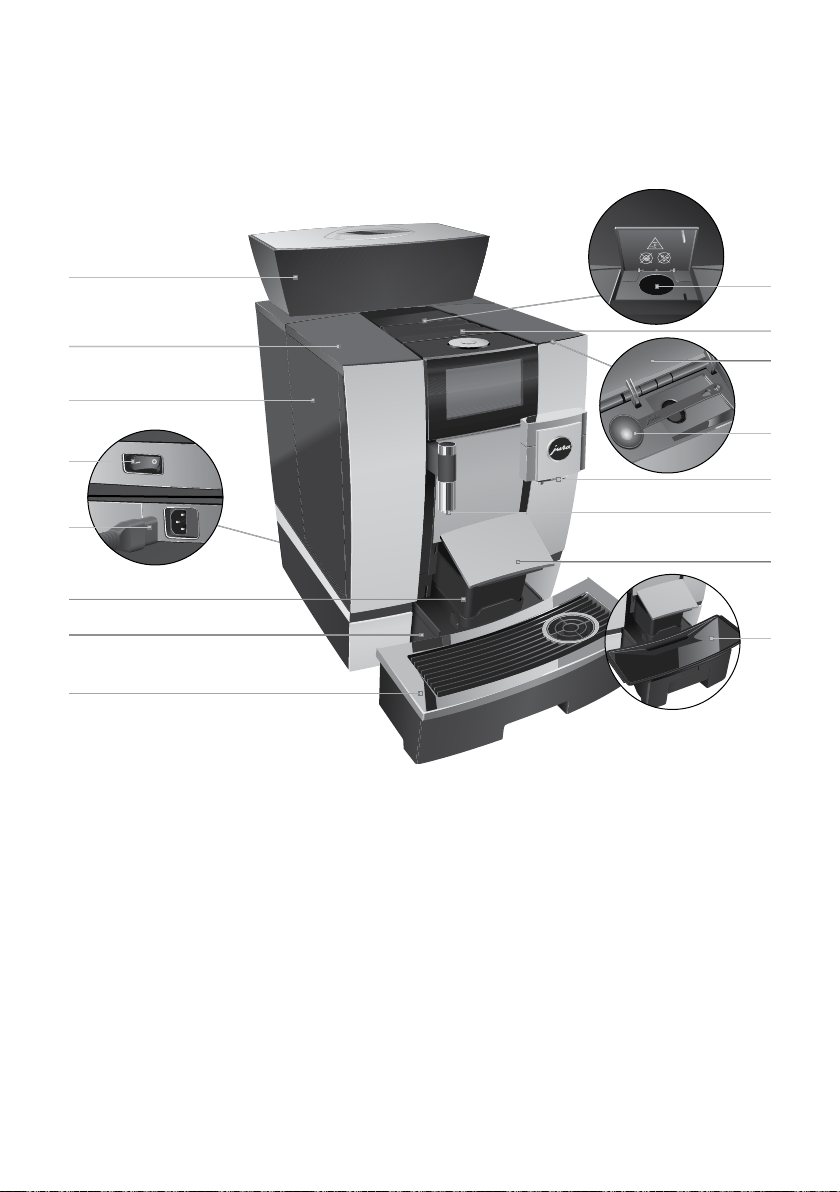
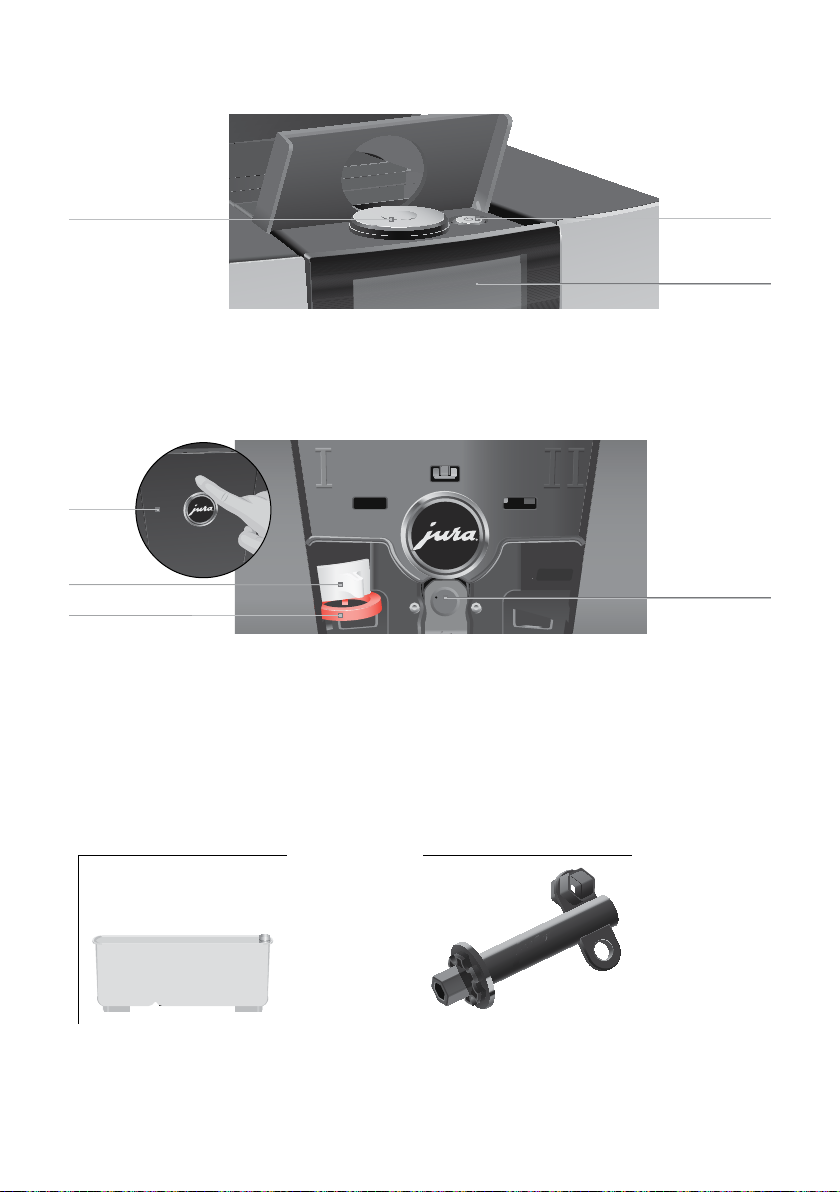
Jura GIGA X3C User manual

GIGA X3c Instructions for Use
JURA Type 753
KOriginal instructions for use
Before using the machine read the instructions for use.
E

2
Control elements 4
Important information 6
Proper use ......................................................................................................................................................6
For your safety...............................................................................................................................................6
1 Preparing and using for the first time 10
JURA on the Internet....................................................................................................................................10
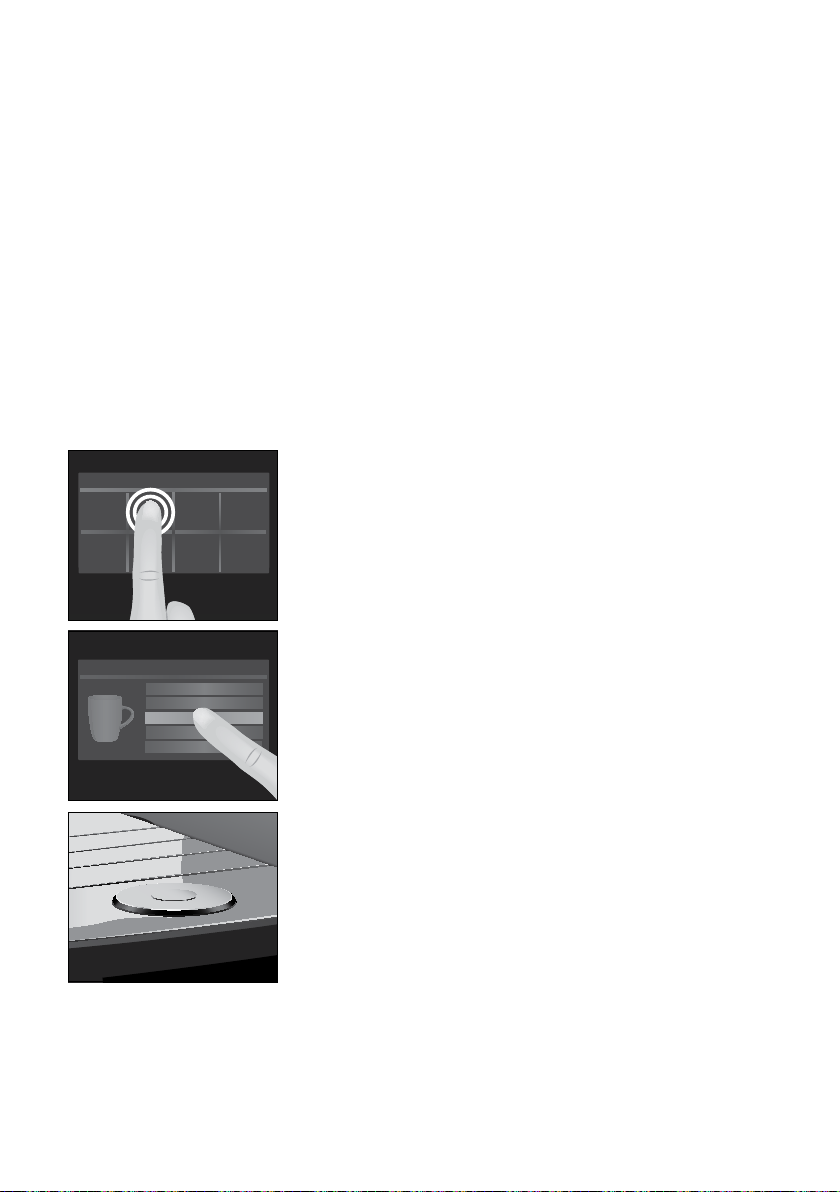
Operation with touchscreen display and Rotary Switch.......................................................................10
Requirements for first-time use .................................................................................................................11
Setting up the machine ...............................................................................................................................11
Filling the bean container............................................................................................................................11
Determining the water hardness ..............................................................................................................12
First-time use ................................................................................................................................................12
Connecting milk...........................................................................................................................................14
Settings by the service technician.............................................................................................................14
Connect accessory (with wireless connection) .......................................................................................15
2 Preparation 16
Ways of preparing a beverage ...................................................................................................................16
Preparing speciality coffees........................................................................................................................18
Preparing two speciality coffees................................................................................................................18
Preparing speciality coffees with milk......................................................................................................18
Caffè Barista and lungo Barista .................................................................................................................19
Ground coffee...............................................................................................................................................19
Hot water.......................................................................................................................................................21
3 Daily operation 22
Switching on the machine.........................................................................................................................22
Daily maintenance...................................................................................................................................... 22
Regular maintenance .................................................................................................................................23
Switching off the machine.........................................................................................................................23
4 Permanent settings in programming mode 24
Product settings ..........................................................................................................................................25
Setting the consistency of grind ..............................................................................................................27
Automatic switch-off.................................................................................................................................. 27
Time and date..............................................................................................................................................28
Timer .............................................................................................................................................................29
Setting the water hardness .......................................................................................................................29
Unit for amount of water / time format..................................................................................................30
Energy-saving mode ...................................................................................................................................31
Enabling and disabling functions..............................................................................................................31
Language...................................................................................................................................................... 32
Display brightness.......................................................................................................................................33
Restore factory settings .............................................................................................................................33
Querying information ................................................................................................................................34
Table of contents
Your GIGA X3c

3
Table of contents
5 Maintenance 35
Rinsing the machine...................................................................................................................................35
Automatic milk system rinsing.................................................................................................................35
Cleaning the milk system..........................................................................................................................36
Dismantling and rinsing the dual spout.................................................................................................36
Changing the filter......................................................................................................................................38
Cleaning the machine ................................................................................................................................39
Descaling the machine ..............................................................................................................................40
Cleaning the bean container.....................................................................................................................42
6 Display messages 43
7 Troubleshooting 44
8 Transport and environmentally friendly disposal 46
Transport/ Emptying the system.............................................................................................................46
Disposal.........................................................................................................................................................46
9 Technical data 47
10 Index 48
11 JURA contact details/ Legal information 52
Warnings
JWARNING
JCAUTION
Always take note of any information marked with the words CAUTION or
WARNING and a warning sign. The signal word WARNING draws your
attention to potential serious injury, and the signal word CAUTION to
potential minor injury.
CAUTION CAUTION draws your attention to potential damage to the machine.
Symbols used
TPrompt to take action. This symbol means that you are being prompted to
perform some action.
EInformation and tips to make it even easier to use your GIGA.
‘Espresso’ Display
Symbol description

4
Control elements
Control elements
2
8
10
14
13
11
3
12
16
15
7
6
19
4
5
1 Bean container with aroma preservation cover
2 Water tank cover
3 Water tank
4 Power switch (back of the machine)
5 Plug-in mains cable(back of the machine)
6 Coffee grounds container
7 Drip tray
8 Cup grille
9 Filler funnel for ground coffee
10 Ventilation slats (Venti Ports)
11 Storage compartment cover
12 Measuring spoon for ground coffee
13 Height-adjustable dual spout
14 Height-adjustable hot-water spout
15 Drip tray cover (pivoting)
16 Insert for drip tray

5
Control elements
1 Rotary Switch 2 On/Off button Q(under cover)
3 Touchscreen display
1
2
3
4
Back of the machine
1 Service cover(open by pressing with
your finger)
2 Locking device
3 Sliding catch
4 Service socket with JURA Smart Connect
Accessories
Container for milk system cleaning Spanner with hexagonal hole
(for milk system)
12
3

6
Important information
This machine is intended for use by specialist or
trained staff in businesses, light industry and agri-
cultural facilities or for commercial use by non-pro-
fessionals. It should only be used for coffee prepa-
ration and to heat milk and water. Use for any other
purpose will be deemed improper. JURA Elektroap-
parate AG cannot accept any responsibility for the
consequences of improper use.
Before using the machine read these instructions
for use thoroughly and completely and comply
with the instructions they contain. A warranty ser-
vice is not applicable for damage or defects caused
by non-compliance with the instructions for use.
Keep these instructions for use close to the machine
and pass them on to the next user.
The GIGA may only be operated by instructed per-
sons. Non-professionals must be supervised during
use.
Please carefully read and observe the important
safety information set out below.
To avoid danger of potentially fatal electric shock:
UNever use a machine which is damaged or has
a defective mains cable.
UIn the event of signs of damage, for example if
there is a smell of burning, unplug the machine
immediately from the power supply and con-
tact JURA service.
UIf the mains cable of this machine is damaged
it must be replaced with a special mains cable,
which is available directly from JURA or from
authorised JURA service centres.
Proper use
For your safety
J

7
Important information
UMake sure that the GIGA and the mains cable
are not located close to hot surfaces.
UBe careful to ensure that the mains cable is not
trapped and does not rub against sharp edges.
UNever open and repair the machine yourself.
Do not modify the machine in any way that is
not described in these instructions for use. The
machine contains live parts. If opened, there is
a danger of potentially fatal injury. Repairs
may only be carried out by authorised JURA
service centres, using original spare parts and
accessories.
UTo completely and safely disconnect the
machine from the power supply, first switch
off the GIGA using the On/Off button Qand
then at the power switch. Only then should
you remove the mains plug from the power
socket.
There is a risk of scalds or burns on the spouts.
UPlace the machine out of the reach of children.
UDo not touch any hot parts. Use the handles
provided.
UBe careful to ensure that the dual spout is cor-
rectly installed and clean. If it is incorrectly fit-
ted or becomes blocked, its parts might come
off. There is a danger of parts being swallowed.
A defective machine is not safe and could cause
injury or fire. To avoid damage and any associated
risk of injury or fire:
UNever allow the mains cable to loosely hang
down. The mains cable could pose a tripping
hazard or become damaged.
UProtect the GIGA from environmental influen-
ces such as rain, frost and direct sunlight.

8
Important information
UDo not immerse the GIGA, mains cable or con-
nections in water.
UDo not put the GIGA or any individual parts in
the dishwasher. Only the insert for the drip
tray, including the drip tray itself, and the cof-
fee grounds container are dishwasher-safe.
UBefore cleaning, switch the GIGA off with the
On/Off button Q. Always wipe the GIGA with a
damp cloth rather than a wet one, and protect
it from prolonged exposure to water splash.
UThe GIGA is not suitable for installation on a
surface where a jet of water can be used.
UThe machine must not be cleaned with a jet of
water.
UOnly connect the machine to the mains vol-
tage in accordance with the information on
the rating plate. The rating plate is located on
the underside of your GIGA. Further technical
data is provided in these instructions for use
(see Chapter 9 ‘Technical data’).
UConnect the GIGA directly to a domestic power
socket. Using multi-socket adapters or exten-
sion cords may cause overheating.
UDo not use alkaline cleaning agents; only use
a soft cloth and mild cleaning agents.
UPlease only use original JURA maintenance
products. Use of products that are not expli-
citly recommended by JURA could damage the
machine.
UDo not use any coffee beans treated with addi-
tives or caramelised coffee beans.
UOnly fill the water tank with fresh, cold water.
USwitch the machine off with the On/Off but-
ton Qif you are going to be absent for a longer

9
Important information
period of time and remove the mains plug
from the power socket.
UChildren may not clean or service the machine
unless supervised by a responsible person.
UDo not allow children to play with the machine.
UKeep children under the age of 8 away from
the machine, or supervise them constantly.
UChildren aged 8 and over may only operate
the machine without supervision if they have
been instructed in how to use it safely. Child-
ren must be able to recognise and understand
the potential dangers arising from incorrect
use.
People, including children, who
Udo not have the physical, sensory or mental
capabilities to use the machine safely or
Uare inexperienced or lack knowledge in how to
use the machine safely
must be supervised by a responsible person when
using it, or must be instructed in how to use it cor-
rectly.
Safety measures when working with the external
filter cartridge JURA:
UFilter cartridges should be kept out of the
reach of children.
UStore filter cartridges in a dry place in the
sealed packaging.
UProtect cartridges from heat and direct
sunlight.
UDo not use damaged filter cartridges.
UDo not open filter cartridges.

10
1 Preparing and using for the first time
Visit us on the Internet. You can download short operating instruc-
tions for your machine from the JURA website (jura.com). You will
also find interesting and up-to-date information on your GIGA and
on every aspect of coffee.
If you need assistance with using your machine, you can find this at
jura.com/service.
Your GIGA features an intuitive touchscreen display. There are two
ways of operating the touch display:
UTouch
Touch the display with your finger, for example to start coffee
preparation or undertake various settings in programming
mode.
USlide
Move your finger across the display from left to right or from
top to bottom (or vice versa). For example, you can select one
of the speciality coffees in the product selector view or switch
between programme items in programming mode.
Programming with Rotary Switch: Also use the Rotary Switch. As
soon as you turn it, the product selector view is displayed. Also navi-
gate through the programme items in programming mode and
change various settings.
JURA on the Internet
Operation with
touchscreen display and
Rotary Switch
>>
>>
>>
>>

11
1 Preparing and using for the first time
A few preparations are necessary before the JURA service technician
can set up your GIGA in your home. The following preparations must
be carried out by a professionally qualified person:
UThe mains connection for the GIGA must be protected by a
residual current device (RCD).
UThere must be a power switch to disconnect the power supply
to the GIGA.
UThe permanent water connection must have a shut-off valve
with a non-return valve (type EA) and filter.
UThe permanent water connection must comply with the spe-
cified technical data (see Chapter 9 ‘Technical data’).
UThe drain hose must be connected to a siphon.
EThese preparations must be carried out by a qualified person.
EThe preparations must be carried out before the JURA service
technician sets up your GIGA in your home.
When setting up your GIGA, please note the following:
UPlace the GIGA on a horizontal surface that is not sensitive to
water (minimum height of 80cm).
UChoose a spot for your GIGA which protects the machine
against overheating. Ensure that the ventilation slats are not
covered.
Coffee beans which have been treated with additives (e.g. sugar),
ground coffee or freeze-dried coffee will damage the grinder.
T Only use roasted, untreated coffee beans to fill the bean con-
tainer.
TRemove the aroma preservation cover.
TRemove any dirt or foreign objects from inside the bean
container.
TFill the bean container with coffee beans and close the
aroma preservation cover.
Requirements for
first-time use
Setting up the machine
Filling the bean container
CAUTION

12
1 Preparing and using for the first time
When you use the machine for the first time, you must set the water
hardness. If you do not know the hardness of your water, you can
find this out first. Use the Aquadur® test strips supplied with the
machine.
THold the test strip briefly (for 1second) under flowing water.
Shake off the water.
TWait for about 1minute.
TYou will then be able to read the degree of water hardness
from the discolouration of the Aquadur® test strip and the
description on the packaging.
EBefore the machine is used for the first time, the permanent
water connection must have been installed by a JURA service
technician.
If the machine is operated with a defective mains cable, there is a
danger of potentially fatal electric shock.
T Never use a machine which is damaged or has a defective
mains cable.
Precondition:The bean container has been filled.
TConnect the mains cable to the machine.
TInsert the mains plug into a power socket.
TSwitch on the GIGA using the power switch on the back of
the machine.
TOpen the cover of the On/Off button.
TPress the On/Off button Qto switch the GIGA on.
‘Sprachauswahl’ / ‘Deutsch’
ETo display more languages, move your finger either down-
wards or upwards in the selection list until the desired lan-
guage comes into focus (e.g. ‘English’).
Determining the water
hardness
First-time use
JWARNING

13
1 Preparing and using for the first time
TTouch ‘Save’.
‘Saved’ appears briefly on the display to confirm the setting.
‘Date’
TEnter the current date (format YYYY/MM/DD).
TTouch ‘Save’.
‘Saved’
‘Units’
TSelect the time format (‘24 hrs.’ or ‘AM / PM’).
TTouch ‘Save’.
‘Saved’
‘Time’
TEnter the current time.
TTouch ‘Save’.
‘Saved’
‘Filter operation’
EIf you are operating the GIGA with an external filter cartridge,
continue with this section. If you are using the GIGA without
a filter, please go to the next section (see Chapter 1 ‘Preparing
and using for the first time – First-time use without an exter-
nal filter cartridge’).
TTouch ‘Save’.
‘Saved’
‘Filter capacity in litres:’
TEnter the filter capacity of the external filter cartridge.
TTouch ‘Save’.
‘Saved’
‘System is filling’
‘Machine is heating’
‘Machine is rinsing’, the system is rinsed. The rinse stops
automatically. The start screen is displayed. Your GIGA is
ready for use.
TNow move your finger across the controller and set it to ‘0’.
TTouch ‘Save’.
‘Descaling mode’ / ‘Saved’
‘Water hardness’
First-time use without an
external filter cartridge

14
1 Preparing and using for the first time
EIf you do not know the hardness of your water, you must find
this out first (see Chapter 1 ‘Preparing and using for the first
time – Determining the water hardness’).
TMove your finger across the display to change the water
hardness setting, e.g. to ‘25°dH’.
TTouch ‘Save’.
‘Saved’
‘System is filling’
‘Machine is heating’
‘Machine is rinsing’, the system is rinsed. The rinse stops
automatically. The start screen is displayed. Your GIGA is
ready for use.
Your GIGA creates fine, creamy, feather-light milk foam with a per-
fect consistency. The most important requirement for frothing milk
is a milk temperature of 4– 8°C. We would therefore recommend
using a JURA milk cooler.
TConnect the milk pipe to the dual spout.To do this, attach
the end of the milk pipe to the connector on the right-hand
side of the dual spout.
TConnect the other end of the milk pipe to a milk cooler.
EYour GIGA is equipped with the HP3 milk system.
Your authorised JURA service technician can change various set-
tings, e.g.:
UCodes: Four codes can be assigned. For each code, you can
define which programme items are available or disabled. Each
code corresponds to different authorisations. For instance,
you can define that initiation of the maintenance program-
mes is disabled using a code.
UActivating/deactivating the ‘Silent Pump’ function (for prepa-
ring hot water)
UChoose not to display the red speedometer symbol for speed
speciality coffees on the start screen.
UActivating/deactivating the external filter cartridge (depen-
ding on the option which was selected when the machine was
first used)
Connecting milk
Settings by the service
technician

15
1 Preparing and using for the first time
You can also obtain the following optional accessories for your GIGA
from your JURA service partner:
UCoffee grounds disposal / drip drain set
ULockable bean container
Your GIGA is equipped with the JURA Smart Connect. This allows you
to connect the machine wirelessly to a compatible JURA accessory
(e.g. the Cool Control milk cooler).
A frequency band of 2.4 GHz is used for this wireless connection. In
this case, the maximum transmission power is below 1 mW.
EThe Smart Connect can be protected against unauthorised
access using a PIN. Activate the PIN function via J.O.E.®–
your JURA app. You will find more information at
jura.com/smartconnect.
EPlease note that you can only connect either the accessory or
J.O.E.®to the coffee machine via Smart Connect and not both
at the same time.
Precondition:The start screen is displayed.
TTouch ‘P’.
‘Maintenance status’
TMove your finger across the display until ‘Machine settings’
is displayed in the centre.
TTouch ‘Machine settings’.
‘Switch off after’
TMove your finger across the display until ‘Connect acces-
sory’ is displayed in the centre.
TTouch ‘Connect accessory’.
‘Connect accessory’
TNow follow the instructions on the display to connect the
accessory to the GIGA.
Connect accessory (with
wireless connection)

16
2 Preparation
2 Preparation
Basic information about preparing drinks:
UDuring the grinding operation you can change the coffee
strength of single products. To do this, move your finger
across the display or turn the Rotary Switch.
UDuring preparation you can change the preset amounts (e.g.
amount of water or milk foam). To do this, move your finger
across the display or turn the Rotary Switch.
UYou can stop preparation at any time. To do this, press the
‘Cancel’ button or the Rotary Switch.
Coffee tastes best served hot. A cold porcelain cup cools the beve-
rage – and impairs the taste. We therefore recommend prewarming
the cups. The full coffee aroma can develop only in prewarmed cups.
You can purchase a JURA cup warmer from your specialised dealer.
You can make permanent settings for all products in programming
mode (see Chapter 4 ‘Permanent settings in programming mode –
Adjusting the product settings’).
The GIGA offers various ways of preparing a speciality coffee, milk or
hot water.
Preparation using the start screen: Simply touch the desired pro-
duct. The following products are displayed as standard on the start
screen:
Page ‘1/2’ Page ‘2/2’
‘Espresso’
‘Coffee’
‘Caffè Barista’
‘Lungo Barista’
‘Hot water’
‘Cappuccino’
‘Latte macchiato’
‘Portion milk’
‘Jug of coffee’
‘Caffè latte’
‘Macchiato’
‘Flat White’
‘Hot water for green tea’
‘2x Espresso’
‘2x Coffee’
‘Portion milk foam’
Ways of preparing a
beverage

17
2 Preparation
Using the product selector view (Rotary Selection): Only some of
the products you can prepare are shown on the start screen. As soon
as you turn the Rotary Switch, more products are displayed in a pro-
duct selector view.
Turn the Rotary Switch or move your finger across the display to
bring the desired product into focus. Touch the product or press the
Rotary Switch to start preparation. The following additional pro-
ducts are shown in the product selector view:
U‘Ristretto’
U‘Special’
U‘Espresso doppio’
U‘Hot water for black tea’
U‘2x Ristretto’
U‘2x Special’
U‘2x Caffè Barista’
U‘2x Lungo Barista’
U‘2x Cappuccino’
U‘2x Latte macchiato’
U‘2x Macchiato’
U‘2x Flat White’
U‘2x Caffè latte’
U‘2x Portion milk’
U‘2x Portion milk foam’
EThe product selector view disappears automatically after
10seconds if no preparation is started.
EThe last product selected always appears first in the product
selector view.
EYou can move any of the standard products programmed in
your GIGA to your preferred position on the start screen and
make it one of your favourites. You can duplicate and perso-
nalise your favourite speciality coffees by giving them a new
product name and individual settings (e.g. amount and coffee
strength) (see Chapter 4 ‘Permanent settings in programming
mode – Product settings’). Please note that the descriptions
provided in the following sections always refer to the default
settings.

18
2 Preparation
Example:Proceed as follows to prepare one coffee.
Precondition:The start screen is displayed.
TPlace a cup under the dual spout.
TTouch ‘Coffee’.
Preparation starts. The preset amount of water for coffee
flows into the cup.
Preparation stops automatically. Your GIGA is once more
ready for use.
Example:Proceed as follows to prepare two ristretti (using product
selector view).
Precondition:The start screen is displayed.
TPlace two cups under the dual spout.
TTurn the Rotary Switch to view the product selector.
TMove your finger across the display until ‘2x Ristretto’ is dis-
played in the centre.
TTouch ‘2x Ristretto’ to start preparation.
Preparation starts. The preset amount of water for coffee
flows into the cups. Preparation stops automatically. Your
GIGA is once more ready for use.
Your GIGA prepares latte macchiato, cappuccino, flat white and
other speciality coffees with milk at the touch of a button. There is
no need to move the glass or cup.
Example:Proceed as follows to prepare one latte macchiato.
Precondition:The start screen is displayed. Milk is connected to the
dual spout.
TPlace a glass under the dual spout.
TTouch ‘Latte macchiato’.
‘Latte macchiato’, the preset amounts of milk and milk foam
flow into the glass.
EThere is a short interval while the hot milk separates from the
milk foam. This allows the typical layers of a latte macchiato
to form.
Preparing speciality
coffees
Preparing two speciality
coffees
Preparing speciality
coffees with milk

19
2 Preparation
Coffee preparation starts. The preset amount of water for
espresso flows into the glass. Preparation stops automati-
cally. Your GIGA is once more ready for use.
E15 minutes after preparation, the milk system is automatically
rinsed (see Chapter 5 ‘Maintenance – Automatic milk system
rinsing’).
To ensure that the milk system in the dual spout always works pro-
perly, you must clean it daily (see Chapter 5 ‘Maintenance – Cleaning
the milk system’).
For the ‘caffè Barista’ and ‘lungo Barista’, the GIGA blends the coffee
with hot water using a special preparation method. This results in a
full-bodied speciality coffee which is particularly easy to digest. You
can change the amount of this additional water (see Chapter 4 ‘Per-
manent settings in programming mode – Adjusting the product
settings’).
Products with a bypass amount of water setting are marked with a
red speedometer symbol in the start screen and in the product
selector.
EYour authorised JURA service technician can set the machine
so that the red speedometer symbol is not displayed next to
these ‘speed speciality coffees’.
EFor products with a set bypass amount of water, it is not pos-
sible to change the fill volume during the preparation process.
You can choose to use another coffee variety, for example decaffe-
inated coffee, with the filter funnel for ground coffee.
Basic information about ground coffee:
UNever add more than two level measuring spoons of ground
coffee.
UUse ground coffee which is not ground too finely. Very fine
coffee can block up the system so that the coffee only comes
out in drips.
UIf you did not fill the machine with a sufficient amount of
ground coffee, ‘Not enough ground coffee’ is displayed and
the GIGA stops the operation.
Caffè Barista and lungo
Barista
Ground coffee

20
2 Preparation
UThe desired speciality coffee must be prepared within appro-
ximately one minute after filling with the ground coffee.
Otherwise the GIGA stops the operation and is once more
ready for use.
UAll speciality coffees with ground coffee are always prepared
following the same model.
Example:Proceed as follows to prepare one coffee using ground
coffee.
Precondition:The start screen is displayed.
TPlace a cup under the dual spout.
TOpen the cover of the filler funnel for ground coffee.
‘Please add ground coffee’
TPlace one level measuring spoon of ground coffee into the
filler funnel.
TClose the cover of the filler funnel.
The speciality coffees you can prepare with ground coffee
are displayed.
TTouch ‘Coffee’.
Preparation starts. ‘Coffee’ and the fill volume are displayed.
The preset amount of water for coffee flows into the cup.
Preparation stops automatically. Your GIGA is once more
ready for use.
Other manuals for GIGA X3C
3
Table of contents
Other Jura Coffee Maker manuals

Jura
Jura GIGA X8c Configuration guide

Jura
Jura 765 User manual

Jura
Jura IMPRESSA XJ5 Professional User manual

Jura
Jura IMPRESSA F8 User manual

Jura
Jura IMPRESSA X30 User manual

Jura
Jura Impressa J6 User manual

Jura
Jura GIGA X8 Professional User manual

Jura
Jura IMPRESSA XJ9 Professional Guide

Jura
Jura 14011 User manual

Jura
Jura IMPRESSA C60 User manual

Jura
Jura ENA Micro 1 Manual

Jura
Jura IMPRESSA Z7 User manual

Jura
Jura J8 User manual

Jura
Jura GIGA X8 Professional User manual

Jura
Jura ENA 3 Installation guide

Jura
Jura GIGA User manual

Jura
Jura IMPRESSA Z9 One Touch TFT User manual

Jura
Jura IMPRESSA C50 User manual

Jura
Jura IMPRESSA F90 User manual

Jura
Jura X7 Manual