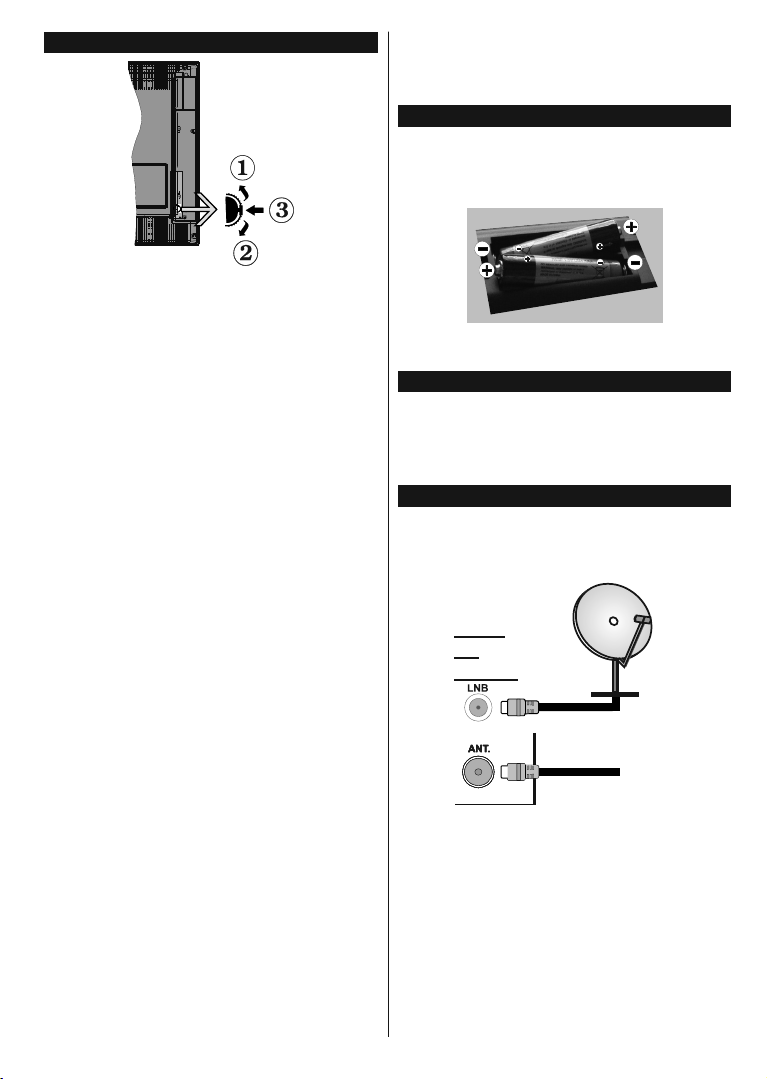
JVC 1016MTH-VT-VT User manual

07+9797
(1*/,6+
(63$f2/
32578*8Ç6
*(50$1
ý(â7,1$
6/29(1ý,1$
0$*<$5
6+4,3
ȺɇȽɅɂɃɋɄɂ
%26$16.,
)5$1d$,6
,7$/,$12
,16758&7,216
/&'79
,16758&&,21(6
79/&'
,16758d®(6
79/&'
%(',(181*6$1/(,781*
/&'79
32.<1<
/&'79
,1â758.&,(
/&'79
87$6Ë7È62.
/&'79
8'+É=,0(7
79/&'
ɂɇɋɌɊɍɄɐɂɂ
/&'ɬɟɥɟɜɢɡɨɪ79
8387679$
/&'79
,16758&7,216
7pOpYLVHXU/&'
,6758=,21,
79/&'

English - 1 -
Dear Customer,
This apparatus is in conformance with the valid European directives and standards regarding electromagnetic compatibility
and electrical safety.
European representative of the manufacturer is:
Vestel Germany GmbH
Parkring 6
85748 Garching b.München
Germany
Information for Users on Disposal of Old Equipment and Batteries
[European Union]
These symbols indicate that the electrical and electronic equipment and the battery with this
symbol should not be disposed of as general household waste at its end-of-life. Instead, the
products should be handed over to the applicable collection points for the recycling of electrical
and electronic equipment as well as batteries for proper treatment, recovery and recycling in
accordance with your national legislation and the Directive 2012/19/EU and 2013/56/EU.
By disposing of these products correctly, you will help to conserve natural resources and will help
to prevent potential negative effects on the environment and human health which could otherwise
be caused by inappropriate waste handling of these products.
For more information about collection points and recycling of these products, please contact your
ORFDOPXQLFLSDORI¿FH\RXUKRXVHKROGZDVWHGLVSRVDOVHUYLFHRUWKHVKRSZKHUH\RXSXUFKDVHG
the product.
Penalties may be applicable for incorrect disposal of this waste, in accordance with national legislation.
[Business users]
If you wish to dispose of this product, please contact your supplier and check the terms and
conditions of the purchase contract.
[Other Countries outside the European Union]
These symbols are only valid in the European Union.
The battery in this product is 2X AAA 1.5V Cell.
This batteries are located in the remote and are readily accessible.
Contact your local authority to learn about disposal and recycling.
The product and packaging should be taken to your local collection point for recycling.
Some collection points accept products free of charge.
Notice:
The sign Pb below
the symbol for
batteries indicates
that this battery
contains lead.
Battery
Pb

English - 2 -
Logo & License
TRADEMARK ACKNOWLEDGMENT
Manufactured under license from Dolby Laboratories. Dolby and the double-D symbol are trademarks of Dolby
Laboratories.
7KHWHUPV+'0,DQG+LJK'H¿QLWLRQ0XOWLPHGLD,QWHUIDFHDQGWKH+'0,/RJRDUHWUDGHPDUNVRUUHJLVWHUHGWUDGHPDUNV
of HDMI Licensing LLC in the United States and other countries.
DVB is a registered trademark of the DVB Project.
For DTS patents, see http://patents.dts.com. Manufactured under license from DTS Licensing Limited. DTS, the
Symbol, & DTS and the Symbol together are registered trademarks, and DTS TruSurround is a trademark of DTS,
Inc.©DTS, Inc. All Rights Reserved.
For DTS patents, see http://patents.dts.com. Manufactured under license from DTS Licensing Limited. DTS, the
Symbol, & DTS and the Symbol together are registered trademarks, and DTS 2.0+Digital Out is a trademark of DTS,
Inc.©DTS, Inc. All Rights Reserved.
For DTS patents, see http://patents.dts.com. Manufactured under license from DTS Licensing Limited. DTS,
DTS-HD, the Symbol, & DTS or DTS-HD and the Symbol together are registered trademarks of DTS, Inc.©
DTS, Inc. All Rights Reserved.
³7KLVSURGXFWLVPDQXIDFWXUHGGLVWULEXWHGDQGZDUUDQWHGH[FOXVLYHO\E\9(67(/7LFDUHW$ù
and serviced by its designated service providers. “JVC” is the trademark of
JVC KENWOOD Corporation, used by such companies under licence.”

English - 3 -
Safety Information
Mains Supply
This television is designed to operate from a 220-240 Volts 50Hz AC mains supply. Other power sources
may damage it. Check that the rating plate (on the back cover of the television) states 220-240V AC before
\RXSOXJLWLQIRUWKH¿UVWWLPH7KHPDQXIDFWXUHUDFFHSWV12OLDELOLW\IRUGDPDJHRULQMXU\FDXVHGE\XVLQJWKH
product with the wrong mains voltage.
Mains Plug
:HKDYH¿WWHGWKLVWHOHYLVLRQZLWKDVWDQGDUGPDLQVSOXJ
If the mains lead is damaged it must be replaced with a mains lead of the same type and rating to avoid a
hazard.
If for any reason you cut off the mains plug, please destroy the old plug as it would be dangerous if inserted
into a live power outlet. Carefully follow the wiring instructions supplied with the new plug.
,IDIXVHLV¿WWHGWRWKHSOXJUHPRYHWKHIXVHEHIRUHWKURZLQJWKHSOXJDZD\
Never use a fused mains plug without the fuse cover.
The mains plug shall be the main disconnect device and should be accessible at all times.
Dangerous voltage constituting a risk
of electric shock is present inside this
equipment.
This equipment is double insulated and an
earth connection is not required.
These marks are applied
to show the equipment
conforms to European
safety and electro-magnetic
compatibility standards.
Safe use and care of your television
We have designed and made this television to meet European Safety Standards, but as with any electronic
equipment you must take care to stay safe and get the best results. Here is some good advice to help you do this.
Read these instructions carefully before you try to use the television.
Protect the mains lead. You must ensure the mains lead cannot be walked on, crushed, chafed, cut or trapped.
Switch off the mains power or pull out the mains plug when you leave the television unattended, unless the
function of the television requires a continuous power supply.
Do not continue to use your television if you have spilt liquids in it, if it is damaged in any way or if it does not
work normally. Immediately unplug the television and get expert advice.
Avoid harsh conditions such as wet or damp places, high humidity, strong vibration, extremely high or low
temperatures, strong sunlight and places that are very dusty.
1HYHU¿WPDNHVKLIWVWDQGVRUOHJVWRWKHWHOHYLVLRQ
Never push objects into holes and ventilation slots.
To prevent electric shock do not remove any cover.

English - 4 -
Safety Information (cont)
Do not touch the LCD display as it gets warm when in use, this is normal and is not a fault.
,IDQ\WKLQJJRHVZURQJGRQRWWU\WR¿[LW\RXUVHOIJHWDTXDOL¿HGVHUYLFHDJHQWWRORRNDWLW
Pull out the mains plug and disconnect the aerial lead during thunder storms.
CAUTION: Connect headphones with the volume set low and increase if required. Prolonged listening through
headphones at high volume settings can result in hearing damage.
Ventilation
3ODFHWKHWHOHYLVLRQRQDKDUGÀDWVXUIDFHDZD\IURPGLUHFWVXQOLJKWRUKHDWVRXUFHV,ILWLVLQDFDELQHWDOORZ
at least a 10cm gap all around. Do not obstruct the ventilation slots, including those underneath with soft
furnishings.
2YHUKHDWLQJZLOOVKRUWHQWKHOLIHRIWKHWHOHYLVLRQDQGLQFUHDVHWKHULVNRI¿UH
Cleaning
Disconnect the mains supply and use only a lightly dampened soft cloth. Do not use chemical solvents or
strong detergents as these may damage the cabinet or screen.
Never allow water droplets to remain on the screen as moisture can cause permanent discolouration.
*UHDV\PDUNVPXVWRQO\EHUHPRYHGZLWKDFRPPHUFLDOFOHDQHUVSHFL¿FDOO\UHFRPPHQGHGIRU/&'VFUHHQV
Eye Fatigue
When using this product as a computer monitor, health and safety experts recommend short frequent breaks
rather than occasional longer breaks. For example a 5-10 minute break after an hour of continuous screen
work is considered to be better than a 15 min break every 2 hours.
Do not use the monitor against a bright background or where sunlight or other bright light sources will shine
directly onto the screen.
Batteries
Remove batteries when the remote control is not to be used for a long time. Batteries left in equipment may
cause damage through deterioration and corrosive leakage, invalidating the guarantee.
To protect the environment use local recycling facilities for battery disposal.
Dispose of used batteries according to the instructions.
CAUTION: Risk of explosion if batteries are replaced by an incorrect type.
WARNINGS:
This appliance is intended for domestic household use only and should not be used for any other purpose
or on any other application, such as for non-domestic use or use in a commercial environment.
,IWKHVXSSO\FRUGLVGDPDJHGLWPXVWEHUHSODFHGE\WKHPDQXIDFWXUHULWVVHUYLFHDJHQWRUVLPLODUO\TXDOL¿HG
persons in order to avoid a hazard.
7KLVDSSDUDWXVVKDOOQRWEHH[SRVHGWRGULSSLQJRUVSODVKLQJ1RREMHFWV¿OOHGZLWKOLTXLGVVXFKDVYDVHV
shall be placed on the apparatus.
1RQDNHGÀDPHVRXUFHVVXFKDVOLJKWHGFDQGOHVVKRXOGEHSODFHGRQWKHDSSDUDWXV
The ventilation should not be impeded by covering the ventilation openings with items, such as newspapers,
tablecloths, curtains etc.
:$51,1*7RSUHYHQWLQMXU\WKLVDSSDUDWXVPXVWEHVHFXUHO\DWWDFKHGWRWKHÀRRUZDOOLQDFFRUGDQFHZLWK
the installation instructions.
This apparatus is not suitable for use in a tropical climate.

English - 5 -
WARNING
7RSUHYHQW¿UHQHYHUSODFH
any type of candle or open
ÀDPH RQ WKH WRS RU QHDU
the TV set.
Accessories Included
Remote Control
Batteries: 2 x AAA
Side AV Connection Cable
Contents
Accessories Included............................................. 5
Wall mounting instructions..................................... 6
TV Control Switch & Operation.............................. 7
Inserting the Batteries into the Remote ................. 7
Antenna Connection.............................................. 7
Remote Control ..................................................... 8
Switching On/Off.................................................... 9
First Time Installation............................................. 9
E-Manual (if available)......................................... 10
Connectivity ........................................................ 10

English - 6 -
Wall mounting instructions
Wall Mounting the TV
The TV can be mounted on a wall using a MXX*X mm (*) VESA mounting kit supplied separately. Remove
the base stand as shown. Mount the TV according to the instructions supplied with the kit. Beware of electrical
FDEOHVJDVDQGZDWHUSLSHVLQWKHZDOO,QFDVHRIDQ\GRXEWSOHDVHFRQWDFWDTXDOL¿HGLQVWDOOHU7KHVFUHZ
thread length must not exceed Xmm (*) into the TV. Contact the store where you purchased the product for
information on where to purchase the VESA kit.
(*)5HIHUWRWKHUHODWHGDGGLWLRQDOSDJHIRUWKHDFFXUDWH9(6$PHDVXUHPHQWVDQGVFUHZVSHFL¿FDWLRQV
Removing the base stand
7RUHPRYHWKHEDVHVWDQGSURWHFWWKHVFUHHQDQGOD\WKH79ÀDWRQLWVIDFHRQDVWDEOHWDEOHZLWKWKHEDVH
RYHUWKHHGJH5HPRYHWKHVFUHZV¿[LQJWKHVWDQGWRWKH79
-or-

English - 7 -
TV Control Switch & Operation
1. Up direction
2. Down direction
3. Volume / Info / Sources List selection and
Standby-On switch
The Control button allows you to control the Volume
/ Programme / Source and Standby-On functions of
the TV.
To change volume: Increase the volume by pushing
the button up. Decrease the volume by pushing the
button down.
To change channel: Press the middle of the button,
the information banner will appear on the screen.
Scroll through the stored channels by pushing the
button up or down.
To change source: Press the middle of the button
twice(for the second time in total), the source list will
appear on the screen. Scroll through the available
sources by pushing the button up or down.
To turn the TV off: Press the middle of the button
down and hold it down for a few seconds, the TV will
turn into standby mode.
Notes:
If you turn the TV off, this circle starts again
beginning with the volume setting.
Main menu OSD cannot be displayed via control
button.
Operation with the Remote Control
Press the Menu button on your remote control to
display main menu screen. Use the directional buttons
to select a menu tab and press OK to enter. Use the
directional buttons again to select or set an item. Press
Return/Back or Menu button to quit a menu screen.
Input Selection
Once you have connected external systems to your
TV, you can switch to different input sources. Press the
Source button on your remote control consecutively
to select the different sources.
Changing Channels and Volume
You can change the channel and adjust the volume
by using the Volume +/- and Programme +/- buttons
on the remote.
Inserting the Batteries into the Remote
Lift the cover on the back of the remote gently. Insert
two AAA batteries. Make sure the (+) and (-) signs
match (observe correct polarity). Place the cover
back on.
Batteries should not be exposed to excessive heat
VXFKDVVXQVKLQH¿UHRUWKHOLNH
Connect Power
IMPORTANT: The TV set is designed to operate on
220-240V AC, 50 Hz socket. After unpacking, allow
the TV set to reach the ambient room temperature
before you connect the set to the mains. Plug the
power cable to the mains socket outlet.
Antenna Connection
Connect the aerial or cable TV plug to the AERIAL
INPUT (ANT) socket or satellite plug to the SATELLITE
INPUT (LNB) socket(*) located on the back of the TV.
satellite(*)
REAR
OF
THE TV
aerial
or
cable
(*) if available

English - 8 -
Remote Control
1. Standby: Switches On / Off the TV
2. TV: Displays channel list / Switches to TV Source
3. Volume +/-
4. Menu: Displays TV menu
5. OK: &RQ¿UPVXVHUVHOHFWLRQVKROGVWKHSDJHLQ7;7
mode), views channel list (DTV mode)
6. Back/Return: Returns to previous screen, opens index
page (in TXT mode)
7. Info: Displays information about on-screen content,
shows hidden information (reveal - in TXT mode)
8. YouTube: Launches the YouTube application
9. My button 2 (*)
10. Language: Switches among sound modes (analogue
TV), displays and changes audio/subtitle language
(digital TV, where available)
11. Rapid reverse: Moves frames backwards in media
such as movies
12. Record: Records programmes(**)
13. Play: Starts to play selected media
14. Coloured Buttons: Follow the on-screen instructions
for coloured button functions
15. Stop: Stops the media being played
16. Pause: Pauses the media being played, starts timeshift
recording(**)
17. Rapid advance: Moves frames forward in media such
as movies
18. Subtitles: Turns subtitles on and off (where available)
19. Screen: Changes the aspect ratio of the screen
20. Text: Displays teletext (where available), press again
to superimpose the teletext over a normal broadcast
picture (mix)
21. Media browser: Opens the media browsing screen
22. EPG (Electronic programme guide): Displays the
electronic programme guide
23. Exit: Closes and exits from displayed menus or returns
to previous screen
24. Directional buttons: Helps navigate menus, content
etc. and displays the subpages in TXT mode when
pressed Right or Left
25. Quick Menu: Displays a list of menus for quick access
26. Internet: Opens the portal page, where you can reach
many web based applications
27. Programme +/-
28. Mute: Completely turns off the volume of the TV
29. Swap: Quickly cycles between previous and current
channels or sources
30. Numeric buttons: Switches the channel, enters a
number or a letter in the text box on the screen.
31. Source: Shows all available broadcast and content
sources
32. NetÀix:/DXQFKHVWKH1HWÀL[DSSOLFDWLRQLIWKLVIHDWXUH
is supported by your TV
(**) If this feature is supported by your TV
Footnote:
Red, green, blue and yellow buttons are multifunction;
please follow on-screen prompts and section instructions.
(*) MY BUTTON:
This button may have a default function depending on the
model. However you can set a special function to this button
E\SUHVVLQJRQLWIRU¿YHVHFRQGVZKHQRQDGHVLUHGVRXUFH
RU FKDQQHO$ FRQ¿UPDWLRQ PHVVDJH ZLOO EH GLVSOD\HG RQ
the screen. Now the MY BUTTON is associated with the
selected function.
Note that if you perform First Time Installation, MY BUTTON
will return to its default function.
Teletext Services
Press the Text button to enter. Press again to activate mix
mode, which allows you to see the teletext page and the
TV broadcast at the same time. Press once more to exit. If
available, sections in the teletext pages will become colour-
coded and can be selected by pressing the coloured buttons.
Follow the instructions displayed on the screen.
Digital Teletext
Press the Text button to view digital teletext information.
Operate it with the coloured buttons, cursor buttons and the
OK button. The operation method may differ depending on
the contents of the digital teletext. Follow the instructions
displayed on the digital teletext screen. When the Text button
is pressed again, the TV returns to television broadcast.

English - 9 -
Switching On/Off
To Switch the TV On
Connect the power cord to the 220-240V AC, 50 Hz.
To switch on the TV from standby mode either:
Press the “ - (Standby)” button, “P+/P- -(Pro-
gramme +/-)” or a numeric button on the remote
control.
3UHVVWKHVLGHIXQFWLRQVZLWFKEULHÀ\VRWKDWWKH79
comes on from standby.
To Switch the TV Off
Press the “ - (Standby)” button on the remote
control or press the side function switch until the TV
switches into standby mode.
To power down the TV completely, unplug the
power cord from the mains socket.
Note: When the TV is switched into standby mode, the
standby LED can blink to indicate that features such as
6WDQGE\6HDUFK2YHU$LU'RZQORDGRU7LPHULVDFWLYH7KH
LED can also blink when you switch on the TV from standby
PRGH
First Time Installation
When turned on for the first time, the language
selection screen is displayed. Select the desired
language and press OK.
On the next screen, set your preferences using the
directional buttons.
Note: Depending on the Country selection you may be asked
WRVHWDQGFRQ¿UPD3,1DWWKLVSRLQW7KHVHOHFWHG3,1FDQQRW
EH<RXKDYHWRHQWHULWLI\RXDUHDVNHGWRHQWHUD3,1
IRUDQ\PHQXRSHUDWLRQODWHU
About Selecting Broadcast Type
Digital Aerial: If Digital Aerial broadcast search
option is turned on, the TV will search for digital
terrestrial broadcasts after other initial settings are
completed.
Digital Cable: If Digital Cable broadcast search
option is turned on, the TV will search for digital cable
broadcasts after other initial settings are completed.
$FFRUGLQJWR\RXURWKHUSUHIHUHQFHVDFRQ¿UPDWLRQ
message may be displayed before starting to search.
Select YES and press OK to proceed. To cancel
operation, select NO and press OK. You can select
Network or set values such as Frequency, Network
ID and Search Step.:KHQ¿QLVKHGSUHVVOK button.
Note: Searching duration will change depending on the
selected Search Step
Satellite(**): If Satellite broadcast search option
is turned on, the TV will search for digital satellite
broadcasts after other initial settings are completed.
Before satellite search is performed some settings
should be made. Antenna Type menu will be
GLVSOD\HG ¿UVW <RX FDQ VHOHFW Antenna Type as
Direct, Single Satellite Cable or DiSEqC switch by
using “ ” or “ ” buttons.
Direct: If you have a single receiver and a direct
satellite dish, select this antenna type. Press OK to
continue. Select an available satellite on the next
screen and press OK to scan for services.
Single Satellite Cable: If you have multiple
receivers and a single satellite cable system, select
this antenna type. Press OKWRFRQWLQXH&RQ¿JXUH
settings by following instructions on the next screen.
Press OK to scan for services.
DiSEqC switch: If you have multiple satellite dishes
and a DiSEqC switch, select this antenna type.
Press OK to continue. You can set four DiSEqC
options (if available) on the next screen. Press OK
EXWWRQWRVFDQWKH¿UVWVDWHOOLWHLQWKHOLVW
(**) If this feature is supported by your TV
Analogue: If Analogue broadcast search option is
turned on, the TV will search for analogue broadcasts
after other initial settings are completed.
Additionally you can set a broadcast type as your
favourite one. Priority will be given to the selected
broadcast type during the search process and the
channels of it will be listed on the top of the Channel
List:KHQ¿QLVKHGSUHVVOK to continue.
You can activate Store Mode option at this point.
7KLVRSWLRQZLOOFRQ¿JXUH\RXU79¶VVHWWLQJVIRUVWRUH
environment and depending on the TV model being
used, the supported features of it may be displayed
on the top of the screen as an info banner. This option
is intended only for store use. It is recommended to
select Home Mode for home use. This option will be
available in System>Settings>More menu and can
be turned off/on later.
Press OK button on the remote control to continue
and the Network/Internet Settings menu will be
GLVSOD\HG LI \RX FRQ¿UP WKH SUHYLRXVO\ GLVSOD\HG
message asking whether you want to do the network
settings. Please refer to Connectivity section to
FRQ¿JXUHDZLUHGRUDZLUHOHVVFRQQHFWLRQ$IWHUWKH
settings are completed press OK button to continue.
To skip to the next step without doing anything select
No and press the OK button when the message is
displayed asking whether you want to do the network
settings.
After the initial settings are completed TV will start
to search for available broadcasts of the selected
broadcast types.
After all the available stations are stored, scan results
will be displayed. Press OK to continue. The Edit
Channel List menu will be displayed next. You can
edit the channel list according to your preferences or
press the Menu button to quit and watch TV.

English - 10 -
While the search continues a message may appear,
asking whether you want to sort channels according
to the LCN(*). Select Yes and press OK WRFRQ¿UP.
(*) /&1LVWKH/RJLFDO&KDQQHO1XPEHUV\VWHPWKDWRUJDQL]HV
DYDLODEOH EURDGFDVWV LQ DFFRUGDQFH ZLWK D UHFRJQL]DEOH
FKDQQHOQXPEHUVHTXHQFHLIDYDLODEOH
Note: 'R QRW WXUQ RII WKH 79 ZKLOH LQLWLDOL]LQJ ILUVW WLPH
LQVWDOODWLRQ1RWH WKDW VRPHRSWLRQVPD\ QRWEHDYDLODEOH
GHSHQGLQJRQWKHFRXQWU\VHOHFWLRQ
Using SatcoDX Feature (**)
You can perform SatcoDX operations using the
Installation>Satelite Settings menu. In the SatcoDX
menu, there are two options regarding to the SatcoDx.
You can download or upload SatcoDX data. In order
to perform these functions a USB device must be
connected to the TV.
You can upload current services and related satellites
& transponders in TV, to a USB device.
Additionally you can download one of the SatcoDx
¿OHVVWRUHGLQ86%GHYLFHWRWKH79
:KHQ\RXVHOHFWRQHRIWKHVH¿OHVDOOVHUYLFHVDQG
related satellites and transponders in the selected
¿OHZLOOEHVWRUHGLQWKH79,IWKHUHDUHDQ\LQVWDOOHG
terrestrial, cable and/or analog services, they will be
kept and only satellite services will be removed.
Afterwards, check your antenna settings and make
changes if necessary. An error message stating “No
Signal” may be displayed if the antenna settings are
QRWFRQ¿JXUHGSURSHUO\
(**) If this feature is supported by your TV
E-Manual (if available)
<RX FDQ ¿QG LQVWUXFWLRQV IRU \RXU 79¶V IHDWXUHV LQ
the E-Manual.
To use E-Manual, press to the Info button while main
menu is displayed on the screen or press Quick Menu
button, select Information Booklet and press OK.
By using the directional buttons select a desired
category. Every category includes different topics.
Select a topic and press OK to read instructions.
To close the E-Manual screen press the Exit or Menu
button.
Note: The contents of the E-Manual may vary according to
WKHPRGHO
For further information and more detailed instructions,
refer to the complete user manual on our website
ZZZMYFWYHX
Connectivity
To Connect to a Wired Network
You must have a modem/router connected to an
active broadband connection.
Ensure that Nero Media Home software is installed
to your PC (for Audio Video Sharing function). See
“Nero Media Home Installation” section.
Connect your PC to your modem/router. This can
be a wired or wireless connection.
Connect your TV to your modem/router via an
ethernet cable. There is a LAN port at the rear
(back) of your TV.
Broadband ISP connection
LAN (ethernet) cable
LAN input on the rear
side of the TV
7RDFFHVVDQGSOD\VKDUHG¿OHV\RXPXVWVHOHFWWKH
Media Browser. Press the Menu button and select
Media Browser. Press OK to continue. Select the
GHVLUHG¿OHW\SHDQGSUHVVOK. You must always
use the Media Browser screen to access and play
VKDUHGQHWZRUN¿OHV
PC/HDD/Media Player or any other devices that are
compatible should be used with a wired connection
for higher playback quality.
To configure wired settings please refer to
the Network/Internet Settings section in the
System>Settings Menu.
You might be able to connect your TV to your LAN
GHSHQGLQJRQ\RXUQHWZRUN¶VFRQ¿JXUDWLRQ,QVXFK
a case, use an ethernet cable to connect your TV
directly to the network wall outlet.

English - 11 -
LAN input on the rear
side of the TV
network
wall socket
Wireless Connectivity
To Connect to a Wireless Network
The TV cannot connect to the networks with a hidden
66,'7RPDNH\RXUPRGHP¶V66,'YLVLEOH\RXVKRXOG
FKDQJH\RXU66,'VHWWLQJVYLDWKHPRGHP¶VVRIWZDUH
To Connect to a wireless LAN, you should perform
the following steps:
1. Ensure that Nero Media Home software is
installed to your PC (for Audio Video Sharing
function).
2. 7RFRQ¿JXUH\RXUZLUHOHVVVHWWLQJVSOHDVHUHIHU
to the Network/Internet Settings section in the
System>Settings Menu.Broadband
ISP
connection
Con¿guring Wireless Device Settings
Open the Network/Internet Settings menu and select
Network Type as Wireless Device to start connection
process.
The TV will scan the wireless networks automatically.
A list of available networks will be displayed. Please
select your desired network from the list.
Note: ,I WKH PRGHP VXSSRUWV 1 PRGH \RX VKRXOG VHW 1
PRGHVHWWLQJV
If the selected network is protected with a password,
please enter the correct key by using the virtual
keyboard. You can use this keyboard via the directional
buttons and the OK button on the remote control.
Wait until the IP address is shown on the screen.
This means that the connection is now established.
To disconnect from a wireless network, highlight
Network Type and press Left or Right buttons to set
as Disabled.
Highlight Internet Speed Test and press the OK button
to check your internet connection speed. Highlight
Advanced Settings and press the OK button to open
the advanced setting menu. Use directional and numeric
buttons to set. Press the OK button to save settings
when complete.
Other Information
The status of the connection will be displayed as
Connected or Not Connected and the current IP
address, if a connection is established.
Connecting to your mobile device via WiFi
If your mobile device has WiFi feature, you can connect
it to your TV via a router, in order to access the content
in your device. For this, your mobile device must have
an appropriate sharing software.
Connect to your router following the steps stated above
in the Wireless Connectivity section.
Afterwards, engage your mobile device with the router
and then activate the sharing software on your mobile
GHYLFH7KHQ VHOHFW ¿OHV WKDW\RX ZDQW WR VKDUH ZLWK
your TV.
If the connection is established correctly, you will be
DEOHWRDFFHVVWKHVKDUHG¿OHVIURP\RXUPRELOHGHYLFH
via the Media Browser of your TV.
Enter the Media Browser menu and the playback
device selection OSD will be displayed. Select your
mobile device and press the OK button to continue.
If available, you can download a virtual remote
controller application from the server of your mobile
device application provider.
Note: This feature may not be supported on all mobile
GHYLFHV
Wireless Display(**)
Wireless Display is a standard for streaming video and
sound content by Wi-Fi Alliance. This feature provides
the ability to use your TV as wireless display device.
Using with mobile devices
There are different standards which enable sharing of
screens including graphical, video and audio content
between your mobile device and TV.
3OXJWKHZLUHOHVV86%GRQJOHWR79 ¿UVWLIWKH79
GRHVQ¶WKDYHLQWHUQDO:L)LIHDWXUH
Then press the Source button on the remote and
switch to Wireless Display source.
A screen appears stating that the TV is ready for
connection.
Open the sharing application on your mobile device.
These applications are named differently for each

English - 12 -
brand, please refer to the instruction manual of your
mobile device for detailed information.
Scan for devices. After you select your TV and
connect, the screen of your device will be displayed
on your TV.
Note: This feature can be used only if the mobile device
VXSSRUWVWKLVIHDWXUH6FDQQLQJDQGFRQQHFWLQJSURFHVVHV
GLIIHUDFFRUGLQJWRWKHSURJUDPPH\RXXVH$QGURLGEDVHG
PRELOH GHYLFHV VKRXOG KDYH WKH VRIWZDUH YHUVLRQ 9
DQGDERYH
(**) If this feature is supported by your TV
Connecting Other Wireless Devices(**)
Your TV supports another short range wireless
connection technology too. A pairing is required before
using these kind of wireless devices with the TV set.
You should do the followings to pair your device with
the TV:
Set the device to pairing mode
Start device discovery on the TV
Note: Refer to the user manual of the wireless device to learn
KRZWRVHWWKHGHYLFHWRSDLULQJPRGH
For audio devices you should use the Audio
Link option in the System>Sound menu, for
remote controllers the Smart Remote option in the
System>Settings>More menu. Select the menu
option and press the OK button to open the related
menu. Using this menu you can discover and connect
the devices that use the same wireless technology and
start to use them. Follow the on-screen instructions.
(**) If this feature is supported by your TV
Using Audio Video Sharing Network Service
Audio Video Sharing feature uses a standard that eases
the viewing process of digital electronics and makes
them more convenient to use on a home network.
This standard allows you to view and play photos, music
and videos stored in the media server connected to your
home network.
1. Nero Media Home Installation
The Audio Video Sharing feature cannot be used if the
server programme is not installed onto your PC or if
the required media server software is not installed
onto the companion device. Please prepare your PC
with the Nero Media Home programme. For more
information about the installation, please refer to the
“Nero Media Home Installation” section.
2. Connect to a Wired or Wireless Network
See the Wired/Wireless Connectivity chapters for
GHWDLOHGFRQ¿JXUDWLRQLQIRUPDWLRQ
3. Play Shared Files via Media Browser
Select Media Browser by using the directional buttons
from the main menu and press OK. The media browser
will then be displayed.
Nero MediaHome Installation
To install Nero MediaHome, please proceed as
follows:
Note: The Audio Video Sharing feature cannot be used if
WKH VHUYHU SURJUDPPH LV QRW LQVWDOOHG RQWR \RXU 3& RU LI
the required media server software is not installed onto the
FRPSDQLRQGHYLFH
1. Enter the link below completely in the adress-
bar of your web browser.
http://www.nero.com/mediahome-tv
2. Click the Download button on the opening page.
7KHLQVWDOODWLRQ¿OHZLOOEHGRZQORDGHGRQWR\RXU
PC.
3. After the download is completed, double click on
WKH LQVWDOODWLRQ ¿OH WR VWDUW WKH LQVWDOODWLRQ The
installation wizard will guide you through the
installation process.
4. 7KHSUHUHTXLVLWHVVFUHHQZLOOEHGLVSOD\HG¿UVW
The installation wizard checks the availability
of required third-party software on your PC. If
applications are missing they are listed and must
be installed before continuing installation.
5. Click the Install button. The integrated serial will
be displayed. Please do not change the displayed
serial.
6. Click the Next button. The License Conditions
(EULA) screen will be displayed. Please read
the license agreement carefully and select the
appropriate check box if you agree to the terms of
the agreement. Installation is not possible without
this agreement.
7. Click the Next button. On the next screen you can
set your installation preferences.
8. Click the Install button. The installation begins
DQG ¿QLVKHV DXWRPDWLFDOO\$ SURJUHVV EDU ZLOO
indicate the state of the installation process.
9. Click the Finish button. The installation is
completed. You will be directed to the web site of
the nero software.
10. A shortcut is now placed on your desktop.
Congratulations! You successfully installed Nero
MediaHome on your PC.
Run Nero MediaHome by double clicking on the shortcut
icon.

Español - 1 -
Estimado Cliente,
Este aparato cumple con las directivas y las normas europeas relativas a la compatibilidad electromagnética
y a la seguridad eléctrica.
El representante del fabricante en Europa es:
Vestel Germany GmbH
Parkring 6
85748 Garching b.München
Germany
Información al usuario sobre el desecho de baterías y equipos viejos
[Unión Europea]
Estos símbolos indican que aquellos equipos eléctricos y electrónicos, así como las pilas
TXHORWHQJDQJUDEDGRQRVHGHEHQGHVHFKDUFRPREDVXUDGRPpVWLFDDO¿QDOGHVXYLGD~WLO
En cambio, los productos deben ser entregados a los puntos de recogida para el reciclaje
de aparatos eléctricos y electrónicos, así como pilas para su tratamiento, recuperación y
reciclado adecuados de acuerdo con su legislación nacional y la Directiva 2012/19/EU y
2013/56/UE.
Al desechar este producto de forma correcta ayudará a conservar los recursos naturales
y evitará las posibles consecuencias nocivas para el medio ambiente y la salud de las
personas que podrían derivarse del mal manejo del producto como residuo.
Para obtener más información sobre puntos de recogida y reciclaje de estos aparatos,
póngase en contacto con su ayuntamiento, servicio de recogida de desechos, o bien con
el establecimiento donde lo adquirió.
En caso de no incumplir la normativa vigente en materia de desecho de materiales, se le
podría sancionar.
[Empresas Usuarias]
Si desea desechar este aparato, contacte con el distribuidor y compruebe los términos y
condiciones del contrato de adquisición.
[Otros países fuera de la Unión Europea]
Estos símbolos son válidos solo en la Unión Europea.
Las pilas para este aparato son 2X AAA de 1.5V.
Son pilas utilizadas en el mando a distancia y fáciles de colocar o extraer.
Contacte con la autoridad local para obtener la información relativa al desecho y reciclado.
El aparato y las pilas deben llevarse al punto local de recogida para su reciclado.
Algunos de estos puntos recogen aparatos de forma gratuita.
Aviso:
El signo Pb
situado bajo el
símbolo de las
pilas, indica que
esta pila contiene
plomo.
Battery
Pb

Español - 2 -
Logotipo y Licencia
RECONOCIMIENTO DE LA MARCA COMERCIAL
Fabricado con la autorización de Dolby Laboratories. Dolby y el logotipo de la doble D son marcas registradas
de Dolby Laboratories.
/RVWpUPLQRV+'0,\+LJK'H¿QLWLRQ0XOWLPHGLD,QWHUIDFH\HOORJRWLSRGH+'0,VRQPDUFDVFRPHUFLDOHVR
registradas de HDMI Licensing LLC en los Estados Unidos y en otros países.
DVB es una marca registrada del proyecto DVB.
Para patentes DTS, consulte http://patents.dts.com. Fabricado bajo la licencia de DTS Licensing Limited.
DTS, el símbolo, y DTS y el símbolo de DTS juntos están registrados como marcas comerciales, y DTS 2.0+
Audio Digital es una marca comercial de DTS, Inc.©DTS, Inc. Todos los derechos reservados.
Para patentes DTS, consulte http://patents.dts.com. Fabricado bajo la licencia de DTS Licensing Limited. DTS,
el símbolo, y DTS y el símbolo de DTS juntos están registrados como marcas comerciales, y DTS TruSurround
es una marca comercial de DTS, Inc. © DTS, Inc. Todos los derechos reservados.
Para patentes DTS, consulte http://patents.dts.com. Fabricado bajo la licencia de DTS Licensing Limited. El
símbolo DTS, DTS-HD, y el texto DTS o DTS-HD y el símbolo juntos son marcas comerciales registradas de
DTS, Inc.© DTS, Inc. Todos los derechos reservados.
“Este producto es fabricado, distribuido y garantizado exclusivamente por VESTEL Tica-
UHW$ù\VHOHSURSRUFLRQDVHUYLFLRDWUDYpVGHSURYHHGRUHVGHVHUYLFLRGHVLJQDGRV³-9&´
HVODPDUFDFRPHUFLDOGH-9&.(1:22'&RUSRUDWLRQXWLOL]DGDSRUGLFKDVHPSUHVDV
EDMROLFHQFLD´

Español - 3 -
Información De Seguridad
Fuentes de alimentación
Este televisor está diseñado para funcionar con una toma de corriente alterna de 220-240 V, a 50 Hz. Cualquier
otra fuente de alimentación podría dañarlo. Antes de enchufar el televisor por primera vez, compruebe
TXHODSODFDLGHQWL¿FDWLYDHQODSDUWHWUDVHUDGHOPLVPRLQGLTXHXQD&$GH9(OIDEULFDQWH12
VHUHVSRQVDELOL]DGHQLQJ~QGDxRQLOHVLyQFDXVDGRVSRUXWLOL]DUHOWHOHYLVRUFRQXQDFRUULHQWHLQDGHFXDGD
Enchufe principal
Este televisor viene equipado con un enchufe de corriente estándar.
6LHOFDEOHGHFRUULHQWHHVWXYLHUDGDxDGRGHEHUiFDPELDUVHSRURWURGHOPLVPRWLSR\FODVL¿FDFLyQFRQHO
¿QGHHYLWDUFXDOTXLHUULHVJR
En caso de cortar la clavija o cable de corriente, tírelos: suponen un riesgo si se conectan a cualquier toma
de corriente activa. Siga cuidadosamente las instrucciones relativas al cable de corriente, suministradas
con el enchufe nuevo.
Si el enchufe cuenta con fusible, primero debe extraer éste antes de desecharlo.
1RXWLOLFHQXQFDXQHQFKXIHFRQIXVLEOHTXHQRWHQJDSXHVWDODWDSDGHOIXVLEOH
El cable de corriente deberá estar siempre accesible, pues es el principal medio de desconexión del televisor
de la corriente.
En el interior de este equipo se encuentra
un voltaje peligroso: conlleva un riesgo de
descarga eléctrica.
Este equipo tiene aislamiento doble y no
requiere de toma a tierra.
Esta marca está visible
para mostrar que el aparato
cumple con los estándares de
seguridad y compatibilidad
electromagnética Europeos.
Seguridad y cuidados del televisor
Este televisor se ha diseñado y fabricado cumpliendo la normativa de seguridad Europea, pero como sucede
con cualquier equipo eléctrico, se deben tomar ciertas precauciones para su seguridad y para obtener el
mejor de los resultados. Aquí encontrará algunos buenos consejos para ayudarle.
Lea detenidamente estas instrucciones antes de utilizar el televisor.
3URWHMDHOFDEOHGHFRUULHQWH$VHJ~UHVHGHTXHQDGLHSXHGDSLVDUGDxDUSUHVLRQDUFRUWDURDWUDSDUHOFDEOH
de corriente.
Desconecte la corriente o desenchufe el cable cuando no vaya a utilizar el televisor, a menos que el televisor
requiera de un suministro continuo de electricidad.
1RXWLOLFHHOWHOHYLVRUVLVHKDQYHUWLGROtTXLGRVHQVXLQWHULRUVLHODSDUDWRVHKDGDxDGRGHDOJ~QPRGRR
si éste no funciona correctamente. Desenchufe el televisor inmediatamente y póngase en contacto con el
servicio técnico.
Evite las condiciones ambientales extremas, como por ejemplo: lugares con mucha humedad, vibraciones
fuertes, temperaturas muy altas o muy bajas, la luz solar directa o lugares muy sucios.
1XQFDXWLOLFHVRSRUWHVQLSLHVLQHVWDEOHVSDUDHOWHOHYLVRU
1RLQWURGX]FDQXQFDQLQJ~QREMHWRSRUORVDJXMHURVQLODVUDQXUDVGHYHQWLODFLyQ
Para evitar una descarga eléctrica, no retire ninguna tapa.

Español - 4 -
Información de Seguridad (continuación)
1RWRTXHODSDQWDOOD/&'pVWDVHFDOLHQWDGXUDQWHHOIXQFLRQDPLHQWRORFXDOHVQRUPDO\QRLQGLFDQLQJ~QIDOOR
6LVXFHGHDOJ~QSUREOHPDFRQHODSDUDWRQRWUDWHGHUHSDUDUORXVWHGPLVPRSyQJDVHHQFRQWDFWRFRQHO
servicio técnico.
Desconecte el cable de corriente y también el cable de antena durante tormentas eléctricas.
PRECAUCIÓN: Conecte los auriculares con el volumen al mínimo, y auméntelo si lo estima necesario. El
uso prolongado a través de auriculares a alto volumen puede causar lesiones auditivas.
Ventilación
6LW~HHOWHOHYLVRUVREUHXQDVXSHU¿FLHIXHUWH\HVWDEOHDOHMDGDGHODOX]VRODUGLUHFWDRGHODVIXHQWHVGHFDORU
6LORFRORFDGHQWURGHXQPXHEOHGHMHXQPtQLPRGHFPGHHVSDFLROLEUHDVXDOUHGHGRU1REORTXHHODV
ranuras de ventilación del equipo con cortinas ni mobiliario (por citar algunos), incluyendo las ranuras de la
parte inferior.
(OVREUHFDOHQWDPLHQWRUHGXFLUiODYLGD~WLOGHOWHOHYLVRU\DXPHQWDUiHOULHVJRGHLQFHQGLR
Limpieza
'HVHQFKXIHHOFDEOHGHDOLPHQWDFLyQ\XWLOLFHVyORXQSDxRVXDYHOLJHUDPHQWHKXPHGHFLGR1RXWLOLFHVROYHQWHV
químicos ni detergentes fuertes, puesto que podrían dañar la carcasa o la pantalla.
Seque cualquier gota que quede encima de la pantalla, puesto que la humedad podría provocar una
decoloración permanente.
Las marcas de grasa sólo deberían eliminarse con un limpiador especial recomendado para pantallas LCD.
Fatiga de la vista.
Cuando use este aparato como monitor de PC, los expertos de seguridad y bienestar recomiendan descansos
cortos y frecuentes en lugar de descansos ocasionales y largos. Por ejemplo, se considera que es mejor
un descanso de 5 o 10 min tras una hora de trabajo continuo en la pantalla, que 15 minutos de descanso
cada 2 horas.
1RXWLOLFHHOPRQLWRUFRQWUDXQIRQGREULOODQWHRHQOXJDUHVHQORVTXHODOX]VRODURFXDOTXLHURWUDIXHQWHGH
luz intensa, iluminen directamente la pantalla.
Pilas
Saque las pilas del mando a distancia si no lo va a utilizar durante mucho tiempo. Si deja las pilas dentro, es
posible que puedan dañar el mando por su deterioro o por una fuga corrosiva, lo que invalidaría la garantía.
$¿QGHSURWHJHUDOPHGLRDPELHQWHWLUHODVSLODVHQXQSXQWRGHUHFRJLGDGHGHVHFKRV
Deshágase de las pilas usadas siguiendo las instrucciones.
PRECAUCIÓN: Si cambia las pilas por otras de tipo incorrecto, existe el riesgo de explosión.
ADVERTENCIAS:
(VWHSURGXFWRHVWiKHFKRSDUDHOXVRGRPpVWLFRHQHOKRJDUVRODPHQWH\QRGHEHVHUXVDGRSDUDQLQJ~Q
otro propósito o ninguna otra aplicación, como un uso no doméstico o su uso en un ambiente comercial.
Si el cable de alimentación está dañado, debe acudir al fabricante, distribuidor, servicio técnico o similares
personas capacitadas, para poder reemplazarlo y evitar así cualquier peligro.
(YLWHFXDOTXLHUVDOSLFDGXUDRGHUUDPHGHOtTXLGRVVREUHHODSDUDWR1RFRORTXHVREUHHOWHOHYLVRUQLQJ~Q
recipiente con líquido, como jarrones y similares.
1RFRORTXHQXQFDHQFLPDQLFHUFDGHODSDUDWRIXHQWHVGHOODPDVVLQSURWHFFLyQFRPRSRUHMHPSORYHODV
encendidas.
1RFXEUDODVUDQXUDVGHYHQWLODFLyQFRQREMHWRVFRPRSHULyGLFRVPDQWHOHVFRUWLQDVHWF
$'9(57(1&,$(QFDVRGHLQVWDODUHODSDUDWRHQODSDUHG\D¿QGHHYLWDUFXDOTXLHUOHVLyQGHEHKDFHUOR
FRUUHFWDPHQWH\VHJ~QODVLQVWUXFFLRQHVGHLQVWDODFLyQ
Este aparato no es adecuado para uso en un clima tropical.

Español - 5 -
ADVERTANCIA
Para evitar la propagación
de fuego, no deben
colocarse objetos o fuentes
de llama abierta como
velas incandescentes o lamparillas
encendidas sobre o cerca del
aparato.
Accesorios Incluidos
Mando a Distancia
Pilas: 2 x AAA
Cable de conexión de AV lateral
øndice
Accesorios Incluidos.............................................. 5
Instrucciones para el montaje en la pared............. 6
Interruptor de Control y Funcionamiento del
Televisor ................................................................ 7
Colocación de las pilas en el mando a distancia... 7
Conexión de la Antena .......................................... 7
Mando a Distancia................................................. 8
Encendido/Apagado .............................................. 9
Instalación inicial ................................................... 9
Uso de la característica SatcoDX (**).................. 10
E-Manual (si está disponible) .............................. 10
Conectividad.........................................................11
&RQH[LyQGH2WURV'LVSRVLWLYRV,QDOiPEULFRV ... 12
Uso del servicio de red Compartir Audio y Vídeo ... 13

Español - 6 -
Instrucciones para el montaje en la pared
Instalación del televisor en la pared
El televisor puede ser montado en la pared utilizando un kit de montaje VESA MXX*X mm (*) que se suministra
por separado. Extraiga la base tal y como se muestra. Instale el televisor de acuerdo con las instrucciones
suministradas con el kit. Esté al tanto de los cables eléctricos, las tuberías de gas y agua que estén en la
SDUHG6LWLHQHGXGDVSRUIDYRUFRQWDFWHDXQLQVWDODGRUFDOL¿FDGR/DORQJLWXGGHODFXHUGDGHOWRUQLOORQR
deberá exceder Xmm (*) dentro del televisor. Póngase en contacto con el establecimiento donde adquirió el
aparato para saber dónde comprar el kit VESA.
(*)&RQVXOWHODSiJLQDDGLFLRQDOUHODFLRQDGDFRQ9(6$SDUDODVPHGLGDVSUHFLVDV\HVSHFL¿FDFLRQHVGHORV
tornillos.
Para quitar la base
3DUDTXLWDUODEDVHSURWHMDODSDQWDOOD\FRORTXHHOWHOHYLVRUVREUHODVXSHU¿FLHSODQDGHXQDPHVDHVWDEOH
FRQODEDVHVDOLHQWHSRUODRULOOD6DTXHORVWRUQLOORVGH¿MDFLyQGHOVRSRUWHDOWHOHYLVRU
-o-

Español - 7 -
Interruptor de Control y Funcionamiento del
Televisor
1. Botón de dirección (Arriba)
2. Dirección abajo
3. Volumen /Información/ Selección de la lista de
fuentes e interruptor de encendido del Modo en
espera
El botón de Control le permite manejar el Volumen,
los Canales, las Fuentes y el Modo de Espera del
televisor.
Para cambiar el volumen: Aumente el volumen
pulsando el botón arriba. Baje el volumen pulsando
el botón abajo.
Para cambiar el canal: Pulse el centro del botón,
la barra de información aparecerá en la pantalla.
Desplácese a través de los canales almacenados
pulsando el botón hacia arriba o hacia abajo.
Para cambiar de fuente: Pulse dos veces el centro
del botón, y aparecerá la lista de fuentes en la
pantalla. Desplásese por las fuentes disponibles
pulsando el botón arriba o abajo.
Apagado del televisor: Si aprieta en el centro del
botón abajo y lo mantiene pulsado unos segundos,
el televisor pasará al modo de espera.
Notas:
Si apaga el televisor, el ciclo se iniciará de nuevo
con el ajuste de volumen.
1RHVSRVLEOHPRVWUDUHOPHQ~SULQFLSDOHQSDQWDOOD
mediante el botón de control.
Manejo con el Mando a Distancia
Pulse el botón del Menu en su mando a distancia
SDUDPRVWUDUHOPHQ~ SULQFLSDO 8WLOLFH ORV ERWRQHV
GHGLUHFFLyQSDUDVHOHFFLRQDUXQDSHVWDxDGHOPHQ~
y pulse OK para entrar. Pulse las teclas de dirección
SDUD¿MDUXQDRSFLyQ3XOVHReturn /Back o Menu
SDUDVDOLUGHOPHQ~GHSDQWDOOD
Selección de entrada
Cuando haya terminado de conectar los aparatos
externos al televisor, puede alternar entre las distintas
fuentes de entrada. Pulse el botón Source en su
mando a distancia consecutivamente para seleccionar
fuentes diferentes.
Cambio de canales y volumen
Puede cambiar el canal y ajustar el volumen con
los botones Volume +/-, Canal +/- en el mando a
distancia.
Colocación de las pilas en el mando a distancia
Levante la tapa trasera del mando y tire suavemente
hacia arriba. Inserte dos pilas AAA$VHJ~UHVHGHTXH
(+) y (-) coincidan con los signos (observe la polaridad
correcta). Coloque la tapa otra vez en su sitio.
1RH[SRQJDODVSLODVDXQDIXHQWHGHFDORUH[FHVLYD
por ejemplo luz solar, fuego o similares.
Conexión a Corriente
IMPORTANTE: Este televisor está diseñado para
funcionar con corriente alterna de 220-240 V, 50
Hz. Tras desembalar el televisor, deje que éste
alcance la temperatura ambiente antes de conectarlo
a la corriente. Enchufe el cable de corriente a la
electricidad.
Conexión de la Antena
Conecte el cable de antena o cable a la toma o
(1&+8)('((175$'$GH$17(1$'(6$7e/,7(
DODHQWUDGDGHVDWpOLWH/1%VLWXDGDHQODSDUWH
posterior del televisor.
satélite(*)
PARTE
TRASERA
DE
LA TV
aérea
o
cable
(*) si la opción está disponible
Table of contents
Languages:
Other JVC LCD TV manuals

JVC
JVC LT-42P300 User manual

JVC
JVC LT-19EM74 User manual

JVC
JVC Wide LCD Panel TV LT-42DV8BG/N/T User manual

JVC
JVC Black Crystal JLC32BC3002 User manual

JVC
JVC LT-Z32FX6 User manual

JVC
JVC LT-37DM7BJ User manual

JVC
JVC LT-26DY8ZG User manual

JVC
JVC LT-40V550 User manual

JVC
JVC LT-Z32SX4B User manual

JVC
JVC Wide LCD Panel TV LT-32F70BC Quick start guide

JVC
JVC LT-42J300 - 42" LCD TV User manual

JVC
JVC LT-Z26S2A User manual

JVC
JVC InteriArt LT-17E75 BJG User manual

JVC
JVC LT-37DF7BC User manual

JVC
JVC LT-32VH3905 User manual

JVC
JVC AV-15LCG User manual

JVC
JVC Wide LCD Panel TV LT-42DA9BN User manual

JVC
JVC LT-26ED81U User manual

JVC
JVC InteriArt LT-26B60BU User manual

JVC
JVC LT-26A60SJ User manual