Kaba RAC 4 User manual
INSTALLATION GUIDE
RAC 3.5 / RAC 4 / RAC 4XT Insert Reader
PK3166-T

PK3166_09-07 • RAC 3.5 / RAC 4 / RAC 4XT INSERT READER INSTALLATION GUIDE
1
1.0 Introductions and Disclaimers ...................................................2
2.0 Checklist and Exploded Views ...................................................3
2.1 Parts list .....................................................................3
2.2Toolsrequired................................................................3
3.0 Installation Guide ..............................................................4
3.1: Prepare Mounting Panel ........................................................4
3.2:Cutoutholeforinsertreader....................................................4
3.3: Connect wiring to reader .......................................................4
3.4:Insertreadertopanelmounting..................................................5
4.0 Using the Insert Reader.........................................................5
4.1Usingthecard................................................................5
4.2 Programming .................................................................5
Note: This installation Guide is for the RAC 3.5 / RAC 4 / RAC 4XT Insert Reader.
Table of Contents
©2007 Kaba Lodging Systems. All trademarks and registered trademarks are the property of their respective owners.
PK3166_09-07 • RAC 3.5 / RAC 4 / RAC 4XT INSERT READER INSTALLATION GUIDE
2
1.0 • Introduction and Disclaimers
This document outlines the Installation Steps for the Insert
Reader (Item Number R71-432) for the RAC3.5, RAC 4
and RAC 4XT and should be used in conjunction with their
respective Installation Guide.
Target Audience
Please read and follow all directions carefully. These
instructions are designed for use by maintenance professionals
or lock installers who are familiar with common safety practices
and competent to perform the steps described. Kaba Lodging
Systems is not responsible for damage or malfunction due to
incorrect installation.
Technical Assistance
For technical assistance call
1-800-906-4526, 1-514-340-9025
OR
Visit the Kaba Support Website:
http://connect.kabalodging.com
Warnings and Cautions
Important: Carefully inspect panel to ensure that the
recommended procedures will not cause damage.
Kaba’s standard warranty does not cover damages
caused by installation.
!
Caution: Wear safety glasses when tools are required for
mounting panel reader
!
Please read and follow all directions
carefully.
!
This installation to be made on a metal panel only. The
panel thickness must be in the range of 1/16" (1.59mm)
to 1/4" (6.35mm)
!
PK3166_09-07 • RAC 3.5 / RAC 4 / RAC 4XT INSERT READER INSTALLATION GUIDE
3
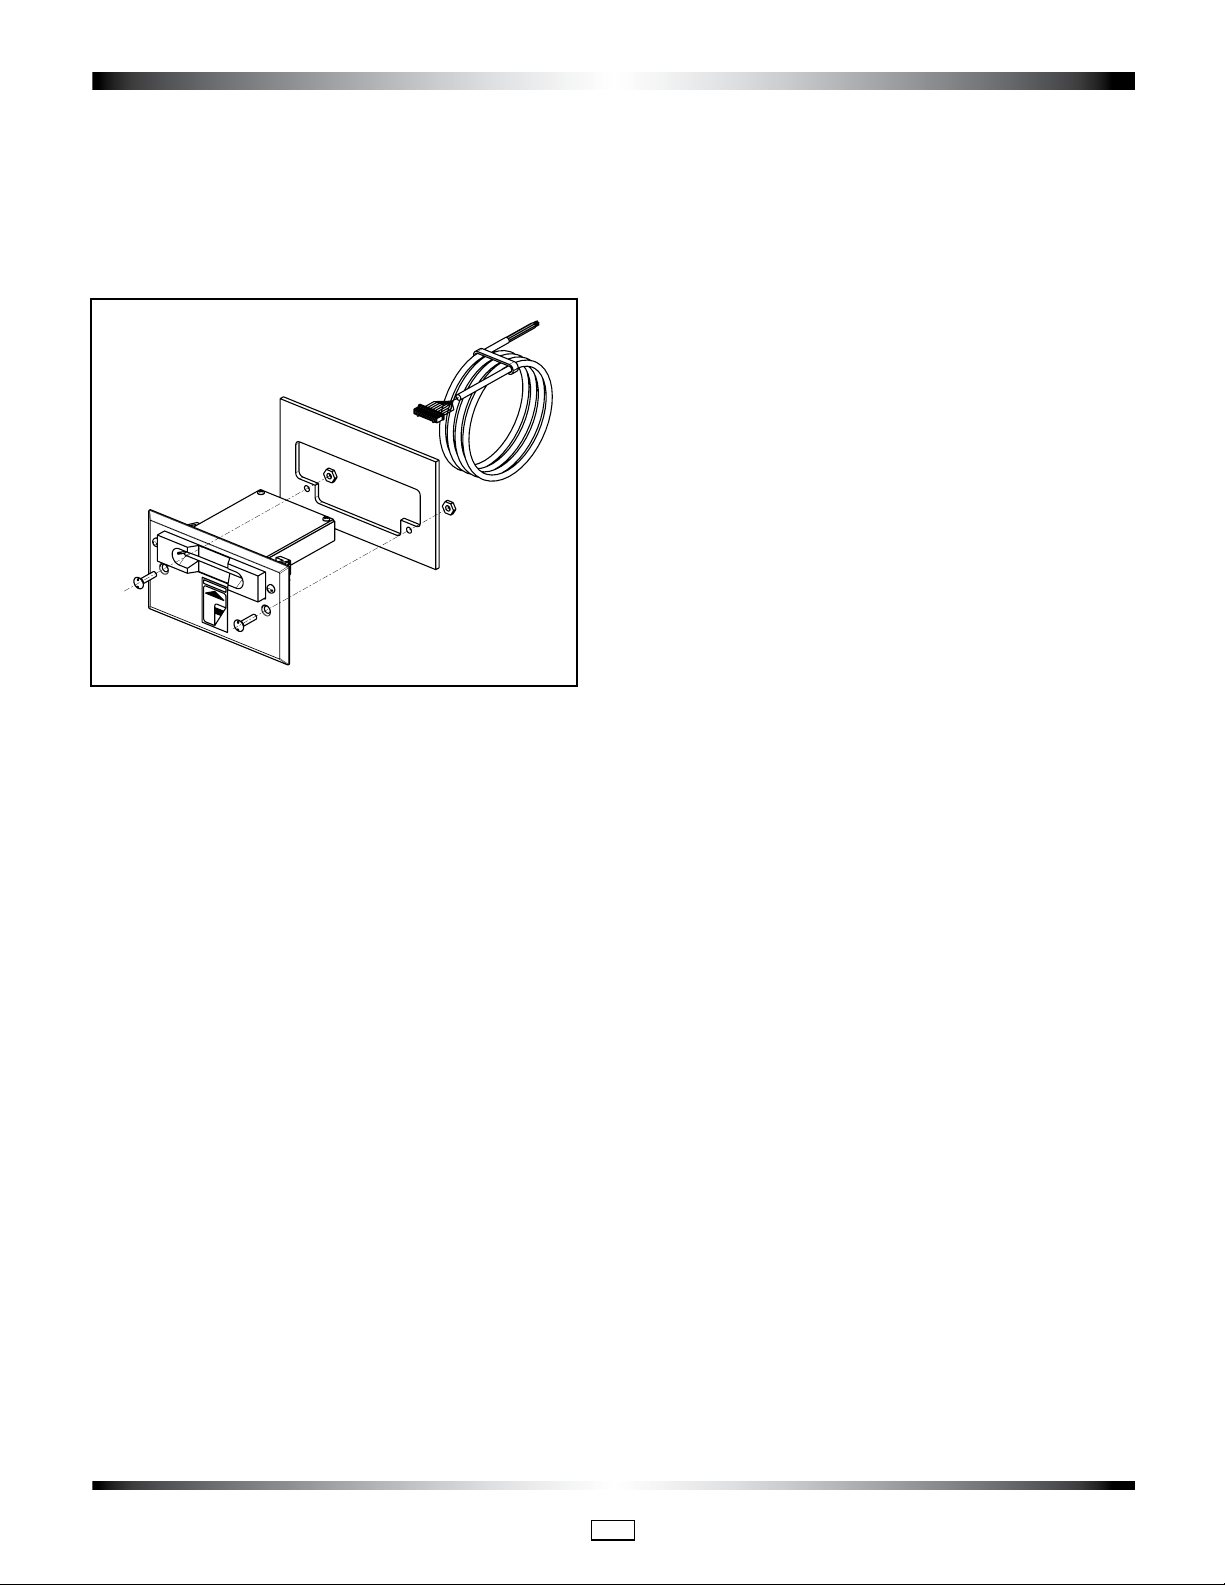
2.0 Checklist and Exploded Views
B
D
A
C
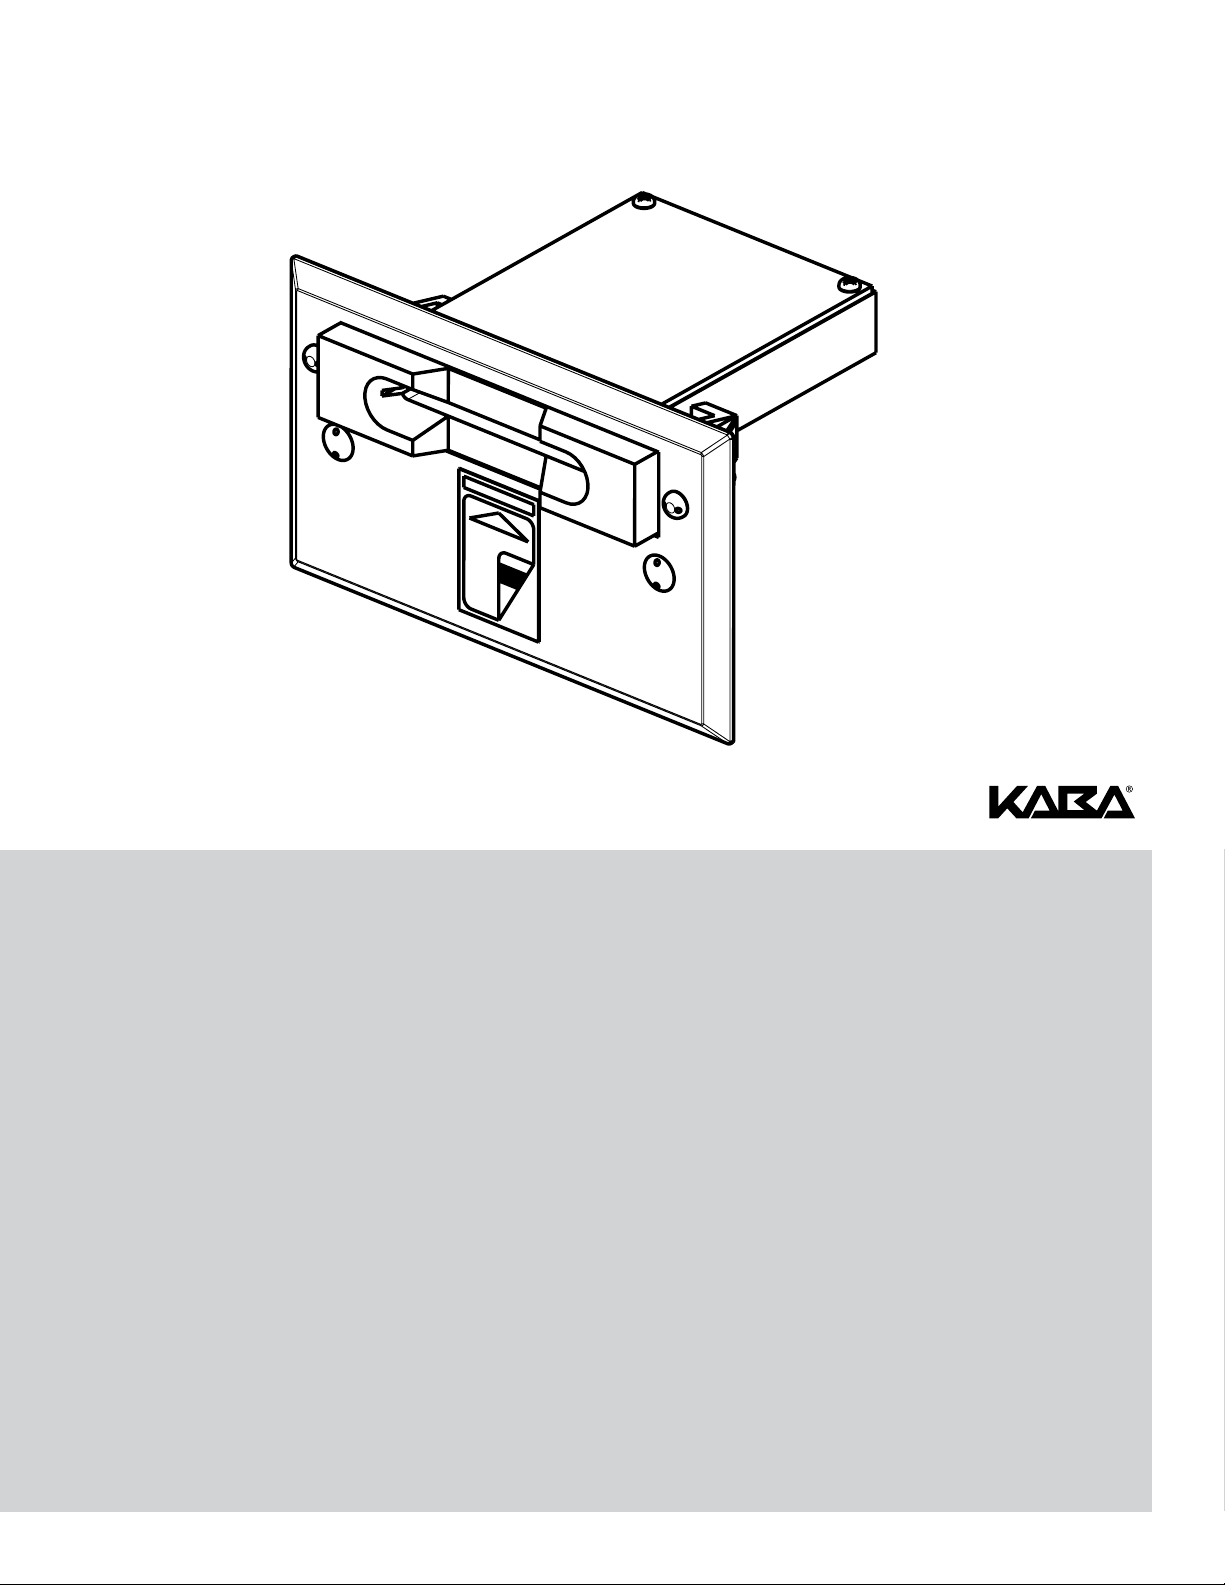
Figure 1:
Exploded view
2.1 Parts list
Each insert reader includes:
(A) Insert reader assembly (Item Number R71-432)
(D) Cable 15 feet with connector
Hardware bag components:
(B) 2 x mounting screws 6-32, 3/4" Spanner head
(C) 2 x Hexagon lock nut
Documentation included:
Drilling Template DT-512152
2.2 Tools required
Mandatory tools required:
• Safetyglasses
• Electricdrill
• 5/32”(6.5mm)drillbit
• AWG24,4-pairshieldedcable(lengthdependent
on distance between reader and RAC control
panel)
• Spannerscrewdriver(#6)
• Adjustablewrenches
• Inkmarker
• Appropriatetoolingforcreatingthecutoutrequired
on the mounting panel
*Dependent on the type of panel material,
different tooling may be required. Please refer
to the assistance of appropriately qualified
maintenance personnel.
Optional tools required:
• Hammer
• Finesteelfile
• Awlorcenterpunch
• Tape
• Tapemeasure
PK3166_09-07 • RAC 3.5 / RAC 4 / RAC 4XT INSERT READER INSTALLATION GUIDE
4
3.0 Installation Guide
3.1 Prepare mounting panel
Using the drilling template DT-512152, align the paper
template at the desired location, mark the location of the holes
to be drilled and the rectangular cut out to be made.
CAUTION: Be sure to follow all relevant building
standards, codes or regulations and any stipulated
safety procedures. Do all appropriate research before
commencing work. Kaba Ilco is not responsible for
damage or malfunction due to incorrect installation
resulting from non-compliance to any building codes,
standards or regulations or non-conformance to any
stipulated safety procedures.
!
3.2 Cut out hole for insert reader
Using the appropriate tool cut out the rectangular hole for
the insert reader. Using the 5/32" (4mm) drill bit, drill the
2 holes needed in the mounting panel for the insert reader
attachment.
CAUTION: Make sure to remove all burrs and sharp edges
after cutting, drilling or tapping operations.
!
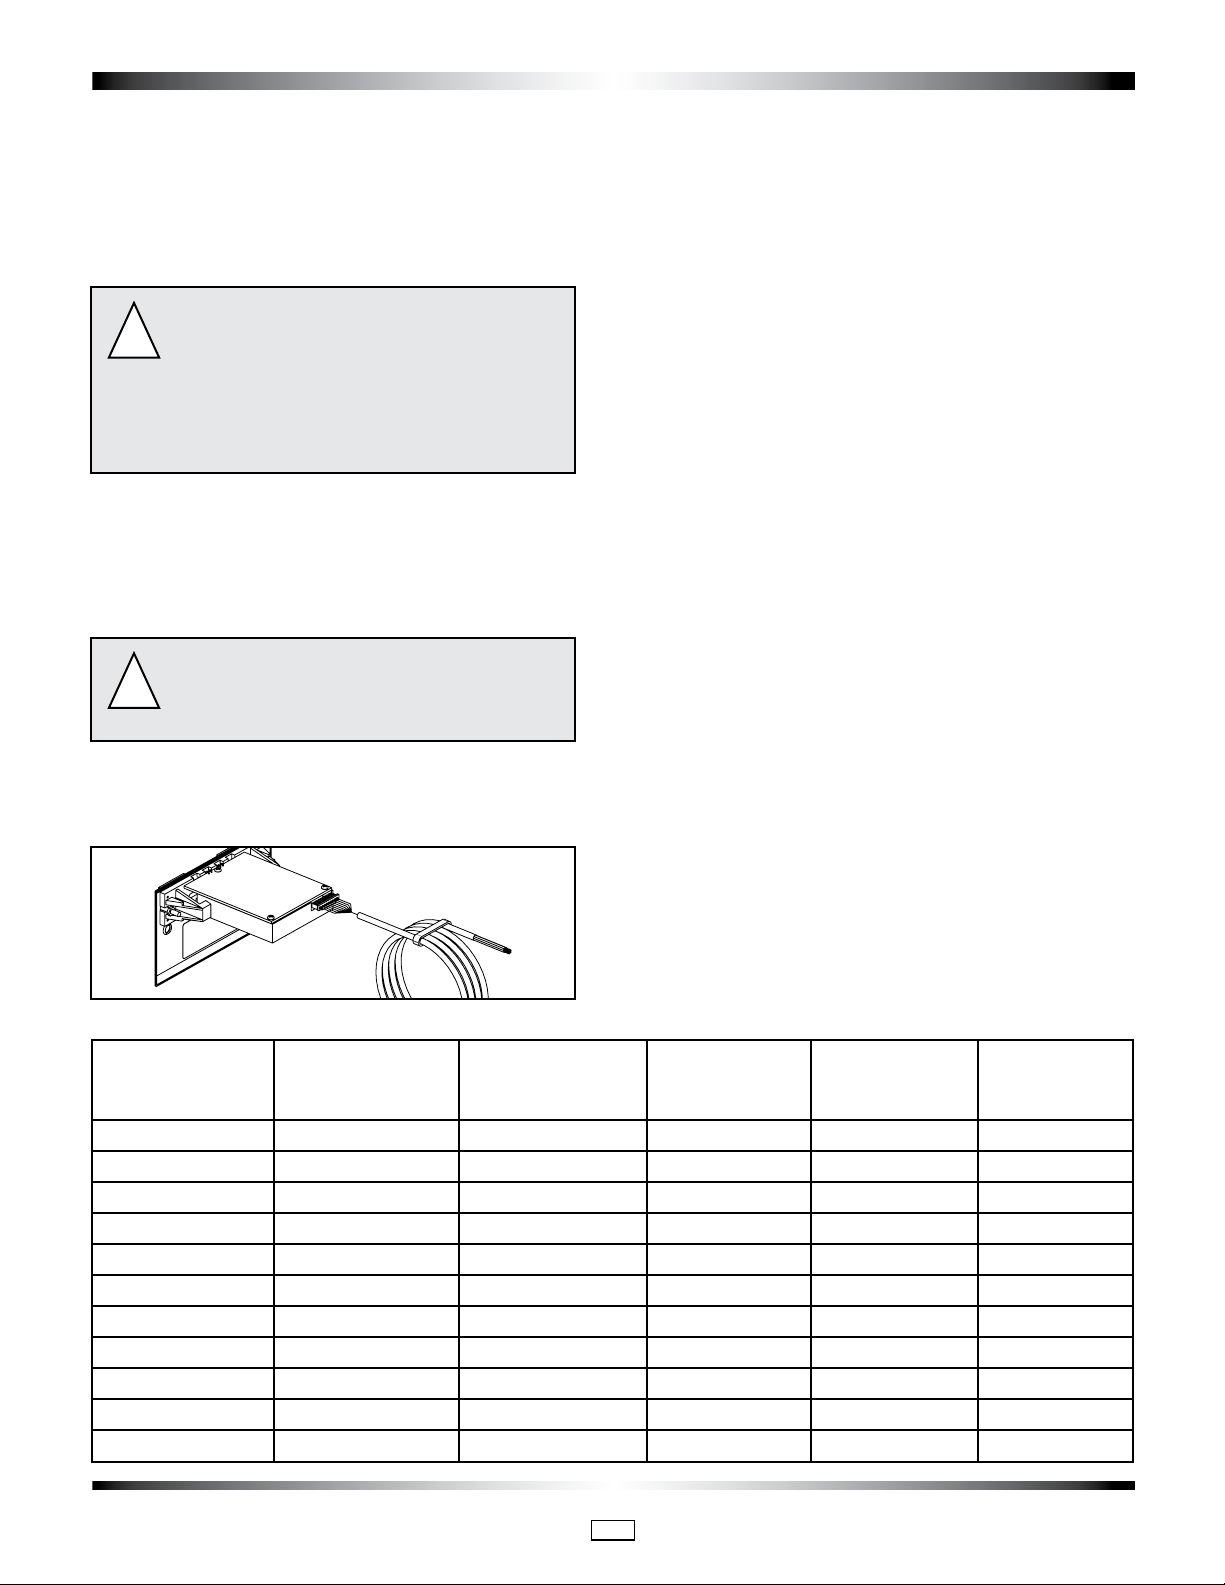
3.3 Connect wiring to reader
3.3.1 Connect cables to reader, see fig.1
3.3.2 Cable Extension
If the 15ft. cable supplied with the reader is not long enough,
use gauge 24 (or bigger) shielded cable with 4 pairs to make
an extension (up to 500 ft.). Make sure that all pairs on the
cable are connected
3.3.3 Connect wires
Depending on the RAC system, follow the appropriate sub
section listed below.
3.3.3.1 For RAC 3.5:
Refer to RAC 3.5 Installation guide PK2918. Connect the cable
to JP3 as per table 1.
3.3.3.2 For RAC 4XT and RAC 4:
Refer to Installation guide PK3191 for RAC 4XT or PK3197 for
RAC 4.
NOTE: RAC 4XT supports single (Ingress) or dual (Ingress
& Egress) readers, while the RAC 4 supports only a single
(Ingress) reader configuration.
For Ingress reader:
Connect the cable to J1, J2 and J3, as per table 1.
For Egress reader:
Connect the cable to J12, J13 and J14, as per table 1.
Signal Name Insert Reader Extension for RAC 3.5 RAC 4/4XT RAC 4XT
Wire Color Cable Length over Ingress Reader Ingress Reader Egress Reader
15ft. Cable Color Connection Connection Connection
+12V Purple Orange/White JP3-1 J1-3 J14-3
GND Purple/Black White/Orange JP3-2 J1-2 J14-2
DATA+ White Black/White JP3-7 J2-1 J13-1
DATA- White/Black White/Black JP3-8 J2-2 J13-2
GREEN_LED+ Red Red/White JP3-3 J3-1 J12-1
GREEN_LED- Red/Black White/Red JP3-4 J3-2 J12-2
RED_LED+ Yellow Yellow/White JP3-5 J3-3 J12-3
RED_LED- Yellow/Black White/Yellow JP3-6 J3-4 J12-4
Not Used (Shield) Black Sheild - - -
Not Used) - Brown/White - - -
Not Used - White/Brown - - -
Table 1
Fig. 1
PK3166_09-07 • RAC 3.5 / RAC 4 / RAC 4XT INSERT READER INSTALLATION GUIDE
5
3.0 Installation Guide (Continued)
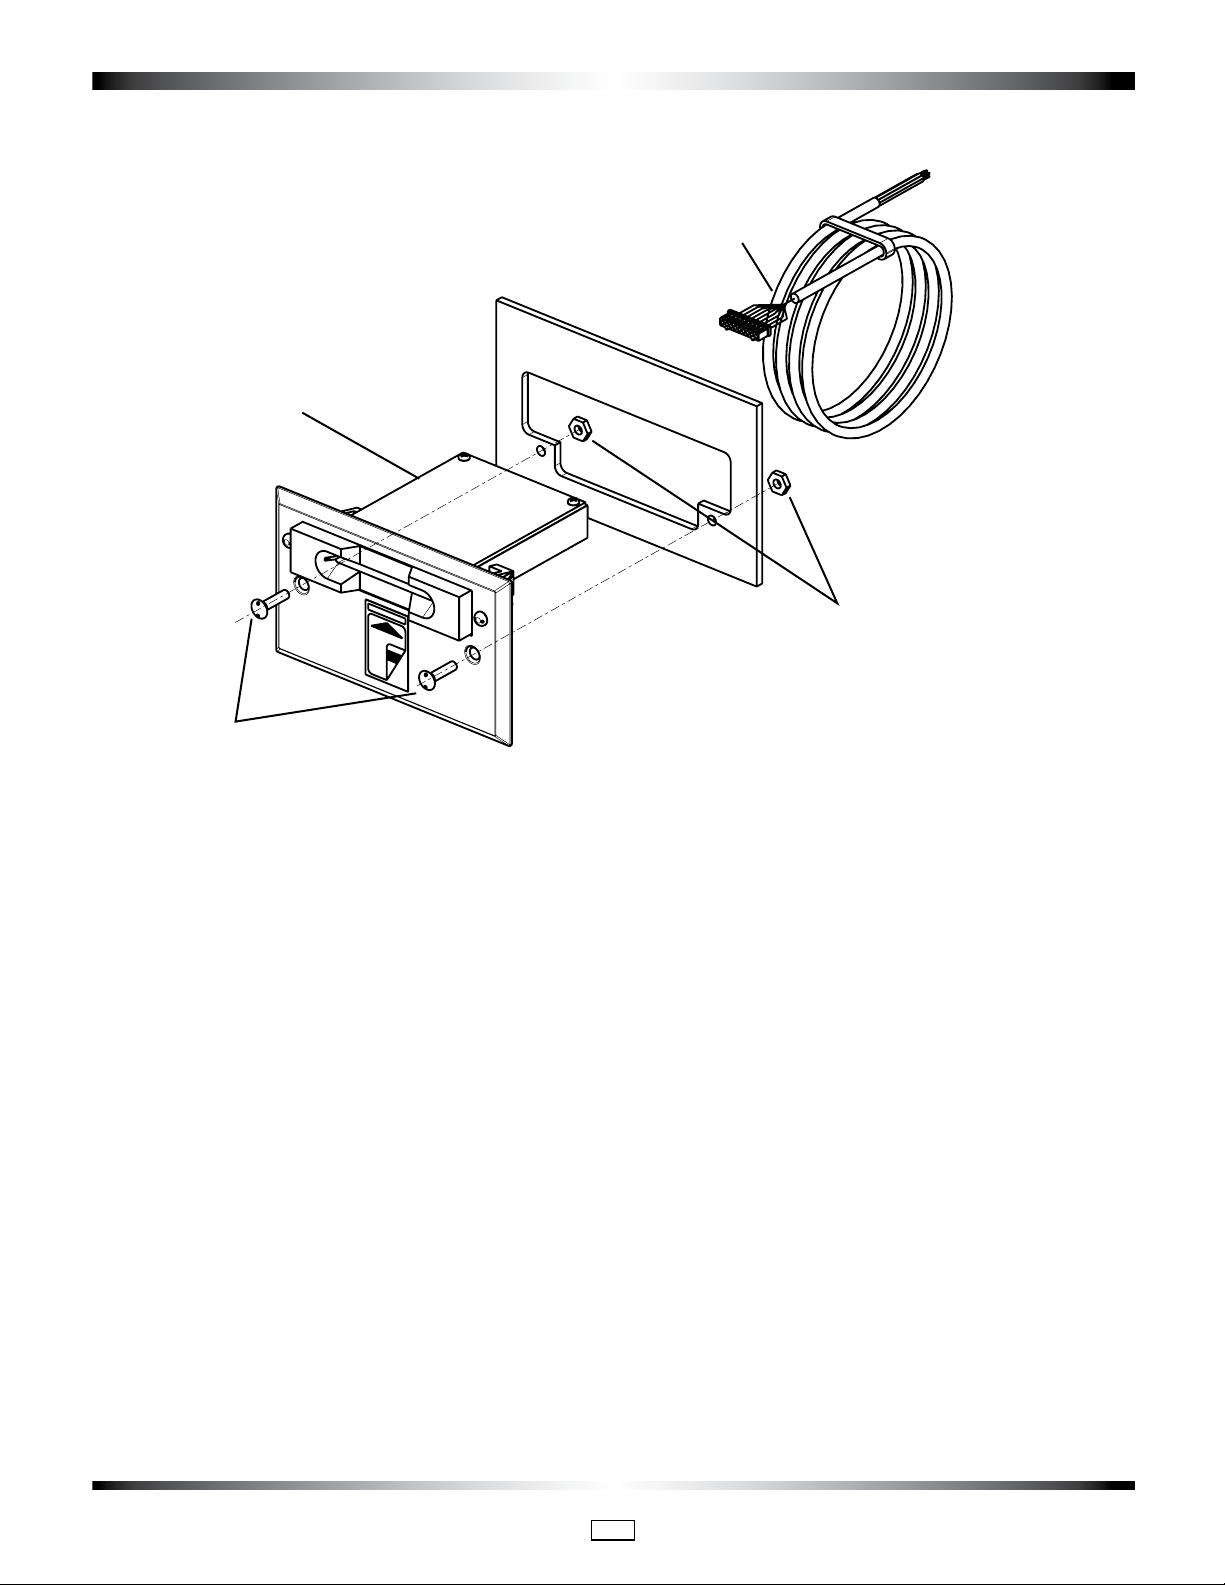
3.4 Insert reader to panel mounting
Slide the insert reader inside the cavity and use the two
spanner screws (6-32 x 3/4") and the two hexagon lock nuts
6-32, to screw the insert reader onto the panel (see fig. 3).
Fig. 3
4.0 Using the Insert Reader
4.1 Using the card
To swipe the card, it needs to be inserted into the reader with
the magstripe facing down to the right.
4.2 Programming
Depending on the RAC version installed, refer to the proper
Installation Guide:
RAC 3.5 ..........................PK2918
RAC 4XT ......................... PK3191
RAC 4 ............................. PK3197

PK3166_09-07 • RAC 3.5 / RAC 4 / RAC 4XT INSERT READER INSTALLATION GUIDE
6

Kaba Lodging Systems
7301 Boul. Décarie Montréal (QC) H4P 2G7
Technical Support:
1.800.906.4526
Customer Service:
T: 1.877.468.3555
F: 514.735.6589
General Information:
www.kabalodging.com
Online Consumable Orders:
www.keycard.com
To access all of our easy steps, please visit our Support Website:
http://connect.kabalodging.com
Printed in Canada PK3166_09_07
Other manuals for RAC 4
1
This manual suits for next models
2
Table of contents
Other Kaba IP Access Controllers manuals


