Kalorik USK CMM 1 User manual

Multi-purpose Mixer
Batidora de uso múltiple
Mixer à usage multiple
Varinha com
aplicações múltiplas
USK CMM 1
1 0V~60Hz 180Wnom/ 0Wmax

2
USK CMM1 - 070323
IMPORTANT SAFEGUARDS
1. READ ALL INSTRUCTIONS
2. Check that your mains voltage correspon s to that state on the
rating plate of the appliance before using the appliance.
3. To protect against electrical shock o not immerse cor , plug, or
the motor unit in water or other liqui .
4. Close supervision is necessary when the appliance is use by or
near chil ren.
5. Unplug from outlet when not in use an before putting on or
taking off parts or before cleaning.
6. Avoi contacting moving parts.
7. Do not operate any appliance with a amage cor or plug or
after the appliance malfunctions or has been amage in any
manner. Return appliance to the nearest authorize service
facility for examination, repair, or a justment.
8. The use of attachments not recommen e or sol by the
manufacturer may cause fire, electric shock or injury.
9. Do not use out oors.
10. Do not let cor hang over e ge of table or counter or touch hot
surfaces.
11. Do not place on or near a hot gas or electric burner, or in a
heate oven.
12. Keep han s, hair, clothing, as well as spatulas an other utensils
away from beaters or hooks uring operation of the han mixer
to re uce the risk of injury to persons, an /or amage to the
appliance.
13. Remove all accessories before washing.
14. Bla es of the chopper an the stick mixer are sharp. Han le
carefully.
15. Always attach plug to appliance first, then plug cor into the wall
outlet. To isconnect remove the plug from the wall outlet.
16. Do not use appliance for other than inten e use.
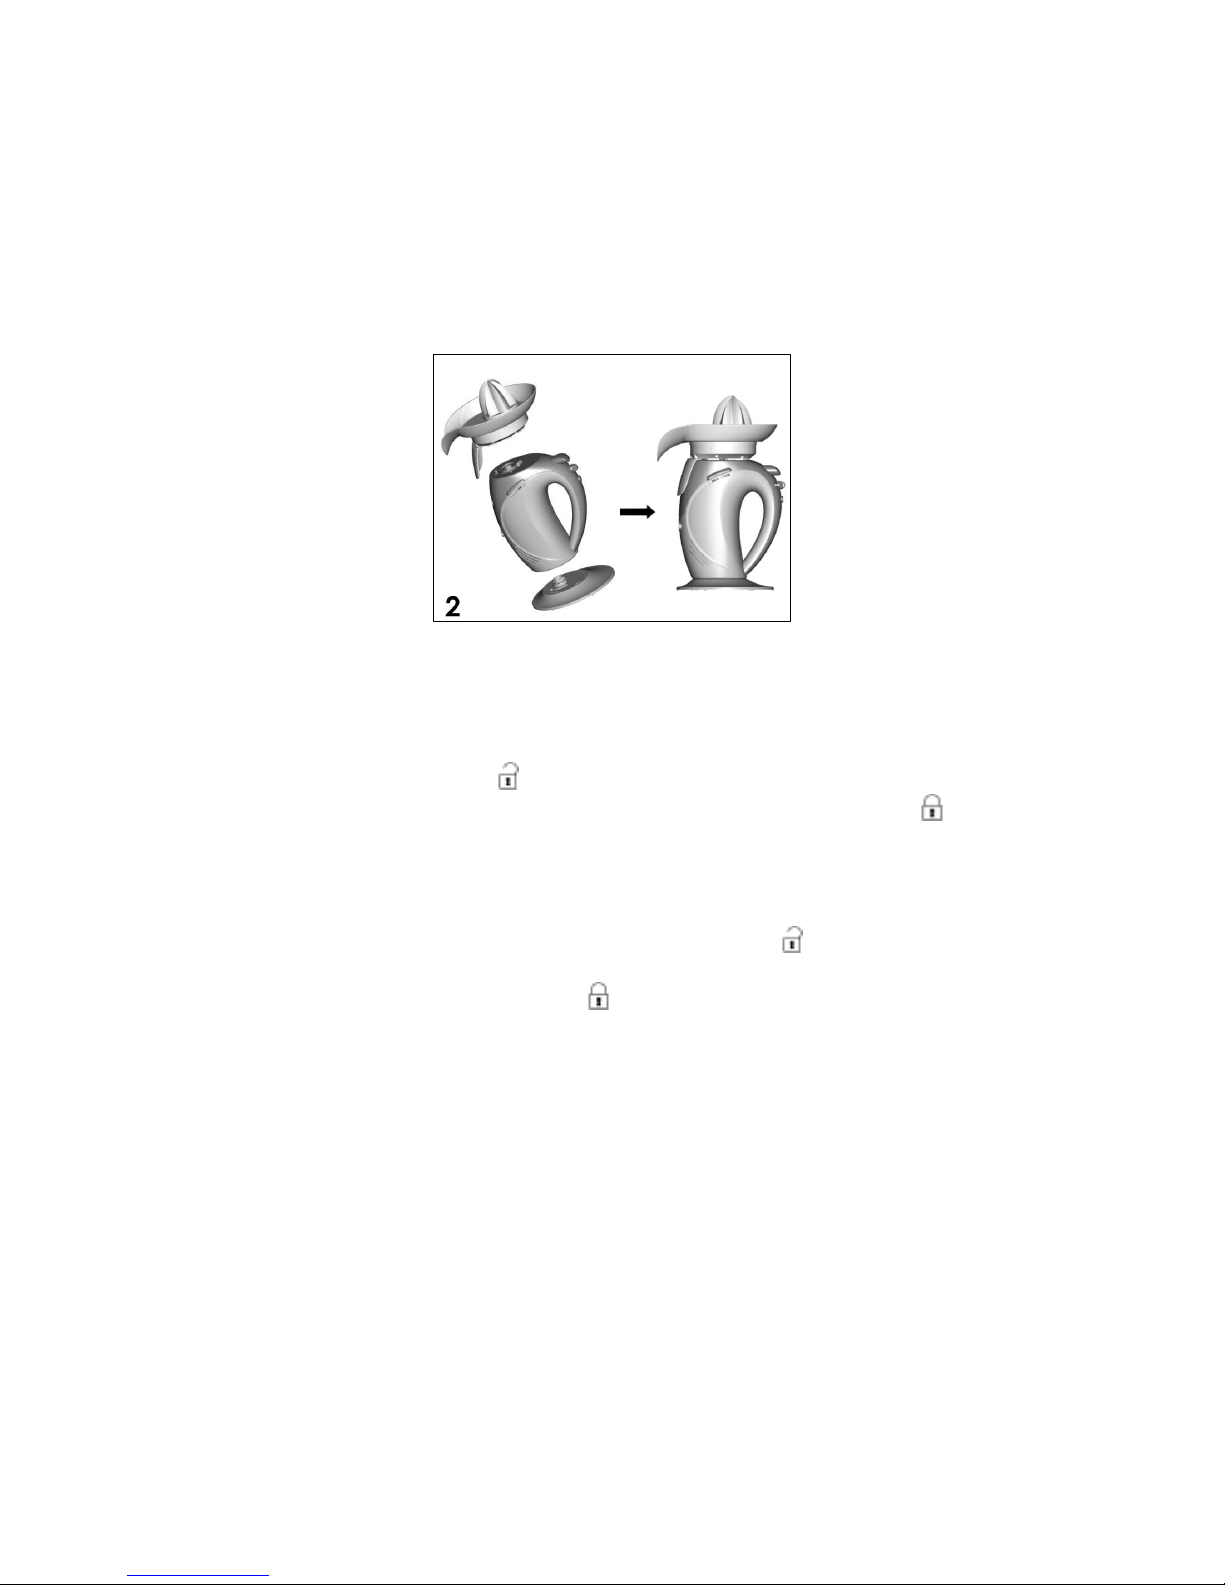
17. Only use this citrus press to extract the juice from ten er fruits
(orange, lemon, grapefruit...). Never try to extract the juice from

3
USK CMM1 - 070323
Assembly page 3/44
fruits such as pineapple, mango or other fruits that are too har
an /or too large.
18. This kin of appliance cannot function continuously, it is not a
professional type of appliance. It is necessary to make temporary
stops. Check the section "Important information" in the instruction
manual.
19. It is absolutely necessary to keep this appliance clean at all times
as it comes into irect contact with foo .
20. The appliance is esigne for preparing small quantities of foo ,
which have to be consume rather quickly. It is not esigne for
preparing large quantities at once.
21. To isconnect the appliance remove the plug from the wall
outlet.
22. Do not attempt to efeat the appliance interlock mechanisms.
23. Keep han s an utensils away from the cutting bla e while
chopping or mixing foo to re uce the risk of severe injury to
persons or amage to the appliance. A scraper may be use but
only when the appliance is not running.
24. When mixing liqui s, especially hot liqui s, use a tall container or
make small quantities at a time to re uce spillage.
SAVE THESE INSTRUCTIONS
POLARIZED PLUG INSTRUCTIONS
This appliance has a polarize plug (one bla e is wi er than the
other). To re uce the risk of electric shock, this plug will fit into the
polarize outlet only one way. If the plug oes not properly fit into
the outlet at first, reverse it. If it still oes not fit, contact a competent
qualifie electrician. Do not attempt to modify the plug in any way.
SHORT CORD INSTRUCTIONS
A short power supply cor is provi e to re uce the hazar s resulting
from becoming entangle in, or tripping over a longer cor .
Extension cor s may be use if care is exercise in their use.

4
USK CMM1 - 070323
Assembly page 4/44
• The electrical rating of the extension cor shoul be at least that
of the appliance. If the electrical rating of the extension cor is
too low, it coul overheat an burn.
• The resulting exten e cor shoul be arrange so that it will not
rape over the counter top or tabletop where it can be pulle on
by chil ren or trippe over.
PART DESCRIPTION
1. Motor unit
2. Li for han mixer an
citrus press function
3. Citrus press juice tray
4. Citrus press cone
5. Stick mixer
6. Chopper bowl
7. Base
8. Hooks
9. Beaters
10. Li for chopper an stick
mixer function
11. Chopper li
12. Ejection button
13. Spee switch
14. “Stick” mixer switch

5
USK CMM1 - 070323
Assembly page 5/44
IMPORTANT INFORMATION
This appliance is not for professional use. You shoul follow the
requeste breaks. Failure to follow this instruction carefully may result
in amage to the motor. Please refer to below spee settings for the
maximum continuous usage time. The breaks shoul last at least 10
minutes.
SPEED SETTINGS
Depen ing on the accessory you are using, you can use the
following spee setting.
HAND MIXER spee s 1 to 5 (KB= 5 mins)
STICK ATTACHMENT: spee s 4 to 5 + stick switch (KB=1 min)
CHOPPER: spee s 3 to 5 (KB= 1 min)
CITRUS PRESS: exclusively speed 1 (KB= 3 mins)
(KB= XX min where XX is the maximum usage time). After you use it
for this time, you shoul make a break of at least 10 minutes)
Variable spee s: place the spee switch on the spee setting you
want.
GENERAL USE
Always respect the below assembly instructions because safety
evices block any unsafe use an the appliance woul not work
properly.

6
USK CMM1 - 070323
Assembly page 6/44
USE OF THE HAND MIXER
With this accessory you can beat (beaters) an mix (hooks) foo .
• Make sure the appliance is unplugge .
• Place the safety li (11) on top of the motor unit making sure the
arrow on the motor unit is in front of the symbol locate on the
li . Then turn the li clockwise until the arrow en s up in front of
the symbol.
• Fit the base on the motor unit making sure the arrow on the motor
unit is in front of the symbol locate on the base. Then turn the
motor unit anticlockwise until the arrow en s up in front of the .
• If the li an the base are not properly fitte , it will be impossible
to switch on the han mixer.
• Insert the beaters or hooks in the openings. Check their locking by
pulling them lightly.
• To isassemble the han mixer, procee inversely except for the
beaters an hooks that have to be ejecte by pressing the
ejection button (12).

7
USK CMM1 - 070323
Assembly page 7/44
USE OF THE CITRUS PRESS
This accessory allows you to prepare fruit juices.
• Make sure the appliance is unplugge .
• Fit the base on the motor unit making sure the arrow on the motor
unit is in front of the symbol locate on the base. Then turn the
motor unit anticlockwise until the arrow en s up in front of the .
If the base is not properly fitte , it will be impossible to switch on
the citrus press.
• Put the motor unit vertically on its base.
• Place the citrus press juice tray on top of the motor unit making
sure the arrow on the motor unit is in front of the symbol
locate on the accessory. Then turn the tray clockwise until the
arrow en s up in front of the symbol.
• Place the cone on the shaft of the juice tray.
• Put a container below the spout of the tray to collect the juice.
• To isassemble the citrus press, procee inversely.

8
USK CMM1 - 070323
Assembly page 8/44
USE OF THE CHOPPER
With this accessory you can chop con iments, rie fruits or meat.
To chop meat, it is recommen e to cut it into small pieces first.
• Make sure the appliance is unplugge .
• Place the safety li (10) on top of the motor unit making sure the
arrow on the motor unit is in front of the symbol locate on the
li . Then turn the li clockwise until the arrow en s up in front of
the symbol. If the li is not properly fitte , it will be impossible to
fix the motor unit on the chopper li .
• Put the bla e on the shaft of the chopper bowl. Be careful not to
hurt yourself with the bla e as it is very sharp.
• Place the li of the chopper on the bowl making sure the lugs of
the li insert into the slots of the bowl.
• Place the motor unit on the shaft of the li making sure the arrow
on the motor unit is in front of the symbol locate on the li .
Then turn the motor unit anticlockwise until the arrow en s up in
front of the symbol.
• To isassemble the chopper, procee inversely.
Note: To remove the li of the chopper bowl, press its fins.
• Be careful when cleaning the chopper as the bla es are very
sharp.

9
USK CMM1 - 070323
Assembly page 9/44
USE OF THE STICK ATTACHMENT
With this accessory you can mix foo as for example vegetables to
prepare soups but also to mix liqui s. Always use it in a vertical
position with bla es facing ownwar s.
• Make sure the appliance is unplugge .
• Place the safety li (10) on top of the motor unit making sure the
arrow on the motor unit is in front of the symbol locate on the
li . Then turn the li clockwise until the arrow en s up in front of
the symbol. If the li is not properly fitte , it will be impossible to
insert the stick attachment in the opening.
• Insert the stick attachment into the opening making sure the
arrow on the motor unit is in front of the symbol locate on the
stick attachment. Push the stick attachment in an turn it
simultaneously anticlockwise until the arrow en s up in front of
the symbol. Check the locking by pulling the stick attachment.
• To isassemble the stick attachment, procee inversely.
• Be careful when cleaning the stick attachment, as the bla es are
very sharp.
• Note: the stick mixer is to be use with spee s 4 or 5 an with the
“stick” button. When mixing foo , put your appliance on spee 4
or 5, then press the stick button. Once you release the button, the
appliance stops. Always take care to put back the spee switch
to 0 after use in or er to avoi using other attachments at an
unsuitable spee , which can be angerous.

10
USK CMM1 - 070323
Assembly page 10/44
CLEANING
• Unplug the appliance before cleaning.
• Remove the accessories before washing them in soap water. Do
not use scouring pa s for the plastic materials. Rinse with clear
water an let ry before each new use. Do not put the
accessories in the ishwasher.
• Wipe the outsi e with kitchen paper or a slightly moistene soft
cloth.
• Never clean the appliance with abrasive pro ucts, as these
woul amage the housing.
• Never immerse the motor unit in water or any other liqui .

11
USK CMM1 - 070323
Assembly page 11/44
CONSEJOS DE SEGURIDAD
1. LEA TODAS LAS INSTRUCCIONES.
2. Antes e utilizar el aparto, compruebe que el voltaje e la re
eléctrica coinci e con el aparato.
3. Para protegerse contra una escarga eléctrica, no sumerja el
cable e alimentación, la clavija o el bloque motor en agua o
en otros líqui os.
4. Es siempre necesaria la supervisión cercana cuan o este
aparato sea utiliza o cerca e niños. Este aparato no ebe ser
usa o por niños.
5. Desenchufe el aparato siempre que no lo use o antes e
limpiarlo.
6. No toque las partes en movimiento.
7. No opere el aparato si el cable o el enchufe están aña os, o
espués e que el aparato ha funciona o ina ecua amente,
se ha caí o o ha si o aña o en cualquier manera. El aparato
ebe ser lleva o al fabricante o a un centro e servicio
autoriza o para ser comproba o y repara o.
8. El uso e accesorios que no sean los recomen a os o ven i os
por el fabricante pue e causar incen ios, escargas eléctricas o
lesiones.
9. No use en el exterior.
10. No permita que el cable cuelgue el bor e e la mesa o el
mostra or o que toque una superficie caliente.
11. No coloque este aparato sobre o cerca e quema ores e gas
o eléctricos, o entro e un horno caliente.
12. Mantenga manos, cabellos, ropas, espátulas y otros utensilios
lejos e los bati ores y amasa ores cuan o utilice la bati ora
para evitar heri as e/o años en el aparato.
13. Quite to os los accesorios antes e limpiar el aparato.
14. Las cuchillas e la pica ora y e la bati ora e varilla están muy
afila as. Tenga cui a o e no cortarse cuan o las manipule.

12
USK CMM1 - 070323
Assembly page 12/44
15. Enchufe siempre primero el cable al aparato y espués en el
enchufe e la re eléctrica. Para esconectar el aparato,
esenchúfelo.
16. No use este aparato más que para lo que ha si o iseña o.
17. Utilice este exprimi or solo para exprimir frutos blan os (naranja,
limón, pomelo, etc.). No intente exprimir frutos como piñas,
mango, u otros frutos uros y/o muy gran es.
18. Este aparato no pue e funcionar e manera continua a, no es
un aparato profesional. Es necesario efectuar pausas a intervalos
regulares. Consulte el punto "Tiempo e utilización" en el mo o
e empleo.
19. Es in ispensable guar ar el aparato limpio, ya que está en
contacto irecto con los alimentos.
20. Este aparato está concebi o para la extracción e una
pequeña canti a e zumo, cuya consumición no ebe ser muy
tar ía. El aparato no está concebi o para preparar gran es
canti a es a la vez. Para esconectar el aparato,
esenchúfelo.
21. No intente bloquear los mecanismos e seguri a .
22. Durante el uso e la pica ora o e la bati ora e varilla,
mantenga las manos u otros utensilios lejos e las cuchillas en
movimiento para evitar heri as o años al aparato. Pue e utilizar
un raspa or sólo cuan o el aparato esté esenchufa o.
23. Cuan o mezcle líqui os, especialmente líqui os calientes, utilice
un recipiente alto o prepare pequeñas canti a es e una vez
para evitar salpica uras.
GUARDE ESTAS INSTRUCCIONES
INFORMACIÓN SOBRE EL ENCHUFE POLARIZADO
Para re ucir el riesgo e choque eléctrico, este aparato tiene un
enchufe polariza o (una pata es más ancha que la otra).
Como me i a e seguri a , este enchufe calza en el
tomacorriente polariza o e una sola manera. Si el enchufe no
cabe totalmente en el tomacorriente, gire el enchufe. Si aún así no
calza, consulte a un servicio técnico cualifica o. No intente anular
esta característica de seguridad.

13
USK CMM1 - 070323
Assembly page 13/44
INSTRUCCIONES DEL CABLE
El cable e alimentación el aparato es un cable corto a fin e
isminuir el riesgo e acci entes (caí as al tropezar con él, etc.)
Pue e utilizar un alarga or si es necesario.
• Asegúrese e que el nivel eléctrico el cable es igual o mayor
que el in ica o. Una extensión con un bajo nivel eléctrico
correría el riesgo e sobrecalentarse y e estropearse.
• Para evitar riesgos colocar e forma tal que los niños no pue an
jalarlo o tropezar con él. Que no arrastre nunca por el suelo.

14
USK CMM1 - 070323
Assembly page 14/44
PARTES
1. Bloque motor
2. Tapa para función bati ora y exprimi or
3. Cubeta el exprimi or
4. Piña el exprimi or
5. Varilla
6. Tazón e la pica ora
7. Base
8. Amasa ores
9. Bati ores
10. Tapa para función pica ora y varilla
11. Tapa e la pica ora
12. Botón e expulsión
13. Selector e veloci a
14. Interruptor « Stick » mixer

15
USK CMM1 - 070323
Assembly page 15/44
TIEMPO DE UTILIZACIÓN
Este aparato no es para usos profesionales. Es necesario realizar
para as a intervalos regulares. Para una utilización óptima e su
aparato y evitar el eterioro e su motor, controle el tiempo e
utilización continua a máximo in ica o más abajo en “Selección
e las veloci a es”. Las pausas e utilización tienen que urar por
los menos 10 minutos.
SELECCIÓN DE LAS VELOCIDADES
Depen ien o el accesorio utiliza o, pue e seleccionar las
siguientes veloci a es:
BATIDORA veloci a 1 a 5 (KB=5 mins)
BATIDORA DE VARILLA veloci a 4 a 5 + interruptor
stick(KB=1min)
PICADORA veloci a 3 a 5 (KB= 1 min)
EXPRIMIDOR Velocidad 1 únicamente (KB= 3 mins)
(KB= XX min ón e xx es el tiempo e uso máximo). Una vez
transcurri o ese tiempo, es preciso hacer una pausa e al menos
iez minutos.
Veloci a es ajustables: Coloque el selector e veloci a en la
posición e la veloci a esea a.
UTILIZACIÓN GENERAL
Respete los ensamblajes abajo escritos porque los ispositivos e
seguri a impi en que se utilice el aparato e mo o no seguro y
porque el aparato no funcionaria correctamente.

16
USK CMM1 - 070323
Assembly page 16/44
UTILIZACIÓN DE LA BATIDORA
Esta función permite batir o amasar alimentos.
• Asegúrese e que el aparato está esenchufa o.
• Coloque la tapa e seguri a (2) en la parte superior el bloque
motor asegurán ose e que la flecha el bloque motor se
encuentra enfrente el símbolo que se encuentra en la tapa.
Y gírela en el senti o e las agujas el reloj hasta que la flecha
esté alinea a con el símbolo .
• Acople la base en el bloque motor asegurán ose e que la
flecha el bloque motor se encuentra enfrente el símbolo e
la base. Y gire el bloque motor en el senti o contrario e las
agujas el reloj hasta que la flecha esté alinea a con el símbolo
.
• Si la tapa o la base no están correctamente fija os, la bati ora
no se pon rá en marcha.
• Intro uzca los bati ores o los amasa ores en los orificios previstos
para este fin. Tire ligeramente e los bati ores para comprobar
que están correctamente fija os.
• Para esmontar la bati ora, proce a e mo o contrario
excepto por los bati ores y amasa ores que eben ser
expulsa os con el botón e expulsión.

17
USK CMM1 - 070323
Assembly page 17/44
UTILIZACIÓN DEL EXPRIMIDOR
Con este accesorio se pue e preparar zumos e fruta.
• Asegúrese e que el aparato está esenchufa o.
• Acople la base en el bloque motor asegurán ose e que la
flecha el bloque motor se encuentra enfrente el símbolo e
la base. Y gire el bloque motor en el senti o contrario e las
agujas el reloj hasta que la flecha esté alinea a con el símbolo
. Si la base no está correctamente fija a, el exprimi or no se
pon rá en marcha.
• Ponga el bloque motor verticalmente en la base.
• Coloque la cubeta el exprimi or en la parte superior el bloque
motor asegurán ose e que la flecha el bloque motor se
encuentra en frente el símbolo ubica o en el accesorio. Y
gire el accesorio en el senti o e las agujas el reloj hasta que la
flecha esté alinea a con el símbolo .
• Intro uzca la piña en el eje.
• Coloque un recipiente para recoger el zumo ebajo el pitorro
e la cubeta.
• Para esmontar el exprimi or, proce a e mo o inverso.

18
USK CMM1 - 070323
Assembly page 18/44
UTILIZACIÓN DE LA PICADORA
Con este accesorio se pue e picar con imentos, fruta seca o
carne. Para picar carne, aconsejase cortarla en pe azos e
antemano.
• Asegúrese e que el aparato está esenchufa o.
• Coloque la tapa e seguri a (10) en la parte superior el
bloque motor asegurán ose e que la flecha el bloque motor
se encuentra enfrente el símbolo e la tapa. Y gírela en el
senti o e las agujas el reloj hasta que la flecha esté alinea a
con el símbolo . Si la tapa e seguri a no está correctamente
coloca a, será imposible acoplar el bloque motor con la tapa
e la pica ora
• Ponga la cuchilla en el eje el tazón e la pica ora. Tenga
cui a o e no herirse con la cuchilla ya que está muy afila a.
• Ponga la tapa e la pica ora en el tazón asegurán ose e que
los salientes e la tapa se intro uzcan en las ranuras el tazón.
• Coloque el bloque motor en el eje e la tapa asegurán ose e
que la flecha el bloque motor se encuentra enfrente el
símbolo e la tapa. Y gire el bloque motor en el senti o
contrario e las agujas el reloj hasta que la flecha esté
alinea a con el símbolo .
• Para esmontar la pica or, proce a e mo o inverso.
Nota: Para quitar la tapa el tazón e la pica ora, es necesario
apretar las aletas.
• Tenga cui a o cuan o limpie la pica ora ya que las cuchillas
están muy afila as.

19
USK CMM1 - 070323
Assembly page 19/44
UTILIZACIÓN DE LA BATIDORA DE VARILLA
Con este accesorio se pue e triturar alimentos como legumbres
para preparar sopas, y también batir líqui os. Sólo ebe ser utiliza o
en posición vertical y con las cuchillas hacia abajo.
• Asegúrese e que el aparato está esenchufa o.
• Coloque la tapa e seguri a (10) en la parte superior el
bloque motor asegurán ose e que la flecha el bloque motor
se encuentra enfrente el símbolo e la tapa. Y gire la tapa
en el senti o e las agujas el reloj hasta que la flecha esté
alinea a con el símbolo . Si la tapa e seguri a no está
correctamente coloca a, será imposible acoplar la varilla con el
bloque motor.
• Inserte la varilla en el orificio asegurán ose e que la flecha el
bloque motor se encuentra enfrente el símbolo e la varilla
Encaje la varilla y gírela simultáneamente en el senti o contrario
e las agujas el reloj hasta que la flecha esté alinea a con el
símbolo . Compruebe el cierre tiran o e la varilla.
• Para esmontar la bati ora e varilla, proce a e mo o inverso.
• Tenga cui a o cuan o limpie la varilla ya que las cuchillas están
muy afila as.
• Nota : el stick mixer ebe utilizarse con las veloci a es 4 o 5 y
con el botón “stick”. Si quiere triturar comi a, ponga su aparato
en veloci a 4 o 5 y pulse el botón « stick ». Al relajar ese botón,
el aparato se para. Siempre tenga cui a o e poner el selector

20
USK CMM1 - 070323
Assembly page 20/44
e veloci a en posición « 0 » para evitar que se utilice otros
accesorios a veloci a es ina apta as, lo que pue e ser
peligroso.
LIMPIEZA
• Desenchufe siempre el aparato e la re antes e limpiarlo.
• Quite los accesorios antes e limpiarlos con agua y etergente.
Evite utilizar esponjas abrasivas para limpiar las partes e plástica.
Pase los accesorios por agua y éjelos secar antes e volver a
utilizarlos. No los ponga en el lavavajillas.
• Pase su aparato con un papel absorbente o un trapo suave y
ligeramente húme o.
• No limpie nunca el aparato con pro uctos abrasivos que
po rían añar el revestimiento.
• No sumerja nunca el bloque motor en el agua o en cualquier
otro líqui o.
This manual suits for next models
2
Table of contents
Languages:
Other Kalorik Mixer manuals

Kalorik
Kalorik MS 39731 User manual

Kalorik
Kalorik TKG M 3014 User manual

Kalorik
Kalorik USK MS 18676 User manual

Kalorik
Kalorik CMM 39732 User manual

Kalorik
Kalorik TKG MX 1010 CW User manual

Kalorik
Kalorik USK MS 1 User manual

Kalorik
Kalorik TKG CMM 1010 CW User manual

Kalorik
Kalorik USK MS 18676 User manual

Kalorik
Kalorik USK MS 39759 User manual

Kalorik
Kalorik CMM 1 User manual