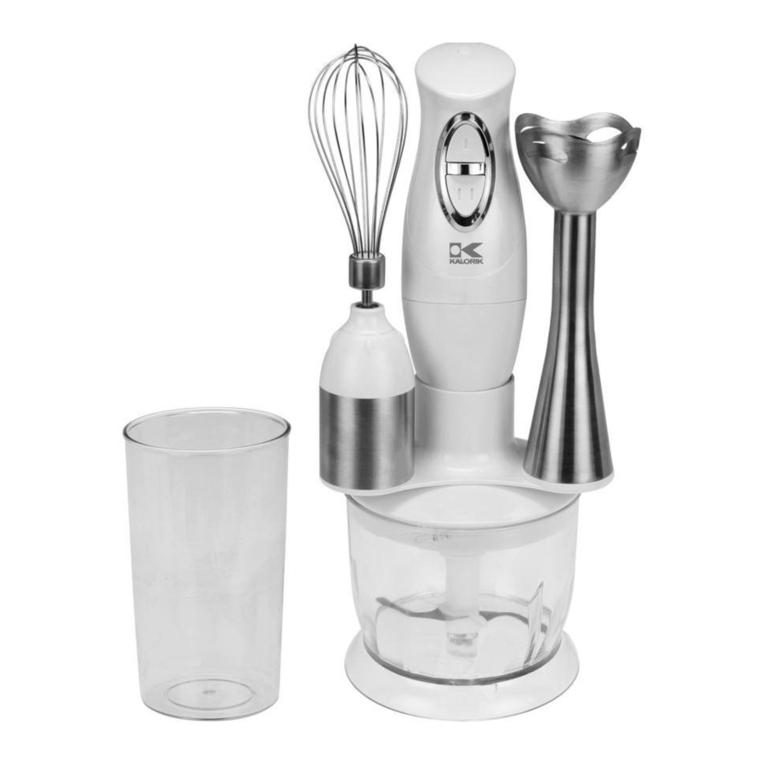
Kalorik USK MS 1 User manual

Stick mixer
Batidora de varilla
Mixer plongeant
USK MS 1
120 V~ 200W
www.KALORIK.com

2
USK MS 1 - 080211
IMPO TANT SAFEGUA DS
1. EAD ALL INST UCTIONS
2.
Check that your mains voltage corresponds to that stated on the
rating plate of the appliance efore using the appliance.
3. To protect against electric shock do not immerse cord, plug, or
motor unit in water or other liquid.
4. Close supervision is necessary when the appliance is used y or
near children.
5. Unplug from outlet when not in use, efore putting on or taking
off parts and efore cleaning.
6. Avoid contacting moving parts.
7. Do not operate any appliance with a damaged cord or plug or
after the appliance malfunctions, or is dropped or damaged in
any manner. Return appliance to the nearest authorized service
facility for examination, repair or electrical or mechanical
adjustment.
8. The use of accessory attachments not recommended y the
appliance manufacturer may cause injuries.
9. Do not use outdoors.
10.
Do not let cord hang over edge of ta le or counter or touch hot
surfaces.
11. Do not place on or near a hot gas or electric urner, or in a
heated oven.
12. Always attach plug to appliance first, then plug cord in the wall
outlet. To disconnect, remove plug from wall outlet.
13. While using the whisk, keep hands, hair, clothing, as well as
spatulas and other utensils away from eater during operation to
reduce the risk of injury to persons, and/or damage to the
appliance.
14.
Remove the accessories from the motor unit efore washing.
15. The lades of the chopper are sharp. Handle carefully.
16. Keep hands and utensils away from moving lades while
processing food to reduce the risk of severe injury to persons or

3
USK MS 1 - 080211
damage to the appliance. A scraper may e used ut must e
used only when the appliance is not running.
17. Never add to container while appliance is operating.
18. Container must e properly in place efore operating appliance.
19. Be certain cover is securely locked in place efore operating
appliance.
20. When mixing liquids, especially hot liquids, use a tall container or
make small quantities at a time to reduce spillage.
SAVE THESE INST UCTIONS
POLA IZED PLUG INST UCTIONS
Some appliances are equipped with a polarized plug (one lade is
wider than the other). To reduce the risk of electric shock, this plug
will fit into the polarized outlet only one way. If the plug does not
properly fit into the outlet at first, reverse it. If it still does not fit,
contact a competent qualified electrician. Do not attempt to modify
the plug in any way.
For appliances equipped with a standard plug, simply insert the plug
into the outlet without paying attention to the way you plug it.
SHO T CO D INST UCTIONS
A short power supply cord is provided to reduce the hazards resulting
from ecoming entangled in, or tripping over a longer cord.
Extension cords may e used if care is exercised in their use.
• The electrical rating of the extension cord should e at least that
of the appliance. If the electrical rating of the extension cord is
too low, it could overheat and urn.
• The resulting extended cord should e arranged so that it will not
hang over the counter top or ta letop where it can e pulled on
y children or tripped over.

4
USK MS 1 - 080211
PA TS DESC IPTION
1. Motor unit
a. Cord and plug
. Cord tidy
c. On/off utton
d. Vents
e. Bayonet connector
2. Detacha le metal leg
3. Jug
4. Lid of the chopper
5. Axle unit
6. Chopper lade
7. Lid
8. Whisk/Frother ody
9. Remova le stainless steel
whisk
10. Remova le stainless steel
frother
11. Base
12. Storage point of
Whisk/Frother

5
USK MS 1 - 080211
IMPO TANT INFO MATION
This appliance is not for long lasting use. You should never exceed
the maximum operating time indicated in the ta le elow (see page
7). Failure to follow this instruction carefully may result in damage to
the motor. Please make some operation reaks regularly. The reaks
should last at least 10 minutes.
BEFO E THE FI ST USE
• Remove all packaging, and check that no parts are damaged or
missing.
• Read these instructions carefully!
• Wash the jug, lid, chopper lade, axle unit and ase in warm
soapy water and dry thoroughly.
• Wipe the motor unit and lid of the chopper with a damp cloth.
• Rinse the leg under warm running water, wipe the lade with a
damp cloth and dry thoroughly.
• Remove the stainless steel whisk from the whisk/frother ody and
wash in warm soapy water, wipe the whisk ody with a damp
cloth and dry thoroughly.
• Wash the stainless steel frother in warm soapy water and allow to
dry thoroughly.
USING THE STICKMIXE
(motor unit and metal leg)
• Ensure that the unit is unplugged
• Hold the motor unit, and push the leg onto the ayonet fitting,
turn the leg clockwise and ensure that the leg is tight.
• Put the ingredients into the jug or a suita le container (such as a
mixing owl or pan). Do not overfill to prevent splashing.
• Plug the unit into a suita le mains socket.
• Hold the unit securely and press the on/off utton. We
recommend that the motor unit is operated in short on/off pulses.
• When mixing liquids ensure the lade is fully immersed efore
switching on the appliance to prevent splashing.
• Never remove the unit from the liquid until the lade has totally
stopped spinning.

6
USK MS 1 - 080211
USING THE CHOPPE
(motor unit, chopper and jug)
• Put the axle unit into the ottom of the jug ensuring it is properly
positioned with the location features inside the jug.
• Sit the chopper lade onto the axle
• Add ingredients to the jug. Some hard foodstuffs (e.g. carrots,
cheese and meat) will need to e chopped efore eing put
into the jug. DO NOT OVERFILL THE JUG.
• Hold the motor unit, and push the lid of the chopper onto the
ayonet fitting, turn the lid of the chopper and ensure that the lid
of the chopper and motor unit are tight.
• Put the lid of the chopper on top of the jug, making sure that the
axle engages properly and that the chopper is located correctly
and securely into the jug.
• Hold the jug handle securely with one hand, and the motor unit
with your other hand.
• Press the on/off utton.
• NEVER remove the motor unit and lid of the chopper from the jug
until the lade has stopped spinning.
• Only use the lid of the chopper, lade and axle unit in the jug
provided.
USING THE WHISK
(motor unit, whisk/frother body and
removable stainless steel whisk)
• Hold the motor unit, and push the whisk/frother ody onto the
ayonet fitting, turn the whisk/frother ody and ensure that it is
tight.
• Push the end of the whisk firmly into the hole on the end of the
whisk/frother ody.
• Press the on/off utton.
• Do not touch the whisk while it is moving
• Please refer to the information at the end of this instruction
ooklet for recipe information and operating guidelines.
• To remove the whisk for cleaning, gra the whisk and firmly tug
from the ody.
• While using the whisk, store the frother in the ase in the storage
point provided.

7
USK MS 1 - 080211
USING THE F OTHE
(motor unit, whisk/frother ody and
remova le frother)
• Hold the motor unit, and push the whisk/frother ody onto the
ayonet fitting, turn the whisk/frother ody and ensure that it is
tight.
• Push the end of the whisk firmly into the hole on the end of the
whisk/frother ody.
• Ensure that the frother is fully immersed in the liquid efore starting
the frother.
• Press the on/off utton.
• DO NOT remove the frother from the liquid until the frother has
totally stopped.
• Please refer to the information at the end of this instruction
ooklet for recipe information and operating guidelines.
• To remove the frother for cleaning, gra the frother and firmly tug
from the ody.
• While using the whisk, store the frother in the ase in the storage
point provided.
ECIPE INFO MATION AND OPE ATING
GUIDELINES
STICK MIXE
Ingredients Maximum quantity Maximum
operating time
Container
Tomato
sauce
14 oz: 1.75 cups
(400g) tinned
tomatoes, 3.5 oz:
1.125 cups (100g)
olives
10 seconds Jug
Vegeta le
soup
3.3 pints: 6.5 cups
(1.5 litres) 30 seconds. Cooking pan
CHOPPE
Ingredients Maximum quantity Maximum
operating time
Container
Chocolate 3.5 oz: 0.75 cup
(100g)
15 seconds Jug

8
USK MS 1 - 080211
Grated
cheese
4 oz: 1 cup (125g) 5 seconds Jug
Chopped
raw onion
(medium
siza)
5 oz: 0.75 cup
(150g)
5 seconds Jug
WHISK
Ingredients Maximum quantity Maximum
operating time
Container
Egg whites 6
3 x 30 seconds
(1.5 minutes in
total)
Large, wide
rimmed owl
Meringue
6 egg whites, 5 oz:
0.75 cup (150g)
sugar
30 seconds Large, wide
rimmed owl
Cream 18 fl oz: 2.25 cups
(500ml)
5 x 30 seconds
(2.5 minutes in
total)
Deep, wide
rimmed owl
F OTHE
Ingredients Maximum quantity Maximum
operating time
Container
Milk 9 fl oz :1.125 cups
(250ml) 5 seconds Tall glass
CA E AND CLEANING YOU P ODUCT
1. Motor unit
- Do NOT immerse the motor unit in water or any other liquid, or
put into a dishwasher.
- Do NOT exceed the recommended maximum operating times
as detailed in the ta le "RECIPE INFORMATION AND OPERATING
GUIDELINES" of this instruction manual.
- To clean your product, wipe the outer surfaces of the unit with a
dry and slightly damp cloth.
- Ensure that the unit is dry efore using
- Periodically check the cord for signs of wear.
. Detachable metal leg
- Wash the leg in warm soapy water

9
USK MS 1 - 080211
- Allow to dry thoroughly
- After processing salty food, rinse the leg immediately under
running water
3. Jug
- Wash the jug in warm soapy water
- Allow to dry thoroughly
- Do NOT wash in a dishwasher
4. Chopper unit
- Wipe with a damp cloth
5. Axle unit
- Wash the axle unit in warm soapy water
- Allow to dry thoroughly
6. Chopper blade
- Wash the chopper lade in warm soapy water
- Take care when handling the sharp lade
7. Lid
- Wash the lid in warm soapy water
- Allow to dry thoroughly
8. Whisk/Frother body
- Wipe the whisk/frother ody with a damp cloth
9. Removable whisk
- Wash the remova le stainless steel whisk in warm soapy water
- Allow to dry thoroughly
10. Removable frother
- Wash the remova le stainless steel frother in warm soapy water
- Allow to dry thoroughly
11. Base
- Wash the ase in warm soapy water
- Allow to dry thoroughly
WHEN PROCESSING FOODS WITH COLOUR (E.G. CARROTS) SOME
PARTS MAY BECOME DISCOLOURED. FOLLOW THE CARE
INSTRUCTIONS ABOVE – THIS WILL NOT AFFECT THE PERFORMANCE OF
YOUR PRODUCT.

10
USK MS 1 - 080211
WA ANTY
We suggest that you complete and return the enclosed Product
Registration Card promptly to facilitate verification of the date of
original purchase. However, return of the Product Registration Card is
not a condition of these warranties. You can also fill this warranty
card online, at the following address: www.KALO IK.com
This KALORIK product is warranted for 1 year from the date of
purchase against defects in material and workmanship. This warranty
is not transfera le. Keep the original sales receipt. Proof of purchase
is required to o tain warranty performance.
During this period, the KALORIK product that, upon inspection y
KALORIK, is proved defective, will e repaired or replaced, at
KALORIK's option, without charge to the customer. If a replacement
product is sent, it will carry the remaining warranty of the original
product.
This warranty does not apply to any defect arising from a uyer's or
user's misuse of the product, negligence, failure to follow KALORIK
instructions noted in the user’s manual, use on current or voltage
other than that stamped on the product, wear and tear, alteration
or repair not authorized y KALORIK, or use for commercial purposes.
There is no warranty for glass parts, glass containers, filter asket,
lades and agitators, and accessories in general. There is also no
warranty for parts lost y the user.
ANY WARRANTY OF MERCHANTABILITY OR FITNESS WITH RESPECT TO
THIS PRODUCT IS ALSO LIMITED TO THE ONE YEAR LIMITED WARRANTY
PERIOD
Some states do not allow limitation on how long an implied warranty
lasts or do not allow the exclusion of incidental or consequential
damages, so the a ove limitations may not apply to you. This
warranty gives you specific legal rights, and you may also have other
rights which vary from state to state.
11
USK MS 1 - 080211
If the appliance should ecome defective within the warranty
period and more than 30 days after date of purchase, do not return
the appliance to the store: often, our Consumer Service
Representatives can help solve the pro lem without having the
product serviced. If servicing is needed, a Representative can
confirm whether the product is under warranty and direct you to the
nearest service location.
If this is the case, ring the product (or send it, postage prepaid),
along with proof of purchase and indicating a return authorization
number given y our Consumer Service Representatives, to the
nearest authorized KALORIK Service Center (please visit our we site
at www.KALO IK.com or call our Customer Service Department for
the address of the nearest authorized KALORIK Service Center).
If you send the product, please include a letter explaining the nature
of the claimed defect.
If you have additional questions, please call our Consumer Service
Department (please see elow for complete contact information),
Monday through Friday from 9:00am - 6:00pm (EST). Please note
hours are su ject to change.
If you would like to write, please send your letter to:
KALO IK Consumer Service department
Team International Group of America Inc
1400 N.W 159th Street, Suite 102
Miami Gardens, FL 33169 USA
Or call :
Toll Free: +1 888-521-TEAM
Only letters can be accepted at this address above. Shipments and
packages that do not have a return authorization number will be
refused.

12
USK MS 1 - 080211
CONSEJOS DE SEGU IDAD
1. LEA TODAS LAS INST UCCIONES.
2.
Antes de utilizar el aparto, comprue e que el voltaje de la red
eléctrica coincide con el aparato.
3. Para protegerse contra una descarga eléctrica, no sumerja el
ca le de alimentación, la clavija o el loque motor en agua o
en otros líquidos.
4.
Es siempre necesaria la supervisión cercana cuando este
aparato sea utilizado cerca de niños. Este aparato no de e ser
usado por niños.
5.
No opere el aparato si el ca le o el enchufe están dañados, o
después de que el aparato ha funcionado inadecuadamente,
se ha caído o ha sido dañado en cualquier manera. El aparato
de e ser llevado al fa ricante o a un centro de servicio
autorizado para ser compro ado y reparado o ajustado
mecánicamente o eléctricamente.
6. Desenchufe el aparato siempre que no lo use o antes de
limpiarlo.
7. No toque las partes en movimiento.
8. El uso de accesorios que no sean los recomendados por el
fa ricante puede causar incendios, descargas eléctricas o
heridas.
9. No use en el exterior.
10.
No permita que el ca le cuelgue del orde de la mesa o del
mostrador o que toque una superficie caliente.
11. Enchufe siempre primero el ca le al aparato y después en el
enchufe de la red eléctrica. Para desconectar el aparato,
desenchúfelo.
12. No coloque este aparato so re o cerca de quemadores de gas
o eléctricos, o dentro de un horno caliente.
13. Mantenga las manos, ca ellos, ropa y espátulas u otros utensilios
lejos del atidor durante la utilización para evitar heridas a las
personas y/o daños al aparato.
14. Desmonte los accesorios del loque motor antes de la limpieza.

13
USK MS 1 - 080211
15. Las cuchillas de la picadora están muy afiladas. Tenga cuidado
de no cortarse cuando las manipule.
16. Durante el uso, mantenga las manos u otros utensilios lejos de las
cuchillas en movimiento para evitar heridas o daños al aparato.
Puede utilizar un raspador sólo cuando el aparato esté
desenchufado.
17. No añada nada en el recipiente cuando el aparato esté
funcionando.
18. Comprue e que el recipiente está correctamente posicionado
antes de poner el aparato en marcha.
19. Asegúrese de que la tapa está correctamente cerrada antes de
poner el aparato en marcha.
20. Cuando misture líquidos, especialmente líquidos calientes, utilice
un recipiente alto o prepare pequeñas cantidades para evitar
derrame.
GUA DE ESTAS INST UCCIONES

14
USK MS 1 - 080211
INFO MACIÓN SOB E EL ENCHUFE POLA IZADO
Algunos aparatos están provistos con un enchufe polarizado (una
pata es más ancha que la otra). Para reducir el riesgo de choque
eléctrico, este enchufe calza en el tomacorriente polarizado de una
sola manera. Si el enchufe no ca e totalmente en el tomacorriente,
gire el enchufe. Si aún así no calza, consulte a un servicio técnico
cualificado. No intente anular esta característica de seguridad.
Para los aparatos provistos con un enchufe clásico, asta con
insertar el enchufe en la toma de corriente.
INST UCCIONES DEL CABLE
El ca le de alimentación del aparato es un ca le corto a fin de
disminuir el riesgo de accidentes (caídas al tropezar con él, etc.)
Puede utilizar un alargador si es necesario.
• Asegúrese de que el nivel eléctrico del ca le es igual o mayor
que el indicado. Una extensión con un ajo nivel eléctrico
conllevaría el riesgo de su so recalentamiento y daño.
• Para evitar riesgos, coloque el aparato de forma tal que los niños
no puedan jalarlo o tropezar con él. Que no arrastre nunca por el
suelo.

15
USK MS 1 - 080211
PA TES
1. Bloque del motor
a. Ca le de
alimentación y clavija
. Atadura del ca le de
alimentación
c. Interruptor
encendido/apagado
d. Rejilla de ventilación
e. Contera de conexión
2. Pié de la varilla
desmonta le
3. Tazón
4. Tapa de la picadora
5. Eje del soporte
6. Cuchilla de la picadora
7. Tapa del tazón
8. Soporte del
atidor/accesorio para
espumar la leche
9. Batidor de acero
inoxida le desmonta le
10. Accesorio para espumar la
leche de acero inoxida le
desmonta le
11. Base
12. U icación del atidor y el
accesorio para espumar la
leche

16
USK MS 1 - 080211
TIEMPO DE UTILIZACIÓN
Este aparato no puede ser utilizado de forma continua. Es necesario
realizar paradas a intervalos regulares. El cuadro más a ajo (véase
página 16) indica el tiempo de utilización máximo que no se de e
superar. No realizar esas paradas podría dañar el motor. Realice
paradas a intervalos regulares. Las pausas de utilización tienen que
durar por los menos 10 minutos.
ANTES DE LA P IME A UTILIZACIÓN
• Quite el em alaje y comprue e que no falta ningún accesorio y
que ninguna parte del aparato está defectuosa.
• ¡Lea detenidamente el manual de instrucciones!
• Limpie el tazón, la tapa, la cuchilla de la picadora, el eje y la
ase con agua caliente y detergente y séquelos con cuidado.
• Limpie el loque motor y la tapa de la picadora con un paño
suave húmedo.
• Pase el pie de la atidora por agua y limpie la cuchilla con un
paño húmedo y seque todo con cuidado.
• Quite el atidor de acero inoxida le del soporte y límpielo con
agua y detergente. Limpie el soporte del atidor/accesorio para
espumar la leche con un paño húmedo y seque las dos partes
con cuidado.
• Limpie el accesorio para espumar la leche con agua y
detergente y séquelo con cuidado.
UTILIZACIÓN DE LA BATIDO A DE VA ILLA
(bloque motor y pie de la batidora)
• Asegúrese de que el aparato está desenchufado.
• Agarre el loque motor, acople el pie en la contera de conexión
del loque motor y gírelo en el sentido de las agujas del reloj
hasta que quede loqueado. Asegúrese de que está ien fijado.
• Ponga los ingredientes en el tazón o en un recipiente adaptado
(de preferencia astante alto). No llene demasiado el recipiente
para evitar salpicaduras.

17
USK MS 1 - 080211
• Conecte el aparato a la red.
• Mantenga firmemente el loque motor y pulse el interruptor
encendido/apagado. Aconsejamos a que pulse el interruptor de
forma intermitente.
• Asegúrese de que la cuchilla está del todo sumergida antes de
empezar a mezclar para evitar salpicaduras.
• No saque nunca el aparato del liquido antes de la parada
completa de la cuchilla.
UTILIZACIÓN DE LA PICADO A
(Bloque motor, picadora
y tazón)
• Ponga el eje en el fondo del tazón asegurándose de que está
correctamente posicionado.
• Ponga la cuchilla de la picadora en el eje.
• Introduzca los ingredientes en el tazón. Corte los ingredientes
duros (por ejemplo zanahorias, queso o carne) antes de
introducirlos en el tazón. NO LLENE EN EXCESO EL TAZÓN.
• Agarre el loque motor, acople la tapa de la picadora en la
contera de conexión del loque motor y gírela en el sentido de
las agujas del reloj hasta que quede loqueada. Asegúrese de
que está ien fijada.
• Luego ponga la tapa de la picadora en el tazón y asegúrese de
que está correctamente posicionada en el eje de la cuchilla.
• Tenga el tazón en una mano y el loque motor en la otra.
• Pulse el interruptor.
• No quite NUNCA el loque motor o la tapa de la picadora antes
de la parada completa de la cuchilla.
• Utilice la tapa de la picadora, la cuchilla, el eje y su soporte
exclusivamente con el tazón original.

18
USK MS 1 - 080211
UTILIZACIÓN DEL BATIDO
(Bloque motor, soporte del
atidor/accesorio para espumar la leche y atidor desmonta le de
acero inoxida le)
• Agarre el loque motor, acople el soporte del atidor/accesorio
para espumar la leche en la contera de conexión del loque
motor y gírelo hasta que quede loqueado.
• Introduzca el atidor en su soporte y comprue e que está
correctamente fijado.
• Pulse el interruptor.
• No toque el atidor cuando esté en movimiento.
• Véase cuadro al final del manual de instrucciones para recetas y
consejos de utilización.
• Para quitar el atidor del soporte, tire firmemente de ello.
• Cuando utilice el atidor, recoja el accesorio para espumar la
leche en la ase.
UTILIZACIÓN DEL ACCESO IO PA A ESPUMA
LA LECHE
( loque motor, soporte del atidor/accesorio para
espumar la leche y accesorio para espumar la leche desmonta le)
• Agarre el loque motor, acople el soporte del atidor/accesorio
para espumar la leche en la contera de conexión del loque
motor y gírelo hasta que quede loqueado.
• Introduzca el accesorio para espumar la leche en su soporte y
comprue e que está correctamente fijado.
• Asegúrese de que el accesorio está del todo sumergido antes de
poner el aparato en marcha.
• Pulse el interruptor.
• No saque nunca el accesorio del liquido antes de su parada
completa.
• Véase cuadro al final del manual de instrucciones para recetas y
consejos de utilización.
• Para quitar el accesorio del soporte, tire firmemente de ello.
• Cuando utilice el accesorio de espumar la leche, recoja el
atidor en la ase.

19
USK MS 1 - 080211
CONSEJOS DE UTILIZACIÓN
BATIDO A DE VA ILLA
Preparación
Cantidad
máxima
Tiempo de
utilización
máximo
ecipiente
Salsa de
tomate
14 oz: 1,75
tazas (400g)
de tomates en
lata, 3,5 oz:
1,125 tazas
(100g) de
aceitunas
10 segundos Tazón
Sopa
3,3 pintas: 6,5
tazas (1,5
litros)
30 segundos Cacerola
PICADO A
Preparación
Cantidad
máxima
Tiempo de
utilización
máximo
ecipiente
Chocolate 3,5 oz: 0.75
taza (100g) 15 segundos Tazón
Queso
rallado
4 oz: 1 taza
(125g) 5 segundos Tazón
Ce olla
cruda
picada
(media)
5 oz: 0.75 taza
(150g) 5 segundos Tazón
BATIDO
Preparación
Cantidad
máxima
Tiempo de
utilización
máximo
ecipiente
Claras de
huevo 6
3 x 30 segundos
(1,5 minutos en
total)
Fuente larga y
ancha
Merengue
6 claras de
huevo, 5 oz:
0.75 taza
30 segundos Fuente larga y
ancha

20
USK MS 1 - 080211
(150g) de
azúcar
Nata 18 fl oz: 2,25
tazas (500ml)
5 x 30 segundos
(2,5 minutos en
total)
Fuente ancha
y honda
ACCESO IO PA A ESPUMA LA LECHE
Preparación
Cantidad
máxima
Tiempo de
utilización
máximo
ecipiente
Leche 9 fl oz: 1,125
tazas (250ml) 5 segundos Grande vaso
MANTENIMIENTO Y LIMPIEZA DEL APA ATO
1. Bloque motor
− No sumerja NUNCA el loque motor en el agua o en
cualquier otro líquido ni para su limpieza ni por cualquier otra
razón.
− No supere nunca el tiempo de utilización máximo indicado
en el cuadro “CONSEJOS DE UTILIZACIÓN” del manual de
instrucciones.
− Pase las superficies del aparato con un trapo seco o
ligeramente húmedo.
− Comprue e regularmente que el ca le de alimentación no
está dañado.
. Pie de la batidora desmontable
− Limpie el pie con agua caliente y detergente.
− Séquelo con cuidado.
− Cuando prepare alimentos salados, pase inmediatamente el
pie por agua corriente.
3. Tazón
− Lave el tazón con agua caliente y detergente.
− Séquelo con cuidado.
− No lo ponga en el lavavajillas
4. Picadora
− Límpiela con un paño húmedo.
5. Eje
− Lave el eje y su soporte con agua caliente y detergente.
− Séquelos con cuidado.
Other manuals for USK MS 1
1
Table of contents
Languages:
Other Kalorik Mixer manuals

Kalorik
Kalorik USK MS 18676 User manual

Kalorik
Kalorik CMM 1 User manual

Kalorik
Kalorik USK MS 39759 User manual

Kalorik
Kalorik TKG CMM 1010 CW User manual

Kalorik
Kalorik TKG M 3014 User manual

Kalorik
Kalorik MS 39731 User manual

Kalorik
Kalorik USK MS 18676 User manual

Kalorik
Kalorik USK CMM 1 User manual

Kalorik
Kalorik CMM 39732 User manual

Kalorik
Kalorik TKG MX 1010 CW User manual