KALOS KLEH101-0100 User manual

Headline
Oct 2021
ASSEMBLY
TIME
PERSONS
REQUIRED
Plush Electric Heater
Floor Standing
KLEH101-0100
Assembly Instructions
IMPORTANT
PLEASE KEEP THIS BOOKLET FOR FUTURE REFERENCE.
THIS IS IMPORTANT INFORMATION REGARDING THE USE AND
CARE OF YOUR OUTDOOR HEATER.

Important Information
Important advice before you begin:
This appliance is not intended for use by persons (including
children) with reduced physical, sensory or mental capabilities
or lack of experience and knowledge if they have been given
supervision or instruction concerning use of the appliance in a
safe way and understand the hazards involved.
Children should not play with the appliance.
Cleaning and user maintenance should not be made by children
without supervision.
Do not use any other tools other than those recommended to
build this product.
Please do not use substitute parts. Use only additional or
replacement parts supplied by Kettler.
In the unlikely event that this product has missing or damaged
parts, please visit our website www.kettler.co.uk/shop.
Unpack the outdoor heater making sure that all of the items are present and that
there are no components left in the box and the heater head is free from any
packaging material. Extra packaging is added to some models for transportation
protection which must be removed before assembly.
Using the detailed drawing following the steps to assemble the outdoor heater
(where relevant).
DO NOT connect the outdoor heater to the electrical supply until the assembly is
complete.
DO NOT connect the outdoor heater to the electrical supply if any of the
components or power cord is damaged in any way.
CAUTION - Risk of Electric Shock. DO NOT open or try to repair the heater yourself.

For Your Safety
1. Site the heater outside or in a large
open area and well away from any
obstructions such as branches or where
the heater is near any objects that can
be aected by heat, such as furniture,
curtains or other inammable objects
(minimum distance 1 metre).
2. DO NOT use this heater in the immediate
surroundings of a bath, a shower or a
swimming pool. Do not use near water.
3. DO NOT use in unventilated areas.
4. DO NOT use where gas, petrol, paint or
other surely ammable goods are stored.
5. DO NOT push any items through,
obstruct or cover the grill of the heater
head.
6. DO NOT position immediately above or
below an electrical socket.
7. DO NOT move when connected to an
electrical supply and always wait for
the patio heater to cool down before
cleaning / storing away.
8. DO NOT touch the heater head when in
use.
9. DO NOT leave turned on and
unattended especially when children
and or animals are in the vicinity.
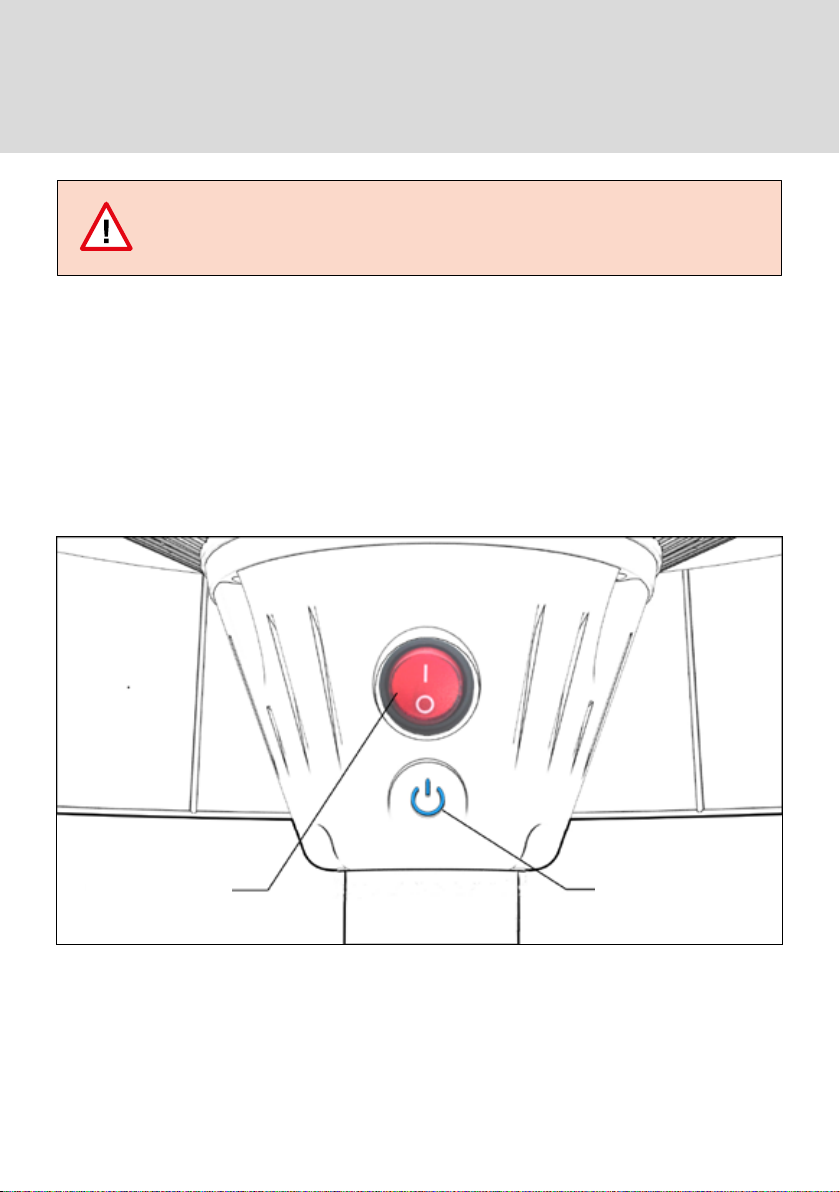
10. The indication of the dierent positions
of switches shall be visible from a
distance of 1M.
Warning
• This heater is not equipped with a device
to control the room temperature. DO NOT
use this heater in small rooms when they
are occupied by persons not capable of
leaving the room on their own, unless
constant supervision is provided.
• Children of less than 3 years should be
kept away unless continuously supervised.
• Children under 8 years shall not plug
in, regulate and clean the appliance or
perform user maintenance.
Caution
• Some parts of this product can become
very hot and cause burns. Particular
attention must be given where children,
vulnerable people and animals are
present.
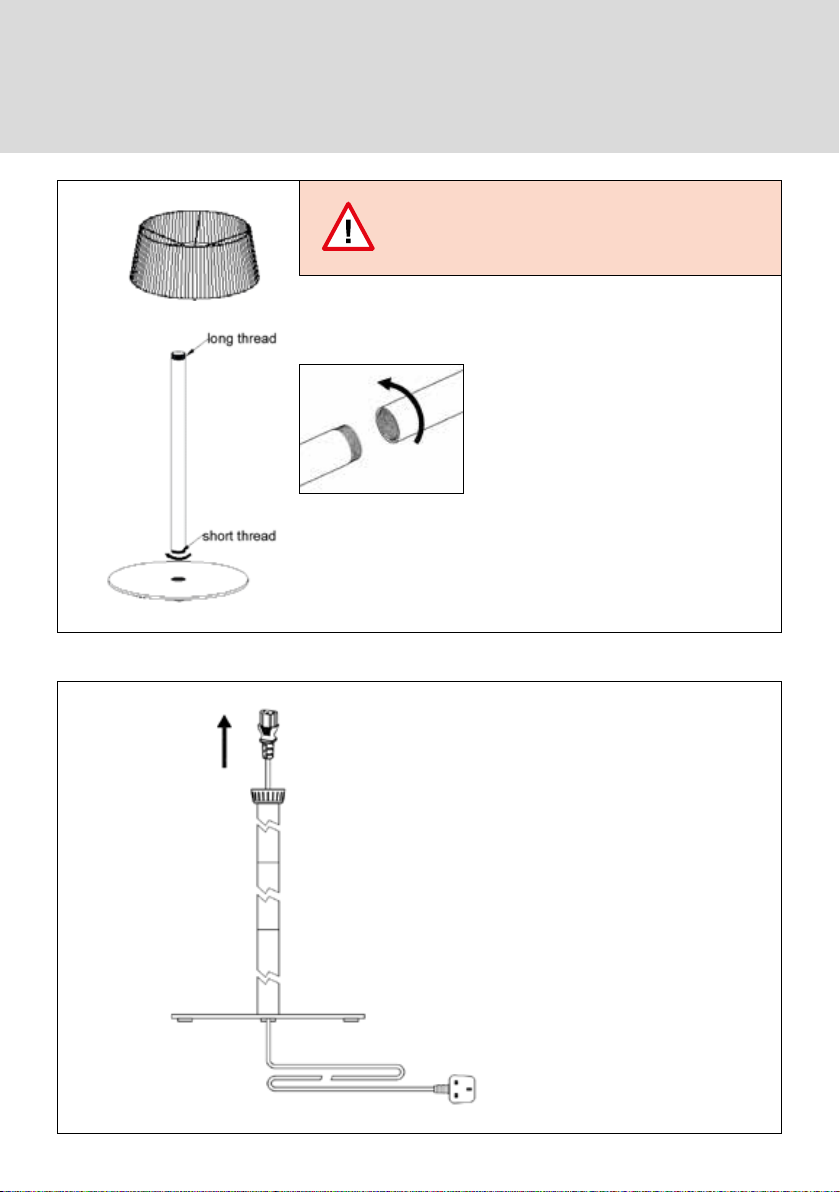
• For oor mounted heaters only use
the heater on a rm solid horizontal
area where all the feet on the base are in
contact with the oor. (Should the heater
be tilted or fall over the auto cut o switch
will activate).
• Risk of Electric Shock. DO NOT open or
try to repair the heater yourself.
• Any maintenance or repairs including
replacing the tube(s) should only be
carried out by a qualied electrician or by
a qualied service centre.

For Your Safety
11. The marking concerning covering should
be visible after the heater has been
installed. It shall not be placed on the
back of portable heaters.
12. The unit must be placed with the
clearance of 50cm to the wall and 25cm
to the ceiling. Make sure the head is at
least 1.8m from the oor.
13. The unit must be correctly installed
according to the instructions.
14. The unit is at high temperature during
operation. It keeps hot for a period after
shut down. Potential danger would occur
when touching it during this period.
Unplug the unit and wait till it cools
before cleaning.
15. DO NOT place the unit close to curtain
and/or other ammable objects.
Otherwise there will be a danger of
catching re.
16. DO NOT cover the unit with anything
during operation or a short time after it is
shut down.
17. DO NOT wrap the power supply cord on
the unit.
18. The unit must be handled with care, and
avoid vibration or hitting.
19. An apparatus with CLASS I construction
shall be connected to a MAINS socket
outlet with a protective earthing
connection.
20. DO NOT use if the unit or power cable is
damaged.
21. DO NOT attempt to repair or adjust any
electrical or mechanical functions on this
unit. Doing so will void your warranty.
The inside of the unit contains no user
serviceable parts. Servicing / Repair
should only be performed by a qualied
electrician or qualied service centre.
22. DO NOT use this unit in place where
causticity or volatile air exists, i.e. dust,
steam, gas, etc.
23. DO NOT use this unit as a cloth drier or
towel drier.
24. DO NOT use this unit as a sauna heater.
25. DO NOT use this unit as a room heater.
26. DO NOT use this unit in place of animal
propagating and raising.
27. DO NOT immerse this unit into water for
cleaning.
28. The unit should be plugged in a socket,
which is easily visible and reachable.
29. DO NOT use this heater with a
programmer, timer or any other
device that switches the heater on
automatically, since a re risk exists
if the heater is covered or positioned
incorrectly.
30. Children should be supervised to ensure
that they do not play with the appliance.
31. When assembling, keep clear from any
board or ammable material.

For Your Safety
32. DO NOT insert or allow foreign objects
to enter any ventilation or exhaust
opening as this may cause an electric
shock or re, or damage the heater.
33. Use only for intended household use as
described in this manual. Any other use
not recommended by the manufacturer
may cause re, electric shock, or injury
to persons. The use of attachments not
recommended or sold by unauthorized
dealers may cause hazards.
34. The unit is for household use only. It
is not safe to use on a building site,
greenhouse, barn or stable where there’s
ammable dust.
35. Avoid the use of an extension cord
because the extension cord may
overheat and cause a risk of re.
However, if you must use an extension
cord, the cord shall be rated to 13A
(Minimum conductor size 1.5mm2) and
if the cord is on a reel it must be fully
unwound before use.
36. Disconnect the power cable from the
electrical supply when the heater is
not in use. If the power cord becomes
damaged, it must be replaced by a
qualied electrician.
37. This appliance is not intended for use
by a person (including children) with
reduced physical, sensory or mental
capabilities, or lack of experience and
knowledge, unless they have been given
supervision or instruction concerning
use of the appliance by a person
responsible for their safety.
38. One dark point may exist on the surface
of the heating elements during the
rst few minutes after it is turned on.
This is normal, and will not aect the
performance of the unit.
39. To avoid re or shock hazard, plug the
unit directly into a 220-240 Vac and 13A
electrical socket outlet.

Assembly
WARNING: Please tear o all of the protective
lm around the shade rst.
• Step 1: Fix the bottom
tubeonto the base.
• Step 2: Connect the
middle tube with bottom
tube by screwing them
together.
• Step 3: Connect the top
tube with middle tube by
screwing them together.
(As same as Step 2)
• Step 4: Place the power
cord through the base,
bottom pole, middle pole
and top pole. Connect the
power cord plug to the
socket in the heater head.
1
2

Assembly
• Step 5: Connect the heater
head with the tube by
screwing them together.
• Step 7: Fix the Power
Cord on the Base by using
4x12mm screws.
3
4

Assembly
• Step 8: We strongly
recommend that the base
is xed to the oor using
the xings provided.
5
Finished

Installation
The heater is built with the best quality
components in accordance to the prevailing
legal regulations and certied for safety
in use. For best results, please ensure
that the installation is done by a qualied
electrician in accordance with the following
instructions and taking full account of
current regulations. When using the heater,
please carefully follow the instructions and
recommendationsbelow.
Minimum required distances of
installation:
• 500mm from the side wall
• 250 mm from the ceiling
• Generally heaters must be placed at a safe
distance (clear space) of at least 2.0m from
combustible materials and glass walls. If
installed in workshops or garages where
inammable or combustible paints are
used, the heaters must be installed at a
distance of at least 4.0m from the source
ofdanger.
• If the heaters are placed in areas where
spray painting of any description is taking
place, they should not be used during the
painting operations.
• Never use the heater in particularly dusty
and explosive areas.
CEILING
min. 50cm
min.
25cm
WALL

Operation Instructions
Connect the power cable to a 13 amp supply that is located in a safe, dry area.
A. Plug the Patio Heater into a grounded 230V, 50-60 Hz power outlet
B. Only operate the heater when it is in the upright position.
C. Our Electric Patio Heater is equipped with three heat settings
D. The ON-OFF touch button on the heater is used to control the power of the heater.
E. Press on the On/O switch to activate the heater
WARNING: The heater must be properly installed before it is used.
This unit is equipped with one heat setting On I O.
On | O Switch Touch Switch

Remote Control & Technical Specications
Remote Control
To operate heater, press the remote control button. Press on the“Low” button for 900W, press on
the “High”button for1200W. Both buttons are pressed for 2100W.
Touch Switch
• Press the button once to operate the heater on low (900W) power.
• Press the button twice to operate the heater on high (1200W) power.
• Press the button three times to operate the heater on (2100W) power.
• Press the button four times to shut the light and heat o.
Technical Specications
• Power supply 230V~ 50-60Hz
• Wattage max 2100w
• Net weight 16.5 kg
• Insulation class I
• Whilst assembling this product keep out of the reach of children. (Choking hazard –
contains small parts)
• Ensure that your working area is free of possible sources of danger, for example don’t
leave any tools lying around.
• Always dispose of packaging material in such a way that it may not cause any danger.
There is always a risk of suocation if children play with plastic bags!
• We reserve the right to make changes for technical reasons.
Attention

Headline
Maintenance and Care Instructions
• When disconnected from the electrical supply, clean the outside of the patio heater with a
damp cloth. Never use corrosive or solvent cleaners or immerse in water.
• Any maintenance or repairs including replacing the halogen tube should only be carried out
bya qualied electrician or by a qualied service centre.
• Check all components regularly for correct function, damage and loose connections especially
at the start of the season and at 1-2 month intervals dependent on use.
• Damaged components may endanger your safety or shorten the life of the product. Replace all
damaged parts immediately. Use only spare parts manufactured by Kettler. Should you wish to
purchase spare parts, they can be ordered directly from: www.kettler.co.uk/shop
• Kettler will not be responsible for damaged caused by improper use.
www.kettler.co.uk
Warranty For Home Use
This product is covered by a 12 month
warranty against manufacturing faults.
This warranty applies to domestic use
only. It does not cover commercial use,
mis-use or accidental damage.
To validate your warranty, register
at www.kettler.co.uk and quote
the product code from the front of
this booklet.
12Mth
Warranty
Table of contents
Other KALOS Electric Heater manuals

KALOS
KALOS KLEH163-0600C User manual

KALOS
KALOS KLEH126-0300 User manual

KALOS
KALOS KLEH151-0500 User manual

KALOS
KALOS KLEH163-0600C User manual

KALOS
KALOS KLEH140-0400 User manual

KALOS
KALOS KLEH113-0200 User manual

KALOS
KALOS KLEH111-0200 User manual

KALOS
KALOS KLEH144-0400 User manual

KALOS
KALOS KLEH103-0100 User manual

KALOS
KALOS KLEH113-0200 User manual