Kapro 895 Prolaser All-Lines User manual

895 Prolaser®All-Lines
7-Beam Self-Leveling Laser
User Manual
Manual del usuario
Manuel d’utilisation
Manuale di istruzioni
Руководство по эксплуатации
Naudotojo vadovas
Up to 130' (40m)
4 AA

2
Thank you for purchasing the Prolaser®895 All-Lines Self-Leveling
Laser. You are now the owner of one of our innovative range of state of
the art tools. These tools incorporate new laser technology, enabling the
professional user and the serious D.I.Y enthusiast to achieve accurate
results and reduce valuable work time.
Applications
The Prolaser®895 All-Lines has been designed for indoor and outdoor
use (with detector). This laser level can be used for:
• Hanging cabinets and shelves
• Setting oor and wall tiles
• Hanging acoustic ceilings
• Framing and aligning windows and doors
• Leveling electrical outlets, plumbing and studs
• Accurately laying out right angles for ooring, drywall installation and
deck construction
• Leveling slopes (manual mode)
Keep this user manual in a safe place for future
reference.
Note

3
Features 4
Safety Instructions 5
Overview 6
Battery Installation 8
Operating Instructions 9-10
Care and Maintenance 11
Field Calibration Test 12
Specications 13
Warranty 14
Contents

4
• Projects six laser lines (2 horizontal and 4 vertical) and one plumb
down dot
• Five intersecting lines (4 wall, 1 ceiling)
• 360º micro-adjustable rotating
• Self-leveling range of ±3º
• Height-adjustable support legs
• Tripod adaptor (5/8")
• Visual & audible warning for “out of level” position
• Built-in lock-protect mechanism
• Pulse mode for outdoor use with detector
• Manual mode for leveling slopes
• High-impact ABS construction with TPR rubber shock absorbers
• Carrying/hanging strap
• Accuracy: 0.05"@20' (1mm@5m)
• Indoor laser range: up to 65' (20m)
• Laser range with detector (sold separately): up to 130' (40m)
• Includes: Beamnder glasses, laser target, hard carry case,
battery charger
Features

5
The Prolaser®895 All-Lines is a Class II Laser.
It is manufactured to comply with IEC international rules of safety.
Read this user guide thoroughly before using your Prolaser®
All-Lines. Always operate the laser level according to the
procedures and warnings in this manual.
Laser Radiation: Serious eye injury could be caused by
looking directly into the beam or by projecting the beam
into the eyes of others.
• The use of protective eyewear is recommended.
• Do not look into a laser beam using magnifying optical
equipment, such as binoculars or telescope, as this will increase
the level of eye injury.
• Always position the laser beam so that it does not cause anyone
to directly stare into it.
• Do not operate the laser level near children or let children
operate the laser level.
Safety Instructions
WARNING

6
Laser Level
Overview
1. Laser output window
2. Keypad
3. Surface Level
4. Battery unit
5. Battery recharger jack
6. Battery locking bolt
7. Pendulum safety lock
8. Fine adjustment knob
9. Adjustable support legs
10. 5/8" tripod thread
1
4
6
7
8
9
2
35
10

7
Keypad
1. Output Control button (1 H, 2V, dot)
2. Output Control button (1 H, 2V, dot)
3. Power LED
4. Manual mode button
5. Manual mode indicator
6. Pulse (Detector) mode button
7. Pulse indicator
1
4
3
2

8
1. Unscrew locking bolt and remove the battery unit.
2. Insert 4 new AA batteries of the same brand (regular or good
quality rechargeable) according to polarity marked inside the battery
compartment.
3. Replace the battery unit and tighten bolt.
4. The power indicator on the keypad will ash when battery is low.
5. For rechargeable batteries: The battery unit can be plugged into the
recharger (included) with or without removing it from the
laser level. Green LED light indicates full battery.
Battery Installation

9
To get the most out of your Prolaser®895 All-Lines, please adhere
carefully to the following instructions.
Operating Instructions
Avoid setting up the laser level near
heavy machinery or sources of vibration that may adversely
affect the leveling of the laser.
Note
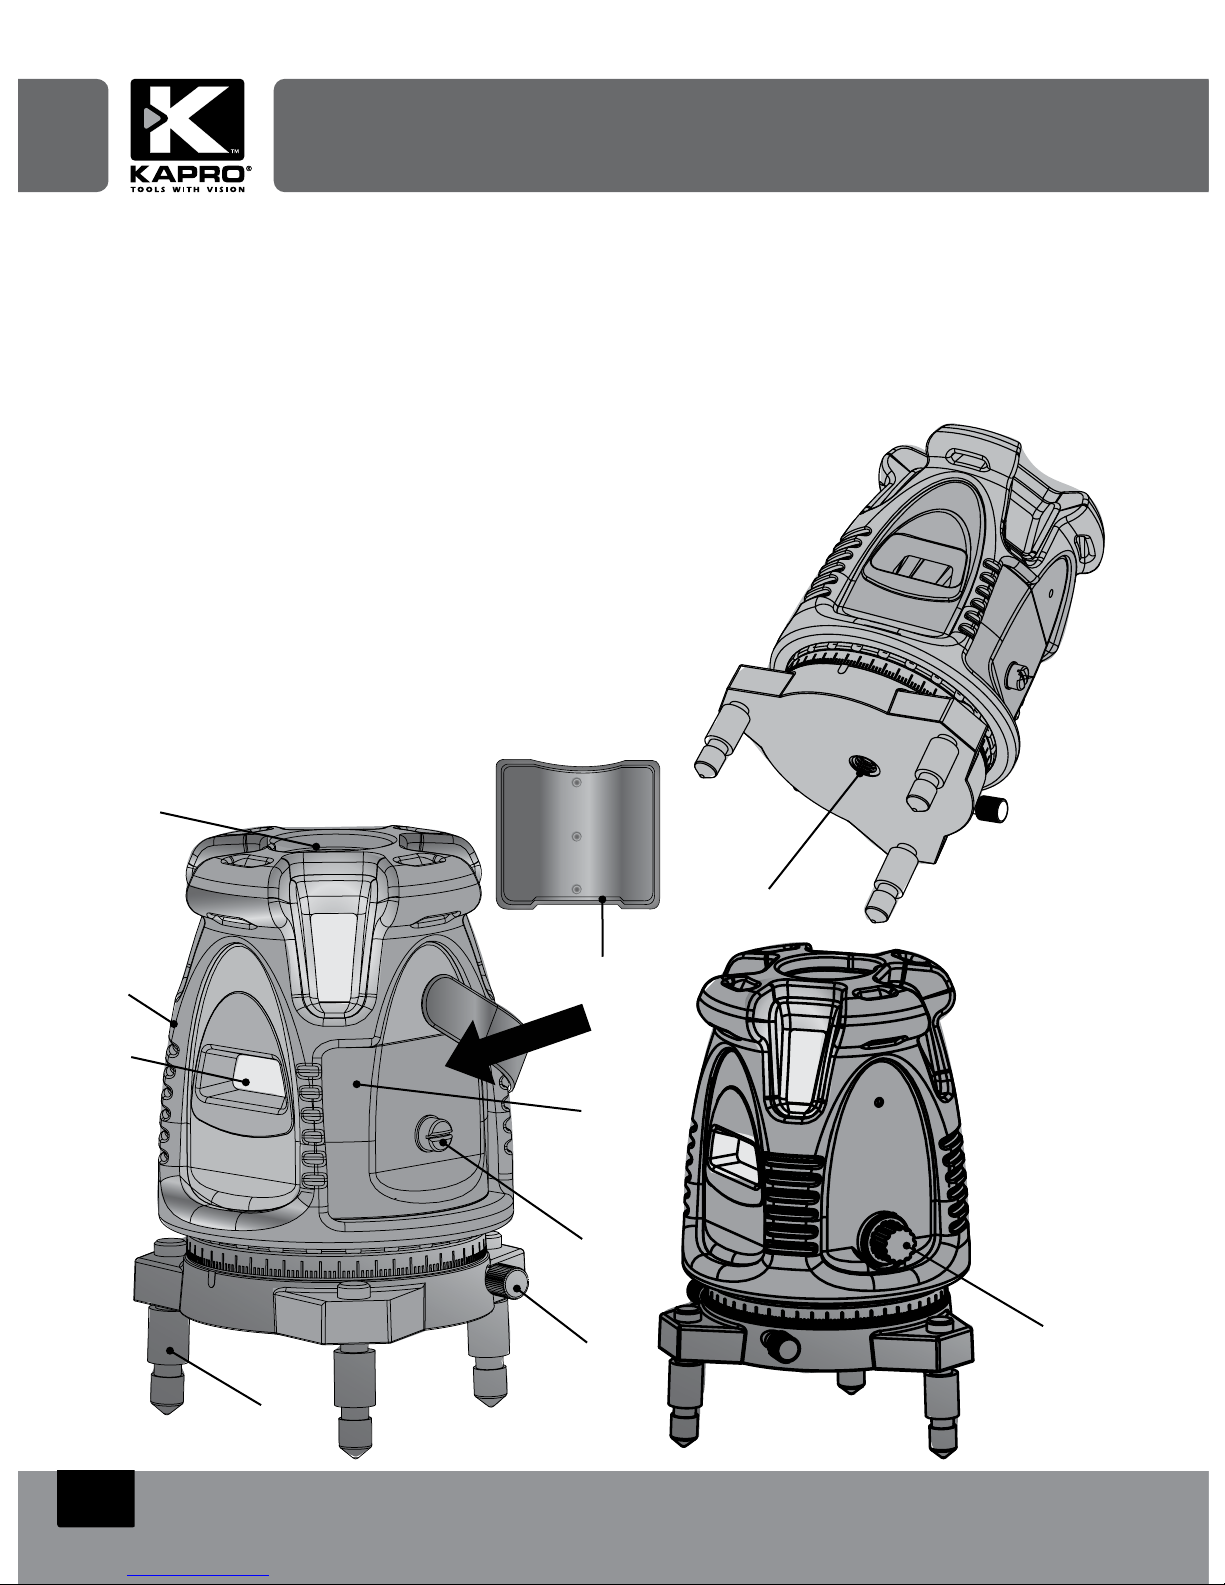
Horizontal and Vertical Lines, Plumb Down Dot
The 895 Prolaser® All-Lines laser level can project 2 horizontal and
4 vertical lines on walls, oor and ceiling (5 intersecting cross lines,
including one on the ceiling). It also projects a plumb down dot.
1. Set up the laser level approximately level on a at, vibration-free
surface or a tripod. The laser level can compensate for up to ± 3°
from the horizontal plane.
2. Adjust support legs until surface level is centered.
3. Unlock the safety lock by twisting the knob on the side of the laser.
The power LED will light.
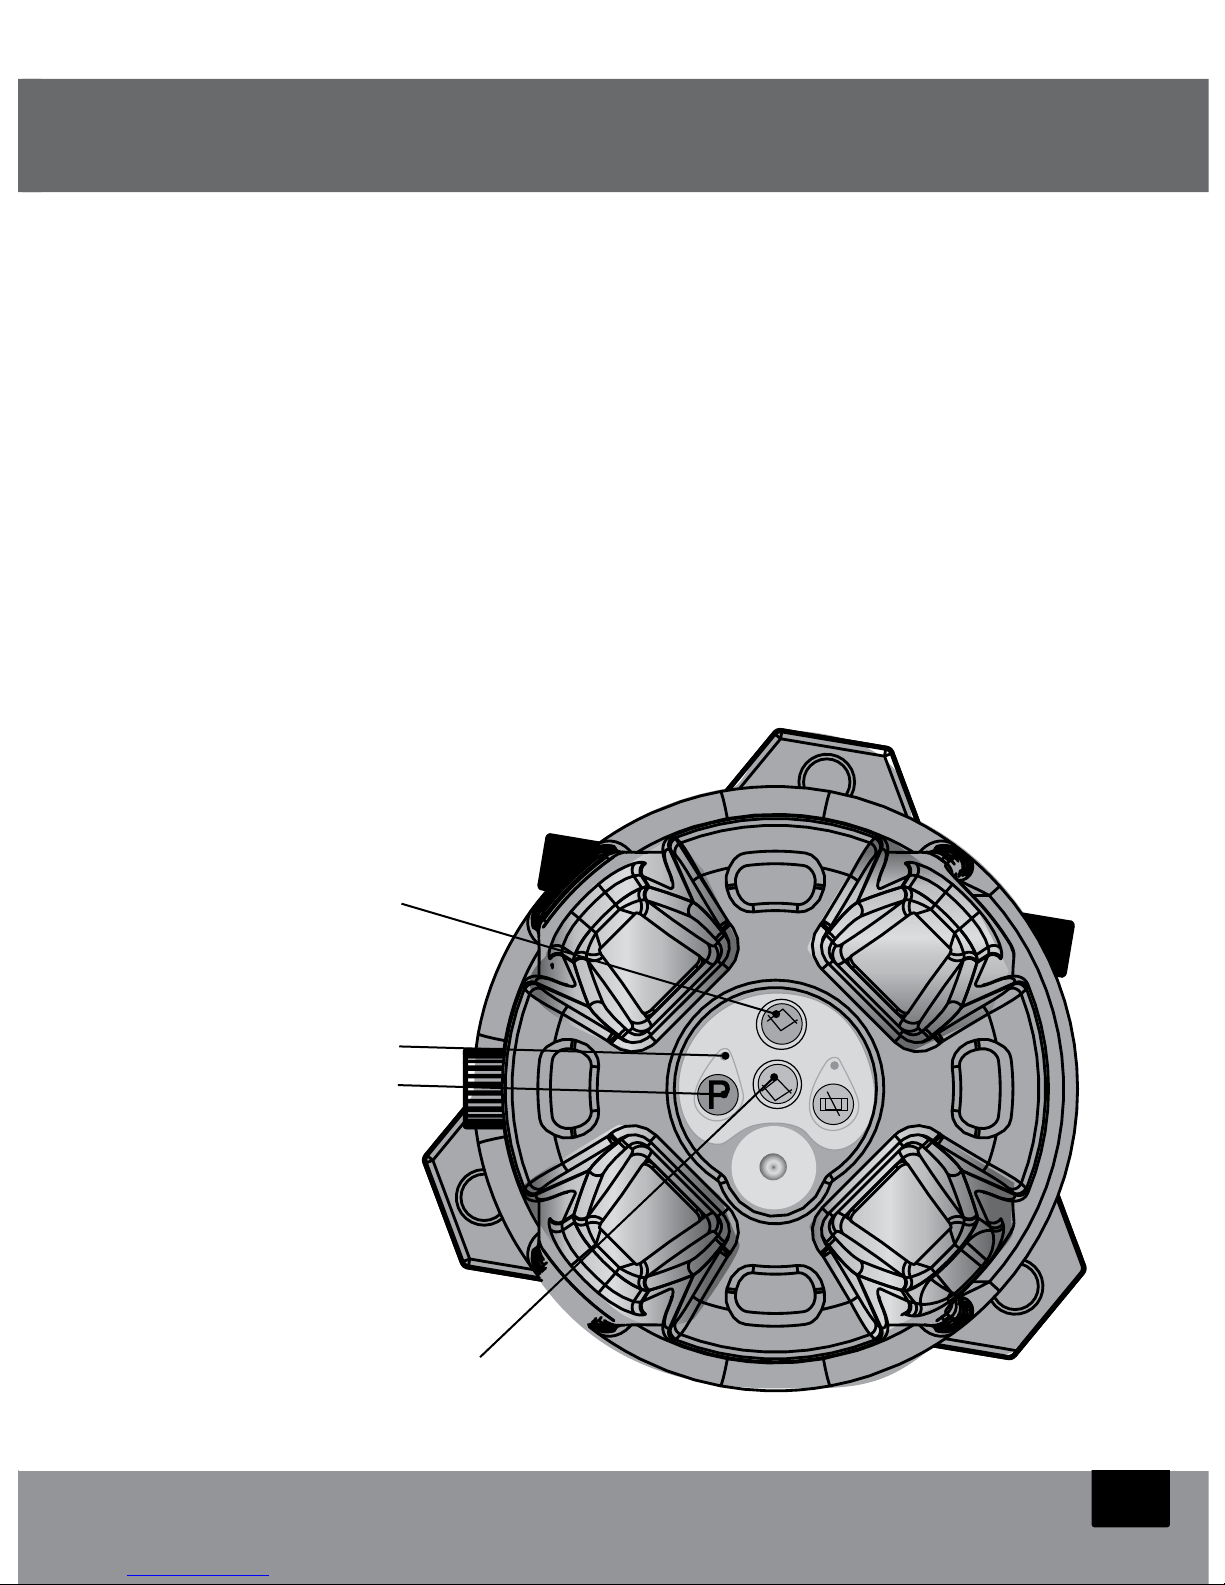
4. Press one of the Output Control buttons on the keypad on the top of
the unit. The laser level will generate 1 horizontal, 2 vertical lines and
a plumb down dot. If it is set up outside the ± 3° self-leveling range
the laser beam will ash and an alarm will sound.
5. Press second Output Control button to generate additional lines
(1 horizontal, 2 vertical) on the opposite wall.

10
6. The vertical lines can be accurately positioned using the micro-
adjusting screw.
7. To activate Detector (Pulse) mode, press the P button on the keypad.
The Detector mode indicator will light up.
8. Before moving the laser level, turn off and lock the safety lock. The
power LED will turn off.
Leveling Slopes (manual mode)
The 895 Prolaser®All-Lines laser level can be operated in manual mode
for setting slopes.
1. Make sure that the unit is turned off (safety lock closed,
power LED off).
2. Press the Manual Mode button. The Manual Mode LED will light.
3. Press one or both of the Output Control buttons to generate
required lines.
4. Set the unit to the required slope, by adjusting the support legs or
the tripod.
Laser Detector (sold separately)
The Prolaser® 895 All-Lines is effective at up to 130ft (40m) when used
together with the Laser Detector.
Use the Laser Detector when it is hard to see the light beam, such as
outdoors or in bright rooms.
Attach the Laser Detector to a rod if the laser unit is positioned above
head height.

11
Care and Maintenance
Preventative Maintenance
• Store in a clean dry place, between 5°F – 131°F (-15°C – 55°C).
• Before moving or transporting the unit, ensure that it is turned off/
locked.
• If the Laser Level is wet, dry off with a dry cloth. Do not seal the laser
in the carrying case until completely dry.
• Do not attempt to dry the Laser Level with re or with an electric
dryer.
• Do not drop the Laser Level, avoid rough treatment, and avoid
constant vibration.
• Periodically check the calibration of the Laser Level.
• Clean with a soft cloth, slightly dampened with a soap and water
solution. Do not use harsh chemicals, cleaning solvents or strong
detergents.
• Keep the laser aperture clean by wiping it gently with a soft
lint-free cloth.
• Remove batteries from the Laser Level during lengthy periods of
non-use, and store in carrying case.
• Ensure that the Laser Level is turned off before removing batteries.
Repairs
• See the Warranty section at the end of this manual.
• Do not take the Prolaser®895 All-Lines apart or permit any
unqualied person to take the laser level apart. Unauthorized
servicing may cause bodily injury, irreparably damage the Laser
Level, and invalidate the warranty.

12
Field Calibration Test
The Laser Level leaves the factory fully calibrated. Kapro recommends
that the level is checked regularly, and after the unit has been dropped or
mishandled.
Horizontal Line Calibration Test
1. Set up the Laser Level on a at, vibration-free surface or tripod as
near as possible to a long wall.
2. Unlock the safety lock by turning the knob on the side of the unit.
Press the Output Control button on the keypad to generate a
horizontal beam on the wall.
3. Make two marks through the laser line on the wall, one very close to
the Laser Level and one as far away as possible.
4. Lock the safety lock, reposition the Laser Level (at the same height)
as near as possible to the far mark on the wall. Repeat steps 2 and 3.
5. Measure the height difference between the laser line and the two
marks previously made on the wall.
6.
If the two measurements are identical, then the laser level is calibrated.
Vertical Line Calibration Test
1. Hang a plumb line from a high point on a wall.
2. Set up the Laser Level on a at, vibration-free surface or tripod about
3' (1m) from the wall.
3. Unlock the safety lock by turning the knob on the side of the unit.
Press the Output Control button on the keypad to generate a vertical beam.
4. Position the Laser Level so that the vertical laser line touches the base
of the plumb line.
5. If the laser line is also aligned to the top of the plumb line, then the
laser level is calibrated.

13
Specications
Product Prolaser®895 All-Lines Self-Leveling Laser
Laser beam output
pattern
2 horizontal and 4 vertical lines
(5 intersecting lines), plumb down dot
Accuracy
(Horizontal/Vertical)
Accuracy (Plumb dot)
0.05"@20' (1mm@5m)
0.02" @ 3.3' 0.5mm@1m
Self Leveling Range ±3°
Recommended
Working Range
Up to 65 ft (20m)
Working Range with
Detector
Up to 130 ft (40m)
Effective Working
Temperature
14ºF-113ºF (-10°C – 45°C)
=
Storage Temperature 5°F – 131°F (-15°C – 55°C)
Power Supply 4 x “AA” batteries
Weight 3.1 lb (1.4 kg) with batteries
Dimensions
(L x W x H)
5.8" x 5.4" x 8.5"
(148mm x 136mm x 216mm)
Laser Classication Class II, >1mv
Laser Wavelength 635 nm

14
This product is covered by a two-year limited warranty against
defects in materials and workmanship. It does not cover products
that are used improperly, altered, or repaired.
Please register this warranty at www.kapro.com
In the event of a problem with the laser level you have purchased,
please return the product to the place of purchase with proof of
purchase.
Kapro Industries Ltd.
Kadarim, 20117 Israel
www.kapro.com
.Kapro Industries Ltd 2011©
Warranty

15
SPANISH
Gracias por adquirir el láser de nivelación automática de haces cruzados
Prolaser®895 All-Lines. Tiene en sus manos una de nuestras
innovadoras y avanzadas herramientas. Estas herramientas incorporan
una nueva tecnología láser que permite, tanto a profesionales como a
amantes del bricolaje, alcanzar resultados exactos y reducir el valioso
tiempo de trabajo.
Aplicaciones
El láser de nivelación automática Prolaser®895 All-Lines has sido
diseñado para ser utilizado tanto en interiores como en exteriores(con
detector). Este láser se puede utilizar para:
• Instalar gabinetes y estantes
• Colocar mosaicos de piso y de pared
• Instalar techos acústicos
• Enmarcar y alinear ventanas y puertas
• Nivelar tomacorrientes, tuberías y travesaños
• Disponer con precisión los ángulos rectos para revestimiento de
pisos, instalación de paredes de yeso, y construcción de tarimas o
• Nivelar pendientes (modo manual)
Nota
Guarde este manual del usuario en un lugar seguro para futuras
consultas.

16
Contenido
Características 17
Instrucciones de Seguridad 18
Descripción General 19-20
Instalación de las Baterías 21
InstruccionesdeOperación 22-23
Cuidado Y Mantenimiento 24-25
Especicacionest 26
Garantía 27

17
Características
• Proyecta seis líneas láser (2 horizontales y 4 verticales) y un punto de
plomada descendente
• Cinco líneas intersecadas (4 pared, 1 techo)
• Rotación de 360º micro ajustable
• Margen de nivelación automática de ±3º
• Patas de soporte ajustables en altura
• Adaptador de trípode (5/8" pulg.)
• Alarma visual y audible para posiciones “fuera de nivel”
• Mecanismo integrado de bloqueo-protección
• Modo de pulsos para uso en exteriores con detector
• Modo manual para nivelar pendientes
• Construcción ABS de alto impacto con amortiguadores de goma TPR
• Correa portadora
• Precisión: 1mm@5m (0,05pulg.@20pies)
• Margen de láser para interiores hasta 20 m. (65 pies)
• Margen de láser con detector (se vende por separado):
hasta 40 m. (130 pies)
• Incluye: lentes de búsqueda de haces, objetivo láser, estuche rígido,
cargador de baterías

18
Instrucciones de seguridad
El Prolaser®895 All-Lines es un láser Clase II. Su fabricación cumple
con las normas de seguridad internacionales de la CEI.
Lea atentamente este manual del usuario antes de utilizar su
Prolaser® All-Lines. Siempre utilice el nivelador láser de acuerdo con los
procedimientos y las advertencias que se incluyen en este manual.
Radiación láser: la observación directa del haz o la proyección del
haz en los ojos de otras personas podrían ocasionar lesiones oculares
graves.
• Se recomienda utilizar protección ocular.
• No observe un haz de láser con equipos ópticos de aumento,
tales como binoculares o telescopios, ya que esto incrementará el nivel
de la lesión ocular.
• Coloque siempre el haz de láser de manera tal que nadie lo observe
directamente.
• No utilice el nivelador láser cerca de niños, ni permita que el mismo
sea operado por niños.
• No dañe o quite las etiquetas de advertencia del nivelador láser.
• No desmonte el nivelador láser o el detector ni permita que lo haga
ninguna otra persona no calicada.
• No deje caer el nivelador láser de haces o el detector.
• No utilice solventes para limpiar el nivelador láser.
• No lo utilice en ambientes combustibles, como en la presencia de
líquidos, gases o polvos inamables.
• No utilice el nivelador láser cerca de niños, ni permita que el mismo
sea operado por niños.
Advertencia

19
Reseña general
Nivelador láser
1 Ventana de salida del láser
2 Teclado
3 Nivelador de supercie
4 Unidad de baterías
5 Enchufe de recarga de
baterías
6 Tornillo de cierre de batería
7 Cerrojo de seguridad de
péndulo
8 Perilla de ajuste no
9 Patas de soporte ajustables
10 Rosca para
trípode de 5/8"
pulg.
1
4
6
7
8
9
2
35
10

20
Teclado
1. Botón de control de salida (1 H, 2V, punto)
2. Botón de control de salida (1 H, 2V, punto)
3. LED de potencia
4. Botón de modo manual
5. Indicador de modo manual
6. Botón de modo de pulsos (detector)
7. Indicador de pulsos
1
4
3
2
Table of contents
Languages:
Other Kapro Measuring Instrument manuals

Kapro
Kapro 883N User manual

Kapro
Kapro KAPROMETER K4 370 User manual

Kapro
Kapro prolaser 891 User manual

Kapro
Kapro Prolaser 852G User manual

Kapro
Kapro 379 User manual

Kapro
Kapro Prolaser Plus User manual

Kapro
Kapro DIGIMAN 985D-L User manual

Kapro
Kapro Prolaser 852 User manual

Kapro
Kapro Prolaser Vector 873 User manual

Kapro
Kapro Prolaser 862 User manual