manuals.online logo
Brands
  1. Home
  2. •
  3. Brands
  4. •
  5. KARAG
  6. •
  7. Shower Cabin
  8. •
  9. KARAG FLORA 200 User manual

KARAG FLORA 200 User manual

www.karag.it
FLORA 200
(S-1030) INSTALLATION MANUAL
EN FR IT DE GR
2
FLORA 200
S-1030
KARAG is not responsible for any spelling or typographical mistakes.
3FLORA 200
S-1030
4
FLORA 200
S-1030
1.
Level and screw the vertical wall proles.
Niveler et serrer les prolés mur verticals.
Livellare ed avvitare i proli muro verticali.
Richten sie das Wandprol aus und schreiben sie es fest.
Αλφαδιάστε και βιδώστε τα κάθετα προφίλ τοίχου.
5FLORA 200
S-1030
2.
3.
Screw the horizontal guides to the
vertical prole bearing the special
recess for stable crystal in order to
set up the metal frame.
Visser les guides horizontaux aux
prols verticaux portant la cavité
spéciale pour le panneau xe an de
mettre en place le cadre métallique.
Avvitare le guide orizzontali sui
proli verticali portando l’incavo
speciale per il pannello sso per
impostare la struttura in metallo.
Schrauben Sie die horizontalen
Führungen zur vertikalen Profil
der speziellen Aussparung für
einen stabilen Kristall, um den
Metallrahmen zu stabilieren. .
Βιδώστε τους οριζόντιους οδηγούς με τα κάθετα προφίλ που φέρουν την ειδική εσοχή για το
σταθερό κρύσταλλο, ώστε να στηθεί ο μεταλλικός σκελετός.
The recess must be on the inside as on the drawing.
La cavité doit être à l’intérieur comme dans le croquis.
L’incavo deve essere sul lato interno come nel disegno.
Die Aussparung muss auf der Innenseite sein, wie auf der Zeichnung.
Η εσοχή πρέπει να είναι από την εσωτερική πλευρά όπως στο σχέδιο.
6
FLORA 200
S-1030
4.
5.
Place in the frame the stable glass
within the vertical proles that you
have been already screwed to the
wall.
Positionner le cadre avec le panneau xe dans les prols
verticaux vissés déjà au mur.
Posizionare il telaio con il pannello sso nei proli verticali già
avvitati alla parete.
Setzen Sie im Rahmen vom stabilen Glas innerhalb der vertikalen Prole, die Sie an die Wand
bereits geschraubt haben.
Τοποθετήστε τον σκελετό με τα σταθερά κρύσταλλα εντός των κάθετων προφίλ που ήδη έχετε
βιδώσει στον τοίχο.
Gently place the xed glass in the duct.
Placer doucement le verre xe dans la cavité speciale.
Posizionare delicatamente il pannello sso nell’ incavo.
Setzen Sie Vorsichtig das feste Glas in die dafür vorgesehene Leitung.
Τοποθετήστε με προσοχή το σταθερό κρύσταλλο στην ειδική εσοχή.
7FLORA 200
S-1030
6.
7.
Secure by screwing the special clips on the horizontal guide on the one hand, and applying the
appropriate rubber wedge on the other in the entire height of the crystal.
Fixer-le en vissant les xations spéciales sur le guide horizontal d’une part, et en apposant le joint
de stabilisation approprié sur l’autre dans la totalité de la hauteur du cristal.
Fissare avvitando gli attacchi speciali alla guida orizzontale, da un lato, e applicando la guarnizione
di stabilizzazione appropriata sull’altro lato in tutta l’altezza del cristallo.
Sichern Sie durch die einerseits die speziellen Clips auf der horizontalen Führung schrauben, und in
der gesamten Höhe des Kristalls auf der anderen Seite die entsprechenden Gummikeilen anwenden.
Σταθεροποιήστε το βιδώνοντας το ειδικό κλιπ στον οριζόντιο οδηγό από τη μια μεριά και εφαρμό-
ζοντας το κατάλληλο λάστιχο σφήνα από την άλλη σε όλο το ύψος του κρυστάλλου.
Insert the sealing prole by
pressing it.
Placer appuyant sur le prolé
d’étanchéité.
Posizionare premendo il prolo
di tenuta.
Legen Sie das Dichtungsprol
ein durch Drücken.
Τοποθετήστε πιέζοντας το
προφίλ στεγανοποίησης.
8
FLORA 200
S-1030
8.
Place the sealing rubbers, proles with magnets, and the rollers.
Placer les prolés d’étanchéité, les prols avec des aimants et les rouleaux.
Posizionare i proli di tenuta, i proli con magneti e i rulli.
Setzen Sie die Dichtungsgummis, die Magneten Prole und die Rollen.
Τοποθετήστε τα προφίλ στεγανοποίησης, τα προφίλ με τους μαγνήτες, και τα ράουλα.
9FLORA 200
S-1030
9.
10.
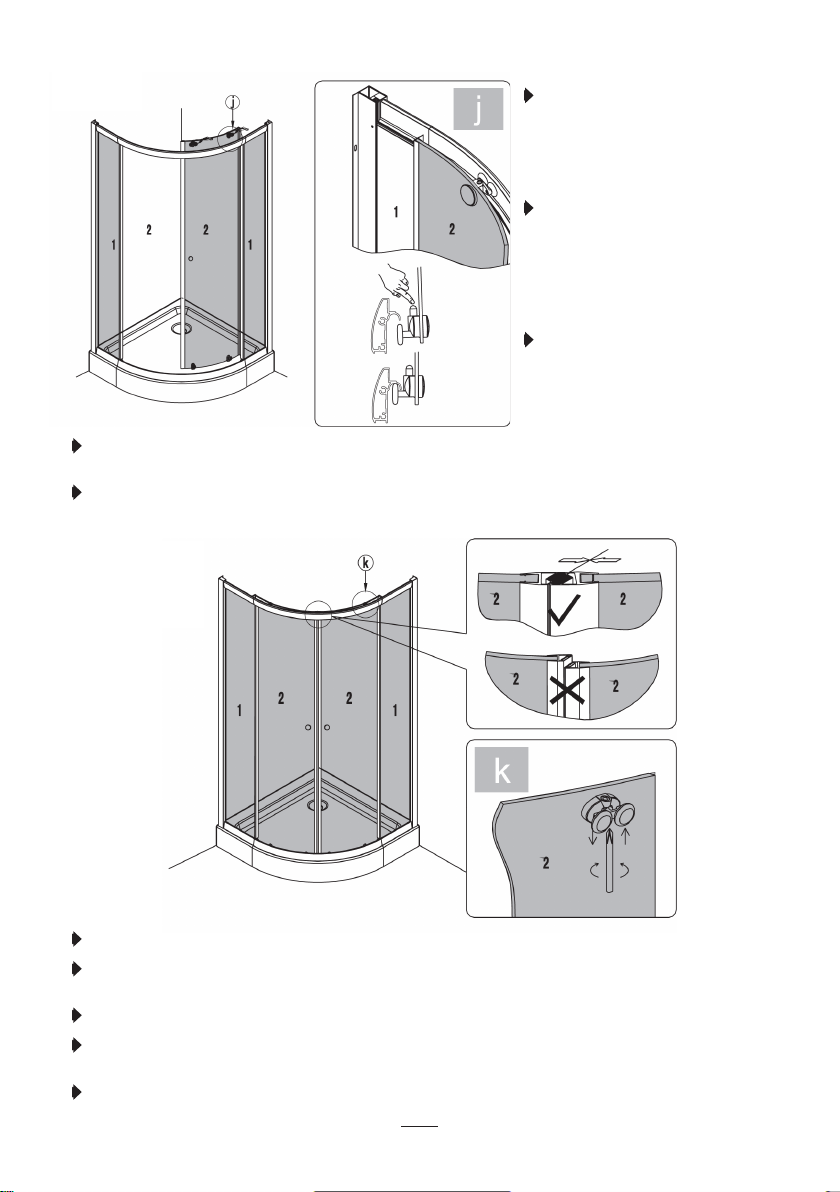
Hang the doors on the upper
guide and lock them by pressing
the springs on the lower rollers
to apply appropriate and in the
lower guide.
Suspendre le portes sur le guide
supérieur et les verrouiller en
pressant les ressorts sur les
rouleaux inférieurs de facon à
appliquer correctement au guide
inférieur.
Appendere la porta sulla guida
superiore e bloccare premendo
le molle sui rulli inferiori per
applicare correttamente la guida
inferiore.
Hängen Sie die Türen auf der oberen Führung ein und verriegeln Sie diese durch Drücken der
Federn auf den unteren Rollen um die untere Führung angemessen zu übernehmen.
Κρεμαστέ τις πόρτες στον επάνω οδηγό και ασφαλίστε τες πιέζοντας τα ελατήρια στα κάτω
ράουλα ώστε να εφαρμόσουν κατάλληλα και στον κάτω οδηγό.
Adjust the two doors with the screws located on the upper rollers so doors to t together perfectly.
Régler les deux portes par les vis des rouleaux supérieurs de sorte que les portes s’adaptent
parfaitement.
Regolare le due porte dalle viti sui rulli superiori in modo che le porte si adattano perfettamente.
Stellen Sie die beiden Türen mit den Schrauben an den oberen Rollen angeordnet, so dass die
Türen perfekt zusammenpassen.
Ρυθμίστε τις δυο πόρτες από τις βίδες που βρίσκονται στα επάνω ράουλα ώστε οι πόρτες να
εφαρμόζουν μεταξύ τους απόλυτα.
10
FLORA 200
S-1030
11.
Place the handles on the doors.
Placer les poignées sur les portes.
Posizionare le maniglie sulle ante.
Setzen Sie die Gri󰀨e an den Türen.
Τοποθετήστε τα χερούλια στις πόρτες.
11 FLORA 200
S-1030
12.
13.
The wall proles allow adjustment 30mm from each side.
Les prols de mur permettent un réglage de 30 mm de chaque côté.
I proli muro consentono 30 millimetri di regolazione da ogni lato.
Die Wandprole ermöglichen die Anpassung von 30 mm von jeder Seite.
Τα προφίλ τοίχου παρέχουν τη δυνατότητα ρύθμισης 30mm από κάθε πλευρά.
Level and x with suitable
screws the frame with the
vertical wall prole.
Niveller et stabiliser le cadre par
des vis appropriées aux prols
mur verticaux.
Livelare e stabilizzare il telaio
a mezzo di viti sui proli muro
verticali.
Setzen Sie Vorsichtig das feste
Glas in die dafür vorgesehene
Leitung.
Αλφαδιάστε και σταθεροποιήστε
με τις κατάλληλες βίδες τον
σκελετό με τα κάθετα προφίλ
τοίχου.
12
FLORA 200
S-1030
14.
15.
KARAG Italia Srl
7, 25 Aprile street
41 042 FIORANO MODENESE (MO)
ITALIA
(+30) 0039 0536 921230
[email protected] / www.karag.it
Copyright © 2016 KARAG Italia Srl
Apply silicone around.
Appliquer autour de la silicone.
Applicare silicone attorno.
Silikon einsetzen.
Εφαρμόστε σιλικόνη περιμετρικά.

Other manuals for FLORA 200

1

This manual suits for next models

1

Other KARAG Shower Cabin manuals

KARAG FREE 1 KS User manual

KARAG

KARAG FREE 1 KS User manual

KARAG FLORA 200 User manual

KARAG

KARAG FLORA 200 User manual

KARAG FLORA 300 User manual

KARAG

KARAG FLORA 300 User manual

KARAG FLORA 100 User manual

KARAG

KARAG FLORA 100 User manual

KARAG FLORA 100 User manual

KARAG

KARAG FLORA 100 User manual

KARAG PENTA 300 User manual

KARAG

KARAG PENTA 300 User manual

Popular Shower Cabin manuals by other brands

ERLIT Elegance ER 5508TP Installation and operation instruction

ERLIT

ERLIT Elegance ER 5508TP Installation and operation instruction

SANPLAST kpl-P-KP4/TX5b installation guide

SANPLAST

SANPLAST kpl-P-KP4/TX5b installation guide

OVE AMBER manual

OVE

OVE AMBER manual

Radaway Almatea KDD Assembly instruction

Radaway

Radaway Almatea KDD Assembly instruction

AQUALUX ShinE Series instruction manual

AQUALUX

AQUALUX ShinE Series instruction manual

Samo B6844 Assembly instruction

Samo

Samo B6844 Assembly instruction

OVE OWS-315G Installation and user guide

OVE

OVE OWS-315G Installation and user guide

Welltime Florenz 65934541 Installation instruction

Welltime

Welltime Florenz 65934541 Installation instruction

Glacier bay GBSH151 installation manual

Glacier bay

Glacier bay GBSH151 installation manual

Insignia PO1057 Assembly & fitting instructions

Insignia

Insignia PO1057 Assembly & fitting instructions

Samo Parete Vasca B1382 Assembly instruction

Samo

Samo Parete Vasca B1382 Assembly instruction

RAVAK Nika PIVOT Series installation instructions

RAVAK

RAVAK Nika PIVOT Series installation instructions

Insignia GT 8058R installation manual

Insignia

Insignia GT 8058R installation manual

ERLIT ER 4515TP Installation and operation instruction

ERLIT

ERLIT ER 4515TP Installation and operation instruction

Inocal M-A6008 installation manual

Inocal

Inocal M-A6008 installation manual

GME mampara TRIO P1241IM01 installation manual

GME

GME mampara TRIO P1241IM01 installation manual

KUDOS pinnacle 8 CURVED QUAD installation instructions

KUDOS

KUDOS pinnacle 8 CURVED QUAD installation instructions

Jula 435-019 installation instructions

Jula

Jula 435-019 installation instructions

manuals.online logo
manuals.online logoBrands
  • About & Mission
  • Contact us
  • Privacy Policy
  • Terms and Conditions

Copyright 2025 Manuals.Online. All Rights Reserved.