Kaz V977N-CAN User manual

Forehead Thermometer
Questions or Comments
Call toll-free: 1-800-477-0457
www.kaz.com
Recommended by**
By K®
Model V977N-CAN
V977N OM.qxd 8/10/06 5:43 PM Page 1

QUICK START GUIDE
for Forehead Thermometer Model V977N
1
2
3
FIRST TIME USE:
• “Pull” plastic strip from Battery Compartment and Discard.
• Remove 37.0°C label from the LCD display and Discard.
• Remove protective sensor cap.
Turn unit ON by
pressing button.
Press button again.
Place the probe gen-
tly and flush onto the
area approximately
1.25 cm (1/2 inch)
above the center of
the eyebrow. Sweep
skin from above
eyebrow to temple
until you hear a beep.
Press button again to
turn unit off.
2
NOTE: If the
eyebrow area
is covered with
hair, sweat or
dirt, please
clean the area
beforehand to
improve the
reading
accuracy.
Press button again to turn unit off.
Wait for lines
to appear and
C or F flashes.
PLEASE NOTE: The unit reads an “oral” equivalent temperature. Add 2°C (1°F) to
get a rectal equivalent. Take 3 measurements if readings appear low.
V977N OM.qxd 8/10/06 5:43 PM Page 2

3
Some Helpful Guidelines For Best Results
When Using the Forehead Thermometer
• Call your doctor when your child has diarrhea,
vomiting or changes in appetite, lethargy
(sluggishness) or is unusually sleepy.
• It is important to know each individual’s
Normal temperature when they are well.
This is the only way to accurately diagnose
a fever. Take multiple readings when healthy
to determine Normal temperature.
• A child’s normal temperature can be as high
as 37.7°C (99.9°F) or as low as 36.1°C (97.0°F).
Re-measure with a standard digital thermome-
ter for confirmation, especially on infants
(It is recommended use a digital thermometer
rectally on infants and on sleeping infants if
there is a question about the measurement.
Be sure to note this unit reads 2°C (1°F)
lower than a rectal digital measurement).
V977N OM.qxd 8/10/06 5:43 PM Page 3

4
Forehead Thermometer
Instruction Manual
Thank you for purchasing the Forehead Thermometer (V977N).
The Forehead Thermometer is a high quality product incorporating the latest technology and
tested in accordance with international standards. With its unique technology, the Forehead
Thermometer can provide a stable, heat-interference-free reading with each measurement.
The instrument performs a self-test every time it is switched on to always guarantee the accuracy
of measurements. The Forehead Thermometer is intended for the monitoring of human body
temperature in the home. It is intended for use on people of all ages.
Please read these instructions carefully before using this instrument and keep the instructions
and the thermometer in a safe place.
Table of Contents
1. The Advantages of your Forehead Thermometer
2. Important Safety Instructions
3. Product Description
4. How the Forehead Thermometer Measures Body Temperature
5. Control Displays and Symbols
6. Directions for Use
7. Changing from Fahrenheit to Celsius and vice-versa
8. Error Messages
9. How to recall 12 readings in the memory mode
10. Cleaning and Storage
11. Replacing the Battery
12. Warranty
13. Technical Specifications
1. The Advantages of your Forehead Thermometer
Measurement in 3 seconds
The innovative infrared technology allows measurement of forehead temperature
in only 3 seconds.
Accurate and reliable
Due to the unique probe assembly construction, the advanced infrared sensor, and the complete
calibration process this unit can offer a very accurate and reliable temperature measurement
comparable to one taken from the oral site with a regular digital thermometer.
V977N OM.qxd 8/10/06 5:43 PM Page 4

5
Gentle and Easy to Use
• The Forehead Thermometer is non-invasive. A measurement can be taken even while a
child is sleeping.
• Design is easy to hold and use.
• The Forehead Thermometer is less threatening to a child than a rectal thermometer and
easier to use than other methods.
Auto-Display Memory
The last reading is automatically displayed for 3 seconds when the unit is switched ON.
Multiple Reading Recalls
Users can recall the last 12 readings when entering the MemoryTracker™recall mode, enabling
efficient tracking of temperature history and variations.
Safe and Hygienic
• No risk of broken glass or mercury ingestion.
• Completely safe for use on children.
Fever InSight™Feature
Fever InSight helps you to better understand the meaning of your child's temperature with the
colour indicated on the display. The screen displays Green if no fever, Yellow when the tem-
perature is slightly elevated and a Red alert for fever. 10 audible beeps indicate temperatures
+37.5°C (99.5°F). alert that the patient may have a fever.
2. Important Safety Instructions
• Never use the thermometer for purposes other than those it has been intended for.
Please follow the general safety precautions when using on children.
•Never immerse the Forehead Thermometer into water or other liquids
(not waterproof). For cleaning and disinfecting please follow the instructions
in the “Cleaning and Storage” section.
• Keep the instrument away from direct exposure to the sun and keep it in a dust-free, dry
area at the temperature between 16°- 40°C (60.8°- 104°F).
• Do not use the thermometer if there are signs of damage on the measuring sensor or on the
instrument itself. If damaged, do not attempt to repair the instrument! Please contact our
Consumer Relations Department at: 1-800-477-0457.
Color Range Meaning
°C °F
Green 36.1-37.5 97.0-99.5 Acceptable
Yellow 37.6-38.2 99.6-100.8 Elevated
Red 38.3+ 100.9+ Possible High Fever
V977N OM.qxd 8/10/06 5:43 PM Page 5

• This Forehead Thermometer consists of high-quality precision parts. Do not drop the
instrument. Protect it from severe impact and shock. Do not twist the instrument or the
measuring sensor.
WARNING:
• Use of this Forehead Thermometer is not intended as a substitute for
consultation with your physician or pediatrician.
• Thermometer is not waterproof! Please NEVER immerse into liquids!
3. Product Description
(1) Start Button
(2) Sensor
(3) LCD Display
(4) Memory Button
(5) Battery Cover
(6) Protective Sensor Cap
4. How the Forehead Thermometer Measures Body Temperature
The Forehead Thermometer measures infrared energy radiated from the skin above of the eyebrow
area and the surrounding tissue. This energy is collected through the lens and converted to a
temperature value. Temperature readings obtained by scanning above the eyebrow area will
provide the greatest accuracy.
The Forehead Thermometer has been clinically tested and proven to be safe and
accurate when used in accordance with its operating instruction manual.
6
m
(1)
(4)
(5)
(2)
(3)
(6)
V977N OM.qxd 8/10/06 5:43 PM Page 6

7
5. Control Displays and Symbols
LCD Display Display Meaning Description
Self check ensures
proper functioning
Press the On/Off button to run
on the unit, all segments will
be shown for 2 seconds.
Recall of last reading The last reading will be shown
on the display automatically for
3 seconds.
Ready to measure The unit is ready for the mea-
surement, the °C or °F icon will
keep flashing.
Measurement complete The reading will be shown on
the LCD display with the °C or °F
icon flashing, the unit is ready
again for the next measurement.
Low battery indication When the unit is turned on, the
battery icon will keep flashing
to remind the user to replace
the batteries.
V977N OM.qxd 8/10/06 5:43 PM Page 7

8
6. Directions for Use
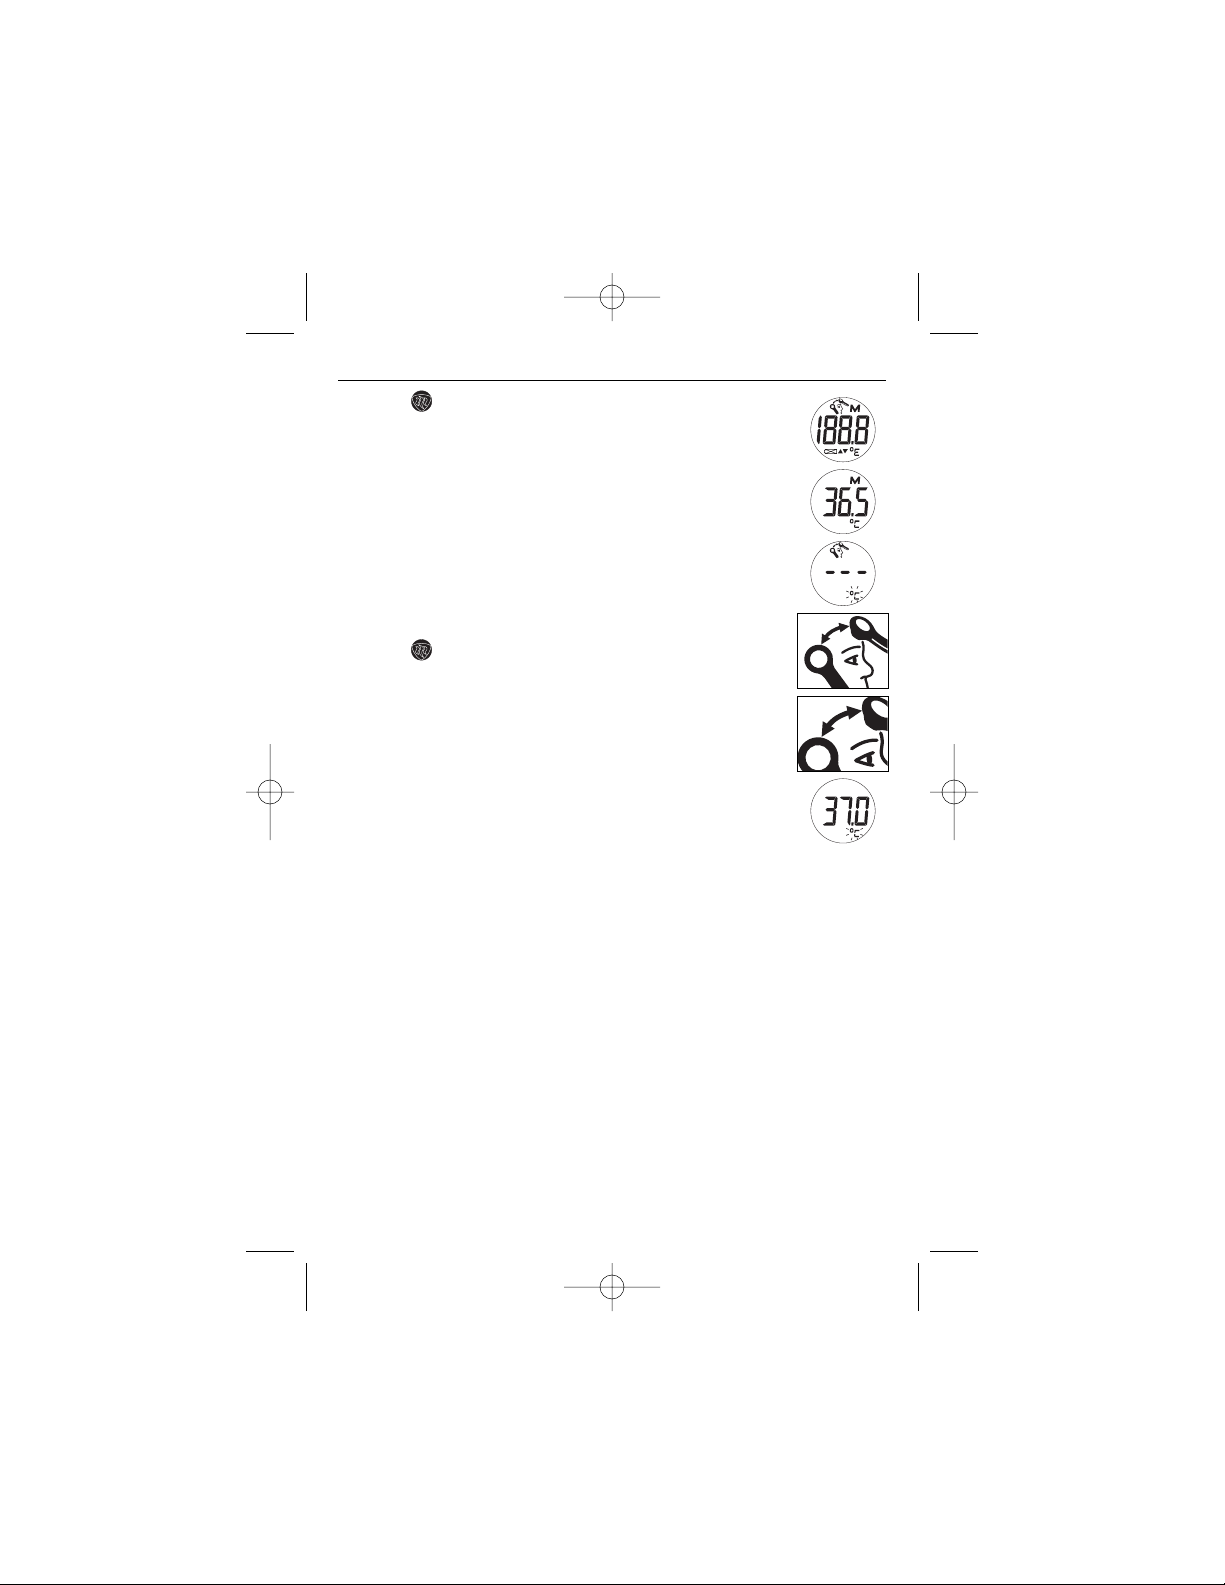
1. Press the button on front of unit. The LCD is activated to show all
segments for 2 seconds.
2. The last measurement reading will be shown on the display automati-
cally for 3 seconds with the «M» icon.
3. When the °C (or °F) icon is flashing, a beep sound is heard and the
thermometer is ready for the measurement.
4. Place the probe gently and flush onto the area approximately 1.25 cm
(1/2 inch) above the center of the eyebrow. If the eyebrow area is cov-
ered with hair, sweat or dirt, please clean the area beforehand to
improve the reading accuracy.
5. Press the button once and release it. Start to move the instrument
steadily from 1cm above the center of the eyebrow to 1.25 cm (1/2
inch) above the tail of the eyebrow area and back up again. A long
beep will sound after 3 seconds to signal measurement complete. If
the probe movement is too slow to reach the tail of the eyebrow
before the long beep sound is heard, repeat the measurement as
above from step 4, and move the probe a little quicker this time.
6. Read the recorded temperature from the LCD display.
(1)
(2)
(3)
(4)
(5)
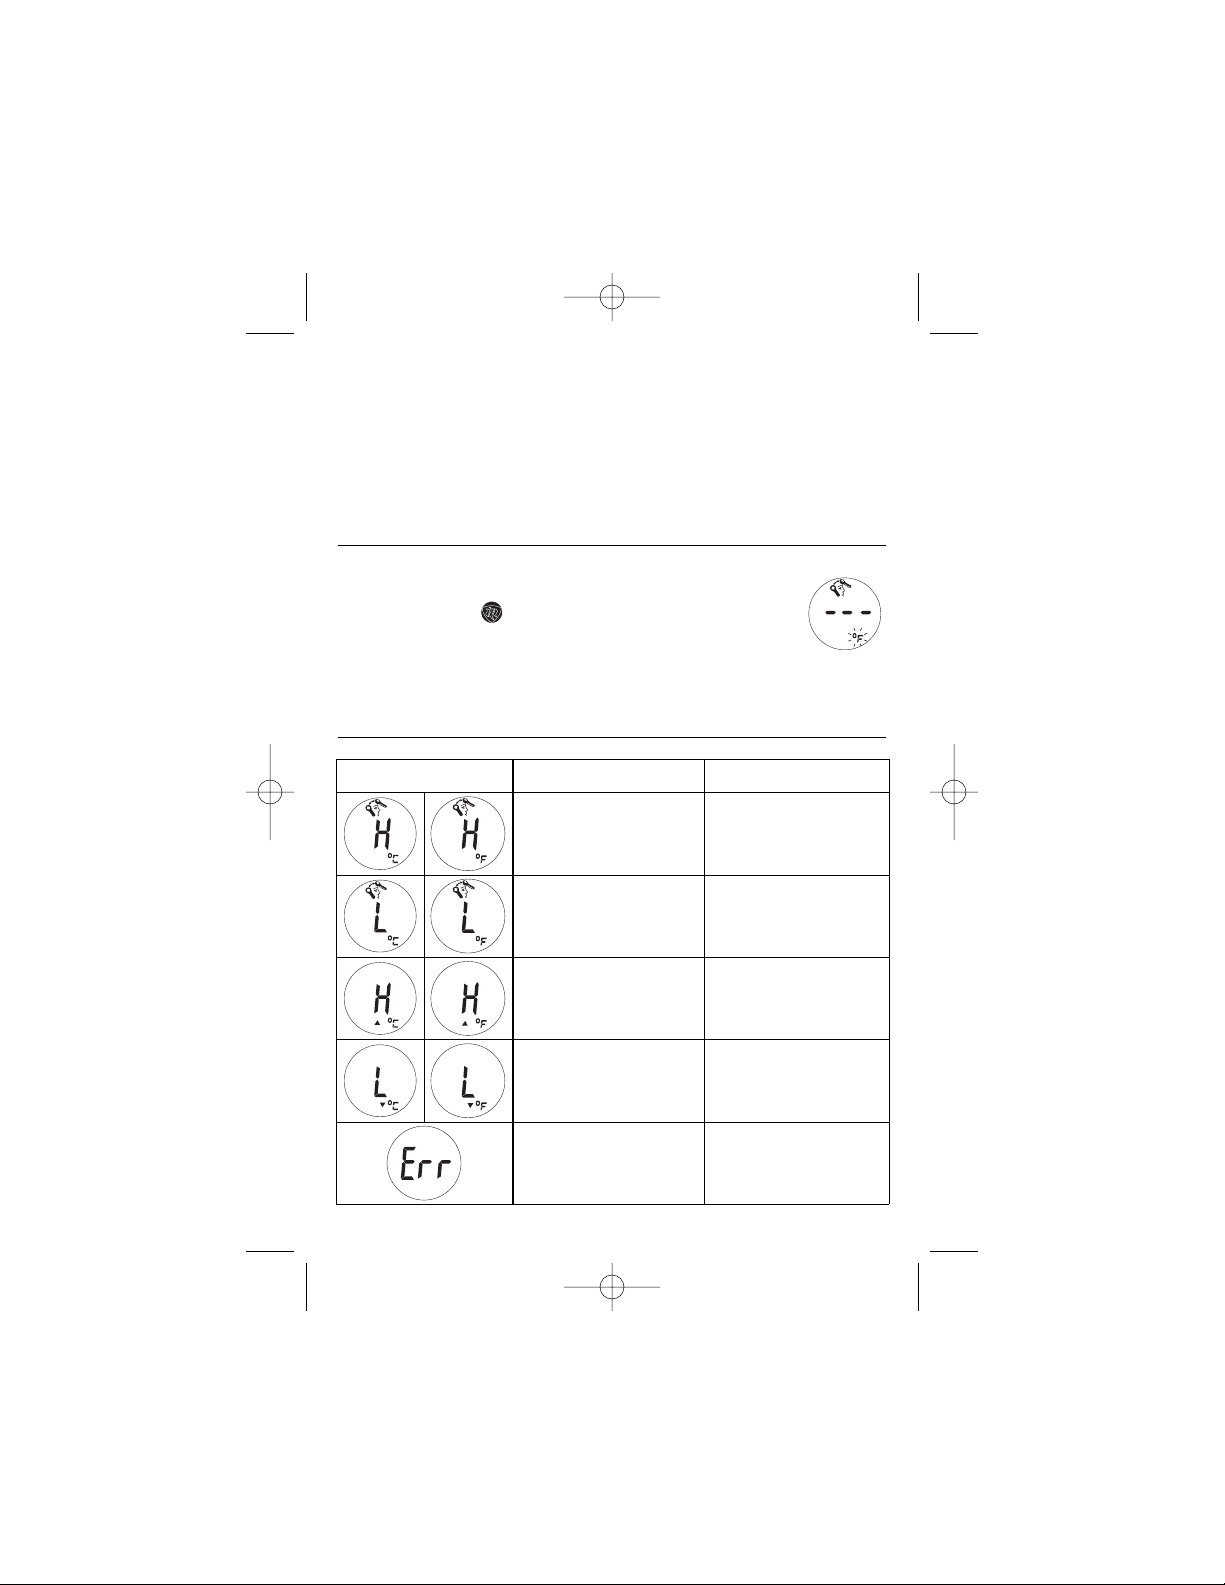
To avoid an inaccurate measurement, note the following:
• Patients should stay in steady - state room condition for at least 30 minutes.
• Don't remove the measurement device from the measuring area before hearing
the final beep.
• Don't take a measurement while or immediately after nursing a baby.
• Don't use the forehead thermometer in high humidity environments.
• Patients should not drink, eat, or be physically active before/while taking the measurement.
• Before placing the thermometer sensor onto the measurement area, remove dirt,
hair, or sweat.
• Use an alcohol swab to carefully clean the sensor and wait for 5 minutes before taking a
measurement on another patient.
• 10 short beeps will sound when the temperature is higher than 37.5 °C (99.5 °F) in order to
alert the patient that he/she may have fever.
• Always take the temperature in the same location, since the temperature readings may vary
from different locations.
(6)
V977N OM.qxd 8/10/06 5:43 PM Page 8

9
7. Changing from Celsius to Fahrenheit and vice-versa
The Forehead Thermometer can display temperature measurements in either
Fahrenheit or Celsius. To change the temperature scale from Fahrenheit to Celsius
or vice versa, press Start button when power is off for more than 5 seconds
until ------and the flashing °C (or °F) icon is shown on the LCD. Press and release
Start to switch from °C to °F, or vice versa. If the scale is not switched (Start not
pressed and released) for 5 seconds, the LCD will indicate ready-for-measurement
(same as normal turn-on).
Display / Problem Display Meaning Possible cause and remedy
Measured temperature too high
CCAAUUTTIIOONN::High fever requires
immediate medical attention!
Displays «HH» when measured
temperature higher than
42.2 °C (108.0 °F).
Measured temperature too low Displays «LL» when measured
temperature lower than
34.0 °C (93.2 °F).
Room temperature too high Displays «HH» in conjunction
with the «▲» when room
temperature is higher than
40.0°C (104.0°F).
Room temperature too low Displays «LL» in conjunction
with the «▼» when room
temperature is lower than
16.0 °C (60.8 °F).
Error function display When system has a malfunction.
8. Error Messages
• In the following situations it is recommended that three temperatures in the same location
be taken and the highest one taken as the reading:
1) Newborn infants in the first 100 days.
2) Children under three years of age with a compromised immune system and for whom the
presence or absence of fever is critical.
3) When the user is learning how to use the thermometer for the first time until he/she has
familiarized himself/herself with the instrument and obtains consistent readings.
V977N OM.qxd 8/10/06 5:43 PM Page 9

9. MemoryTracker™Mode
Use the following steps to recall the last 12 temperature measurements.
10
Pressing and releasing the Start button after the last 12 readings have been recalled will
resume the above sequence from reading 1.
Display / Problem Display Meaning Possible cause and remedy
Blank display Please check if the battery
has been loaded correctly.
Also check polarity (<+> and
<–>) of batteries.
Dead battery indication If the steady battery icon
is the only symbol shown
on the display, the battery
should be replaced immediately.
8. Error Messages (Continued)
Display Display Meaning Description
Recall Mode Press the button to enter
Recall Mode when power is off.
The memory icon «M» flashes.
Reading 1
(the last reading)
Press and release the
button to recall the last reading.
The number 1 will appear show-
ing the last saved reading.
Reading 2
(the second latest
reading)
Press and release the button
to recall the second latest
reading.
Reading 12
(the last reading)
Press and release the button
consecutively to recall readings
in succession, up to the last 12
readings.
m
m
m
m
V977N OM.qxd 8/10/06 5:43 PM Page 10

11
10. Cleaning and Storage
Use an alcohol swab or cotton swab moistened with alcohol
(70% Isopropyl) to clean the thermometer casing and the measur-
ing probe. Ensure that no liquid enters the interior of the ther-
mometer. Never use abrasive cleaning agents, thinners or
benzene for cleaning and never immerse the instrument in
water or other cleaning liquids. Take care not to scratch the
surface of the LCD by replacing the protective cap after use.
11. Replacing the Battery
The Forehead Thermometer is supplied with 2 AAA
batteries. Replace with 2 new AAA batteries when
the flashing battery symbol appears on the LCD dis-
play. To change the batteries, slide open the battery
cover as shown and remove batteries. Replace the
batteries being sure to align properly as indicated
inside the battery compartment.
Remove the battery from the instrument if it is not
required for extended periods of time in order to
avoid damage to the thermometer resulting from a
leaking battery.
Dispose of batteries according to local waste
management directions.
12. Warranty
Your Forehead Thermometer is durable and manufactured for normal, household use. Following
directions carefully will ensure years of dependable operation. If for any reason (other than mis-
use or normal battery replacement) you are dissatisfied with your Forehead Thermometer, we
will repair or replace it, at our option, free during the three year warranty period. Modification to
the product by the consumer is not authorized and voids the warranty.
If the thermometer does not function properly, first check the battery. Replace if necessary.
If repair is necessary call our Consumer Relations Department at 1-800-477-0457 or write to
Kaz Incorporated, Consumer Relations Department, 250 Turnpike Road, Southborough, MA 01772
working. Our consumer service representative will provide further instruction on how to correct
the trouble yourself or will ask you to return the thermometer for repair or replacement.
2 x AAA
V977N OM.qxd 8/10/06 5:43 PM Page 11

Type: Forehead Thermometer V977N
Measuring Range: Forehead measuring range: 34.0°C to 42.2°C (93.2°F to 108.0°F).
Resolution: 0.1°C / °F
Accuracy: Laboratory: ±0.2°C, 36.0 ~ 39.0°C (±0.4°F, 96.8 ~ 102.2°F)
(Ambient Temperature: 60.8°F to 104°F (16°C to 40°C))
Display: Liquid Crystal Display, 4 digits plus special icons
Acoustic: a. The unit is turned ON and ready for the measurement: 1 short
«beep» sound.
b. Complete the measurement: 1 long beep sound.
c. System error or malfunction: 3 short «beep» sounds.
Memory: a. Auto-Display the last measured temperature when switched on.
b. 12 readings recall in the Memory Mode.
Backlight a. The display will be lighted for 4 seconds when the unit
is turned ON.
b. The display will be lighted again for 5 seconds when the
measurement has been completed.
Operating temperature: 16°C to 40°C (60.8°F to 104°F)
Storage/transport
temperature:
-20°C to +50°C (-4°F to 122°F)
Automatic Switch-off: Approx. 1 minute after last measurement has been taken
Battery: (2) AAA Batteries - at least 1000 measurements
Weight: 48g (with battery), 45g (w/o battery)
Standards: Complies with ASTM E-1965-98 requirements
13. Technical Specifications
k
Manufacturing Quality Healthcare Products for Over 75 Years
© 2006, www.kaz.com
**Vicks is a registered trademark of Procter & Gamble Company (P&G).
Although P&G Company recommends this product, P&G does not manufacture this product. P/N 31IM971190
V977N OM.qxd 8/10/06 5:43 PM Page 12

13
Thermomètre Frontal
Besoin d’aide?
Appelez Kaz au 1 800 477-0457
www.kaz.com
Recommended by**
par KMD
Model V977N-CAN
V977N OM.qxd 8/10/06 5:43 PM Page 13

14
GUIDE DE DÉMARRAGE
du thermomètre frontal KAZMD Modèle V977N-CAN
1
2
3
PREMIÈRE UTILISATION :
•
Retirez la bande de plastique du compartiment des piles. Jetez-la.
•
Retirez l’étiquette 37,0 °C (98,6 °F) de l’écran ACL. Jetez-la.
Allumez l’instru-
ment (ON) en
appuyant sur le
bouton.
Appuyez de nouveau sur le
bouton. Placez la sonde en
l’appuyant doucement con-
tre le front, à environ 1,25
cm (1/2 po) au-dessus du
centre d’un sourcil. Balayez
le front depuis le dessus du
sourcil jusqu’à la tempe,
jusqu’à ce que vous
entendiez un bip sonore.
Appuyez de nouveau
sur le bouton pour
éteindre l’instrument.
REMARQUE : Si
le front est cou-
vert de cheveux,
de sueur ou de
saleté, nettoyez-
le au préalable
pour obtenir
une lecture
plus précise.
Appuyez de nouveau sur le bouton pour
éteindre l’instrument.
Attendez que les
lignes apparaissent
et que les lettres C
ou F clignotent.
REMARQUE : L’instrument lit la température « orale » équivalente.
Ajoutez 2 °C (1 °F) pour obtenir la température rectale équivalente.
Si la température semble basse, prenez-la trois fois.
V977N OM.qxd 8/10/06 5:43 PM Page 14

15
Quelques directives utiles pour obtenir les
meilleurs résultats possibles lorsque vous
utilisez le thermomètre frontal
• Appelez votre médecin si votre enfant éprouve de la
diarrhée, des vomissements ou une perte d’appétit,
s’il est léthargique (torpeur) ou s’il s’endort de façon
inhabituelle.
• Il est important de connaître la température « nor-
male » de la personne lorsqu’elle n’est pas malade.
C’est la seule façon de diagnostiquer une fièvre de
façon précise. Prenez la température à de nom-
breuses reprises lorsque la personne est en
bonne santé afin de déterminer sa température
« normale ».
• La température normale d’un enfant peut être aussi
élevée que 37,7 °C (99,9 °F) ou aussi basse que
36,1 °C (97,0 °F). Prenez de nouveau la température
avec un thermomètre numérique standard aux fins
de confirmation, particulièrement lorsqu’il s’agit
d’un nourrisson. (Si vous n’êtes pas certain de la
mesure, il est recommandé d’utiliser un
thermomètre rectal numérique pour les nourrissons
ainsi que pour les nourrissons qui dorment.
N’oubliez pas que la lecture de cet instrument est
inférieure de 2 °C (1 °F) à celle d’un thermomètre
rectal numérique.)
V977N OM.qxd 8/10/06 5:43 PM Page 15

16
Thermomètre frontal
Mode d’emploi
Nous vous remercions d’avoir acheté le thermomètre frontal (V977N).
Le thermomètre frontal est un produit de haute qualité qui comprend la toute dernière
technologie. Il a été soumis à des essais conformément aux normes internationales.
Grâce à sa technologie unique, le thermomètre frontal peut offrir une lecture stable,
sans interférence thermique, à chaque mesure.
L’instrument effectue un autotest chaque fois qu’on l’allume afin de toujours garantir une mesure
précise. Le thermomètre frontal est conçu pour surveiller la température du corps humain, à la
maison. Il convient aux gens de tous les âges. Veuillez lire attentivement le mode d'emploi avant
d'utiliser l'instrument. Veuillez également garder le mode d'emploi et le thermomètre dans un
lieu sûr.
Table des matières
1. Avantages du thermomètre frontal
2. Consignes de sécurité importantes
3. Description du produit
4. Façon dont le thermomètre frontal mesure la température du corps
5. Affichages et symboles
6. Directives d’emploi
7. Passage des degrés Celsius aux degrés Fahrenheit et inversement
8. Messages d’erreurs
9. Façon de rappeler 12 lectures dans le mode mémoire
10. Nettoyage et rangement
11. Remplacement des piles
12. Garantie
13. Caractéristiques techniques
1. Avantages du thermomètre frontal
Mesure en trois secondes
La technologie infrarouge innovatrice permet de mesurer la température frontale en trois
secondes seulement.
Précis et fiable
Grâce à l’unique assemblage de la sonde, à la sonde infrarouge de pointe et au processus
de calibrage complet, cet instrument permet de mesurer la température d’une façon très
précise et fiable qui est comparable à une mesure orale prise à l’aide d’un thermomètre
numérique ordinaire.
V977N OM.qxd 8/10/06 5:43 PM Page 16

17
Doux et facile à utiliser
• Le thermomètre frontal est non invasif. On peut même prendre la température d’un enfant
lorsqu’il dort.
• Il est facile à tenir et à utiliser.
• Pour un enfant, un thermomètre frontal est moins menaçant qu’un thermomètre rectal.
Il est aussi plus facile à utiliser que d’autres méthodes.
Mémoire d’affichage automatique
Lorsqu’on allume le thermomètre (ON), la dernière lecture s’affiche automatiquement pendant
trois secondes.
Rappels de lectures multiples
Les utilisateurs peuvent rappeler les douze dernières lectures lorsqu’ils entrent dans le mode
de rappel MemoryTrackerMC, lequel permet un suivi efficace de l’historique et des variations
des températures
Sécuritaire et hygiénique
• Aucun risque de verre brisé ou d’ingestion de mercure.
• Tout à fait sécuritaire pour les enfants.
Caractéristique Fever InSightMC
La caractéristique Fever InSight vous aide à mieux comprendre la température de votre enfant
grâce à la couleur de l’écran. L’écran est vert lorsque l’enfant ne fait pas de fièvre, jaune lorsque
la température est légèrement élevée et rouge lorsque l’enfant fait de la fièvre. Dix bips sonores
indiquent une température supérieure à 37,5 ?C (99,5 ?F) afin de signaler que le patient fait
peut-être de la fièvre.
2. Consignes de sécurité importantes
• N’utilisez jamais le thermomètre à d’autres fins que celles prévues. Veuillez suivre les
consignes de sécurité générales lorsque vous utilisez le thermomètre pour prendre la
température d'un enfant.
•N’immergez jamais le thermomètre frontal dans l’eau ou d’autres liquides
(non étanche). Pour le nettoyer et le désinfecter, veuillez suivre les directives à
la section intitulée « Nettoyage et rangement ».
• Gardez l’instrument loin des rayons directs du soleil et rangez-le dans un endroit sec à l’abri de
la poussière, à une température variant entre 16 °C et 40 °C (60,8 °F et 104 °F).
• N’utilisez pas le thermomètre si la sonde ou l’instrument même semblent endommagés.
Si l’instrument est endommagé, ne tentez pas de le réparer! Veuillez communiquer avec notre
service de relations avec les consommateurs au 1 800 477-04577.
Couleurs la gamme Explication
°C °F
Vert 36.1 à 37.5 97.0 à 99.5 Acceptable
Jaune 37.6 à 38.2 99.6 à 100.8 Élevée
Rouge 38.3+ 100.9+ Haute Fièvre possible
V977N OM.qxd 8/10/06 5:43 PM Page 17

• TLe thermomètre frontal comprend des pièces de précision de haute qualité. Ne l’échappez
pas. Protégez-le contre les chocs violents. Ne tordez ni l’instrument ni la sonde.
MISE EN GARDE :
• Le thermomètre n’est pas conçu pour remplacer une consultation médicale.
• Le thermomètre n’est pas étanche! Ne l’immergez JAMAIS dans des liquides!
3. Description du produit
(1) Bouton de mise en marche (Start)
(2) Sonde
(3) Écran ACL
(4) Bouton de mémoire
(5) Couvercle des piles
(6) Embout protecteur
de la sonde
4. Façon dont le thermomètre frontal mesure la température du corps
Le thermomètre frontal mesure l’énergie infrarouge dégagée par la peau au-dessus d’un sourcil
et des tissus environnants. Cette énergie est recueillie à travers les lentilles et convertie en une
valeur de température. Les lectures de température obtenues en balayant la région au haut d’un
sourcil sont les plus précises.
Le thermomètre frontal a été mis à l’essai en clinique. Il est sécuritaire et précis
lorsqu’on l’utilise conformément au mode d’emploi.
18
m
(1)
(4)
(5)
(2)
(3)
(6)
V977N OM.qxd 8/10/06 5:43 PM Page 18

19
5. Affichages et symboles
Écran ACL Affichage Description
L’autotest assure un
fonctionnement adéquat.
Appuyez sur le bouton
marche-arrêt (On/Off) pour
allumer l’instrument. Tous les
segments s’afficheront pendant
deux secondes.
Rappel de la dernière lecture La dernière lecture s’affichera
automatiquement sur l’écran
pendant trois secondes.
Prêt à mesurer L’instrument est prêt à prendre
une mesure; l’icône °C ou °F
clignotera.
Mesure terminée La lecture s’affiche sur l’écran
ACL pendant que l’icône °C ou °F
clignote; l’instrument est prêt
pour la prochaine mesure.
Indication de pile faible Lorsque l’instrument est allumé,
l’icône de la pile clignote pour
aviser l’utilisateur de remplacer
les piles.
V977N OM.qxd 8/10/06 5:43 PM Page 19

20
6. Directives d’emploi
1. Appuyez sur le bouton situé sur le devant de l’instrument.
L’écran ACL est activé pour afficher tous les segments pendant
deux secondes.
2. La dernière lecture et l’icône « M » s’afficheront automatiquement sur
l’écran pendant trois secondes.
3. Lorsque l’icône °C (ou °F) clignote, on entend un bip sonore et le ther-
momètre est prêt à mesurer.
4. Placez la sonde en l’appuyant doucement contre le front, à environ
1,25 cm (1/2 po) au-dessus du centre d’un sourcil. Si le front est cou-
vert de cheveux, de sueur ou de saleté, veuillez le nettoyer au préal-
able pour obtenir une lecture plus précise.
5. Appuyez sur le bouton une fois et relâchez-le. Commencez à
déplacer l’instrument à 1 cm au-dessus du centre du sourcil en allant
jusqu’à 1,25 cm (1/2 po) au-dessus de l’extrémité du sourcil, puis en
revenant au centre. Un long bip se fera entendre au bout de trois sec-
ondes pour indiquer que la prise de température est terminée. Si vous
déplacez la sonde trop lentement et que le long bip sonore se fait
entendre avant que vous ayez atteint l’extrémité du sourcil, prenez de
nouveau la température à partir de l’étape 4, et déplacez la sonde un
peu plus rapidement cette fois-ci.
6. Lisez la température affichée sur l’écran ACL.
(1)
(2)
(3)
(4)
(5)
Pour éviter une mesure inexacte, veuillez prendre note de ce qui suit :
• Les patients doivent demeurer dans une pièce où les conditions sont stables pendant
au moins 30 minutes.
• Ne retirez pas l’instrument de mesure avant d’entendre le dernier bip sonore.
• Ne prenez pas la température d’un bébé pendant ou immédiatement après l’allaitement.
• N’utilisez pas le thermomètre frontal dans un endroit très humide.
• Les patients ne doivent ni boire, ni manger ni être physiquement actifs avant ou pendant
la prise de température.
• Avant de placer la sonde du thermomètre sur le front, enlevez la saleté, les cheveux
ou la sueur.
• Utilisez un tampon d’alcool pour bien nettoyer la sonde et attendez cinq minutes avant
de prendre la température d’un autre patient.
• Dix brefs bips sonores se font entendre lorsque la température est supérieure
à 37,5 °C (99,5 °F) afin d’aviser le patient qu’il fait peut-être de la fièvre.
• Prenez toujours la température au même endroit, puisque les lectures peuvent varier
d’un endroit à l’autre.
(6)
V977N OM.qxd 8/10/06 5:43 PM Page 20
Table of contents
Languages:
Other Kaz Thermometer manuals