KEBCO combivert R6-S User manual

05/2017
00.R6.SUB-K000 rev.2D
COMBIVERT
US INSTRUCTION MANUAL Power Supply and Regeneration Unit
Type R6-S Size 15/19
Version 1.4

US - 2
1. Introduction......................................................................................................................4
1.1 Preface............................................................................................................................................... 4
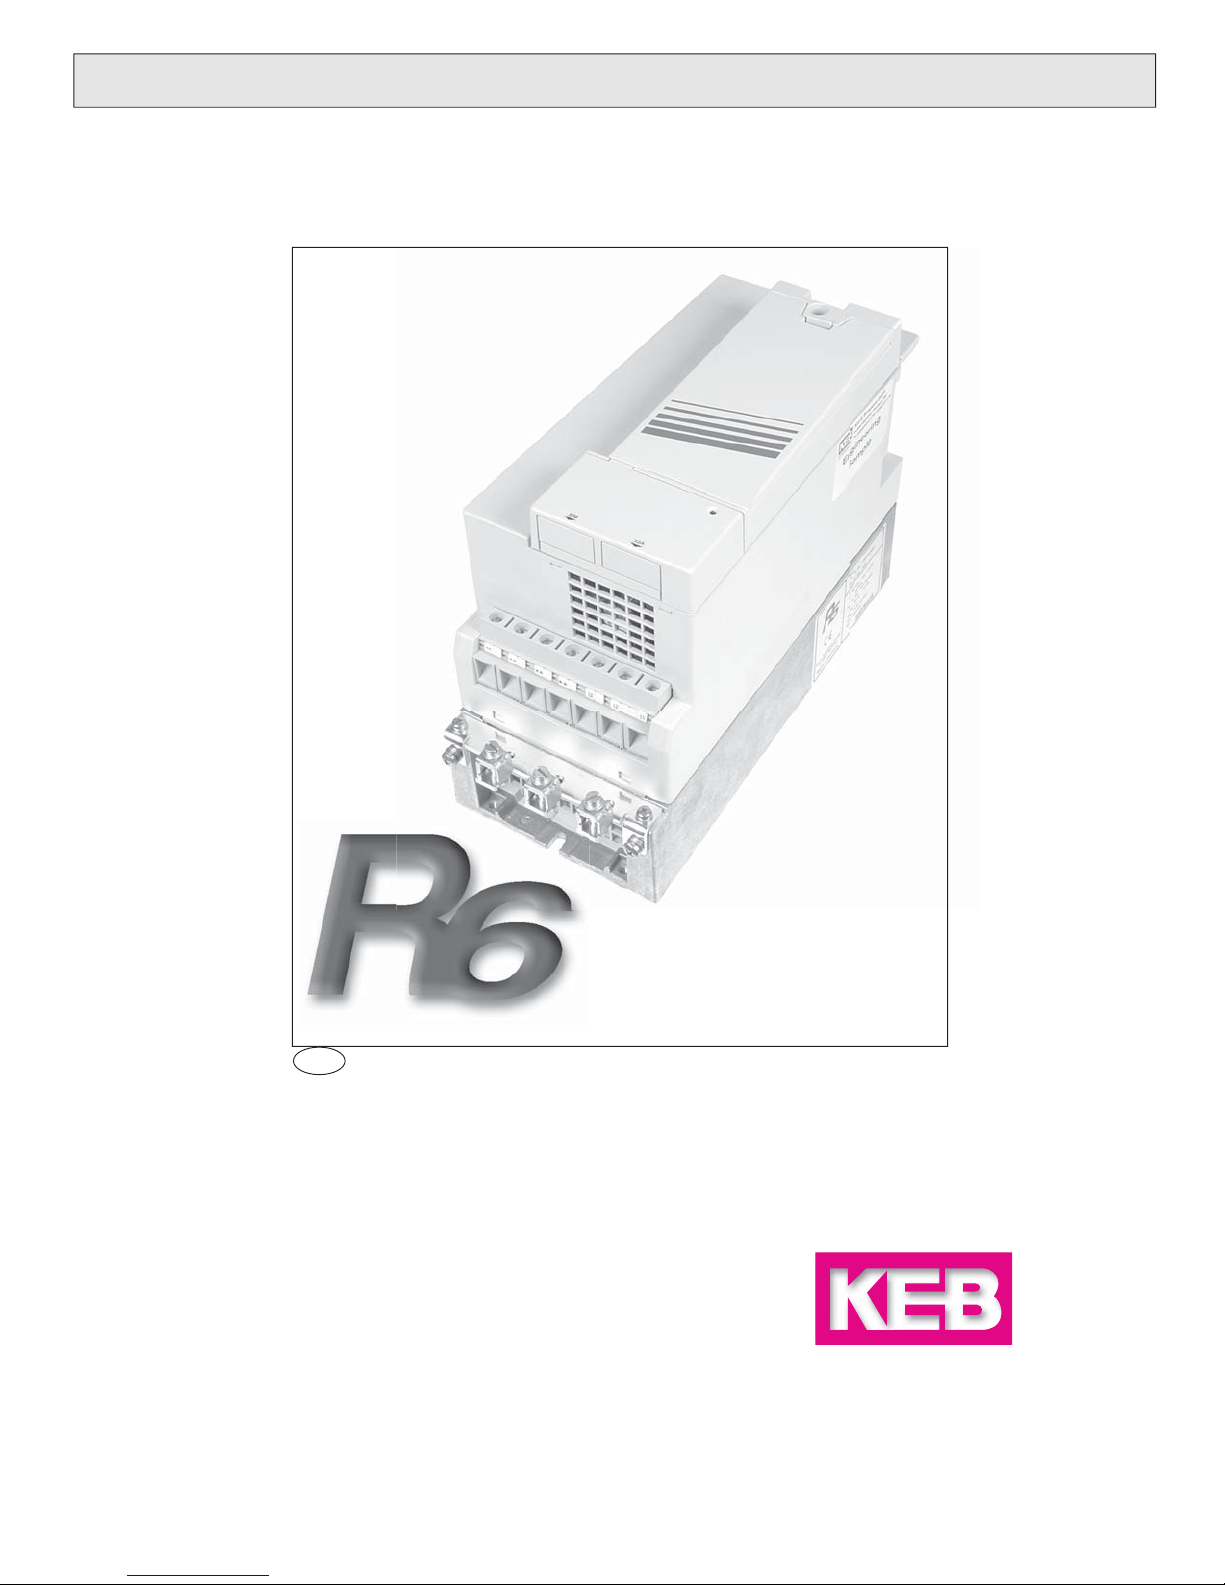
1.2 Product description.......................................................................................................................... 4
1.3 Specified application........................................................................................................................ 5
1.3.1 Standard operation ............................................................................................................................. 5
1.3.2 Abnormal operation............................................................................................................................. 5
1.4 Unit identification.............................................................................................................................. 5
2. Safety Instructions..........................................................................................................6
2.1 General instructions......................................................................................................................... 6
2.2 Transport, storage and installation................................................................................................. 6
2.3 Electrical connection........................................................................................................................ 7
2.4 EMC instructions ............................................................................................................................ 10
2.5 EMC conforming installation.........................................................................................................10
3. Technical Data ...............................................................................................................12
3.1 Power data....................................................................................................................................... 12
3.2 Operating Environment Specifications ....................................................................................... 13
3.3 Accessories..................................................................................................................................... 14
3.4 Options ............................................................................................................................................ 14
3.5 Dimensions and weights................................................................................................................14
3.5.1 COMBIVERT R6-S ........................................................................................................................... 14
3.5.2 Commutation Choke ......................................................................................................................... 15
3.5.3 HF sub-mount filter ........................................................................................................................... 15
3.5.4 Synchronization Cable ..................................................................................................................... 15
3.5.5 Ferrite Rings ..................................................................................................................................... 15
4. Installation......................................................................................................................16
4.1 EMC-compatible control cabinet installation............................................................................... 16
4.2 Installation instructions ................................................................................................................. 16
4.3 Connection of the COMBIVERT R6...............................................................................................17
4.3.1 Connection terminals of the power circuit......................................................................................... 17
4.3.2 Connection terminals of the commutation choke.............................................................................. 17
4.3.3 Connections of the synchronization module .........................................................................................
4.4 Connection power circuit R6-S with internal fuses..................................................................... 18
4.4.1 Points for General Consideration........................................................................................................... 18
4.4.2.1 Wiring Scheme 'A' with Single Regen Unit.......................................................................................... 18
4.4.2.2 Wiring Scheme 'A' with Single Regen Unit and Harmonic Filter ......................................................... 18
4.4.3 Wiring Scheme 'A' with Parallel Regen Units ........................................................................................ 19
4.4.4 Wiring Scheme 'B' with Single Regen Unit ....................................................................................... 20
4.4.5 Wiring Scheme 'B' with Parallel Regen Units ..............................................................................................21
4.4.6 Sizing for Wiring Scheme A..........................................................................................................................22
4.4.7 Sizing F5 DC Bus Capacitances.................................................................................................................23
4.5 Control connections....................................................................................................................... 24
4.5.1 Assignment of the control terminal strip X2A.................................................................................... 24
4.5.2 Assignment of socket X2B ............................................................................................................... 24
4.5.3 Wiring example ................................................................................................................................. 25
4.6 Operator........................................................................................................................................... 26
5. Operation of the Unit.....................................................................................................27
5.1 Keyboard ......................................................................................................................................... 27
5.2 Operation with PC and programming software COMBIVIS......................................................... 27
5.3 Turn-on and operation procedure................................................................................................. 28
5.4 Parameter summary ....................................................................................................................... 29
5.5 Parameter description.................................................................................................................... 30
6. Diagnosis and Troubleshooting...................................................................................34
Table of Contents

US - 3
Table of Contents
6.1 Status Display: Status and Error Messages................................................................................ 34
6.1.1 Status Messages .............................................................................................................................. 34
6.1.2 Error Messages................................................................................................................................. 34
6.2 Troubleshooting.............................................................................................................................. 35
6.2.1 Troubleshooting Error Messages...................................................................................................... 35
6.2.2 Troubleshooting Operational Problems ............................................................................................ 38
A.1 Certification..................................................................................................................................... 40
A.1.1 CE Marking........................................................................................................................................ 40
A.1.2 UL Marking ........................................................................................................................................ 40
A.1.3 CSA Marking ..................................................................................................................................... 40

US - 4
Preface
1. Introduction
1.1 Preface
First we would like to welcome you as a customer of KEB and congratulate you on the purchase of this product.
You have decided on a product of the highest technical innovation.
The enclosed documents as well as the specified hardware and software are developments of KEB. KEB has
created these documents, hardware, and software and they are, to the best of KEB's knowledge, error free. KEB
reserves the right to change specifications without prior notice. This statement is not exclusive.
The icons used throughout this document have following significance:
Danger
Caution
Discharge Time
Pay Attention
Important
Warning
Information
Help
Tip
1.2 Product description
This instruction manual describes the power supply and recovery unit KEB COMBIVERT R6-S. The COMBIVERT
R6-S has the following technical features.
As a supply unit
• converts a three-phase input voltage into DC voltage.
• supplies a single KEB frequency inverter or multiple units via DC interconnection.
• can be connected in parallel, if higher supply power is required.
• increases the stability of the DC Bus voltage in shared DC Bus applications.
As a regeneration unit
• returns the excess energy from generating operation (i.e. overhauling load) to the utility supply system.
• reduces the net energy demand.
• reduces the heat dissipation.
• is environmentally friendly.
• replaces braking resistor and braking transistor.
• is cost saving and space saving.
The COMBIVERTR6-S is generally protected against over current, ground fault and high temperature.Appropriately
dimensioned DC fuses protect the DC Bus circuit against short-circuit. The following accessories are necessary
for operation with the COMBIVERT R6-S:
• Commutation choke
• HF filter (for observance of European EMC standard)

US - 5
Preface
1.3 Specified application
The COMBIVERT R6-S serves exclusively for the supply of frequency inverters with DC input and/or regeneration
of excess energy into the line supply system. The operation of other electrical loads is prohibited and can lead to
malfunctions or destruction of the unit.
1.3.1 Standard operation
If the DC Bus voltage increases to a value above the peak value of the line voltage (negative power), regeneration
of the current to the line occurs automatically. The line voltage is measured by the R6 unit. Regeneration occurs
in a square-wave format, whereby the current flow period corresponds to the line frequency and the normal
conduction times of a standard 6 pulse bridge rectifier circuit. Regeneration stops if the DC bus voltage decreases
below the line supply peak voltage (positive power).
1.3.2 Abnormal operation
When exceeding the permissible limit values for voltage, current, or temperature the current flow between DC link
and the line is blocked during regeneration. An appropriate error message is also displayed. When acting as a
supply, the unit must be disconnected from the supply system in case of over current, as current flow can not be
limited by the unit itself when in this mode of operation.
With factory settings, the modulation is switched off in case of a line phase loss and/or a synchronization line
failure. The error message E.nEt is displayed.
Special adjustments from KEB are necessary if the modulation and/or the standard operation should start again
within a defined time in case of return of power supply.
1.4 Unit identification
19.R6.S 3 E-R 0 0 A
Type A: Heat sink (standard) B: Flat Heatsink
Design 0: default
reserved 0: default
K: Kit (High speed Class J fuses, choke, fuse holder)
Voltage R: 3-ph.; 180…550 V; AC
Housing E
Options 0: without pre-charging 3: Pre-charging, DC-fuses
1: pre-charging
Control S: 1B.R6 (Block Commutation) 1N.R6 (NCM)
Series R6
Unit size 15,19

US - 6
Safety Instructions
2. Safety Instructions
2.1 General instructions
CAUTION - Risk
of Electrical
Shock
The COMBIVERT R6 power supply and recovery unit contains dangerous voltages which
can cause death or serious injury.
The COMBIVERT R6 can be adjusted such that energy is returned to the line supply system
even in case of power failure during generator operation. Therefore dangerous high voltage
can exist in the unit even after disconnection from the line supply system.
Before working with the unit always verify the voltage has dropped to a safe value by
measuring both the DC bus voltage and the AC line voltage at the R6 unit.
Care should be taken to ensure correct and safe operation and to minimize risk to personnel
and equipment.
Only Qualified
Electrical
Personnel
All work from the transport, to installation and start-up as well as maintenance may only be
done by qualified personnel (IEC 364 and/or CENELEC HD 384 and IEC-Report 664 and
note national safety regulations). According to this manual, qualified personnel means those
who are able to recognize and judge the possible dangers based on their technical training
and experience as well as those with knowledge of the relevant standards and who are
familiar with the field of power transmission or conversion.
Observe
Standards
The COMBIVERT R6 must not be started until it is determined that the installation complies
with 89/392/EEC (machine directive) as well as the EMC-directive (89/336/EEC)(note
EN60204), the US - NEC, and the OSHA machine safety code.
The COMBIVERT R6 meets the requirements of the Low-Voltage Directive 73/231/EEC. The
harmonized standard of the series EN 61800-5-1 (VDE 0160) is used.
This is a product of limited interference susceptibility in accordance with IEC 61800-3. This
product may cause radio interference in residential areas. In this case the installer/operator
may need to take corresponding measures.
2.2 Transport, storage and installation
The storage and transport of the COMBIVERT must be done in the original packing. It is to be protected against
humidity and excessive cooling and thermal effects. Long-distance transportation must be carried out in the
original packing. It is to be secured against physical impact and shock during transport. Verify the packaging for
signs of mishandling before removal from the packaging. Contact the shipper in case of damage. After removing
the final packing, the COMBIVERT R6 must be mounted on a stable mounting base.
Protect Against
Accidental
Contact
The COMBIVERT R6 must be protected against abnormal operation. Components and
covers must not be bent or moved as this may affect insulation distances. The units contain
electrostatically endangered components which can be destroyed by inappropriate handling.
For that reason the contact of electronic components and circuit boards is to be avoided.
The equipment must not be switched on if it is damaged as it may no longer comply with
mandatory standards.
Make sure during installation there is at least the minimum clearance and enough cooling.
Climate conditions must be observed in accordance with this instruction manual.
Hot Surface
Heatsinks can reach high temperatures, which can cause burns when touched. A warning
notice "hot surface" must be mounted on the machine control panel if direct physical contact
with the heatsink can not be avoided.

US - 7
Safety Instructions
2.3 Electrical connection
Note Capacitor
Discharge Time
Before any installation and connection work, the system must be switched off and secured.
After switch off, the intermediate circuit capacitors are still charged with high voltage for a
short period of time. The unit can be worked on after it has been switched off for 5 minutes.
Secure
Isolation
The terminals of the control terminal strip are securely isolated in accordance with EN
61800-5-1. With existing or newly wired circuits the person installing the units or machines
must ensure the EN requirements are met. When used together with frequency inverters that
are not isolated from the supply circuit, all control lines must be secured by other protective
measures (e.g. double insulation or shielded, earthed and insulated).
Voltage With
Respect To
Ground
Connection of the COMBIVERT R6 is only permissible on symmetrical networks with a
maximum line voltage (L1, L2, L3) with respect to ground (N/GND) of 317V. An isolating
transformer must be used for networks which exceed this value! The unit may be damaged
if this is not observed.
Grounded Delta
Supply
Connection of the R6 series inverters to voltage systems configured as a corner grounded
delta, center tap grounded delta, open delta, or ungrounded delta may defeat the internal
noise suppression of the inverter. Increased high frequency disturbance in the controller
and on the line may be experienced. A balanced, neutral grounded wye connection
is required. The three phase voltage imbalance must be less than 2% phase-to-phase.
Greater imbalance can lead to damage of the inverter's power circuit.
It is acceptable to use a transformer with a WYE connection on the secondary.
Example of a center grounded wye transformer:
x1x2
x3
x0
Only Fixed
Connection
The COMBIVERT R6 is designed for fixed connection only as high frequency ground leakage
currents of > 3.5 mA may occur especially when using EMI filters. It is therefore necessary
to use a ground conductor with a section of at least a #4 AWG (16mm2) copper conductor or
a second ground conductor in compliance with EN 61800-5-1. Ground point-to-point with the
shortest connection possible to the main ground point in the system (avoid ground loops).
Insulation
Measurement
When doing a high voltage insulation measurement in accordance with VDE 0100 / Part
620, the power semiconductor of the unit and existing radio interference filters must be
disconnected because of the danger of destruction. This is permissible in compliance with
the standard, since all units are given a high voltage test during the quality testing at KEB in
accordance with EN 50178.

US - 8
Safety Instructions
Different
Ground
Potentials
When using components without isolated inputs / outputs, it is necessary that equal potential
bonding exist between the components to be connected (e.g. through the equalizer).
Disregard can cause destruction of the components by the equalizing currents.
Fuse Sizing
with Isolation
Transformer
When the R6 unit is supplied through an isolation transformer, the maximum allowable fuse
size is dictated by the size of the transformer as defined in the National Electric Code (NFPA-
70 or CSA 22.1). As per Article 450-3(B) of NFPA-70 (similar statements can be found in CSA
22.1), the max fuse size is defined in table 450.3(B) with a rating not greater than 125% of
the rated secondary current. In the case of multiple secondaries, it is the rated value of the
winding which the unit is supplied from. In this case it is to be assumed that the end customer
will fuse the transformer primary side with fuses exceeding 125% of transformer rated input
current. The value of this secondary fuse may be less than the max fuse value listed in the
technical data section 3.1 of this manual. The fusing of the transformer supercedes the fuse
rating of the unit because the value required for the transformer is lower than the max value
with which the unit was tested.
Prevent
Disturbances
Trouble-free and safe operation of the COMBIVERT R6 is only guaranteed when the
connection instructions below are strictly followed. Incorrect operation or damage may result
from incorrect installation.
• Pay attention to the line supply voltage.
• Supply connection must be a symmetrical, center-grounded wye.
• Install power cables and control cables separately (>6.0 inches (15 cm) separation).
• Use shielded / twisted control lines. Connect the shield at one end to the COMBIVERT
R6-S GND terminal!
• Only use suitable circuit elements to control the logic and analog inputs, whose contacts
are rated for extra-low voltages.
• The heatsink of the COMBIVERT R6 must be well grounded. Shields of large power
cables must be directly and securely attached to both the inverter GND terminal and the
motor ground terminal. Remove paint finish where necessary.
• Ground the cabinet or the system with the shortest connection to the main ground point
(avoid ground loops)
• Use exclusively the commutation choke or harmonic filter specified by KEB.
• The average value of the supplied DC current may not exceed the maximum DC
current.
• If several frequency inverters are connected to the COMBIVERT R6, the maximum
permissible DC bus capacities of all connected frequency inverters must be considered
during supply operation (see technical data).
• A ferrite ring must be installed over both + and - DC bus connections to the
COMBIVERT R6 unit to limit common mode noise on the DC bus.
Automatic
Restart
The COMBIVERT R6 can be adjusted in such a way that the unit will restart automatically
after an error (e.g. single phase brown out or loss). System design must take this into
account. If appropriate, additional monitoring or protective features should be added where
necessary.
Not Short-
Circuit Proof
(Supply)
The COMBIVERT R6 is not short-circuit proof as a power supply input ! If the I2t - protection is
adapted with a class gR fuse, a conditional protection at supply input is possible. If necessary
the short-circuit protection at DC output is ensured by internal class aR fuse.

US - 9
Safety Instructions
Conditionally
Short-Circuit
Proof
(Regen)
The COMBIVERT R6 is conditionally short-circuit proof (EN 61800-5-1 / VDE 0160). After
resetting the internal protection devices, the function as directed is guaranteed.
Exception:
• A ground fault or short-circuit frequently occurring at the output, can lead to damage to
the unit.
Cyclic Turn On
and Turn Off
With applications requiring the COMBIVERT R6 to be switched on and off cyclically, maintain
an off-time of at least 5 min. If you require shorter cycle times please contact KEB.
GFI (Ground
Fault Interrupt
Circuit-Breaker)
If personnel protection of the system against ground fault is required, the COMBIVERT R6-S
must be protected according to EN 61800-5-1:
• 3-phase inverters (with B6 bridge-connected rectifier) by RCMA’s with separation (use
privileged) or RCD’s type B (all-current sensitive GFI’s)
The tripping current should be 300mA or more, in order to avoid a premature triggering by
leakage currents (about 200mA. Dependent on the load, the length of the motor cable and
the use of a radio interference filter, substantially higher leakage current can occur). The
connection instructions from the manufacturer and the valid local requirements must be
observed.
Dependent on the available supply type (TN, IT, TT) further protective measures are
necessary in accordance with VDE Part 410 4( Part 4; Chapter 41).
For example, with TN-mains this protection is made with over current protective devices,
with IT-mains it is insulation monitoring with a pulse-code measuring method. A protective
separation can be used with all mains forms as long as the required power and cable lengths
permit this.
The person setting up the unit must present proof of compatibility before installing the
converter!

US - 10
EMC instructions
2.4 EMC instructions
The COMBIVERT R6-S represents electrical equipment designed for use in industrial and commercial installations.
In accordance with the EMC directive 89/336/EEC, it is not mandatory to mark these devices as they represent
components to be further handled by the respective machine and system manufacturer and are not operable
independently according to the EMC directive. The person installing / operating the machine / system is obliged
to prove the protective measures demanded by the EMC directive are complied with. The prescribed ratings
can usually be complied with when using the radio interference voltage filters as specified by KEB, and when
observing the following measures and installation guidelines.
2.5 EMC conforming installation
The COMBIVERT R6 is designed to be used in a second environment as defined in EN 61800-3 (unit with its own
supply transformer). Take additional measures when using it in the first environment (residential and commercial
area connected to public low-voltage line)!
• Install the control cabinet or system in an appropriate and correct manner (see chapter "control cabinet
installation")
• To avoid coupled noise, separate during installation high voltage supply lines, motor lines, control and data
lines (low-voltage level < 48V) and leave a space of at least 6.0 inches, 15 cm between them.
• In order to maintain low-resistance high frequency connections, grounding and shielding, as well as other
metallic connections (e.g. mounting plate, installed units), must be made with bare metal to metal contact with
the mounting plate, over as large a surface area as possible. Use ground conductors with a section as large
as possible, minimum #4 AWG (16mm2) or use thick ground straps.
• Only use shielded cable with copper or tin-plated braid, since steel braid is not suitable for high frequency
ranges. The shield must always be connected to the ground bare on the unit or fastened with clamps to the
bare metal of the sub mounting plate. Do not connect the shield using the drain wires alone, this reduces the
effectiveness of the shield by 70%!
• If external interference suppression filters are used, then these must be installed as close as possible <12
inches (30 cm) to the interference source and must be in metal to metal contact with the sub mounting plate,
over as large a surface area as possible.
• Always equip inductive control elements, (contactors, relays etc.), with suppressors such as varistors, RC-
elements or diodes.
All connections must be kept as short as possible and as close as possible to the ground plane. Free floating
cables act as active and passive antenna.
• Keep connection cables straight (do not loop). Tie all spare unassigned wires at one end to the ground.
• The twisted pair cables should be used when the conductors are not shielded in order to dampen common-
mode noise.
• The cable for phase synchronization between the commutation choke and COMBIVERT R6-S may not exceed
a line length of 39 inches (1 m) .
• Further information can be found on the internet, see "www.kebamerica.com".

US-11
Storage
2.6 Storage of the Unit
The DC bus of the KEB R6 is equipped with electrolytic capacitors. If the electrolytic
capacitors are stored de-energized, the oxide lm working as dielectric uid reacts with the
acidic electrolyte and destroys itself slowly. This affects the dielectric strength and capacity of
the unit. If the capacitors start running with rated voltage again, the oxide lm tries to build up
quickly. This causes heat and gas and leads to the destruction of the capacitors.
In order to avoid failures, the KEB R6 must be started up according to the following
specication based on duration of storage period (powered off):
Storage Period < 1 Year
*Start up normally, without any additional precautions
Storage Period 1...2 Years
*Power on frequency inverter for one hour without modulation
Storage Period 2...3 Years
*Remove all cables from power circuit
*Open control release
*Connect variable voltage supply to inverter input
*Increase voltage slowly to indicated input level and remain at for the specied time.
Voltage Class Input Voltage Minimum Time
230V 0...160V 15 min
160...220V 15 min
220...260V 1 h
460V 0...280V 15 min
280...400V 15 min
400...500V 1 h
Storage Period > 3 Years
*Input voltages same as above, however double the amount of time for each additional year.
Eventually consider changing capacitors.

US - 12
Technical Data
3. Technical Data
3.1 Power data
Unit size 15 19
Housing size E
Phases 3
Rated voltage *) [V] 208/230/480
Supply voltage [V] 180…528 ±0 %
Line frequency [Hz] 50 / 60 ±2
Regenerative operation
Output rated power *) [kVA] 18 (10.5) 45 (26)
Rated active power *) [kW] 17 (10) 42 (23)
Max. power output *) [kVA] 27 (15.5) 67.5 (39)
Max. active power *) [kW] 25.5 (15) 63 (34.5)
Regenerative rated current [AAC]26 65
Regenerative DC current [ADC]32 80
Over load current (E.OL) 60 s 1) [AAC] 39 97.5
Max. regenerative DC current 60 s [ADC] 48 120
Power supply operation
Output rated power *) [kVA] 18 (10.5) 48.5 (28)
Rated active power *) [kW] 16 (10) 44.5 (25.5)
Max. power output *) [kVA] 27 (15.5) 72.5 (42)
Max. active power *) [kW] 24 (14.5) 67 (38)
Rated supply current 2) [AAC]26 70
DC supply current [ADC]32 87
3)
Over load current (E.OL) [AAC] 39 105
Max. DC supply current [ADC] 48 130
OC-tripping current [A AC]42 112
DC output voltage *) [VDC] 180...680
Max. permissible DC bus capacitance *) [μF] 5,000 (21500) 5,000 (21500)
Max. permissible line fuse UL 248 Class J 5) [A] 50 90
External DC Fuses: Siemens Type Sitor 3NE8-717-1, rated
690Vac/700Vdc, 50A
Type Sitor 3NE8-722-1, rated
690Vac/700Vdc, 125A
Alternate external DC fuse: Bussmann Type 170M1364-1 Type 170M1368-1
Short Circuit Current Rating (SCCR) [kA] 10 10
I2t Peak current ratings of the semiconductor [A2s] 1200 4500
Internal DC fuse class aR Siemens Sitor 3NC2240 3NC2200
Supply conductor cross section (min for terminal) [AWG] #18 (0.5mm2) #14 (1.5mm2)
Supply conductor section (max) [AWG] #6 (10mm2) #3 (25mm2)
DC conductor cross section (min for terminal) [AWG] #18 (0.5mm2) #14 (1.5mm2)
DC conductor cross section (max) [AWG] #6 (10mm2) #3 (25mm2)
Power loss at nominal operation [W] 200 470
Max. heat sink temperature [°C] 70 88
*) Use bracketed values for operation at 230V.
1) The over load time is specified for 1 minute. The overload period is 300 seconds. This corresponds to duty class 2 EN60146-1-1.
2) The current ratings are based on a displacement power factor of g=0.95. The displacement power factor or the effective value of the input current
is dependent on load and line supply conditions. With uncontrolled diode bridge rectifiers, the power factor can be set to 1.0, so the value of the
fundamental frequency components is equal to the value of the displacement power factor.
3) For installations according to the UL 508C standard and DC supply currents > 85A, the DC bus connection must use both ++ and -- terminals with
a second parallel conductor.
4) The wire gauge is based on the maximum fuse rating, copper wire with a 75°C insulation rating, THHW or equivalent. If branch circuit protection is
selected based on the continuous current below the rated value, the wire size could be reduced.
5) For installations with isolation transformers, follow fuse sizing guidelines of NEC NFPA-70. Fuse size may be lower than the fuse rating of the unit.
The fusing of the transformer supercedes the fuse rating of the unit. See page 8 for further details.
The units are not short circuit proof without correctly dimensioned fuses
Exceeding the maximum DC bus capacitance can lead to failure.

US - 13
Technical Data
3.2 Operating Environment Specifications
Standard Classification Specifications
Definition According To EN 61800-2 Inverter Product Standard: Measurement specs.
EN 61800-5-1 Inverter Product Standard: General Safety
Operating Altitude 2000m above sea level
with 1% power derating per 100m above 1000m
Specifications During Operation
Environment Temperature 60721-3-3 3K3 Range -10C ...45 °C
(from 45°C to max. 55°C a power derating of 5%
per 1°C can be applied.)
Humidity 3K3 5...85% (no condensation)
Mechanical Vibration Railroad EN50155 Max. oscillation amplitude 1 mm (5…13 Hz)
max. accel. amplitude 7 m/s² (13…200 Hz), sinewave
Germ.Loyd Part 7-3
Shock EN60721-3-3 3M1 max. 50m/s2; 30msec; half sinewave
Contamination Gas 3C2
Particle 3S2
Specifications During Transport
Environment Temperature 60721-3-2 2K3 Range -25 ...70 °C
Humidity 2K3 (no condensation)
Mechanical Vibration Railroad EN50155 Max. oscillation amplitude 3.5 mm (2…9 Hz)
max. acceleration amplitude 15 m/s² (9…200 Hz),
sinewave
Germ.Loyd Part 7-3
EN60721-3-3 2M1
Shock EN60721-3-3 2M1 max. 100m/s2; 11msec; half sinewave
Contamination Gas 2C2
Particle 2S2
Specifications During Storage
Environment Temperature 60721-3-2 1K4 Range -25 ...70 °C
Humidity 1K3 (no condensation)
Mechanical Vibration Railroad EN50155 Max. oscillation amplitude 1 mm (5…13 Hz)
max. acceleration amplitude 7 m/s² (13…200 Hz),
sinewave
Germ.Loyd Part 7-3
EN60721-3-3 1M1
Shock EN60721-3-3 1M1 max. 100m/s2; 11msec; half sinewave
Contamination Gas 1C2
Particle 1S2
Construction / protection EN60529 IP20 Chassis
Environment Class IEC 664-1 Pollution degree 2
Definition According To EN 61800-3 Inverter Product Standard: EMI
EMI disturbance creation (See instruction manual)
Conducted disturbance EN 55011 C3 Level A (Level B optional)
Radiated disturbance EN55011 C3 Level A
EMI Susceptibility
ESD EN 61000-4-2 8kV AD (air charge) and CD (contact charge
Burst - Control wires and bus com. EN 61000-4-4 2kV
Burst - Line supply EN 61000-4-4 4kV
Surge - Line supply EN 61000-4-5 1 / 2kV Phase to phase / Phase to ground
EMF EN6100-4-3 10 V/m
Line supply fluctuations; collapse EN 61000-2-1 +10 %, -15 %; 90 %
Line voltage symmetry / line
frequency variation
EN 61000-2-4 3% / 2%
Installation altitude maximum 6,562 ft (2000 m). With installation altitudes over 3280 ft (1000 m) a de-rating of 1 %
per 328 ft must be taken into consideration.

US - 14
Technical Data
A load disconnection in the DC bus circuit may only occur after the operating status "Standby" is achieved.
3.3 Accessories
Unit size 15 19
Rated voltage 480 V (can also be used at 230V)
Commutation choke 15.Z1.B05-1000 19.Z1.B05-1000
3.4 Options
Unit size 15 19
Line EMI filter 15.R6.T60-1001
according to EN 55011 class A
19.R6.T60-1001
according to EN 55011 class A
Ferrite Rings See section 3.5.5 See section 3.5.5
Internal DC fuses 600 V / 50A
(part number 00.90.25H-3459)
600 V / 125A
(part number 00.90.25H-3559)
Operators Digital operator, Serial Interface operator
Bus operators CAN, ProfiBus, InterBus, Ethercat, Ethernet, Sercos, ModBus, Devicenet,
HSP5
Harmonic Filter
(Sizing Based on Input Current and Line
Voltage)
230/208V
On request
480V
17Z1C05-1002
19Z1C05-1002
21Z1C05-1002
3.5 Dimensions and weights
3.5.1 COMBIVERT R6-S
H
C
B
A
Ø F
C1
Housing A B C C1* F H Weight
E 5.12 11.4 8.19 0.55 0.27 10.8 12.4 lb
Values are in inches
*C1 with operator

US - 15
Technical Data
3.5.2 Commutation Choke
ØF
B
H G
C A
Part number A B C F G H Weight
15.Z1.B05-1000 2.95 9.45 7.09 0.21 2.13 6.54 12.4 lb
19.Z1.B05-1000 4.53 11.4 9.57 0.28 3.35 8.86 30.2lb
Values are in inches
3.5.3 HF sub-mount filter
CA
G
BH
ØF
Part number A B C F G H Weight
15.E4.T60-1000 1.97 13.9 5.14 0.28 3.94 13.0 4.4 lb
19.R6.T60-1001 2.56 16.6 7.80 0.28 5.91 15.6 16.8 lb
Values are in inches
3.5.4 Synchronization Cable
Part number 00.F5.0C3-4010
Length 39.4 in (1m)
3.5.5 Ferrite Rings
Ferrite rings are required to minimize electrical disturbances on the DC bus connections between the inverter(s)
and the COMBIVERT R6 unit. The ferrite rings are to be installed over both the ++ and -- DC bus conductors. Do
not use ferrite rings intended for the inverter(s)' motor leads on the DC bus as doing so negates the effect. Do not
pass ground conductors through the ferrite rings. The ferrite rings are selected based on the size of the conductor
and the inner diameter of the ring.
Part Number Overall dimensions in mm Opening cross section in mm
0090390-K000 R56/32/18 29.5

US - 16
Installation
4. Installation
4.1 EMC-compatible control cabinet installation
1 Line fuse
150 mm
30 mm
150 mm
1
2 6
8
7
10b 9
10c
10a
11
11a
12
4 + 5
3
2 Line contactor
3 Harmonic filter
4 COMBIVERT R6
5 HF sub-mounting filter
6 Commutation choke
7 Frequency inverter
8 If necessary, external DC fuses
9 Motor cables
10a Protective ground on the sub
mounting plate power circuit
10b Protective ground on the mounting
plate control circuit
10c Equal potential bonding with the
housing earth
11 Line connection power circuit
11 A Line connection control circuit
12 Control circuit conductors
Large area contact on the sub mount
plate
Control circuit Power circuit Direction of the cooling fins
4.2 Installation instructions
• Install and ground the COMBIVERT R6 on a stationary system.
• Mist, water, or other liquids and vapors must not be allowed to permeate the device.
• Allow for sufficient heat dissipation if installed in a dust-proof housing.
• When operating the COMBIVERT in an explosion proof environment, install the unit in an appropriate
enclosure in accordance with the local regulations and codes.
• Protect the COMBIVERT against conductive and aggressive gases and liquids.
• The conductors to the commutation choke must be limited to 39 inches (1 m).
6.0 in
6.0 in
1.2 in

US - 17
Connection Terminals
4.3 Connection of the COMBIVERT R6
4.3.1 Connection terminals of the power circuit
Pay attention to the input voltage, since both 230V and 480V are possible!
Housing Size E Name Tightening torque [Nm]
- - ++ L12++ L32L22
- -
Permissible line cross section [awg] Size
15
2
to
4
Size
19
2
to
4
Function Size
15
#16
to
#8
Size
19
#14
to
#4
L12
L22
L32
3-phase supply input from the
commutation choke
++
– – DC voltage input with in rush current
limiting
GND,
Connections for shielding and
grounding occur via the provided
copper ground bar and clamps. It
must be mounted to the heatsink with
the four screws provided. The strain
relief and the shielding must be done
by the customer.
–
1.3
for
philps.
screws
6
for cable
clamps
4.3.2 Connection terminals of the commutation choke
15/19.Z1.B05-1000 Name Tightening torque [Nm]
L1.1 L1.2 L2.1 L2.2 L3.1 L3.2
X2B
PE
PE
Permissible line cross section [awg] Size
15
2
to
4
Size
19
6
to
8
Function Size
15
#14
to
#6
Size
19
#12
to
#2
L1.1
L2.1
L3.1 3-phase line connections
L1.2
L2.2
L3.2 Output to COMBIVERT R6-S
X2B see below - -
PE Connection for shielding / ground – 6

US - 18
Connection Power Unit
4.4 Connection power circuit R6-S with internal fuses
4.4.1 Points for General Consideration
Always use ULlisted and CSAapproved wire. Use 60/75°C copper conductors only. Use minimum
300V rated wire with 230V systems and minimum 600V rated wire with 480V systems.
Suitable for use on a circuit capable of delivering not more than 10000 rms symmetrical
amperes, 240 or 480 volts maximum when protected by fuses as listed in table 3.1.
4.4.2.1 Wiring Scheme 'A' with Single Regen Unit
L1’
L2’L2 L3’
L1
L3
L1.2
X2B
L2.2L2.1 L3.2
L1.1
L3.1
L2
L1
L3
++
++
X2B
- -L22 - -
L12
L32
1 2 4 5
6
3 7
++/+PA
- - / -
PE
W
V
U
PE
1 Line fuse UL Class J 1) 5 COMBIVERT R6-S
2 Main Line contactor 6 Frequency Inverter
3 HF filter (optional) 7 Motor
4 Commutation Choke
or Harmonic Filter
(with
synchronization connection)
1) KEB recommends using fast acting class J fuses only (ex. Bussman type JKS). For applications with KEB Harmonic Filters and an isolation
transformer, a high speed class J fuse must be used (only Ferraz type HSJ is approved).
4.4.2.2 Wiring Scheme 'A' with Single Regen Unit and Harmonic Filter
T1 T2
L2.1
L3.1
2T1
GND
4T2 6T3
T1
T2
T3
T4
NC KTY
L1.1
KEB
Harmonic Filter
++/+PA
U
V
W
PE PE
2T1 4T2 6T3
GND
L2
L3
PE
L1
KEB
EMI FILTER
L2.2
L3.2
L1.2
GND
L22
L32
GND
L12
KEB R6-S
Line Regen
++
--
++
--
Fuse
or CB
L1
L2
L3
Capacitor Assembly
Alternately T3/T4 could be connected to T1/T2 on the R6 when the R6 has
the KTY temperature sensor option.
Otherwise T3/T4 can be connected to an external KTY evaluation device.
Max. Dist.
2m
- - / -
X2BX2B
Max. Dist.
1m KEB F5 Drive

US - 19
Connection Power Unit
4.4.3 Wiring Scheme 'A' with Parallel Regen Units
L1’
L2’L2 L3’
L1
L3
X2B
L2
L1
L3 ++
++
X2B
- -L22 - -
L12
L32
1 2
6 7
L1’
L2’L2 L3’
L1
L3
L1.2
X2B
L2.2L2.1 L3.2
L1.1
L3.1
L1.2
L2.2L2.1 L3.2
L1.1
L3.1
++
++
X2B
- -L22 - -
L12
L32
3 4
8
PE
W
V
U
$ุPPt
PE
++
+PA
- -
-
5a
5b
1 Main Line contactor 5 COMBIVERT R6-S
2 Line fuse UL class J 1) 6 External terminal block 2)
3 HF filter (optional) 7 Frequency inverter
4 Commutation Choke
or Harmonic Filter
(with
synchronization connection)
3) 4)
8 Motor
1) KEB recommends using fast acting class J fuses only (ex. Bussman type JKS). For applications with KEB Harmonic Filters and an isolation
transformer, a high speed class J fuse must be used (only Ferraz type HSJ is approved).
2) If the inverter current is greater than the current of one COMBIVERT R6, the DC bus conductors from the inverter must be connected to an
external terminal block to split the current to multiple R6 units. In this case the conductors to each R6 unit must be at least 6 AWG (10 AWG for
the size 15R6) or larger based on the DC bus current to each unit.
3) Due to tolerances in the inductance values of the commutation choke or harmonic filter, the actual available power of each R6 unit must be
reduced by 15% to account for unequal load sharing. Therefore the total power available is reduced. With parallel connection of different sized
R6 units, it is necessary to use the same commutation choke or harmonic filter in order to maintain the same short circuit voltage (uK) across
the chokes.
4) The regen CAT5 synch cables must plug into the same synchronization module. It does not matter which X2B ports are used on the module.
Sizings with harmonic filters must utilize Wiring Scheme A (Sections 4.4.2 and 4.4.3) and
should only be used in combination with harmonic filters from KEB.
E

US - 20
Connection Power Unit
4.4.4 Wiring Scheme 'B' with Single Regen Unit
L1’
L2’L2 L3’
L1
L3
L1.2
X2B
L2.2L2.1 L3.2
L1.1
L3.1
L2
L1
PE
L3 ++
++
X2B
- -L22 - -
L12
L32
4
PE
PE
U V W
L1’
L2’L2 L3’
L1
L3
3 65
5
L2L3 L1
10
PE
2
++/
+PA
- -/
-
①⑧
⑦
9
1 Main line contactor 6 Inverter line choke 2) 4)
2 Regen contactor 3) 7 Commutation choke 2) 4)
3 Inverter line fuse UL class J 1) 8 COMBIVERT R6-S
4 Regen line fuse UL class J 1) 9 Frequency Inverter
5 HF filter (optional) 10 Motor
1) KEB recommends using fast acting class J fuses only (ex. Bussman type JKS). For applications with KEB Harmonic Filters and an isolation
transformer, a high speed class J fuse must be used (only Ferraz type HSJ is approved).
2) Current sharing between the R6-S and the frequency inverter must be taken into consideration during motor (supply) operation. The current
sharing is dependent on the uk value (voltage drop across the choke) and the nominal current of the line choke (see formula below). If too much
current flows through the R6 unit, a second R6 unit should be used in parallel with the first.
3)
The regenerative contactor may only be closed if the pre-charging of the DC bus circuit of the inverter is completed. A relay output on the R6
unit can provide the control for this contactor. See Section 4.5.1.
4) Aline choke with minimum Uk=3% is required for all inverters equal to or greater than size 23 for 480V units or size 20 for 230v units. Additionally
a line choke is also recommended in general to minimize circle current which can flow between the R6 unit and the frequency inverter during
regen operation. This circle current can reduce the available capacity of the R6 unit by 10-25% depending on the value of the choke connected
to the inverter and the commutation choke.
Wiring Scheme B should only be utilized with R- and U-Housing F5 Elevator Drives. The
drive housing is indicated in the part number's seventh digit (e.g. xx.F5.A1H-xxxx,
xx.F5.A1R-xxxx, xx.F5.A1U-xxxx).
Sizings with harmonic filters must utilize Wiring Scheme A (Sections 4.4.2 and 4.4.3) and
should only be used in combination with harmonic filters from KEB.
E
E
Other manuals for combivert R6-S
4
Table of contents
Other KEBCO Power Supply manuals

KEBCO
KEBCO Combivert R6 User manual

KEBCO
KEBCO combivert R6-S User manual

KEBCO
KEBCO combivert R6-S User manual

KEBCO
KEBCO COMBIVERT F5 User manual

KEBCO
KEBCO Combivert R6 User manual

KEBCO
KEBCO Combivert R6 User manual

KEBCO
KEBCO COMBIVERT R5-C User manual

KEBCO
KEBCO Combivert R6 User manual

KEBCO
KEBCO combivert R6-S User manual