Kenwood PP510 User manual

Kenwood Limited, New Lane, Havant, Hampshire PO9 2NH, UK
www.kenwoodworld.com 57497/2
PP510
KENWOOD
O
I
UNFOLD
Spaghetti Quadri (AT910006)
Linguine (AT910009)
Casarecce (AT910003)Bigoli (AT910002)
Fusilli (AT910010)
Silatelli (AT910008)
Pappardelle (AT910007)
Bucatini (AT910012)
Biscuit Maker (AT910014)
Maccheroni Lisci (AT910004)
Orecchiette (AT910013)
Spaccatelli (AT910005)
Conchigliette (AT910011)

before using your Kenwood
appliance
●Read these instructions carefully and
retain for future reference.
●Remove all packaging and any
labels.
safety
●Pasta mix made too dry or fed
through too quickly can break your
pasta maker and/or machine.
●Do not place your fingers or any
other item, except the
spanner/pusher supplied, down the
feed tube.
●Only use the spanner/pusher handle
to push dough down the feed tube.
And don’t push too hard.
●Never attach or remove the pasta
maker whilst the machine is in
operation.
●Feed the dough small amounts at a
time and at a steady rate. Don’t
allow the feed tube to fill up.
●Take care when handling or cleaning
as the cutting assembly blade will be
sharp.
●Always unplug:
●●before fitting or removing parts
●●after use
●●before cleaning.
●Ensure the attachment is secured in
position before switching on.
●To avoid electric shocks, never let
the power unit, cord or plug get wet.
●Never use a damaged machine. Get
it checked or repaired: see ‘Service’.
●Never use an unauthorised
attachment.
●Never let the cord hang down where
a child could grab it.
●This appliance is not intended for
use by persons (including children)
with reduced physical, sensory or
mental capabilities, or lack of
experience and knowledge, unless
they have been given supervision or
instruction concerning use of the
appliance by a person responsible
for their safety.
●Children should be supervised to
ensure that they do not play with the
appliance.
●Only use the appliance for its
intended domestic use. Kenwood
will not accept any liability if the
appliance is subject to improper use,
or failure to comply with these
instructions.
before plugging in
●Make sure your electricity supply is
the same as the one shown on the
underside of your machine.
Important – UK only
●The wires in the cord are coloured
as follows:
Blue = Neutral,
Brown = Live.
●The appliance must be protected by
a 3A approved (BS1362) fuse.
Note:
●For non-rewireable plugs the fuse
cover MUST be refitted when
replacing the fuse. If the fuse cover
is lost then the plug must not be
used until a replacement can be
obtained. The correct fuse cover is
identified by colour and a
replacement may be obtained from
your Kenwood Authorised Repairer
(see Service).
●If a non-rewireable plug is cut off it
must be DESTROYED
IMMEDIATELY. An electric shock
hazard may arise if an unwanted
non-rewireable plug is inadvertently
inserted into a 13A socket outlet.
●This appliance conforms to EC
directive 2004/108/EC on
Electromagnetic Compatibility and
EC regulation no. 1935/2004 of
27/10/2004 on materials intended
for contact with food.
before using for the first time
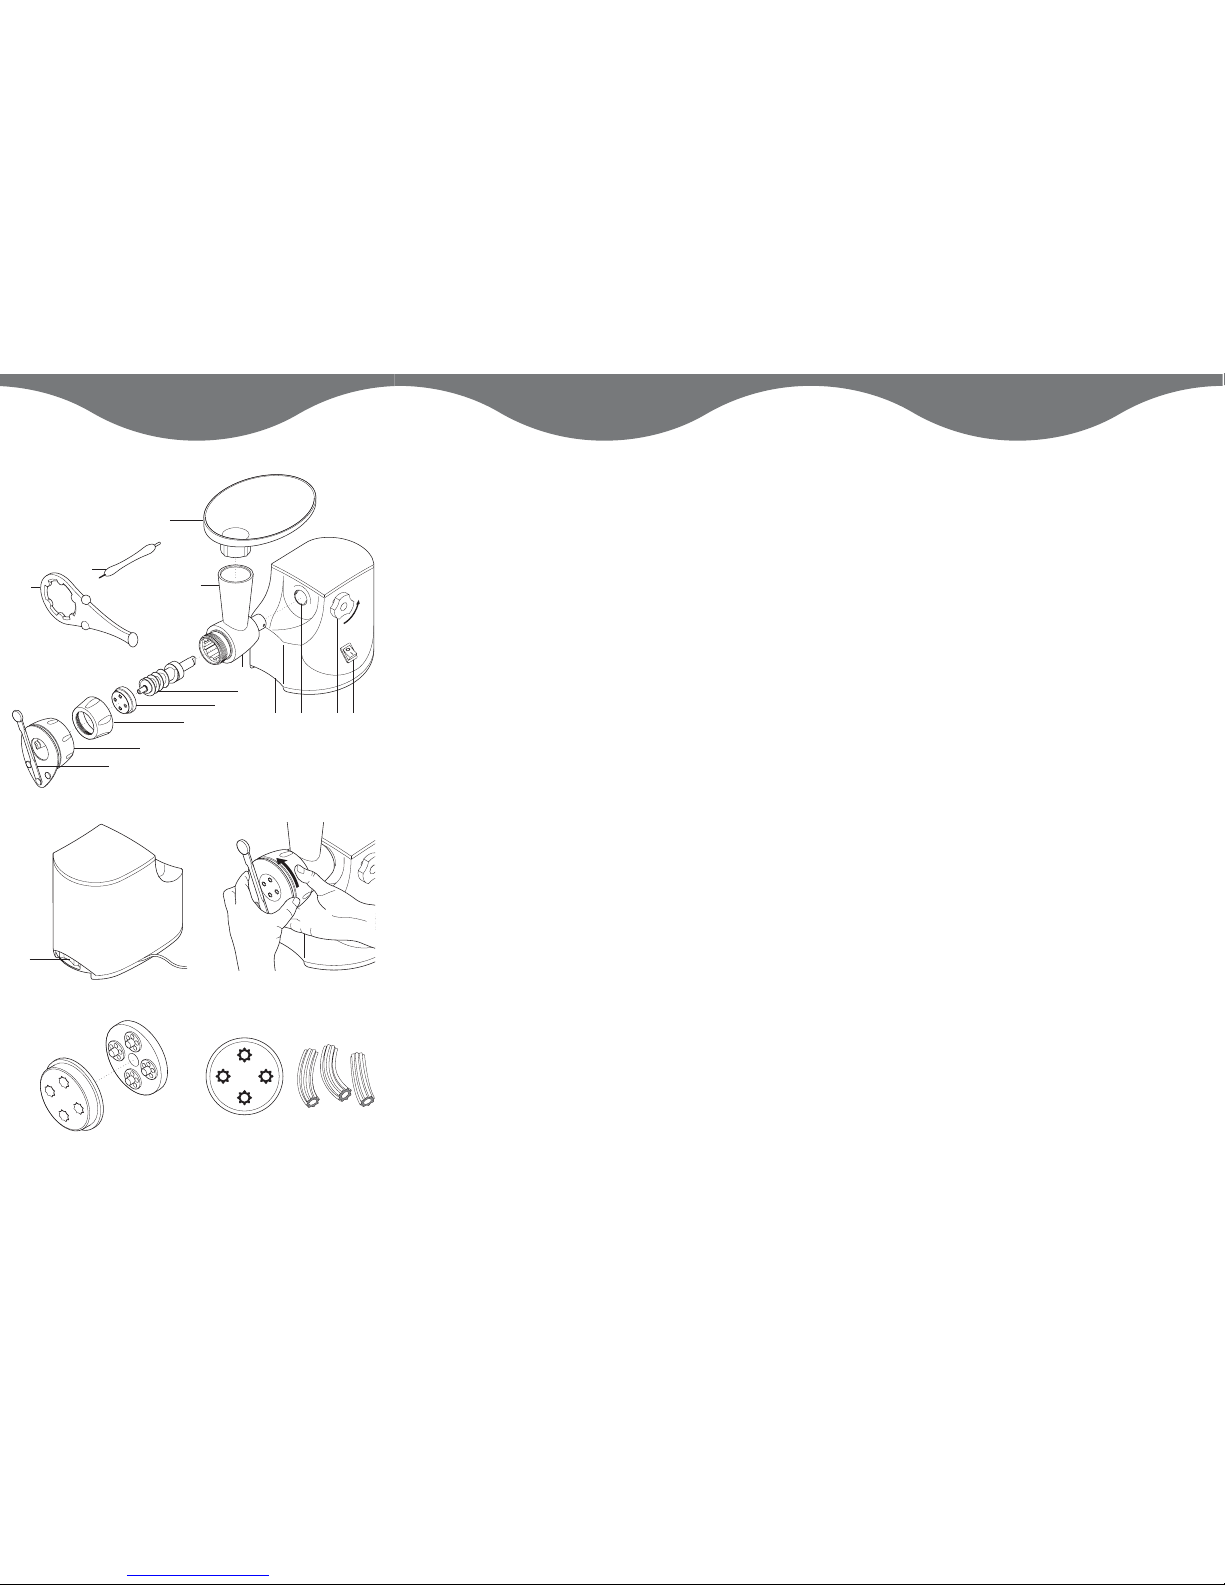
1Wash the parts: see ‘cleaning’.
English
2
KENWOOD
O
Maccheroni Rigati

key
hopper
feed tube
body
scroll
die*
securing nut
clamp ring of cutting assembly
cutting blade
spanner/pusher
cleaning tool
power unit
attachment outlet
locking screw
on/off switch
reverse switch
*Included in your pack is the
Maccheroni rigati die shown on the
illustration page. To purchase any of
the additional dies shown on the
back page of this booklet, please
call 0870 241 3653 or contact the
shop where you purchased the
attachment.
to assemble
1Optional: for easier pasta making,
warm the body, die and ring nut in
hot water, then dry.
2Release the locking screw by turning
anti clockwise , then slide the
pasta maker body into the outlet.
3Turn it both ways until it locks into
place. Then turn the locking screw
clockwise to secure.
4Fit the scroll inside the body and
rotate until it engages with the
machine.
5Fit the die.
6Fit the securing nut and hand
tighten. (Don’t use the
spanner/pusher as this is to assist
with removal only).
●Make sure the securing nut is almost
flush against the body of the
attachment.
7Fit the hopper.
Optional: The cutting assembly
can be fitted to the assembled pasta
maker to assist with cutting the
pasta into the desired lengths.
1With the handle of the cutting blade
uppermost, unscrew the clamp ring
slightly. Place over the securing nut
and twist if necessary until fully
home on the attachment. The die
should fit flush with the front of the
cutting assembly.
2Hold the edge of the cutting
assembly and at the same time
tighten the clamp ring by turning
away from you .
Note – Whenever you fit or remove
the cutting assembly, always hold
the edge of the assembly in one
hand and twist the clamp ring with
the other.
to use your pasta maker
1Make your pasta mix following a
recipe supplied.
●Don’t make the mix too dry as it
could break your pasta maker or
machine. It should resemble coarse
breadcrumbs or a coarse crumble
texture. The particles should be
separate but if squeezed together it
should form a clump which bonds
together.
2Switch on.
3Place some of the mix onto the
hopper. Feed a small amount of mix
into the feed tube at a time. Allow
the scroll to clear before continuing.
If the feed tube becomes clogged
use the end of the spanner/pusher
handle to push the mix onto the
scroll (don’t use anything other than
the spanner handle and don’t push
too hard). Never let the feed tube fill
up.
4When the pasta is long enough,
move the handle on the cutting
assembly back and forth to cut the
pasta into the desired length.
Alternatively if the cutting assembly is
not fitted use a knife to cut the pasta.
3

●To change dies remove the cutting
assembly. Always hold the edge of
the cutting assembly in one hand
and twist the clamp ring towards you
and remove. Remove the securing
nut (use the spanner/pusher to
loosen the securing nut if necessary)
and switch on briefly to eject the die.
Remove the die and any visible
excess pasta and then fit the desired
die. Replace the securing nut and
cutting assembly.
warning
The pasta maker will get hot in use –
this is normal and is caused by the
pasta being compressed in the
attachment.
●If the machine stalls or jams during
use, switch off. Depress the reverse
switch for a few seconds to release
the clogged pasta. Unplug and
remove any clogged material.
NOTE
The dies are specially made from a
bronze material to give the pasta a
rough textured surface to hold pasta
sauce for an authentic full flavour.
cleaning
Don’t wash any part in the
dishwasher.
dismantle the attachment
●Always hold the edge of the cutting
assembly in one hand and twist the
clamp ring towards you and remove.
Remove the securing nut, use the
spanner/pusher to loosen the
securing nut if necessary. Remove
the attachment from the machine by
turning the locking screw anti-
clockwise and pulling off the
attachment. Dismantle the parts.
dies
The Maccheroni rigati, Maccheroni
lisci and Bucatini dies can be pulled
apart to assist with the cleaning
process .
●Clean immediately after use,
otherwise the pasta will dry and be
extremely difficult to remove. Use the
cleaning tool to remove all the pasta
from the dies. The thicker end of the
tool is ideal for cleaning the larger
holes on the Maccheroni rigati die,
whilst the thinner end is suitable for
cleaing other dies. Wash in hot
soapy water, then dry thoroughly.
scroll
●Do not immerse in water.
●Wipe clean, then dry.
hopper, ring nut, body,
spanner, cutting assembly.
●Remove any pasta dough and if
necessary wash in hot soapy water,
then dry thoroughly.
service and customer
care
●If the cord is damaged it must, for
safety reasons, be replaced by
Kenwood or an authorised Kenwood
repairer.
UK
If you need help with:
●using your pasta maker or
●servicing, spare parts or repairs (in or
out of guarantee)
call Kenwood customer care on 023
9239 2333. Have your model
number ready – it’s on the
underside of the power unit.
●spares and attachments
call 0870 2413653.
●other countries
Contact the shop where you bought
your machine.
4

IMPORTANT INFORMATION FOR
CORRECT DISPOSAL OF THE
PRODUCT IN ACCORDANCE
WITH EC DIRECTIVE
2002/96/EC.
At the end of its working life, the product
must not be disposed of as urban
waste.
It must be taken to a special local
authority differentiated waste collection
centre or to a dealer providing this
service.
Disposing of a household appliance
separately avoids possible negative
consequences for the environment and
health deriving from inappropriate
disposal and enables the constituent
materials to be recovered to obtain
significant savings in energy and
resources. As a reminder of the need to
dispose of household appliances
separately, the product is marked with
a crossed-out wheeled dustbin.
guarantee - UK only
If your pasta maker goes wrong
within one year from the date you
bought it, we will repair it (or replace
it if necessary) free of charge
provided:
●you have not misused, neglected or
damaged it;
●it has not been modified (unless by
Kenwood);
●it is not second-hand;
●it has not been used commercially;
●you have not fitted a plug incorrectly;
and
●you supply your receipt to
show when you bought it.
This guarantee does not affect your
statutory rights.
recipe for plain pasta
mix
We recommend using 00 flour, but if
this is not available, use All Purpose
Plain Flour. Measure the ingredients
carefully as too dry a mix could
break your attachment and/or
machine. However, if the mixture
forms a ball of dough then too much
liquid has been added.
200g 00 flour
100g beaten egg (approximately 2
medium sized eggs)
Method
Place the flour into a bowl and
gradually add the beaten egg. Mix
until the ingredients resemble coarse
breadcrumbs or a coarse crumble
texture. The particles should be
separate but if a small amount is
squeezed together it should form a
clump which remains bonded
together.
5

to make flavoured pasta
herb pasta
Use the above recipe but add 20ml
washed and finely chopped herbs
such as parsley to the beaten egg,
wholemeal – replace the flour with
ordinary plain wholemeal flour
verdi – Replace 30ml beaten egg
with 30ml finely pureed spinach.
eggless pasta
200g 00 flour
pinch salt
25ml virgin olive oil
approximately 100ml water
Follow the method for plain pasta
mix adding the salt to the flour and
replacing the egg with the oil and
water.
Japanese Soba
Buckwheat Noodles
– Ideal for people who require a
gluten free diet.
300g buckwheat flour
150g beaten egg
Follow the method for plain pasta
mix.
Pass the mix through the pasta
maker fitted with the Bigoli screen
and cut into suitable lengths. Cook
in boiling water.
udon noodles
350g All Purpose Plain flour
140ml cold water
20g salt
Stir the salt into the water until
dissolved.
Follow the method for plain pasta
mix replacing the beaten egg with
the salt water.
Pass the mix through the pasta
maker fitted with the Bigoli screen
and cut into suitable lengths. Cook
in unsalted boiling water for
approximately 5 minutes, the
noodles should be firm but tender.
Drain immediately and rinse in cold
water. Serve immediately with a
sauce of your choice.
to cook your pasta
Before cooking, pasta can be dried
for short periods - up to an hour
before cooking. This will vary
according to the type of pasta
produced.
1Bring a pan three quarters full of
water to the boil. Add salt to taste.
2Add your pasta and boil stirring
occasionally. Cook until the pasta is
al dente. It should be tender but yet
still firm to bite. As a guide this will
take 1 - 10 minutes but will vary on
the type of pasta and the texture
desired. Always check the texture
regularly as the pasta will continue to
cook a little after being removed
from the heat.
●Never add oil to your water as it
makes the pasta slippery, preventing
the sauce from sticking properly.
6

choosing a sauce for
pasta
Selecting the pasta to the sauce can
make a difference. Tubular shapes
trap bits of food in thick sauces,
wheras long strands are good for
absorbing juices of tomato sauces
and seafood sauces without going
soft, whilst thicker pasta usually
goes with strong flavoured sauces.
biscuit maker (AT910014)
See back page for illustration of the
biscuit maker.
1Make up one of the following biscuit
recipes and chill in the fridge to allow
the mix to firm.
●Use small eggs otherwise the mix
will be too soft.
2Remove the shaper from the bisuit
die. Assemble the pasta maker with
the biscuit die, making sure the slots
in the die end up on either side. Fit
the attachment to the mixer. (The
cutting assembly should not be
fitted.)
3Slide the shaper into the slots either
side of the die and move until the
desired shape is in the centre of the
hole.
plain biscuits
150g softened butter
150g caster sugar
2 small eggs, beaten
300g plain flour, sieved
Cream the butter and the sugar in a
bowl until the mixture is light and
fluffy. Beat in the egg, then fold in
the sifted flour. Pass the mixture
through the attachment, having
selected the desired shape and cut
into suitable lengths. Place onto a
greased baking sheet and bake in
the centre of a hot oven 190°C,
375°F, gas mark 5 for approximately
10 minutes or until cooked. Cool on
a wire rack.
chocolate biscuits
125g softened butter
200g caster sugar
2 small eggs, beaten
250g plain flour }sieved together
25g cocoa powder
Follow the method for plain biscuits.
After the biscuits have cooled, they
can be decorated by dipping in
melted chocolate or dusted with
icing sugar.
7

8
trouble shooting
Question Answer/Hint
The appearance of the pasta is rough ●The screens/dies are specifically
made of bronze. A feature of the
bronze die is that it gives the pasta a
rough surface which is preferred as it
allows any accompanying sauce to stick
The quality of the extruded pasta ●This is normal, but can be minimised
varies throughout the mix by:-
-ensuring the mix is of a fairly even
consistency to start with.
- adding the mix to the pasta maker at a
steady rate.
- ensuring that all the mix is extruded in
one batch.
- ensuring the mix is not allowed to dry
out.
Pasta doesn’t come out of the holes ●Ensure the dies are clean before
starting, any dried pasta in the holes
will prevent extrusion.
●Check that the feed tube is not blocked.
●Use the spanner/pusher to help
feed the pasta onto the scroll.
The dies are difficult to clean ●Always clean immediately after use,
do not allow the mix to dry onto the
die.
●Use the tool provided. The thicker
end of the tool is ideal for cleaning the
larger holes on the Maccheroni rigati
die, whilst the thinner end is suitable
for cleaning other dies.
Pasta shapes are ragged ●Sometimes the first pasta extruded is
slightly ragged. Add the pasta mix in
a constant steady rate, try adjusting
the rate at which the mix is added.
Warm the body, die and ring nut in hot
water and dry thoroughly before using.
The die doesn’t fit onto the scroll ●Check that the centre hole in the die
is cleared of any dry mix from
previous tests.
●Check that if you are changing dies
during operation, there is no mix
between the die and scroll preventing
it from fitting flush.

Question Answer/Hint
The feed tube keeps blocking ●Add small amounts of pasta at a time
in a steady rate and only add more
when the feed tube is clear.
●The mix is too wet.
●Use the end of the spanner/pusher to
push the mix down the feed tube.
(Removing the hopper will enable the
spanner to reach lower down the feed
tube).
●Vary the speed of adding the mix.
The cutting assembly is difficult ●Leave the attachment to cool down
to remove for approximately 30 minutes.
The cutting assembly is difficult ●Make sure the metal clamp ring is
to fit partially unscrewed from the plastic
inner before pushing onto the
attachment.
9
Table of contents
Other Kenwood Pasta Maker manuals