Kett C-600 User manual

Rice Whiteness Tester C-600
User Manual

Safety Precautions
If this device is not used according to safety precautions, accidents can occur which may
cause damage to the instrument, the operator or other items. Our design has included
substantial consideration for product safety but please read the precautions contained in
this user manual and use the product correctly.
■ Please obey all safety precautions
Please thoroughly read the precautions included in the user manual.
■ Please don't use this product if it is not working properly
If the product should break or malfunction, please contact the retail outlet where you purchased
the product or our company directly.
■ Interpreting warning symbols
The following symbol is displayed in this user manual to help prevent an incident from occurring due
to inappropriate use of this device.
This symbol is displayed along with instructions that, if ignored, and if the device
is inappropriately used, may lead to the user suffering an injury or material damage.
Caution

1. Measurement Principles and Characteristics..................................... 4
2. Specications ........................................................................................ 5
3. Part Names............................................................................................. 6
4. Description of Operation Keys............................................................. 7
5. Preparing for Measurement.................................................................. 8
6. Measurement......................................................................................... 9
7. Maintenance and Other Functions ......................................................11
8. Errors......................................................................................................14
Table of Contents

4
1. Measurement Principles and Characteristics
■ MeasurementPrinciples
This device is designed to measure the whiteness of rice based on our
own uniquely developed standard. The C-600 measures reflectivity and
utilizes two blue LEDs as its light source. The light from the blue LEDs
shine onto the sample surface at a 45 degree angle. Next, the amount
of reflected light reflected is measured with a photo diode. The whiter the
sample, the more light reflected back and detected, and thus a higher
measurement value is registered. The whiteness of rice correlates directly
with the milling percentage of that rice. Therefore, you can use this device
to indirectly measure the milling percentage of a rice sample.
■ Characteristics
This device is lighter and more compact than our previous C-300 model.
Furthermore, using blue LED light sources allows for a longer light source
lifetime, reduced power consumption and reduced heat generation. Sensitivity
calibration when the device is turned on has also been reduced, allowing you
to begin measurements faster when compared to previous models.

5
2.Specications
MeasurementMethod : Reectivitymeasurement
Accepted Samples : Non-glutinous polished rice, non-glutinous brown rice, non-glutinous pre-
washed rice, glutinous polished rice, glutinous brown rice, glutinous pre-
washed rice
Measured Item : Whiteness
Measurement Range : 5.0 to 69.9
Resolution : 0.1
Display Method : Fluorescent display tube
Functions : Average, printer output
Usable Temperature/Humidity Range
: Temperature: 5 to 40°C, Humidity: 30 to 85% (non-condensing)
Light Source : Blue LED
External Output : RS-232C
Power Source :
AC 100V-120V (50/60Hz) : Power cord A (Flat blade attachment plug, Type A-1)
AC 200V-240V (50/60Hz) : Power cord B (Round pin attachment plug, Type C-4)
Maximum Power Consumption
: 35 W (100 V), 60 W (240 V)
Dimensions : 290 (W) × 295 (D) ×185 (H) mm
Weight : 5.0 kg
Included Parts : Whiteness standard plate, sample case, sample platter, fixed quantity
shooter, sample cup, main unit cover, glass wipe, replacement sponge,
replacement packing (x3), replacement fuse, power cord A (100-120V) or
power cord B (200-240V) , power plug adapter, user manual
Optional Items : Printer VZ-330, printer connector cable VZC-14

6
<Front Side>
Display
Sample Case Slot
<Rear Side>
3. Part Names
<Main Unit>
<Included Parts - with part numbers>
<Optional Parts>
RS-232C Connector
Exhaust
Fuse Holder
Whiteness Standard Plate Sample Case Sample Platter Fixed Quantity Shooter Sample Cup
C-600-01 C-600-02 C-600-03 C-600-04 C-600-05
Main Unit Cover Glass Wipe Replacement Sponge Replacement Packing (x3) Replacement Fuse
C-600-06 C-600-07 C-600-08 C-600-09 C-600-10
Power Cord A Power Cord B
Power Plug Conversion Adapter
User Manual Printer VZ-330
Printer Connector Cable VZC-14
(100V-120V) (200V-240V) C-600-12 C-600-13 C-600-14 C-600-15
C-600-11-A C-600-11-B
Glass Filter
Front Cover
Power Switch
Power Connector
Key
It is attached for Power cord A
(for 100V-120V uses) only.
( )
A or B

7
4. Description of Operation Keys
Key Function
Used to turn the printer output ON or OFF.
Used as a backspace when inputting numerical values.
Used to input standard plate values.
Usedtonalizenumericalinput.
~ Used to input numerical values.
Used for sensitivity calibration.
Used to display the average of the measured values.
<Operation Panel>

8
5-1. Connecting the Power Cord
[Caution] Power supply voltage may be different when
using this product in other countries. Please only
use a power cord designed for your country.
(1) Insert the power cord into the power supply connector on
the rear side of the main unit.
(2) If the power supply is a three-prong plug 100V-120V outlet,
insertthepowercordintoVACoutlet.(Seetherightgand
in case of 100V-120V uses with blade plug condition)
Connect the included power plug conversion adapter into
the power cord first, then plug the cord into a 100V-120V
power outlet. Next, connect the ground wire on the power
cord to the ground.
[Caution] 200V-240V outlet is used, power cord B should be used.
[Caution] Ifthepowersupplyis200V-240Vwithatbladeplug,the
conversion adapter should be prepared by yourself.
[Caution] If the power supply is 100V-120V with round pin plug, the
conversion adapter should be prepared by yourself.
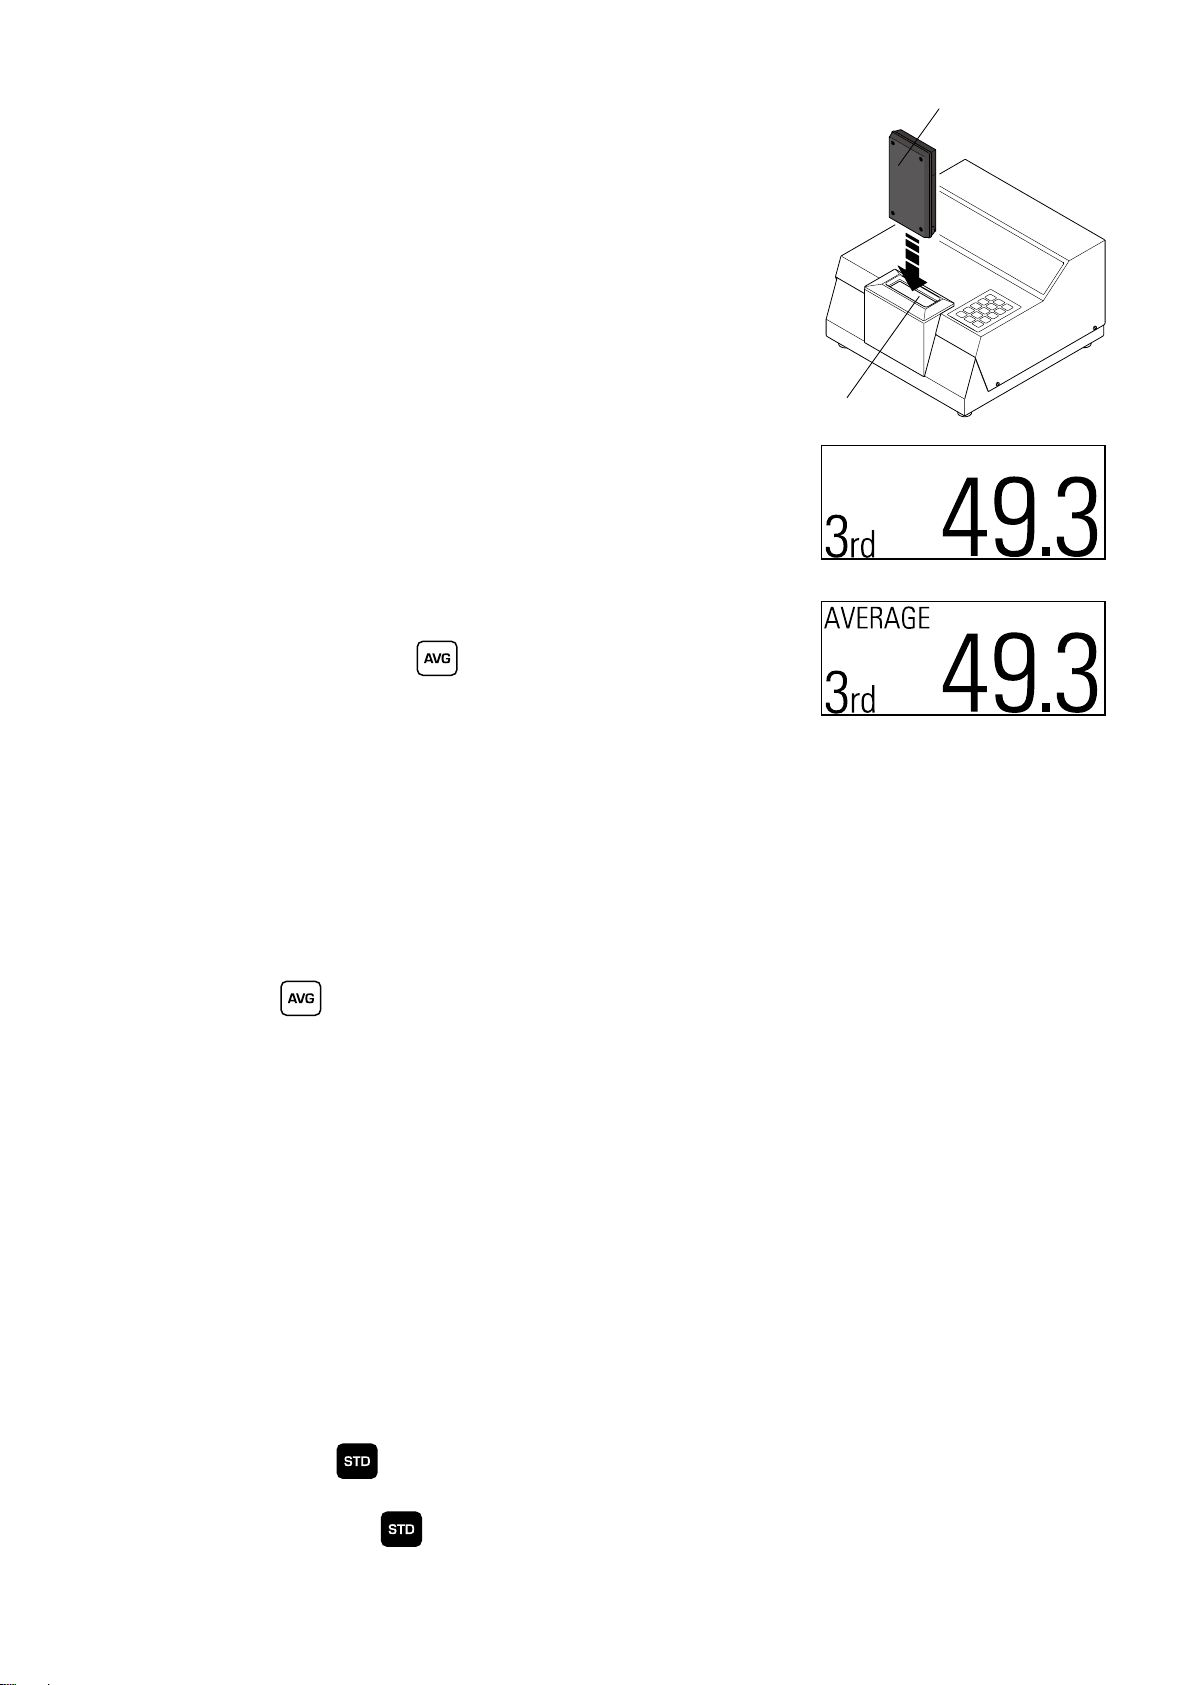
5-2. Inserting the Whiteness Standard Plate
Asshowninthegure,insertthewhitenessstandardplate
into the sample case slot on the main unit until it cannot be
inserted any further.
[Caution] The whiteness standard plate lid should never be
opened unless you need to clean the glass surface.
[Caution] Make sure the rice whiteness plate is facing in the
correct direction.
5-3. Starting Up the Main Unit
Turn the power switch located on the rear side of the main
unit to ON. "WARMING-UP" is displayed. You will see
numbersashingandafterapproximately20seconds,the
value of the whiteness standard plate is displayed. Once
the value of the whiteness standard plate is displayed,
remove the whiteness standard plate.
[Caution] If the whiteness standard plate is not inserted correctly
when the power switch is turned ON, the display will
repeatedly show "INSERT STD. "If this should occur,
insert the whiteness standard plate into the sample case
slot on the main unit until it cannot be inserted any further.
The C-600 is now ready for measurement.
5. Preparing for Measurement
Sample Case Slot
Whiteness Standard Plate
Rear Side

9
6. Measurement
[Caution] Before performing any measurements, use the
glass wipe to clean the glass surface of the
samplecaseandthemainunit'sglasslter.
Fixed Quantity Shooter
Sample Platter
Sample Case
Fixed Quantity
Shooter Hole
6-1. Inserting the Sample for Testing
(1) Place the sample case on a flat surface and set the
sample platter.
(2) Placethexedquantityshooteronthesampleplatter.
(3) Put a level cup of rice in the sample cup, then pour the rice from
the cup through the hole in the fixed quantity shooter. Insert
allofthericefromthecupuntilthericebeginstooverowout
oftheholeinthexedquantityshooter.
[Caution] The sample cup is designed for acquiring a
sample of rice only. Do not use the sample cup as
a container for any other purpose.
(4) Removethexedquantityshooterfromthesampleplatter
and tightly close the lid on the sample case.
[Note] By carefully following the above instructions you can
virtually eliminate any discrepancies in measurement
values due to human error. If you do not properly
insert the test sample, you will not receive an accurate
measurement.

10
6-2. Insertion Into the Main Unit
Insert the sample case into the sample case slot on the
main unit until it cannot be inserted any further.
[Caution] Make sure the sample case is facing the correct
direction.
6-3. Measurement
Once the sample case has been inserted into the main unit,
the number of times measured and the whiteness value are
displayed on the display.
■AverageValue
You can also display the average value of two to nine
measurements. After performing between two to nine
measurements, press the key to view the average
value and the number of times measured. Once the
average value is displayed, all values up to that point are
cleared and the next measurement is treated as the first
measurement of a new set.
The number of measurements is displayed after each
measurement is completed.
However, the number of measurements is reset to one in the
following cases.
(1) When the key is pressed.
(2) When the number of measurements exceeds nine.
6-4. Sensitivity Calibration
After performing measurements for a long period of time,
the sensitivity of the device may need to be re-calibrated.
Therefore, you must check the sensitivity of the device from
time to time.
To check the sensitivity, insert the whiteness standard plate into
the main unit and measure the value of the whiteness standard
plate. If this measurement value is not equal to the number on
the whiteness standard plate, the sensitivity needs to be re-
calibrated. Press the key with the whiteness standard plate
still inserted to automatically calibrate the sensitivity.
You can also press the key to calibrate the sensitivity
when "STD" is displayed in the upper-left corner of the display.
Sample Case Slot
Sample Case
Rear Side

11
7-1. Main Unit Glass Filter
Iftheglasslteronthemainunitisdirty,youwillnotreceive
an accurate measurement. You must keep the glass filter
clean at all times when using the device. Use your finger
to lift upwards on the handle on the inside of the front cover,
in order to remove the front cover. This gives you access
totheglasslterforcleaning.
[Caution] There are sharp edges protruding from the front
cover and the metal parts of the main unit. Be care-
ful not to injure yourself when cleaning the glass
lter.
7-2. Sample Platter Sponge
As the sample platter sponge wears, the amount of sample
materialyoucantintothesampleplatterincreases,which
results in inaccurate measurements. The sponge needs
to be replaced when you can see lines on the inside of the
sample platter when it is empty. The sponge is attached
to the bottom of the platter with double-sided tape. Simply
pull out the sponge to replace it.
7-3. Main Unit Glass Filter Packing
When the packing attached to the main unit's glass filter
wears down, please replace it. If this packing wears down,
aspacewillformbetweentheglasslterandthesamplecase.
[Caution] Attachthepackingintheorientationshownintheg-
ure.
7. Maintenance and Other Functions
Sponge
Worn Packing
Narrow
Wide
Caution
Front Cover
Handle
Glass Filter

12
7-4. Inputting a Whiteness Standard Value
(1) If the device is turned ON, turn the device OFF.
(2) Insert the whiteness standard plate into the main unit.
(3) When you turn the power switch ON, "WARMING-UP"
is displayed.
(4) After a few moments, the light on the lower right side will
begintoash.Whenthishappens,pressthe key.
(5) "INPUT STD" is displayed.
(6) Input the three-digit number written on the whiteness standard
plate. Press the key.
[Note] If you make a mistake when inputting the number,
you can press the key to go back and correct
your mistake.
[Note] You can only enter values in the range of 80.0 to
99.9.
(7) "WARMING-UP" is displayed, and after a few moments,
the value of the whiteness standard plate is displayed.
Once the value of the whiteness standard plate is dis-
played, remove the whiteness standard plate.
[Note] This procedure must be performed whenever the
whiteness standard plate is replaced.
7-5. Replacing the Fuse
(1) Turn the power OFF and disconnect the power cord from
the power supply connector.
(2) The fuse compartment is on the rear side of the main unit.
Insertaatheadscrewdriverorsomeotherthin,atobjectat
the top of the fuse compartment and pull it out towards you.
(3) Remove the fuse from the fuse compartment and check
to see if it has been blown.
(4) If the fuse is not blown, put it back into the fuse compartment.
If the fuse is blown, replace it with the spare fuse or another
compliant fuse (250 V, 3.15 A).
(5) Insert the fuse compartment back into the main unit as it was
before removal.
(6) Insert the power cord back into the power supply connector
of the device.
[Note] If the fuse blows again after replacement, the
device itself may be broken. If this should occur,
please request a maintenance inspection.

13
7-6. Output to a Printer (Optional)
You can output measurement data if you connect the de-
vice to an optional printer.
Press this key to switch printer output ON or OFF.
When the key is pressed and "PRINT" is displayed,
printer output is turned ON. When "NO PRINT" is displayed,
printer output is turned OFF.
[Caution] Connect the device to the printer using the printer
cable (VZC-14) only after setting up the printer
(VZ-330).
[Caution] Refer to the printer's user manual for more details
about how to connect the device to the printer.
[Caution] Whiteness values outside the range of 5.0 to 69.9 can-
not be output. RICE WHITENESS TESTER C-600
TIMES
1 39.6
2 39.5
3 39.7
4 39.6
5 39.6
AVERAGE 39.6
[Printout Example]

14
8. Errors
When an error occurs with this device, an error number is displayed alongside an error message.
Display Cause Solution
Circuitry error. Repair is required.
No whiteness standard plate has
been inserted when attempting to
perform a sensitivity calibration.
Insert the whiteness standard
plate, then try performing the
sensitivity calibration again.
Circuitry error. Repair is required.
The value of the whiteness
standard plate is not the same as
the value input on the main unit.
Follow the instructions for inputting
the whiteness standard value
(see Section 7-4) and try again.
Circuitry error. Repair is required.


1201 · PA · 0201 · 200
Notes
● Copyingsomeorallofthecontentsofthisusermanualwithoutpriorwrittenconsentisstrictlyprohibited.
● Thecontentsofthisusermanualmaybechangedatanytimeinthefuturewithoutanypriornotice.
● Theappearanceand/orrepresentationsoftheproductsandpartsdepictedinthisusermanualmaynotappear
exactly as their actual counterparts, but this does not affect their operation or functionality.
● Thisusermanualwasintendedtobewrittenasclearlyandaccuratelyaspossible.However,ifyouareunclear
about anything in this user manual or notice any missing information, please contact us directly.
● Wecannotbeheldresponsibleforanyactionsoreffectsresultingfromtheexecutionofanyoperationsoutlined
in this user manual.
Table of contents
Other Kett Test Equipment manuals
Popular Test Equipment manuals by other brands

Agilent Technologies
Agilent Technologies 11645A Series User's and service guide

Vanguard Instruments
Vanguard Instruments VBT-75 user manual

Greenlee
Greenlee 6701 instruction manual

Electronic Technologies
Electronic Technologies ES3010 user manual

Fluke
Fluke Versiv Series user manual

IDEAL Networks
IDEAL Networks SignalTEK CT Quick reference guide