Kett MT-200 User manual

Operating Manual
Thank you for purchasing this product.
Please read the operating manual carefully and use this product properly.
Wood Chip Moisture Tester
MT-200

Safety Precautions
If the safety precautions for the wood chip moisture tester are not observed, injuries or damage to property may
result. The utmost care has been given to the safety of the product, however take care to read the precautions in
this operating manual for proper handling.
■Be sure to carefully follow all safety precautions.
Carefully read the operating manual.
■Do not use the unit if it is not functioning properly.
Immediately contact our service representative if the unit malfunctions or does not operate properly.

1. Features........................................................................................................4
2. Specications ...............................................................................................6
3. Part names....................................................................................................7
4. Display ..........................................................................................................8
5. Description of Main Unit Keys (control panel) ..............................................9
6. Before Measuring .........................................................................................10
7. Directions......................................................................................................11
7-1. Measurement.......................................................................................11
7-2. Average display ...................................................................................14
7-3. Continuous measurement mode setting .............................................15
7-4. Moisture Content Value Correction .....................................................16
7-5. Setting the Alarm.................................................................................17
8. User Calibration Curve and Moisture Value Bias Adjustment Function .......18
9. Warnings and Errors .....................................................................................22
Contents

4
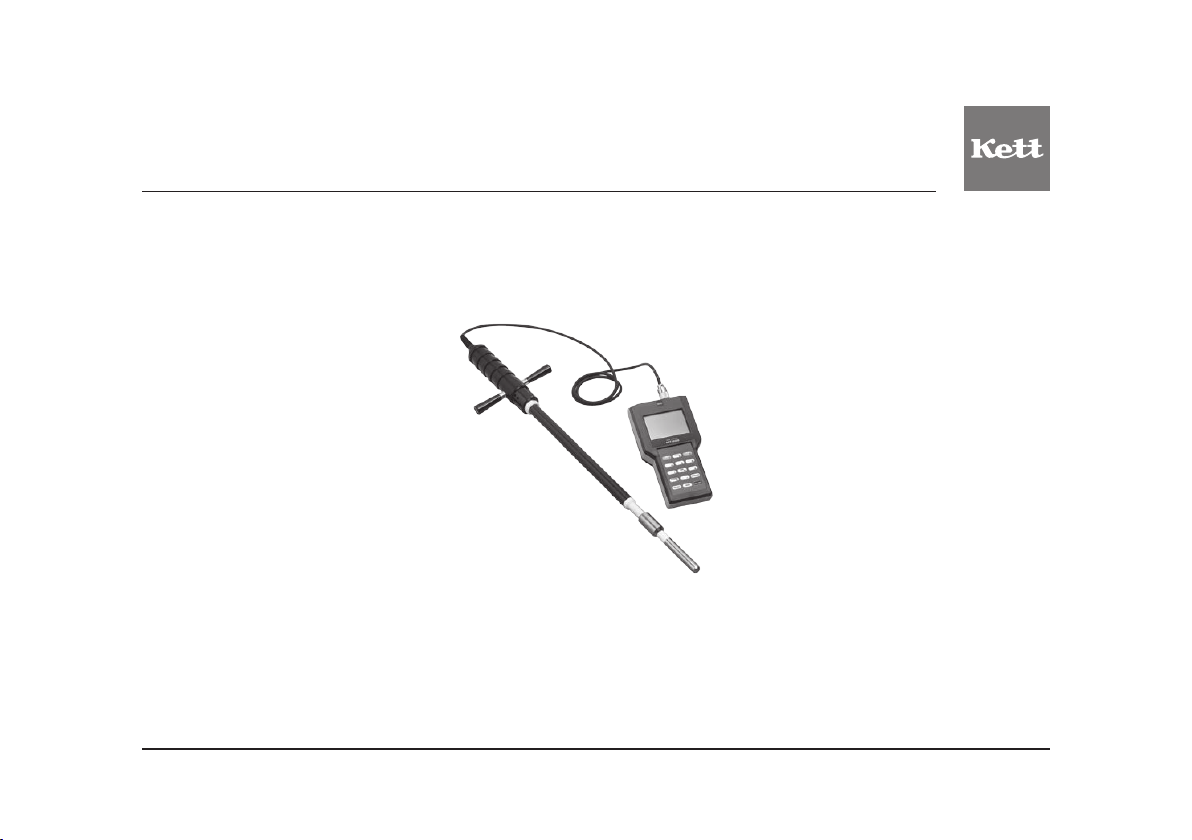
This unit is a wood chip moisture tester that applies electric resistance of an object to be measured. Only
putting the bar sensor into wood chips displays their moisture content (%). This moisture tester needs only
simple operation for quick measurement without selecting an operator or measurement environment.
1. Features
● Autopowerofunction
If no measurement is made or key is operated
for approximately 5 minutes, the power is
automatically shut off and avoids wasting the
batteries.
● Upperlimitsettingfunction
Setting any moisture value enables a buzzer to
sound when a measured moisture value exceeds
the set moisture value.
● Abletocompensateformoisturevalues
A moisture value can be corrected in the range
from -9.9 to +9.9%.
● Up to 13 types of user original calibration
curvesregistrable
In order to support various t ypes of wood
chips, user-originated calibration curves can be
registered under numbers from 03 to 15.
●Calibrationcurveselectablefrom2types
Regarding an electric resistance type moisture
tester, an electric resistance value of an object
to be measured is measured, and a moisture
content is converted from the resistance value.
This transformation formula is called a calibration
curve. This unit has pre-registered calibration
curves for cutting chips and crushing chips in
accordance with a dierence in shape and type
of wood chips, and accordingly, only selecting a
calibration curve number enables a user to simply
conduct measurement.
Calibration curve No. 02:
Crushing chips
Calibration curve No. 01:
Cutting chips

5
<Displayofmoisturetester>
There are two types, "wet base" and "dry base", of moisture contents that indicate the
hydrous state of a substance. A moisture content is generally calculated by a means called
drying method.
Whatisthedryingmethod?
The drying method is a method by which a moisture content is measured by comparing
the weight of a sample before drying and the weight of the sample after drying at a certain
temperature. The calculation of a moisture content with use of the drying method varies
depending on what is the percentage is calculated with respect to, and the formulas are
shown as follows:
* Ingeneral,thewetbaseisusedforgrainsuchasriceandwheat,andthedrybaseisusedfortimber
andminerals.
*Beawarethatallthemoisturecontentsdisplayedonthisunitareindicatedonthewetbase.
● Wetbase
Moisture content (%) =Sampleweightbeforedrying(g)−Sampleweightafterdrying(g)×100
Sample weight before drying (g)
● Drybase
Moisture content (%) =Sampleweightbeforedrying(g)−Sampleweightafterdrying(g)×100
Sample weight after drying (g)

6
2.Specications
Measurement method :Electrical resistance
Applications :Cutting and crushing chips
Measurement range : 15-55% (wet base)
Measurement precision : <Cutting chips> Standard error: 5.0%, repeatability: 2.0%
<Crushing chips> Standard error: 3.0%, repeatability: 2.0%
Standard method: Constant weight method at 103°C (ISO 18134)
Display : Digital (LCD, minimum displayed digit is 0.1%)
Operating Temperature :Operatingtemperature:0to40℃(nocondensation)
Functions :Upper limit alarm setting (15 to 55% and OFF), Moisture value bias adjustment (-9.0 to
9.9%), Auto power off (automatically turned off in approx. 5 minutes), Average value
display, Continuous measurement mode, Calibration curve memory function (13 types)
Power supply : 1.5 V batteries (AA alkaline) x6
Power consumption :0.54W
Dimensions : 110 (W) x 210 (D) x 50 (H) mm
Mass :0.5kg
Accessories : Bar sensor (PU-360), Shoulder strap, 1.5 V batteries (AA alkaline) x6, Operating manual

7
<Mainunit> <Accessories>
Connector
Display
Control panel
Battery cover (back)
Bar sensor (PU-360)
Operating Manual1.5 V batteries (AA alkaline) x6
Shoulder strap
3.Partnames

8
Calibration curve number
Battery indicator
Number of measuring
Calibration curve name
Set value for the alarm
Moisture value
Bar graph
4. Display

9
*The numerical keys from 0 to 9 are used for number input. Some keys combine numerical input and other
functions.functions.
<Control panel>
5.DescriptionofMainUnitKeys(controlpanel)
Key Functions
Turns the power “ON” and “OFF”.
Adjusts a moisture value bias.
Selects a sample number.
Averages measured values.
Enters a minus correction value.
Activates an alarm.
Enters a calibration curve and a value.
Conducts measurement.
Changes the current mode to the continuous
measurement mode.

10
(1) The unit is powered by six 1.5 V batteries (AA, alkaline). Remove the
rear battery cover, place the batteries into the compartment taking
care to correctly orient the positive "+" and negative "–" terminals.
Then attach the battery cover.
* is displayed when the batteries become low. Replace all six with
newbatteries.
(2) Plug the connector of the bar sensor into the main unit securely, and
tighten the lock ring to secure the connection.
* At this mom en t, direct the silver indentation to the front side, or
measuredvaluesmaybeaected.
(3) Prepare a sample to be measured, and allow the sample to equilibrate
to the same temperature as this unit.
*Errors may occur when there is a large difference in the temperature
between the sample and this unit . To ma ke more accurate
measurements,allowthetemperatureofasampletoequilibratetothat
of this unit.
(1) Direct the silver indentation to the front
side and securely insert the connector
(2)Tighten the lock ring
6. Before Measuring

11
7-1. Measurement
(1) Press the key to turn on the power. All elements of the LCD
will be displayed for about 3 seconds. Subsequently, "calibration curve
name," and "%" will be displayed.
* At this time, if the display shows something other than the above, this
unitmaybeintheabnormalstate.Referto“9.WarningsandErrors"on
page 22.
(2) Select the number of the calibration curve to be measured. This unit
has two types of pre-registered calibration curves as shown below.
* Different measurement results are obtained depending on wood chip
shapes, and accordingly, a calibration curve needs to be selected at
measurement.
<CalibrationcurveNo.01:Formeasuringcuttingchips>
Successively press keys in the order of →→.
<CalibrationcurveNo.02:Formeasuringcrushingchips>
Successively press keys in the order of →→.
7. Directions
<Calibration curve No. 01: Cutting chip selection screen>
<Calibration curve No. 02: Crushing chip selection screen>

12
* The symbol denotes a blinking display.
(3) Insert the bar sensor into wood chips.
*Whenthebarsensorisinserted,pushthesensorrmlyintowoodchips
toplacemorethanhalfofthesensorinthechips.Ifinsertionisnotdeep
enough,contactbetweenthebarsensorandwoodchipsisnotsucient
andanaccuratemeasurementresultmaynotbeobtained.
*Donotstir,twist,orwrenchwoodchipswithuseofthebarsensorina
recklessmanner.Failuretoobservethismayapplyexcessiveloadtothe
barsensorandaccordinglycausedamagetoit.Inaddition,thestateof
contactwithasamplesignicantlychanges,whichmaygreatlyaecta
measurementresult.
(4) Press the or key. The decimal point will blink. After
approximately 3 seconds a “beep” will sound and the “Measurement
number”, “Moisture value”, and “Bar graph” will be displayed.
*Thebargraphwilldisplayupto50%inunitsof2%.
*Whenthemoisturevalueisoutsideofthemeasuringrange,"HI"willbe
displayedifthevalue ishigherthan themeasuringrange, and"LO"will
bedisplayedifthevalueislowerthanthemeasuringrange.

13
(5) Remove the bar sensor from wood chips. At this time, the moisture value
remains on the display. To continue to make further measurements,
start the procedure from the step “(3) Insert the bar sensor into wood
chips" on page 12.
When measurement is completed, press the keytoturn o
the power.
* Theautopowerofunctionturnsothepowerofthisunitautomatically
ifnomeasurementoroperationisconductedfor5minutes.
* Cleanthebarsensorunitwithadryclothorthelikeafteruse.Ifthebar
sensorisdirty,itmaydeteriorate.

14
7-2.Averagedisplay
Pressing the key when the number of measurements is from
2 to 9 displays "measurement number" and "average value". At this
time, “measurement number” and “average value” remain displayed,
but if a measurement is continuously made, “measurement number”
will be 1.
* Ifthenumberofmeasurementsexceeds9,themeasuredvalueuptothat
pointresetsandmeasurementstartsfrommeasurementnumber1.
*Wood chipshaveindividualdierencesdependingonproducing areas
andtreespecies.Therefore,itisrecommendedtoconductmeasurement
multipletimesandusetheaveragevaluefunction.

15
7-3.Continuousmeasurementmodesetting
If the continuous measurement mode is selected, measurements
can be made without pressing the or key for each
measurement.
* The symbol denotes a blinking display.
(1) Continuousmeasurementmodesetting
In the step "7-1. Measurement (4)" on page 12, pressing the
key causes the decimal point to blink and display the moisture value
and bar graph. When the bar sensor is not inserted into wood chips
or the moisture content is below the measurement range, “LO” will be
displayed, and the numeric display will blink.
(2) Cancelingthecontinuousmeasurementmode
Hold down the key for 2 seconds or more until a “beep”
sounds. The display will momentarily go blank. When you take your
ngerothekey,theunitwillreturntonormalmeasurementmode.
* Pressing the keyturnsothepowerandautomaticallycancels
thecontinuousmeasurementmode.
* Note that the battery life is shorter in the continuous measurement
mode. The battery life is approximately 48 hours when measurements
arecontinuouslyconducted(at20°C).

16
7-4. Moisture Content Value Correction
The moisture value scale of this unit is created by statistically processing the relationship between the
drying method and electric resistance. However, depending on various conditions, there are cases
where the standard measurement method and the moisture value do not agree. In such cases, a
moisture value bias can be adjusted (–9.9 to 9.9%) by the following method.
* The symbol denotes a blinking display.
(1) Press the key.
The “BIAS” indicator will blink, and the previously entered bias value
will be displayed. The initial value is 0.0%.
(2) Enter a correction value. Enter a 2-digit number.
To enter “2.0%”, press the and keys in succession.
To enter a negative value, press the key prior to pressing the
numerical keys.
(3) Press the or key to make measurements.
* Ifacorrectionvaluehasbeenentered,“BIAS”willbedisplayed.
*Tocancelthecorrectionvalue,enter“0.0%”.

17
7-5.SettingtheAlarm
When wood chips having moisture higher than the set moisture value are measured,
a buzzer sounds to issue an alarm.
* The symbol denotes a blinking display.
(1) Press the key.
The numbers to the right of “ALARM” will blink.
(2) Enter the alarm value.
Enter a 2-digit number. To enter “20%”, press the and
keys in succession.
(3) The alarm setting value is displayed.
Press the or key to make measurements.
* Tocancelthealarmsetting,enter“0.0%”.
* Thesettingrangeis15to55%.
* If the continuous measurement mode is selected, the alarm setting
cannotbeused.

18
8.
UserCalibrationCurveandMoistureValueBiasAdjustmentFunction
Calibrationcurvesarecreatedwithpluralsamplesinorderforthisunittosupportmeasuringmanydierent
typesofwoodchips.However,woodchipshaveindividualdierencesdependingonproducingareasand
tree species. Therefore, our created calibration curves do not apply to some samples. In such a case, this
function allows a user to create user original calibration curve for your sample and accordingly allows a
user to conduct measurement with higher accuracy by adjusting moisture value bias.
10
10
15
20
25
30
35
40
15 20 25 30 35 40
● After user correction
○ Before user correction
Value displayed on moisture tester (%)
Moisture value by drying method (%)
<Example of user calibration curve>
The example of the graph at right shows that the
measurement results using this unit are displayed
lower than the measurement results by the drying
methodandthedierencesbetweenthembecome
larger as the moisture content of the sample to be
measured is higher. In this case, even if a correction
is conducted according to the procedure in "7-4.
Moisture Content Value Correction" on page 16,
the correction effect may be insufficient because
a dierence is present between the inclinations of
the calibration curves. For such a case, a correction
more suitable for user's sample can be conducted
by user adjustment.
Meas.
point
Moisture value by
drying method (%)
Value displayed on
moisture tester (%)
Point A 18 11
Point B 28 18
Point C 38 25

19
Regarding user's sample for user adjustment:
(1) Measurement by using a base method such as drying method
(2) Measurement by using this unit
Adierencebetweenthemeasurementvaluebythebasemethodandthemeasurementvaluebeforecorrection
ischeckedafterconductingthemeasurementsmentionedabove,andthecorrectioncoecients,AandB,are
obtainedfromtheresults.Regardinghowtoobtainthecorrectioncoecients,AandB,pleaseprepareonyour
own, for example, use a regression formula.
* The user calibration curve function does not include the temperature correction
function.Therefore,whenthemeasurementof(2)mentionedaboveisconducted,
conductmeasurementbyusing1.0and0.0forthedefaultcorrectioncoecients
AandBrespectivelyofusercalibrationcurvesinthetemperatureenvironmentto
beused.Whenthecorrectioncoecientsaredefaults,thecalibrationcurvename
is not displayed.
The user correction formula is shown as follows:
MeasurementValueafterCorrection(%)=CorrectionCoecientA×MeasurementValuebeforeCorrection(%)+CorrectionCoecientB
*ThecorrectioncoecientAchangestheinclinationofthecalibrationcurve,andthecorrectioncoecientBisthe
biasvalue.Ifthecorrectioncoecientissetto1.0orhigher,ameasurementvalueisapttobedisplayedhigheras
the coecient is set higher. Regarding the correction coecient B, the procedure is the same as "7-4. Moisture
ContentValueCorrection"onpage16.
* Inthiscase,thecalibrationcurveoriginatesfrom"CalibrationcurveNo.01:Cuttingchips".

20
(1) Press the key to turn on the power. All elements of the LCD
will be displayed for about 3 seconds. After that, "CUT" and "%" are
displayed.
(2) Press the key, and the unit will be the calibration curve input
mode.
(3) Enter a user calibration curve number (03 to 15) to be registered. In
this case, "03" is selected for user calibration curve registration.
Successively press keys in the order of →→.
Ex.)When1.4and3.0areenteredintothecorrectioncoecientsAandBrespectivelyoftheusercalibrationcurveNo.03
Table of contents
Other Kett Test Equipment manuals
Popular Test Equipment manuals by other brands

agratronix
agratronix HT-PRO Operator's manual

Sperry instruments
Sperry instruments 4105 Operating instruction

Tektronix
Tektronix DPO70000SX Series Installation and safety manual

MTS Systems
MTS Systems Exceed 40 Series product manual

Chauvin Arnoux
Chauvin Arnoux C.A 745 user manual

DH Instruments
DH Instruments BG0002 Operation and maintenance manual