Kew Labs UTS-1 User manual

Invisible Fast Wireless Charger
UTS-1
User Instructions
and
Installation Guide

In the box
1. UTS - 1 charger
2. Apple & Samsung phone calibration template
3. 9cm + 8cm stickers
4. Screws
5. Cable management clips
6. Power adaptor
7. Country plug adaptor
8. User instructions
WIRELESS CHARGER
KEW LABS
Invisible Fast Wireless Charger
UTS-1
User Instructions
and
Installation guide

Check before installation
To watch the installation guide, please scan
the QR code below or visit
www.kewlabstech.com/uts-1 install
Installation video QR link
Installation Video Guide
■If you have a phone case please ensure it is flat and
does not contain any metal, center magnets, card holders,
pop sockets or kickstands.
■Ensure the surface under your table is flat
■Prepare a pencil and screwdriver if needed
■Check installation area is within 1.5m(4’11’’) of your
power point

Stage 1
Use the desk sizing tool to measure your table’s compatibility.
If you are not within the coloured area, you should not install the
charger. please note the H(high) and L(low) setting indicator for later.
Place your mobile phone where you want to charge it.
1.
2.
Align the center of your phone to the icon in the charging area
3.

Choose between screw or tape installation.
Tape or screw the charger into position making sure the charger
still reaches the power point . (screws may be easier to remove)
4.
OR
Use the cable clips to attach the power cable to your table.
Plug the power cable into either port
Use only one of the two ports.
5.

Phone calibration - how to make sure your phone is positioned
correctly and charging.
Swich the toggle to“C” position
1.
Apple/Samsung users
Align your phone to fit
your phone model
Other brand mobiles
Align your phone to
the best fit model
3.
Select a sticker template guide according to
your phone size or personal preference.
See suggested sizing below
2.
Stage 2
Small phone 8cm template Max or + model use
9cm template

Lorem ipsum
Use the phone template handle to slowly
move your device closer to the charging
area and listen for the increasing speed
of the audio beeps.
- Please allow up to 1 second before
moving your device to re-position.
- As the audio beeps get faster, you
are getting closer to the centred
charging position.
- When the sound changes to a solid
signal you have reached your perfect
charging area.
4.
Remove your phone whilst keeping your
template card in position and carefully
place the charging sticker in the circular
gap in the template.
If selecting the smallest sticker please
ensure you place it in the center.
5.
+

Switch the toggle position of the
charger to the correct thickness setting
for your surface (either 20mm or 25mm)
*Use setting tool on packaging as a
reference.
6.
7. Audio Confirmation Beep Configuration.
Change your height toggle switch to calibration (C) mode and
switch back to your original height (H/L) position and listen for
the number of audio beeps.
1 beep = disabled audio confirmation buzzer
2 beeps = enabled audio confirmation buzzer
Repeat again to disable or enable depending on preference.
Kew Labs advises using the audio confirmation buzzer to start
with to determine successful charging.

Place your phone face up aligning the center
of your phone to the center of the sticker.
1.
The UTS-1 will make an audio confirmation beep confirming that
charging has started. If you do not hear this beep, please realign
your phone more centrally or lift it off and reattempt.
WARNING - UNLESS YOU HEAR THE CONFIRMATION AUDIO BEEP
YOUR PHONE HAS NOT STARTED CHARGING EVEN IF YOUR
PHONE SHOWS THE BATTERY IS CHARGING
2.
User instructions

Trouble Shooting and FAQs
For all other queries and questions please email
messaging page.
●Why is my phone not charging?
○Please ensure :
■ If you have a phone case, it is flat and does not contain any
metal, centrally located magnets, card holders, pop sockets
or kickstands
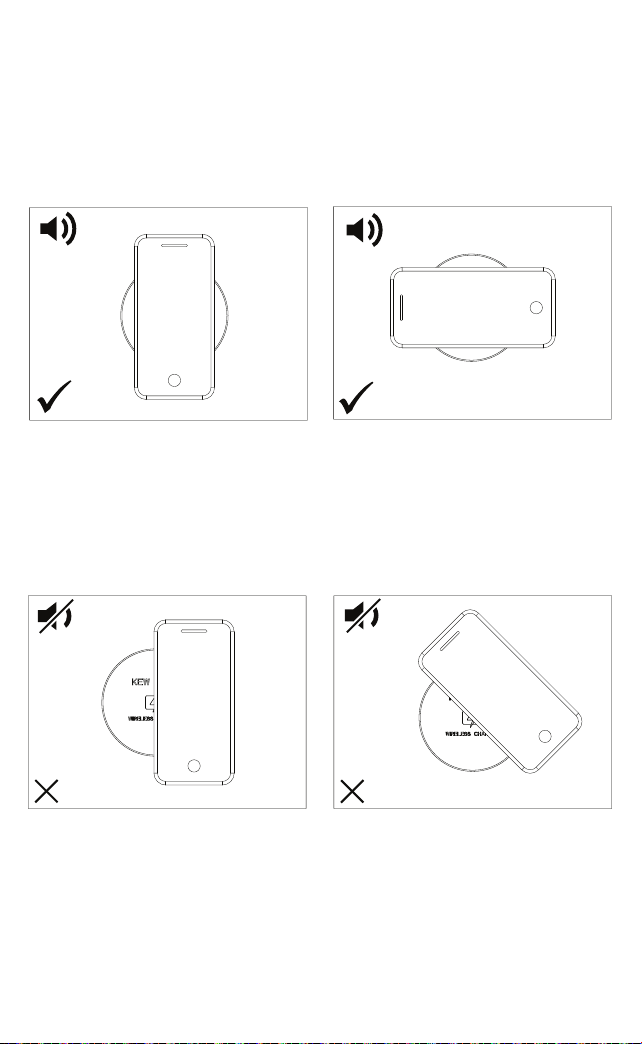
■ Ensure your phone is aligned as centrally as possible
■ Check if your phone is Qi wirelessly charging enabled
●Why does the audio confirmation beep take different amounts
of time?
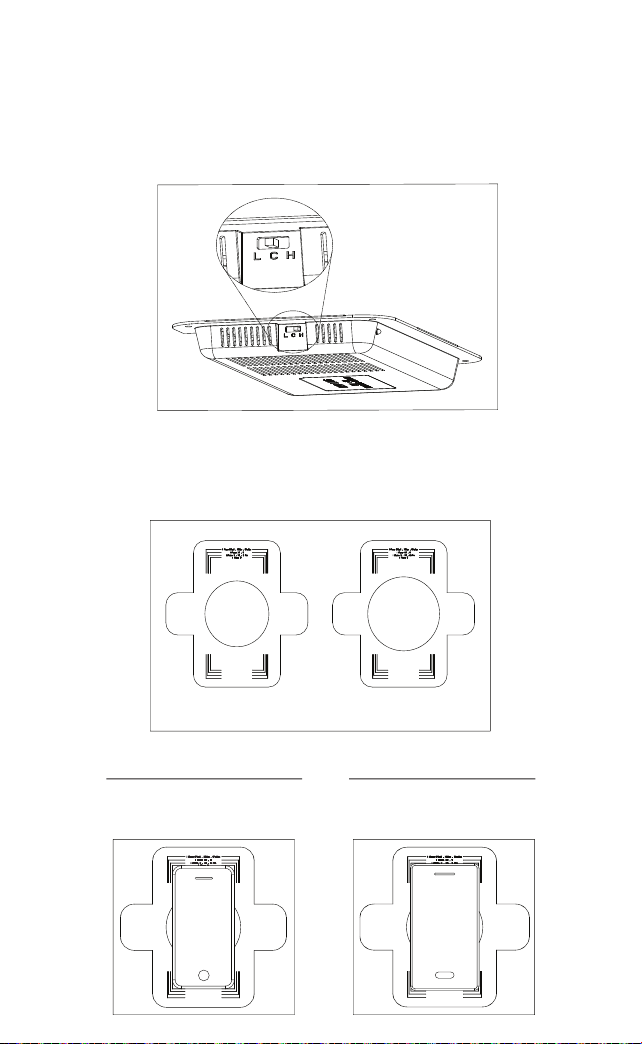
○The time taken to beep is determined by how accurately you
have positioned your device. A center position will beep faster
than a misaligned placement or at greater distances I.e.
25mm (1.0”). Thicker cases can also cause longer recognition
time and therefore longer time to beep. Recalibrate if necessary
to improve sticker position or center your device on the sticker
more accurately to get a better alignment.
● Why does my phone feel hot?
○Increased phone temperatures during wireless charging are
normal especially during longer charging sessions.
Our IPC™ technology is designed to minimise phone heating
however, if your phone is hotter than usual, please ensure you
have aligned it correctly and try again.

● Can I switch the audio confirmation off?
○Yes – if you would prefer or need to use the charger without
the audio confirmation buzzer system, you are able to turn it off.
However, without the audio confirmation, your phone is not
necessarily charging just through the charging indication on
your screen which is why the audio buzzer system was initially
created. If you choose to use the device without the buzzer,
please ensure your alignment and setup is correct and accurate.
● Why do the charging speeds vary?
○Different phones have different battery sizes and therefore take
different times to charge, with larger batteries taking longer.
Charging speeds may also slow at ≥80% in IOS models due to
Apple software requirements designed to limit battery
deterioration during wireless charging.
The UTS-1 recognises IOS charging signals and corresponds by
adapting charging speeds until your device requests more power.
please try turning OFF ‘Optimised Battery Charging’in your‘Settings’.
● What does flashing a LED indicator on the charger mean?
○If your LED is flashing, please unplug and plug in the charger
again to reset. If it is still flashing, the UTS-1 might be damaged
through using an incorrect adaptor usage or incompatible plug
point. This can cause the overcurrent, over temperature or
overvoltage protection to take over. please contact
■ To disable the buzzer.
Switch your height toggle switch to calibration mode and switch
back to your original height position and listen for the number
of audio beeps.
1 beep = disabled audio confirmation buzzer
2 beeps = enabled audio confirmation buzzer
Repeat again to disable or enable depending on preference.

■SPECIFICATIONS
• Fast Charging Speeds
- Qi enabld 9W Fast Charge
• Charging Distance
- 18mm ~ 25mm (0.7’ ~ 1.0’)
• Normal Charging Speed
- Qi enabled Google , Huawei , Sony , Nokia , LG , Xiaomi
- 5W Charge
• Charges Through
- All non-metalic surfaces wood , plastic , granite , quartz , marble
glass
• Product Dimensions
- 182mm x 112mm x 20mm (7.17’ x 4.41’ x 0.79’)
• Power cable length
- 1.5m (4’11”)
•FCCID : 2AWLH-UTS-1

• LED Indication
• Buzzer Indication
• System Fault
- Under Voltage Protect (UVP)
- Over Voltage Protect (OVP)
- Over Current Protect (OCP)
- Over Temp Protect (OTP)
- Phone Protect Mode : Action when the phone is positioned closer
than the Charging distance (under 18mm)
※System Fault can be used again after removing cause of
occurrence, turning power off and on.
Status
Buzzer
Power Transfer Start Beep
Calibra�on Mode
Beeps occur at regular intervals.
If the phone is near center, the beep
sound interval is short.
Change Dip Switch
20/25mm
Beep : Buzzer Off
Beep-Beep : Buzzer On
( at Power Transfer Start )
Status
LED
Power OffOff
Power On On
System Fault
(OTP,OCP,UVP,OVP,
Phone Protect Mode
)
Blink

Warranty
CUSTOMER SERVICE
KEW LABS warrants to the purchaser that your product shall
be free from defects in material and workmanship for the
length of time, identified on your product package and/or at
www.kewlabstech.com
under the warranty specification for your product, from the
date of purchase. This warranty is non transferable and is limited
to original purchaser and the country it was purchased in.
This warranty does not cover problems or damage resulting from
(1) accident, abuse, misapplication, or any unauthorized repair,
modification or disassembly; (2) improper operation or maintenance,
usage not in accordance with product instructions or connection
to improper voltage supply; (3) use of non Kew Labs consumables,
such as replacement batteries, (4) lost parts that were originally
supplied with by Kew Labs; (5) normal wear and tear.
This limited warranty does not, under any circumstances, cover
the replacement of or reimbursement for any electronic device
or personal property that is not a KEW LABS product.
any technical assistance, warranty claim or just any feedback you
may have relating to this product. Otherwise please visit our website
www.kewlabstech.com for more FAQs and more product news.

Safety instruction
•Avoid contact with water and do not submerge
•Avoid extreme temperatures
•Avoid dropping.
•Use original or certied cables.
•Do not clean with corrosive substances or oils.
•Do not disassemble.
•This product is in compliance with the radio interference
requirements of the European Community.
•Electronic adapters are recyclable waste and must not be
disposed of in the house- hold waste.
Dispose of this equipment using a designated collection
point for the recycling of electrical and electronic equipment.
• Use only the adaptor provided with the UTS-1 product.
• Use Only one adaptor.
FCC Statements
This device complies with Part 15 of the FCC Rules.
Operation is subject to the following two conditions:
(1) This device may not cause harmful interference.
(2) This device must accept any interference received, including
interference that may cause undesired operation.
2. Changes or modifications not expressly approved by the party
responsible for compliance could void the user's authority to
operate the equipment.
NOTE: This equipment has been tested and found to comply with
the limits for a Class B digital device, pursuant to Part 15 of the
FCC Rules.
These limits are designed to provide reasonable protection
against harmful interference in a residential installation.
Con�nued

This equipment generates uses and can radiate radio
frequency energy and, if not installed and used in
accordance with the instructions, may cause harmful
interference to radio communications. However, there is
no guarantee that interference will not occur in a particular
installation. If this equipment does cause harmful
interference to radio or television reception, which can be
determined by turning the equipment off and on, the user
is encouraged to try to correct the interference by one or
more of the following measures: (1) Reorient or relocate
the receiving antenna.(2) Increase the separation between
the equipment and receiver. (3) Connect the equipment
into an outlet on a circuit different from that to which
the receiver is connected. (4) Consult the dealer or an
experienced radio/TV technician for help.
RF warning statement:
The device has been evaluated to meet general RF exposure
requirement. The device can be used in portable exposure
condition without restriction.
FCC Radiation Exposure Statement
This equipment complies with FCC radiation exposure limits
set forth for an uncontrolled environment. This equipment
should be installed and operated with minimum distance 20
cm between the radiator and your body. This transmitter
must not be co-located or operating in conjunction with any
other antenna or transmitter.
FCCID : 2AWLH-UTS-1
Other manuals for UTS-1
1
Table of contents
Other Kew Labs Batteries Charger manuals