Kia Optima Parts list manual

features & functions
GUIDE
OPTIMA

Congratulations On Your New Kia!
Your new Kia vehicle has been designed, engineered and manufactured to provide you with years of comfortable,
safe and dependable driving. Kia is committed to quality, innovation, safety and – above all – your satisfaction.
Using This Guide
The information contained in this guide will help you become familiar with the operation and features of
your new Kia vehicle. The ipbook format facilitates information access, while the detailed illustrations
ensure the instructions are easy to follow.
This Features & Functions Guide provides an overview of vehicle operation and equipment and is not
meant as a substitute for your Owner’s Manual. Please refer to your Owner’s Manual for specic
information about the operation and maintenance of your Kia vehicle, including cautions and other
safety information that you need to know.
While the information contained in this guide is accurate at the time of printing, Kia may change
vehicle specications without notice in advance or after the fact, and assumes no liability in
connection with such changes.
OPTIMA
Driver’s ControlsInstrument Cluster
Steering Wheel/
Panel/Stalk Controls
Center Panel
Controls
Roof Panel ControlsSeatingSafety Safety
Maintenance
Services Seating Instrument
Cluster
Steering Wheel/
Stalk/Panel
Controls
Center Panel
Controls
Roof Panel
Controls
Driver’s
Controls

Kia D eli v ery Firs t –t he Pr iori t y th at Deli vers M o re 1
Always check the Owner’s Manual for complete operating information and safety warnings.
*If equipped.
KIA OPTIMA FEATURES & FUNCTIONS GUIDE
Contents:
Instrument Cluster
2
• Warning Lights
02
• Tire Pressure Monitoring System
(TPMS)
03
Steering Wheel/Stalk/
Panel Controls 4
• Tripmeter/Trip Computer*
04
• Electronic Stability
Control (ESC)*
05
• Headlights Control &
Turn Signals
05
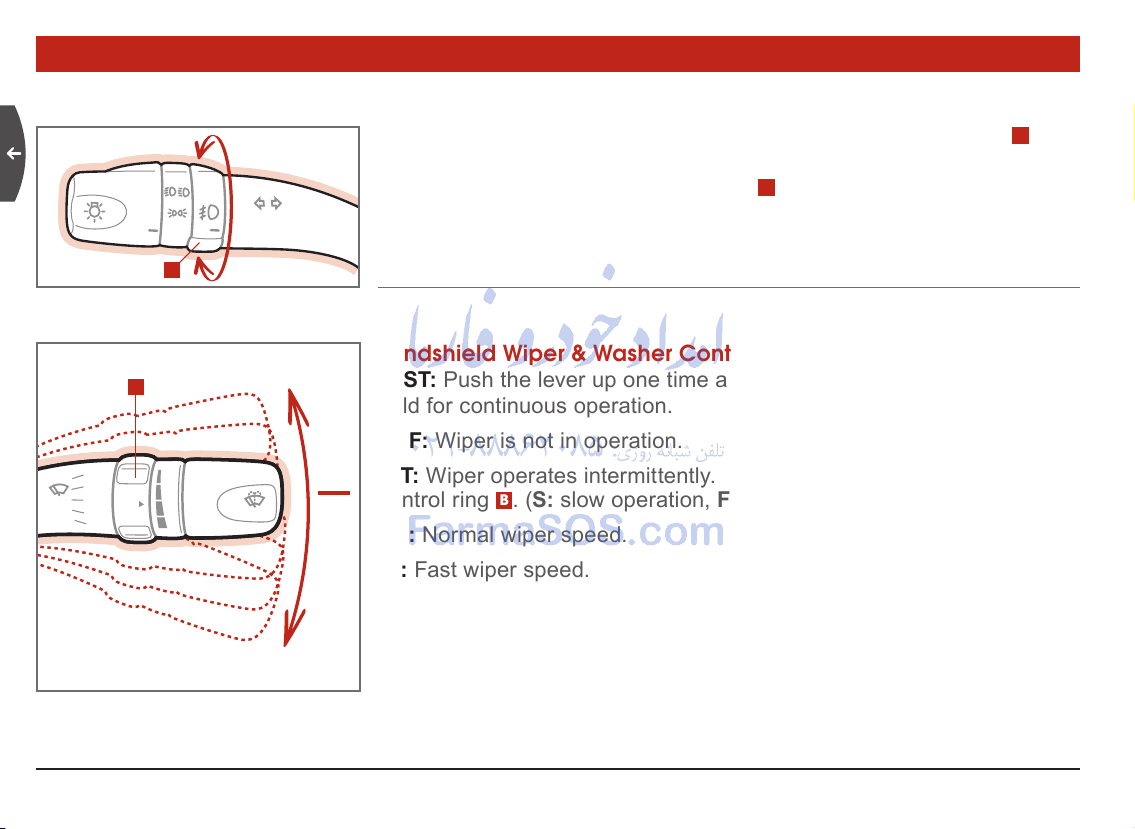
• Windshield Wiper &
Washer Controls
06
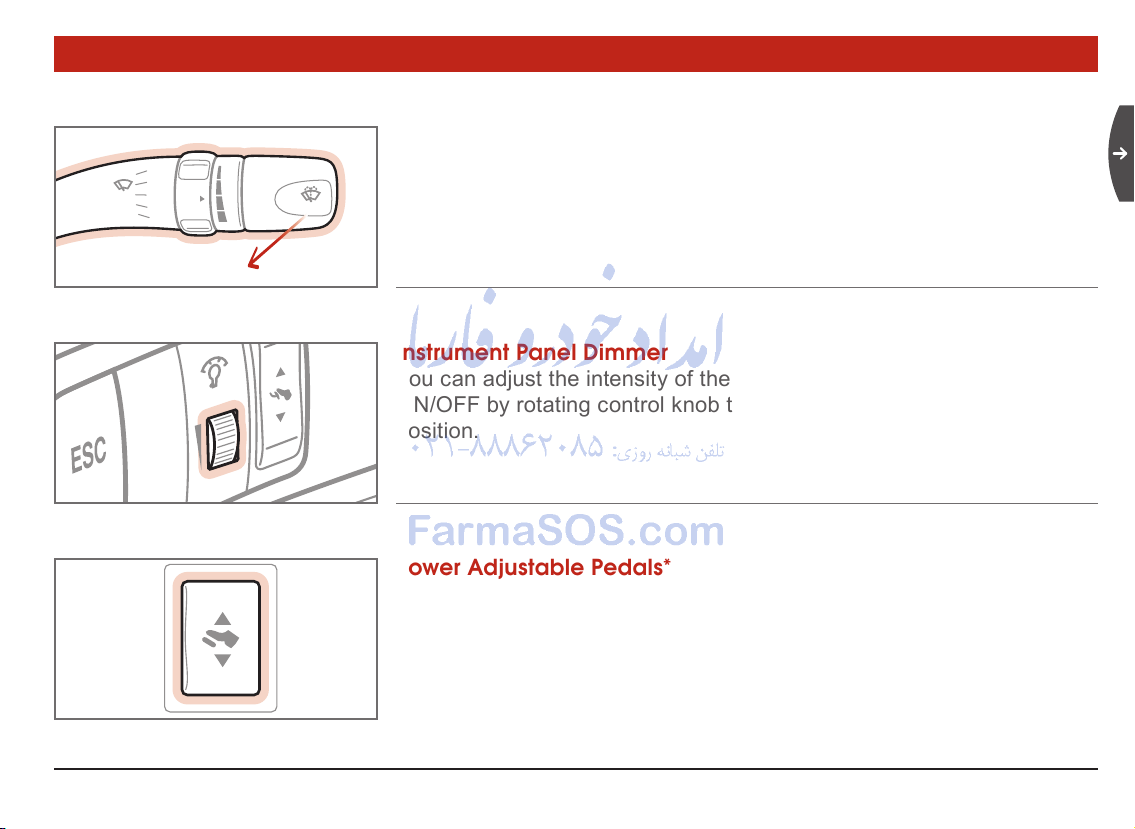
• Instrument Panel Dimmer
07
• Power Adjustable Pedals*
07
• Steering Wheel Audio Controls*
08
• Cruise Control*
09
Center Panel Controls
10
• Digital Clock
10
• Audio Systems
11
• Auxiliary Audio Input Jack
11
• Climate Controls
13
• Automatic Gear Shift*
16
• Manual Gear Shift*
16
Seating
17
• 8-Way Power Adjustable
Driver’s Seat*
17
• Manual Driver’s Seat &
Passenger’s Seat
18
• Front Active Headrests
18
Driver’s Controls
19
Exterior
• Double-Turn Unlocks All
19
• Key Fob/Remote Keyless Entry*
19
• Fuel Cap/Check Engine Light
19
Interior
• Power Windows
20
• Central Door Lock Button
20
• Power Heated Outside Mirrors
20
Roof Panel Controls
21
• Map Light
21
• Dome Light
21
Safety
22
• Passenger Air Bag Off
22
• Child Safety Locks
22
• Safety Belts
23
• Safety Belt Retractor Inertial
Locks
23
Maintenance
24
• Normal Maintenance Schedule
24
QUICK GUIDe:
●How Does the Tire Pressure Monitoring System (TPMS) Work? Page 03
●How Do I Use My Windshield Wiper & Washer? Page 06
●How Do I Set My Climate Control? Page 13
●How Do I Prevent My Windshield from Fogging Up? Page 14
●How Do I Adjust My Seats? Page 17
●How Do I Operate My Dome / Map Lights? Page 21

Kia D eli v ery Firs t –t he Pr iori t y th at Deli vers M o re
2
instruMent cluster
–Air Bag Warning
–Low Tire Pressure Warning
– Tire Pressure Monitoring System Warning
– High Beam Indicator
– Front Fog Lights
– “Check Engine” Light
–Trunk Lid Warning
–Parking Brake/Fluid Warning
– Oil Pressure Warning
4
3
2
1
0
20
20
0
mph
x1000rpm
km/h
40
60
80 100 120 140
160
180
200
220
0
40
60 80
100
120
140
5
6
7
8
C H E F
– Door Ajar
– Charging System Warning
– Safety Belt Warning
– ESC (Electronic Stability Control)*
– ESC OFF*
–
ABS Warning
–
Cruise
– Set
–Low Fuel
ESC
ESC
OFF
CRUISE
Warning Lights:
The warning lights and indicators alert you to situations that may need attention.
Refer to your Owner’s Manual for more information on the function of all the warning lights.
SET

Kia D eli v ery Firs t –t he Pr iori t y th at Deli vers M o re 3
Always check the Owner’s Manual for complete operating information and safety warnings.
AEngine Temperature Gauge
B
Tachometer
C
Turn Signal Indicators
DShift Pattern Indicator
ESpeedometer
F
Fuel Gauge.
4
3
2
1
0
20
20
0
mph
x1000rpm
km/h
40
60
80 100 120 140
160
180
200
220
0
40
60 80
100
120
140
5
6
7
8
C H E F
Tire Pressure Monitoring System (TPMS)
TPMS detects loss of tire pressure beyond specic limits. The system will turn on a warning light to
alert the driver of tire(s) with a low pressure condition, check/correct to extinguish warning light. If the
letters TPMS appear and remain illuminated, this indicates the Tire Pressure Monitoring System is not
functioning properly. Consult your dealer for service. For proper maintenance, safety, and maximum fuel
economy, you must always maintain recommended tire ination pressures and stay within the load limits
and weight distribution recommended for your vehicle.
F
E
A
B
D
C C
instruMent cluster
*If equipped.

Kia D eli v ery Firs t –t he Pr iori t y th at Deli vers M o re
4
TRIP
TRIP
Tripmeter/Trip Computer*
Located to the left of the steering column, press the TRIP button
for less than 1 second to access the following operations:
NOTE: Pressing the TRIP button for more than a second when the
operation is displayed clears the function.
(TRIP) Tripmeter:
Select tripmeter A or B to display total distance
traveled since last tripmeter reset.
(ET) Driving Time: Displays total driving time from engine start to
ignition “OFF.”
(AVG mph) Average Speed: Displays average vehicle speed.
(RANGE) Distance to Empty: Displays driving distance remaining with
current amount of fuel.
(OUTSIDE) Outside Ambient Temperature: Displays outside
temperature.
8
888888
TRIP
ºF
OUTSIDE
ET
RANGE
AVG.
MPH
MI
A B
steering Wheel / stalK / Panel controls

Kia D eli v ery Firs t –t he Pr iori t y th at Deli vers M o re 5
Always check the Owner’s Manual for complete operating information and safety warnings.
*If equipped.
OFF
ON
OFF
AUTO
OFF
ON
OFF
AUTO
Electronic Stability Control (ESC)*
The Electronic Stability Control (ESC) monitors information from
various vehicle sensors, then compares the driver’s commands with
the behavior of the vehicle. If an unstable condition occurs, ESC
intervenes within fractions of a second via the engine computer and
brake system. To turn the ESC off, press ESC button. To turn ESC on,
press again. System defaults to “ON” position at start.
Headlights Control & Turn Signals
High Beams:
Push light control away from you. Pull back for low beams.
Light Control: Turn control stalk knob to the desired position:
OFF –Exterior lights off
–Parking lights on
–Headlights on
AUTO* –Auto lights on
HINT: Auto light function may cause headlights to activate in low
light conditions.
PUSH
PULL
ROTATE
steering Wheel / stalK / Panel controls

Kia D eli v ery Firs t –t he Pr iori t y th at Deli vers M o re
6
OFF
ON
OFF
AUTO
Front Fog Lights*:
With the headlights on, rotate the control ring
Ato
the “ON” position for improved visibility in inclement weather. To turn
the fog lights off, turn the
Control Ring
Ato “OFF” position.
Turn Signals: Move stalk control up to signal a right turn, or down to
signal a left turn.
Windshield Wiper & Washer Controls
MIST: Push the lever up one time and release for a single wipe, or
hold for continuous operation.
OFF: Wiper is not in operation.
INT: Wiper operates intermittently. To vary the speed, rotate the speed
control ring B. (S: slow operation, F: fast operation).
LO: Normal wiper speed.
HI: Fast wiper speed.
A
ON
OFF
REAR
F
INT
TIME
S
PULL
OFF
MIST
INT
INT
LO
HI
F
S
OFF
MIST
INT
LO
HI
PULL
MIST
OFF
INT
LO
HI
B
MOVE UP
MOVE DOWN
steering Wheel / stalK / Panel controls
ROTATE

Kia D eli v ery Firs t –t he Pr iori t y th at Deli vers M o re 7
Always check the Owner’s Manual for complete operating information and safety warnings.
*If equipped.
F
S
OFF
MIST
INT
LO
HI
PULL
Windshield Washer:
Pull control stalk toward you, hold for continuous spray and wipe.
Instrument Panel Dimmer
You can adjust the intensity of the interior lights (map and dome lights)
ON/OFF by rotating control knob to maximum upward or downward
position.
Power Adjustable Pedals*
With the ignition in the “ON” position, push
▲
switch portion to move
pedals forward or
▼
switch portion to move pedals rearward.
PULL
steering Wheel / stalK / Panel controls

Kia D eli v ery Firs t –t he Pr iori t y th at Deli vers M o re
8
Steering Wheel Audio Controls*
MODE:
Press the MODE button to select Radio, Tape, or CD.
VOLUME (VOL ▲ /▼
)
: Press up to increase and down to decrease volume.
SEEK/PRESET (
▲ /▼
):
If pressed for more than 1 second, it will work as follows in each mode:
Radio Mode: AUTO SEEK select button.
Tape Mode: FF/REW button.
CDP (CD Player) Mode: FF/REW button.
CDC (CD Changer) Mode: DISC UP/DOWN button.
If pressed for a second or less, it will work as follows in each mode:
Radio Mode: PRESET STATION select button.
Tape Mode: AUTO MUSIC SEARCH (AMS) button.
CDP (CD Player) Mode: TRACK UP/DOWN button.
CDC (CD Changer) Mode: TRACK UP/DOWN button.
steering Wheel / stalK / Panel controls
MODE
VOL
VOL
MODE
VOL
VOL

Kia D eli v ery Firs t –t he Pr iori t y th at Deli vers M o re 9
Always check the Owner’s Manual for complete operating information and safety warnings.
*If equipped.
MODE
MUTE
VOL
VOL
RES
ACCEL
CANCEL
ON
•
OFF
COAST
SET
RES
ACCEL
CANCEL
ON
•
OFF
COAST
SET
Cruise Control*
To Set Cruise Control, Do the Following:
1. Push the ON/OFF button
C
to turn the system on.
2. Accelerate to the desired speed (must be more than 24 mph).
3. Push the COAST/SET switch, and release the accelerator.
To Cancel Cruise Control, Do One of the Following:
1. Press the brake pedal.
2. Push the CANCEL switch.
3. Depress the COAST/SET and RES/ACCEL buttons at the same time.
To Increase Cruising Speed, Do One of the Following:
1. Depress the RES/ACCEL button and release. This will increase your
current cruising speed by 1 mph (1.6 km/h).
2. Hold the RES/ACCEL button down, your speed will increase
gradually. Let go of the button when you reach your desired speed.
To Decrease Cruising Speed, Do One of the Following:
1. Depress the COAST/SET button and release. This will decrease
your current cruising speed by 1 mph (1.6 km/h).
2. Hold the COAST/SET button down, your speed will decrease
gradually. Let go of the button when you reach your desired speed.
To Resume Speed:
1. After brake application, press RES/ACCEL to reset previous speed.
C
steering Wheel / stalK / Panel controls

Kia D eli v ery Firs t –t he Pr iori t y th at Deli vers M o re
10
H
M
R
Digital Clock
With the ignition in the “ACC” or “ON” position, the clock buttons
operate as follows:
HOUR: Press “H” to advance
the time displayed by one hour.
MINUTE: Press “M” to advance the time displayed by one minute, or
hold to rapidly advance.
RESET: Press and hold “R” for 2 seconds to reset the 24-hour format
to a 12-hour format.
center Panel controls

Kia D eli v ery Firs t –t he Pr iori t y th at Deli vers M o re 11
Always check the Owner’s Manual for complete operating information and safety warnings.
*If equipped.
CD/AUX
SCAN
EQ
FM
PUSH
POWER
PUSH
RPT
RDM
AUDIO
VOLUME TUNE
SEEK
TRACK
FF
REW
1
4
2
5
3
6
AM
FM 1 3103.4
ST CH
POPS
4
1
2
5
6
7
13
8
12
9
WARNING: Forcing the CD into the slot may damage
the player.
AM/FM/CD Audio System
3
10
10
10
11
1
RADIO AM / FM1 / FM2 Band Select buttons
2
CD Eject button
3
CD Insert slot
4
EQUALIZER button
5
CD IN indicator light
6
CD MODE / AUX button
7
RADIO STATION SCAN / CD TRACK SCAN
button
8
POWER ON-OFF / VOLUME CONTROL knob
9
RADIO STATION SEEK and / CD TRACK
Select / MP3 CD File Select buttons
10
REPEAT CD Track button
11
RADIO STATION PRESET buttons
12
CD TRACK FAST FORWARD / REWIND buttons
13
RADIO FREQUENCY TUNER knob / AUDIO
Controls Select button
center Panel controls
A
UX
A
UX
Auxiliary Audio Input Jack
Lift the cover to access the jack, which provides connectivity for
portable audio devices using 3.5mm plugs.
NOTE: This Auxiliary Audio Input Jack is located inside the center
console arm rest.

Kia D eli v ery Firs t –t he Pr iori t y th at Deli vers M o re
12
1
CD / MP3 / AUX Mode button
2
RADIO Mode AM / FM1 / FM2 Band Select button
3
CD / CD CHANGER Tape Eject button
4
PREVIOUS CD / NEXT CD Select buttons
5
CD / CD CHANGER Insert slot
6
CD / CD CHANGER LOAD button
7
EQUALIZER button
8
RADIO STATION SCAN / CD TRACK SCAN /
MP3 CD FILE SCAN button TAPE
9
MP3 CD Full File Name Display button
10
POWER ON-OFF button / VOLUME CONTROL
knob
11
RADIO STATION SEEK and / CD TRACK
Select / MP3 CD FILE Select button
12
CD TRACK /MP3 CD FILE FAST FORWARD /
REWIND button
13
RANDOM CD TRACK / MP3 FILE Playback Mode
button
14
REPEAT CD TRACK / MP3 FILE Playback Mode
button
15
TRACK / MP3 FILE Full Name Display button
16
MP3 CD FILE Select For Playback button
17
RADIO STATION Preset buttons
18
MP3 CD FILE FOLDER Directory Search or
bu t to n
19
RADIO FREQUENCY TUNER knob / AUDIO
Controls select button / MP3 FILE Search knob /
MP3 FILE Play button
AM/FM/MP3/6-DISC CD CHANGER
AUDIO SYSTEM*
SCAN
INFO
LOAD
DISC DISC
EQ
FM/AM
PUSH
POWER AUDIO
CONTROL
PUSH
FF
REW RPT MARK
SCROLL
RDM
ENTER
VOLUME TUNEFILE
SEEK
TRACK FLDR
1
4
2
5
3
6
CD/AUX
MARK
ALL RPT RDM SCAN SURST
M
888
4
3
1
2
5
6
7
13
10
11
8
10
10
14
15
16
12
9
19
18
WARNING: Forcing the CD into the slot may damage the player.
center Panel controls
17

Kia D eli v ery Firs t –t he Pr iori t y th at Deli vers M o re 13
Always check the Owner’s Manual for complete operating information and safety warnings.
*If equipped.
center Panel controls
Automatic Climate Control*
1
Temperature Control Knob
2
Automatic Operation
3
Climate Control Off
4Windshield Defroster Button
5
Rear Window/Mirrors Defroster Button
6
Recirculated Air Intake Button
7Fresh Air Intake Button
8
Climate Control Display
9
Fan Speed Control Knob
10
Mode Selection Button
11 Air Conditioning Button
TEMP
AUTO
OFF
MODE
A/C
AUTO
72 F
5 6
4
1
3
2
7
89
10
11
Automatic Climate Control
Auto Function:
Press 2to select automatic system operation, Full Automatic
Temperature Control will control fan speed, air intake, air
ow, and air conditioning by setting desired temperature 1.
NOTE: During automatic operation, air conditioning system
will turn on at any time, this is done to help reduce humidity.

Kia D eli v ery Firs t –t he Pr iori t y th at Deli vers M o re
14
Automatic system functions to operate defrost:
For maximum defrosting, do the following:
1. Select Defrost mode .
2. Set the temperature to hot.
3. Set the fan speed to maximum. When defrost
is selected, the outside air and air conditioning
functions are activated automatically, to further
reduce window fogging. This is accomplished
by helping to remove moisture from the
incoming air.
NOTE: In defrost mode some moisture may
be visible on the windshield during cool A/C
operation. This condition happens more at night
and on cloudy days.
center Panel controls
Automatic system functions to operate
defogging:
1. Select Defrost mode .
2. Select the desired temperature.
3. Set the fan speed to maximum. When defrost
is selected, the outside air and air conditioning
functions are activated automatically, to further
reduce window fogging. This is accomplished
by helping to remove moisture from the
incoming air.
NOTE: The purpose of defogging is to remove
interior moisture from the vehicle windows.

Kia D eli v ery Firs t –t he Pr iori t y th at Deli vers M o re 15
Always check the Owner’s Manual for complete operating information and safety warnings.
*If equipped.
center Panel controls
PUSH
A/C
PUSH
OFF
MAX
A/C
TEMP
5
6
4
1
3
2
Manual Climate Control
1
Fan Speed Control Knob
2
Air Conditioning Button
3
Temperature Control Knob
4Mode Selection Control Knob
5
Rear Defroster Button
6
Fresh Air Intake Control Button
7Recirculated Air Intake Button
Manual system functions to operate defrost:
1. When defrost mode is selected A/C is operational, fresh air vent is open, although A/C lamp is off.
2. Select any fan speed (higher fan speeds will defrost the windshield more quickly).
NOTE: In defrost mode some moisture may be visible on the windshield during cool A/C operation. To
eliminate this effect adjust Temperature Control Knob 3as desired. This condition happens more at night
and on cloudy days.
3. Select the desired temperature.
4. Select the Defrost or Floor/Defrost position.
7

Kia D eli v ery Firs t –t he Pr iori t y th at Deli vers M o re
16
Automatic Gear Shift*
P (Park): Press the brake pedal to move the gearshift from PARK.
R (Reverse): Reverse.
N (Neutral): Gears disengaged.
D (Drive): The transaxle will shift through the gears automatically.
NOTE: Press the brake pedal to move gear shift from N to P or R position.
Sport Mode: Move the shift lever from the D position to the right
gate to select.
Sport Mode Shifting: Move the shift lever forward (+) to upshift or
(-) to downshift.
Manual Gear Shift*
The manual transaxle has 5 forward gears.
1. Press the clutch pedal down fully while shifting, release it slowly.
2. Return the gear shift leaver to the neutral position before shifting
into reverse.
center Panel controls
P
R+
-
N
D
SLIDE
1
24R
3S
N
1 3 5
R4
2

Kia D eli v ery Firs t –t he Pr iori t y th at Deli vers M o re 17
Always check the Owner’s Manual for complete operating information and safety warnings.
*If equipped.
seating
8-Way Power Adjustable Driver’s Seat*
Adjusting the Seat Forward and Backward: Push
switch Aforward or backward to move the seat accordingly.
Cushion Height Adjustment: Push switch Aupward or
downward to adjust the height of the entire seat cushion.
Rear Seat Cushion (tilt) Height Adjustment: Push the
back portion of switch Adownward to lower, or upward to
raise.
Front Seat Cushion (tilt) Height Adjustment: Push the
front portion of switch Adownward to lower, or upward to
raise.
AB

Kia D eli v ery Firs t –t he Pr iori t y th at Deli vers M o re
18
Manual Driver’s Seat & Passenger’s Seat
1
Adjusting the Seat Forward and Backward:
1. Pull up on the lever under the seat cushion and hold it.
2. Slide the seat until the desired position is attained.
3. Release the lever and make sure the seat is locked in place.
2
Cushion Height Adjustment (Driver’s Seat Only):
To raise: Pull the lever up several times.
To lower: Press the lever down several times.
3
Seat Recline Adjustment:
1. Lean forward slightly and pull up on the lever.
2. Lean back on the seat until the desired position is attained.
3. Release the lever and make sure the seat is locked in place.
NOTE: Never attempt to adjust the seat while the vehicle is in motion.
1
2
3
seating
Front Active Headrests
Move forward and upward in the event of a rear impact to help prevent
the driver’s and front passenger’s heads from moving backward, thus
helping to prevent neck injuries.
Other manuals for Optima
10
Table of contents
Other Kia Automobile Accessories manuals

Kia
Kia F1211ADE00ST User manual

Kia
Kia B2210ADE00AL User manual

Kia
Kia Sorento Instruction Manual

Kia
Kia Front Mudguard Kit User manual

Kia
Kia UVO FORTE User manual

Kia
Kia D4211ADE00AL User manual

Kia
Kia Sportage Parts list manual

Kia
Kia F1211ADE00AL User manual

Kia
Kia Bluetooth Phone System 2010 User manual

Kia
Kia 3W211ADE00ME User manual

Kia
Kia E8300-4D000 User manual

Kia
Kia F1620ADE00CP User manual

Kia
Kia 66582ADE00 User manual

Kia
Kia C5211ADE01 User manual

Kia
Kia D9062 ADUP0 User manual

Kia
Kia C6F46 AC200 User manual

Kia
Kia 66701ADE00 User manual

Kia
Kia Rear Seat Entertainment System User manual

Kia
Kia E8300-4D050 User manual

Kia
Kia Sorento 2022 User manual