manuals.online logo
Brands
  1. Home
  2. •
  3. Brands
  4. •
  5. Kidde
  6. •
  7. Control Unit
  8. •
  9. Kidde FX-IDCWS Assembly instructions

Kidde FX-IDCWS Assembly instructions

© 2020 Carrier 1 / 2 P/N 3101084-EN • REV 006 • ISS 20OCT20
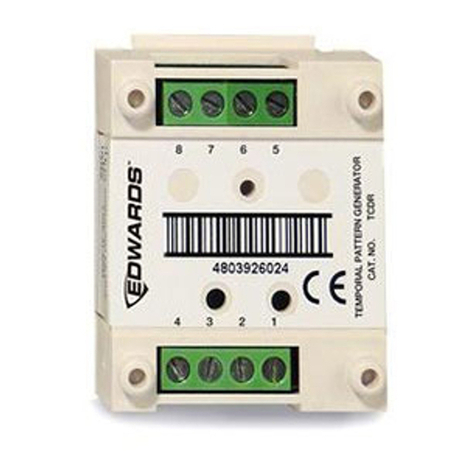
FX-IDCWS Analog Dual Input
Waterflow - Supervisory
Module Installation Sheet
Operation
The module is an analog addressable device used to connect normally
open waterflow alarm and supervisory initiating device circuits (IDCs)
to a control panel. This module is designed for Class B circuit
operation.
The device address is set using the two rotary switches located on the
front of the module. Two consecutive device addresses are required.
The second device address is automatically assigned one number
higher than the value set on the rotary switches.
The module can operate in the following modes.
Table 1: Module operation
Operation
Device type description
Waterflow
Alarm latching delayed: Configures the module for use
with only nonretarded waterflow alarm switches. When
the NO input contact of an initiating device is closed, an
alarm is sent to the control panel, which after a 16
second time delay, generates an alarm signal.
Supervisory
Supervisory active nonlatching US marketplace
Supervisory active latching Canadian marketplace
Nonlatching: Configures the module for normally open
dry contact initiating devices. When the NO input
contact of an initiating device is closed, a supervisory
signal is sent to the control panel and the supervisory
condition is not latched at the module.
Latching: Configures the module for normally open dry
contact initiating devices. When the NO input contact of
an initiating device is closed, a supervisory signal is
sent to the control panel and the supervisory condition
is not latched at the module.
LED operation
The module provides a bicolor LED that shows its status.
Normal: Green LED flashes
Alarm/active: Red LED flashes
Installation
Install and wire this device in accordance with applicable national and
local codes, ordinances, and regulations.
WARNINGS
• This module will not operate without electrical power. As fires
frequently cause power interruption, you should discuss further
safeguards with your local fire protection specialist.
• This module does not support conventional smoke detectors.
Note: The module is shipped from the factory as an assembled unit; it
contains no user-serviceable parts and should not be disassembled.
To install the module:
1. Verify that all field wiring is free of opens, shorts, and ground
faults.
2. Make all wiring connections as shown in “Wiring” and Figure 3.
3. Set the module address. Refer to the panel technical reference
manual for a list of valid addresses.
Use a screwdriver to adjust the two rotary switches on the front of
the module. Set the TENS rotary switch (0 through 12) for the 10s
and 100s digit and the ONES rotary switch for the 0 through 9
digit. For example: device address 21, set TENS rotary switch to 2
and set the ONES rotary switch to 1 (see Figure 1).
4. Mount the module on the electrical box using screws provided with
the electrical box.
5. Mount the wall plate on the module using the hardware shown in
Figure 2.
Figure 1: Module address
(1) Insert screwdriver here
Figure 2: Module installation
(1) Cover plate plastite screws (2X)
(2) Wall plate
(3) Screw
(4) Module
(5) Compatible electrical box
firealarmresources.com
2 / 2 P/N 3101084-EN • REV 006 • ISS 20OCT20
Wiring
Wire the device as shown in Figure 3. Be sure to observe the polarity
of the wires.
• This module does not support two-wire smoke detectors.
• All wiring is power-limited and supervised.
• Refer to the control panel technical reference manual for wiring
specifications.
Specifications
Communication line voltage
Maximum 20.6 V peak-to-peak
Current
Standby
Activated
550 µA
725 µA
Ground fault impedance
10 kΩ
Operating environment
Temperature
Relative humidity
32 to 120°F (0 to 49°C)
0 to 93% noncondensing at
90°F (32°C)
Storage temperature range
–4 to 140°F (–20 to 60°C)
Compatible electrical boxes
North American 4 inch square ×
2-1/2 in. (64 mm) deep 2 gang box
Standard 4 in. square box 1-1/2 in.
(38 mm) deep
Wire size
12, 14, 16, or 18 AWG wire (2.5, 1.5,
1.0, or 0.75 mm2) (Sizes 16 and
18 AWG are preferred)
Initiat
ing device circuit (IDC)
EOL resistor value
Max. circuit resistance
Max. circuit capacitance
47 kΩ, (P/N: EOL-47)
50 Ω (25 Ω per wire)
0.1 µF
Figure 3: Module wiring
(1) To next device
(6) Maximum 12 AWG wire; minimum 18 AWG wire
(2) From previous device
(3)
Class A or Class B
(4)
Class B
(5) Maximum 25 Ω resistance per wire
(7) Maximum 10 VDC at 350 µA
(8) Typical normally open (NO) supervisory/tamper switch
(9) 47 kΩ EOLR
(10) Typical normally open (NO) waterflow switch
Contact information
For contact information, see www.kidde-esfire.com.
firealarmresources.com

Other Kidde Control Unit manuals

Kidde FX-IDC1A Assembly instructions

Kidde

Kidde FX-IDC1A Assembly instructions

Kidde AEGIS 84-732001-001 User manual

Kidde

Kidde AEGIS 84-732001-001 User manual

Kidde FX-2WIRE Assembly instructions

Kidde

Kidde FX-2WIRE Assembly instructions

Kidde GSA-UM Assembly instructions

Kidde

Kidde GSA-UM Assembly instructions

Kidde GSA-CC1 Assembly instructions

Kidde

Kidde GSA-CC1 Assembly instructions

Kidde AEGIS User manual

Kidde

Kidde AEGIS User manual

Kidde CTM City Tie Assembly instructions

Kidde

Kidde CTM City Tie Assembly instructions

Kidde GSA-REL Product manual

Kidde

Kidde GSA-REL Product manual

Kidde Alarmline II User manual

Kidde

Kidde Alarmline II User manual

Kidde ARIES User manual

Kidde

Kidde ARIES User manual

Kidde CO120X User manual

Kidde

Kidde CO120X User manual

Popular Control Unit manuals by other brands

Bardiani Valvole B925 Use and maintenance manual

Bardiani Valvole

Bardiani Valvole B925 Use and maintenance manual

A.R.I. D-025 L ARISENSE Installation operation & maintenance

A.R.I.

A.R.I. D-025 L ARISENSE Installation operation & maintenance

Moog G761 Series Installation and operation instruction

Moog

Moog G761 Series Installation and operation instruction

Microhard Systems Nano Series operating manual

Microhard Systems

Microhard Systems Nano Series operating manual

PalmSens EmStat3+ Getting started

PalmSens

PalmSens EmStat3+ Getting started

Siemens SITRANS FM MAG 8000 IIoT operating instructions

Siemens

Siemens SITRANS FM MAG 8000 IIoT operating instructions

NeuLog NUL-205 quick start guide

NeuLog

NeuLog NUL-205 quick start guide

PR electronics 9410 Series manual

PR electronics

PR electronics 9410 Series manual

Clack Water Specialist CI Programming manual

Clack

Clack Water Specialist CI Programming manual

Pickering SYSTEM 10 user manual

Pickering

Pickering SYSTEM 10 user manual

Anaren A2530R24A user manual

Anaren

Anaren A2530R24A user manual

Kuhse KEA 291 NSTR operating instructions

Kuhse

Kuhse KEA 291 NSTR operating instructions

HAI Hi-Fi 62A12-1 installation manual

HAI

HAI Hi-Fi 62A12-1 installation manual

Pilz PNOZ m EF 8DI4DO operating manual

Pilz

Pilz PNOZ m EF 8DI4DO operating manual

Siemens SINAMICS G120 operating instructions

Siemens

Siemens SINAMICS G120 operating instructions

Karel DSS10-28 Technical reference and user's guide

Karel

Karel DSS10-28 Technical reference and user's guide

Heritage Bathrooms SGRC02 Installation instructions and user guide

Heritage Bathrooms

Heritage Bathrooms SGRC02 Installation instructions and user guide

FutureSmart MDAD8-6 installation guide

FutureSmart

FutureSmart MDAD8-6 installation guide

manuals.online logo
manuals.online logoBrands
  • About & Mission
  • Contact us
  • Privacy Policy
  • Terms and Conditions

Copyright 2025 Manuals.Online. All Rights Reserved.