manuals.online logo
Brands
  1. Home
  2. •
  3. Brands
  4. •
  5. Koden
  6. •
  7. Marine Radar
  8. •
  9. Koden MDC-900 Series User manual

Koden MDC-900 Series User manual

Change the range/gain of the lower screen in the
PPI/PPI. ([GAIN] knob)
10
LCD BRILL
PANEL BRILL
10
5.0
SUB-SCREEN RANGE
SUB-SCREEN GAIN
5.0
ENT
ENT
ENT
MENU
MENU
RANGE
GAIN
GAIN
GAIN
TX
STBY
BRILL
MENU
BRILL BRILL
BRILL
MENU
TX
STBY
ENT
MENU
RANGE
GAIN
TX
STBY
BRILL
PRC
1
6789
2
3
4
5
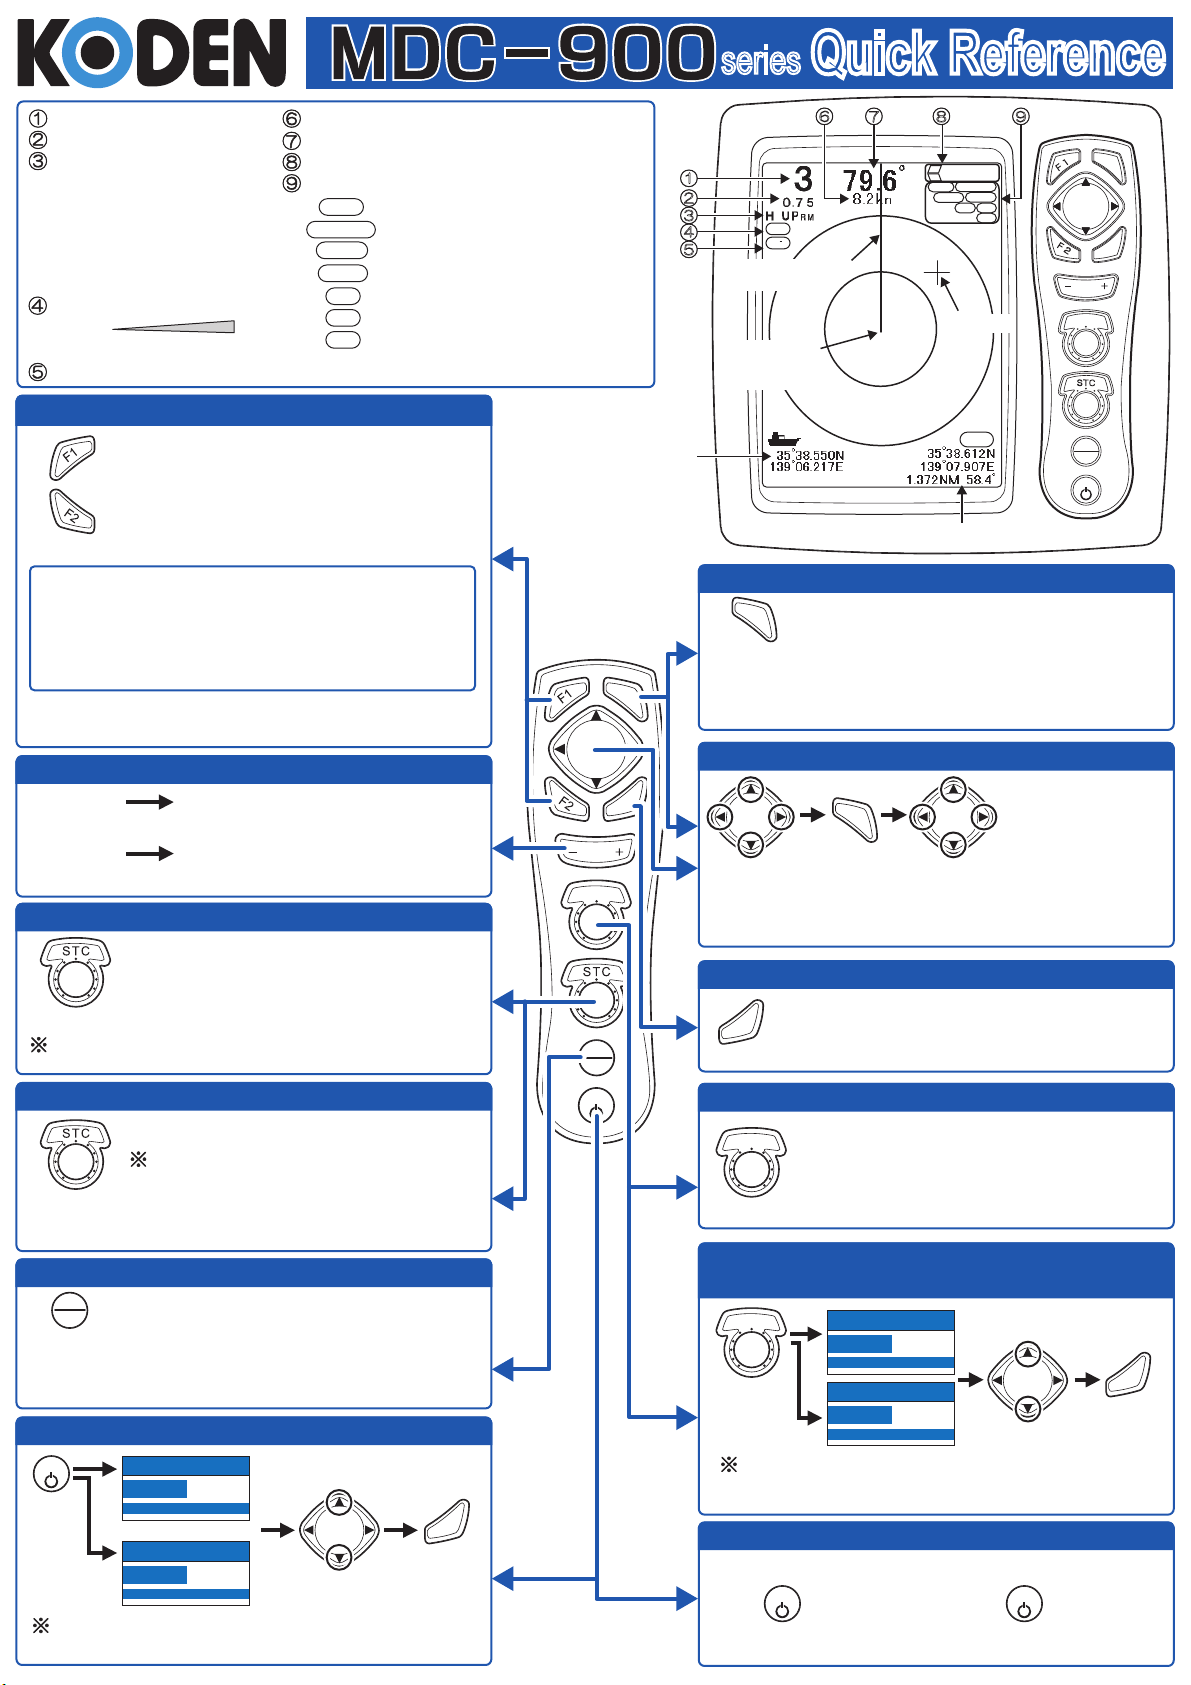
By keep pressing the [F1] / [F2] key, a function assigned
to each key can be selected.
0093142134-02
Range
Range Rings Interval
Mode
H UP: Head Up
N UP: North Up
C UP: Course Up
WPT UP: WPT Up
RM: Relative Motion
TM: True Motion
Pulse
Short Long
SP < M1 < M2 < L1 < L2
Off Center State
[FTC], [Mode], [Display Select], [Off Center],
[Enhance], [Trail Time], [EBL], [VRM], [Color],
[PI (Parallel Cursor)], [Alarm Mode], [ACQ], [Delete],
[POB], [Target], [Other Ship], [Pulse], [Process]
SPD
Heading
State of [F1]/[F2] key assignment
Display Setting Information
FTC set value
Trail Time
Alarm Mode
Sleep Setting
Interference Rejection Setting
Enhance Setting
PROCESS: OFF/ON
When set to OFF, the data is not displayed.
series Quick Reference
The operation differs depending on the
preset function.
Operate while referring to the operation
guide on the display.
Execute the preset function. ([F1] / [F2] keys)
Press
Functions which can be preset to [F1] / [F2] keys
Change the range. ([- RANGE +] key)
Press [+] The observation range is widened.
(The image shrinks.)
In PPI/PPI, the upper and lower screens change
simultaneously.
Press [-] The observation range is narrowed.
(The image expands.)
Adjust the STC. ([STC] knob)
When rotating clockwise the [STC] knob, the
effect of suppressing the reflection from sea
surface becomes stronger.
When rotating counterclockwise the [STC]
knob, suppressing the reflection from sea
surface becomes weaker.
To clear the CCD camera video, press any other key.
Rotate
Rotate
Display the video of CCD camera. ([STC] knob)
The video of the CCD camera is displayed.
The [LCD BRILL] and the [PANEL BRILL] are
toggled by pressing the [BRILL] key.
The full screen and the half screen are
toggled by pressing the [STC] knob.
Press
Start the transmission. ([STBY/TX] key)
Press
The transmission starts, and the picture is
displayed.
To stop the transmission, press the [STBY/TX] key
again.
Adjust the brilliance. ([BRILL] key)
Press
Press
Press
+ cursor information
heading line
own ship’s
position
+ cursor
own ship’s information
When releasing the [ENT] key, the heading line
appears again, and the + cursor returns to the own ship
position,
Delete the heading line. ([ENT] key)
Keep pressing
While pressing the [ENT] key,
the heading line disappears.
Measure the distance/heading of 2-points. ([ENT] key)
Press Press Press
The cursor
moves.
The origin
is set.
The distance/direction
from the origin to the
+ cursor is displayed.
Press the [MENU] key to finish.
Open the menu. ([MENU] key)
Press
Press
Press
Press
Press
The menu is displayed.
Press the [MENU] key again to close the menu.
(For the menu, see the back side.)
When rotating clockwise the [GAIN] knob,
the gain increases.
When rotating counterclockwise the [GAIN]
knob, the gain decreases.
Adjust the gain. ([GAIN] knob)
The [SUB-SCREEN RANGE] and the
[SUB-SCREEN GAIN] are toggled by pressing the
[GAIN] knob.
Turn on/off the power. ([BRILL] key)
Turn on the power. Turn off the power.
Turn off the power. Keep pressing
the key for more than 3 seconds.
FTC 3
ALM IN
SLP 5M
IR 2
ENH 1
TRAIL 6M
M 1
OFF
CENT
FTC 3
ALM IN
SLP 5M
IR 2
EBL
F1
F2
VRM
ENH 1
TRAIL 6M
CURS
PRC
Measure the bearing from own ship to a target.
After selecting [ON] and pressing the [ ] key, change the bearing with the
[ ] and [ ] keys.
Measure the distance from own ship to a target.
After selecting [ON] and pressing the [ ] key, change the distance with the
[ ] and [ ] keys.
Change the color of entire display.
Set the shape of the + cursor.
Display straight lines which are parallel with own ship set as a standard.
Set a number of parallel lines.
Change the + cursor and the bearing display mode of the EBL.
[TRUE] : The true north points 0°.
[REL] : The heading points 0°.
Display the bearings and speeds of own ship and other ships as vector lines.
Set the mode (TRUE/RELATIVE) of the vector line.
ECHO
TRAILS MODE
DISPLAY SELECT
OFF CENTER
ENHANCE
PROCESS
PULSE
DISPLAY
ALARM
NEXT
AIS
ATA
FTC 3
H UP RM
PPI
OFF
1
OFF
RESO-P PRI
EBL
VRM
COLOR
CURSOR SHAPE
PI
PI NUMBER
BRG TRUE/REL
VECTOR
VECTOR TRUE/REL
ON
ON
REL
STANDARD
STANDARD
OFF
7
TRUE
6MIN
Function of Adjust Set Menu
ECHO
TRAILS
DISPLAY
ALARM
NEXT
AIS
ATA
ECHO
TRAILS
DISPLAY
ALARM
NEXT
AIS
ATA
Functions of Trail Setting Menu
TRAIL MODE
TRAIL TIME
TRAILSHAPE
TRAIL LEVEL
TRUE
3MIN
STANDARD
7
Function of Display Setting Menu
MENU
MENU
MENU
0093142134-02
How to operate the Menu
Open the
menu
Select the
menu name
Select the
setting item
Change the
setting content
1st time: The menu returns
to the set item.
2nd time: The menu returns
to the menu name.
Close the menu
Close
the menu
Change the setting of FTC.
The bigger numerical value brings bigger effect.
Change the display mode.
Select from [H UP RM], [N UP RM], [N UP TM], [C UP RM], [C UP TM], and
[WPT UP RM].
Set the display configuration.
Set the center position of the display.
The set position becomes the center of the display (own ship’s position).
The enlarged image is displayed.
The bigger numerical value expands target more greatly.
Stabilize the unstable targets by signal-processing the picture.
Change the pulse width.
[RESO-P PRI] :
Suitable for searching in the place where targets are crowded
.
[GAIN PRI] : Suitable for searching small targets.
Set the display method of the trail.
[REL] : Display the difference of the relative target position as a trail.
[TRUE] : Display the trail of the course and speed of a moving target
irrespective of own ship’s motion.
To display the true trail, entering the data of heading, ship speed and
latitude/longitude is required.
Set a time to display the trail.
Set the shape of the trail.
[STANDARD] : Even if time goes, the shape of the trail remains unchanged.
[DECREASE]: As time goes, the trail becomes narrower.
Set the signal level of the trail.
When increasing the numerical value, only targets that return strong
reflections are displayed.

Other manuals for MDC-900 Series

1

Other Koden Marine Radar manuals

Koden MDC-2240 User manual

Koden

Koden MDC-2240 User manual

Koden MDC-5200 SERIES User manual

Koden

Koden MDC-5200 SERIES User manual

Koden MDC-2000A Series User manual

Koden

Koden MDC-2000A Series User manual

Koden MDC-5204 User manual

Koden

Koden MDC-5204 User manual

Koden MDC-5004 Installation manual

Koden

Koden MDC-5004 Installation manual

Koden MDC-5000 Series User manual

Koden

Koden MDC-5000 Series User manual

Koden MDC-7060 User manual

Koden

Koden MDC-7060 User manual

Koden MDC-2900 User manual

Koden

Koden MDC-2900 User manual

Koden MDC-7900P series User manual

Koden

Koden MDC-7900P series User manual

Koden MDC-2000 series User manual

Koden

Koden MDC-2000 series User manual

Koden MDC-1810P User manual

Koden

Koden MDC-1810P User manual

Koden MDC-7000P series User manual

Koden

Koden MDC-7000P series User manual

Koden MDC-2000BB Series User manual

Koden

Koden MDC-2000BB Series User manual

Koden MDC-7006 User manual

Koden

Koden MDC-7006 User manual

Koden MDC-2900 User manual

Koden

Koden MDC-2900 User manual

Koden MDC-2900 User manual

Koden

Koden MDC-2900 User manual

Koden MDS-1100R Series User manual

Koden

Koden MDS-1100R Series User manual

Koden MDC-5000 Series User manual

Koden

Koden MDC-5000 Series User manual

Koden MDC-900 Series User manual

Koden

Koden MDC-900 Series User manual

Koden MDC-2200 series User manual

Koden

Koden MDC-2200 series User manual

Koden MDC-5004 User manual

Koden

Koden MDC-5004 User manual

Koden MDC-2900 User manual

Koden

Koden MDC-2900 User manual

Koden RA40C User manual

Koden

Koden RA40C User manual

Koden MDC-2200 series User manual

Koden

Koden MDC-2200 series User manual

Popular Marine Radar manuals by other brands

Garmin GMR 18 installation instructions

Garmin

Garmin GMR 18 installation instructions

Furuno FR/FAR-2835SW/2865SW installation manual

Furuno

Furuno FR/FAR-2835SW/2865SW installation manual

Furuno FAR-2157-BB installation manual

Furuno

Furuno FAR-2157-BB installation manual

Furuno FAR-2107 Series Operator's guide

Furuno

Furuno FAR-2107 Series Operator's guide

HELZEL Messtechnik WERA Quick installation guide

HELZEL Messtechnik

HELZEL Messtechnik WERA Quick installation guide

Furuno 1931 Operator's manual

Furuno

Furuno 1931 Operator's manual

Furuno 1835 installation manual

Furuno

Furuno 1835 installation manual

Garmin GMR FANTOM 50 Series installation instructions

Garmin

Garmin GMR FANTOM 50 Series installation instructions

Icom MR-1200RII user manual

Icom

Icom MR-1200RII user manual

Sitex T-900 Series Operation manual

Sitex

Sitex T-900 Series Operation manual

King-Dome 9704 troubleshooting guide

King-Dome

King-Dome 9704 troubleshooting guide

Furuno FR-2010 Operator's manual

Furuno

Furuno FR-2010 Operator's manual

Sailor SP4400 operating instructions

Sailor

Sailor SP4400 operating instructions

Furuno FAR-2218 Operator's manual

Furuno

Furuno FAR-2218 Operator's manual

Grundig GSS STC 816 Assembly instruction

Grundig

Grundig GSS STC 816 Assembly instruction

Furuno 1720 owner's manual

Furuno

Furuno 1720 owner's manual

iNetVu Viasat SurfBeam 2 quick start guide

iNetVu

iNetVu Viasat SurfBeam 2 quick start guide

manuals.online logo
manuals.online logoBrands
  • About & Mission
  • Contact us
  • Privacy Policy
  • Terms and Conditions

Copyright 2025 Manuals.Online. All Rights Reserved.