Kogan SMARTERHOME 5S User manual

KOGAN SMARTERHOME™
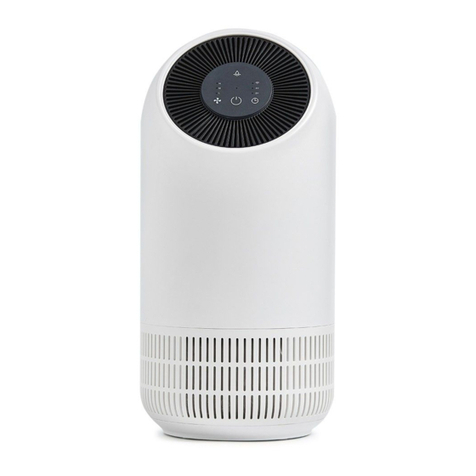
AIR PURIFIER 5S
WITH H13 HEPA FILTER
KASMAPF5SIA

2
Safety & Warnings
3
Overview
4
Operation
6
Connect to SmarterHome™ App
8
Cleaning & Care
16
Troubleshooting
19
Specifications
20
Notes
21

3
Ensure to read all instructions and warnings in this user guide prior to first use. Retain this
user guide for future reference.
• This air purifier should not be used by persons (including children) with physical
disabilities, mental disabilities, or lack of relevant experience and skills, unless they
are given instructions by the person responsible for their safety.
• Do not allow children to play with the air purifier.
• This air purifier is not a substitute for normal ventilation, daily vacuuming, or cooking
rangehoods.
• Do not use the filter for fuel or similar purposes. Burning the filter may cause
irreversible human harm or endanger other lives.
• Ensure the air purifier is used on a stable, flat surface.
• Ensure the air purifier is connected to a power socket that is between 100–240V, with
a frequency of 50 or 60Hz.
• Ensure the power cord is well connected into the power socket.
• Ensure there is at least a 30cm clearance on the back and sides of the air purifier.
Ensure there is at least a 50cm clearance above the air purifier.
• To avoid electric shock and fire, do not allow water, liquid, or any flammable
detergent to enter the air purifier.
• Do not use this air purifier when using indoor aerosol repellent or in places filled with
oil, flammable gas, or chemical fumes.
• Do not spray insecticides, perfumes, or other flammable sprays around the air purifier.
• Do not block or place objects over the air inlet and air outlet.
• Do not insert anything into the air inlet or air outlet.
• Do not place anything onto the air purifier.
• Do not place the air purifier under an air conditioner to prevent condensation from
dripping into the air purifier.
• If the power cord is damaged, stop use immediately and contact help.Kogan.com for
assistance.
• Adult supervision is required if children are cleaning the air purifier.
• Do not use any third-party filters with this air purifier.
• Do not hit the air purifier with hard objects.
• Unplug the air purifier before moving it.
• Do not move the air purifier by pulling the power cord.
SAFETY & WARNINGS

4
OVERVIEW
Top cover
Control panel
Air outlet
Display panel
Back cover
Filter
Air inlet

5
Control panel
UV/Anion button
Mode button
Timer button
Power button
Display panel
LED light
PM2.5 display
Timer
Mode indicator
UV indicator
Wi-Fi indicator
Anion indicator

6
Placement
Place the air purifier on dry, stable, flat surface. Ensure there is at least a 30cm clearance
around the back and sides, and a 50cm clearance above the air purifier.
Powering on/off
Plug the power cord of the air purifier into the power socket, then turn the socket on.
The air purifier will emit a sound before the LED light and display panel flashes once. This
will indicate the air purifier has entered standby.
Press the power button to turn the air purifier on/off.
Modes
This air purifier features four modes:
• Auto – The air purifier will automatically adjust the fan speed to regulate the air
quality to ideal levels.
• Sleep – The air purifier will operate at a lower noise level, ideal when sleeping.
• Mid – The air purifier will operate at a medium intensity.
• High – The air purifier will operate at a high intensity.
When turned on, the air purifier will operate in auto mode. This will be indicated by the
mode indicator on the display panel.
The LED light will also illuminate a colour to reflect the air quality measured by the amount
of PM2.5 particles µg/m³. The lower the number, the less pollutants there are in the air. This
is shown as below.
PM2.5 µg/m³
LED light colour
0–75
Blue
76–150
Yellow
> 151
Red
OPERATION

7
UV/Anion button
This air purifier can use either UV light or anions to remove bacteria and other pollutants in
the air.
To set whether the air purifier uses UV light or anions, press the UV/Anion button. The
relevant UV or anion indicator will illuminate on the display panel to reflect this.
Timer
The air purifier can be set to turn off automatically after a pre-determined number of hours
(2–24 hours).
Press the timer button to set how long from now the air purifier will turn off. This will be
reflected on the display panel (2H–4H–6H–8H–10H–12H–24H–cancel).
To cancel the timer, press and hold the timer button.
Note:
If UV light is being used, the air purifier will intermittently operate it every two hours.

8
This air purifier can connect to the Kogan SmarterHome™ app in three different ways.
• AP mode
• EZ mode
• Bluetooth
AP mode connection
Install App
Download the ‘Kogan SmarterHome’ app from the Play Store (Android) or App Store (iOS).
Play Store (Android)
App Store (iOS)
To reg i ste r :
1. If you already have a SmarterHome account, select ‘Log In’. To register a new
account, select ‘Sign Up’.
2. The system will automatically recognise your country. If needed, you can manually
select your country from the drop-down box. Enter your email address and tap ‘Get
Verification Code’ to continue.
3. A 6-digit code will be sent to the submitted email address. Enter this code before the
one-minute timer expires.
4. Continue to the next page and complete your SmarterHome profile.
CONNECT TO SMARTERHOME™ APP

9
Set device in pairing mode
When the device is first turned on, it may automatically enter pairing mode (the Wi-Fi
indicator will be flashing slowly).
If not automatically in pairing mode when powered on, you can manually set the device in
pairing mode by pressing and holding the mode button for two seconds until the Wi-Fi
indicator is flashing slowly.
Add device through network
1. Once registered, tap ‘Add Device’ on the app’s home page, or the ‘+’ in the upper
right corner, to add a new device through the network.
2. Select the product type from the list of options in the app (Air Treatment > Air
Purifiers).
3. Adjust your connection method by tapping on the mode type in the top-right
corner of the screen. Select ‘AP Mode’ for the set-up type.
4. Ensure that the device is in pairing mode, with the Wi-Fi indicator flashing slowly,
and tap ‘Confirm light is slowly flashing’.
5. Enter your Wi-Fi details. It is important that your SmarterHome™ device and the
app are connected to the same Wi-Fi network during setup.
Notes:
• The device and the app have to use the same Wi-Fi network.
• The device is only compatible with 2.4Ghz networks.

10
6. Follow the in-app prompts to continue AP Mode connection, which will pair your
mobile phone to the device’s Wi-Fi hotspot to ensure a connection. This may be
named ‘SL-KoganSmart’, ‘SmartLife-XXXX’, or another similar name.
7. The device will commence the pairing process and connect to the app. Ensure
your Wi-Fi router, mobile phone, and the SmarterHome™ device are kept close
until connection is complete.
8. After successfully being added, you will have the option to rename the device and
assign it to a location. It will now be listed on the app’s home page. Tap the device
listing to enter its control page.
Note:
If the Wi-Fi hotspot does not appear on your phone in the list of available networks,
your device may not be set in AP Pairing Mode correctly. Try repeating the steps
outlined above to ensure your device is ready for connection.
Note:
Once connected, you can select Create Scene from the ‘+’ in the upper right
corner (or from the Scene tab) to group connected SmarterHome™ products
and automate their functions.

11
Having trouble connecting?
The prior steps detail the process for ‘AP Mode’ connection. If that does not work for your
connection, we suggest trying it again, and if still no success, attempting the following
method for EZ Mode connection.
Set device in EZ pairing mode
Set the device in pairing mode by pressing and holding the mode button for two seconds
again until the Wi-Fi indicator starts flashing rapidly.
Using EZ Mode to add device
1. Follow the previous steps to select your product type (Air Treatment > Air Purifiers).
2. Adjust your connection method by tapping on the mode type in the top-right corner of
the screen. Select ‘EZ Mode’for the set-up type.
3. Enter your Wi-Fi details. It is important that your SmarterHome™ device and the app
are connected to the same Wi-Fi network during setup.
Notes:
• The device and the app have to use the same Wi-Fi network.
• The device is only compatible with 2.4Ghz networks.

12
4. Ensure that the device is in pairing mode, with the Wi-Fi indicator flashing rapidly,
and tap ‘Confirm light is rapidly flashing’.
5. The device will commence the pairing process and connect to the app. Ensure your
Wi-Fi router, mobile phone, and the SmarterHome™ device are kept close until
connection is complete.
6. After successfully being added, you will have the option to rename the device and
assign it to a location. It will now be listed on the app’s home page. Tap the device
listing to enter its control page.
Note:
Once connected, you can select Create Scene from the “+” in the upper right
corner (or from the Scene tab) to group connected SmarterHome™ products
and automate their functions.

13
Bluetooth connection
Install App
Download the “Kogan SmarterHome” app from the Play Store (Android) or App Store (iOS).
Play Store (Android)
App Store (iOS)
To reg i ste r :
1. If you already have a SmarterHome account, select ‘Log In’. To register a new
account, select ‘Sign Up’.
2. The system will automatically recognise your country. If needed, you can manually
select your country from the drop-down box. Enter your email address and tap ‘Get
Verification Code’ to continue.
3. A 6-digit code will be sent to the submitted email address. Enter this code before the
one-minute timer expires.
4. Continue to the next page and complete your SmarterHome profile.

14
Set device in pairing mode
When the device is first turned on, it may automatically enter pairing mode (Wi-Fi indicator
will be flashing rapidly).
If not automatically in pairing mode when powered on, you can manually set the device in
pairing mode by pressing and holding the mode button for two seconds until the Wi-Fi
indicator is flashing rapidly.
Add device through network
1. Once registered, tap “Add Device” on the app’s home page, or the “+” in the upper
right corner, to add a new device through the network.
2. Select the product type from the list of options in the app (Air Treatment > Air
Purifiers).
3. Enter your Wi-Fi details. It is important that your SmarterHome™ device and the app
are connected to the same Wi-Fi network during setup.
Notes:
• The device and the app have to use the same Wi-Fi network.
• The device is only compatible with 2.4Ghz networks.

15
5. Ensure that the device is in pairing mode, with the Wi-Fi indicator flashing rapidly, and
tap “Confirm light is rapidly flashing”.
6. The device will commence the pairing process and connect to the app. Ensure your
Wi-Fi router, mobile phone, and the SmarterHome™ device are kept close until
connection is complete.
10. After successfully being added, you will have the option to rename the device and
assign it to a location. It will now be listed on the app’s home page. Tap the device
listing to enter its control page.
Note:
Once connected, you can select Create Scene from the “+” in the upper right
corner (or from the Scene tab) to group connected SmarterHome™ products
and automate their functions.

16
å
Ensure the air purifier is turned off and unplugged before cleaning.
• Remove the filter and take it outdoors to a well-ventilated area. Gently pat the dust
off the outer surface of the filter. The filter should be regularly put under direct
sunlight to sterilise bacteria.
• Using a soft cloth and neutral detergent, clean the air inlet/outlet and exterior of the
air purifier. Allow to dry.
• After the air purifier is dry, reinsert the filter, and place a dust cover/bag over the
appliance.
Filter replacement
When the display panel shows the indicator that the filter has finished its service life (2200
hours) and the LED light is flashing yellow, the filter must be replaced.
Ensure the air purifier is turned off and unplugged before replacing the filter.
CLEANING & CARE
Notes:
• Ensure no water drops into the appliance when cleaning.
• Do not immerse the air purifier into water or any liquid.
• Do not use abrasive, corrosive, or flammable cleansers (for example, bleach,
alcohol) to clean any part of the appliance.
• Do not wash the filter.
• Do not use a vacuum cleaner to clean the filter.
Note:
Do not use third-party filters with this air purifier.

17
To replace the filter:
1. Turn off the air purifier and unplug the power cord from the power socket.
2. Open the back cover.
3. Remove the filter.
4. Remove the packaging from the new filter (not included).
5. Rotate the bottom cover of the filter in the direction marked ‘Close’, then insert the
new filter (not included) into the air purifier.
Packing bag

18
6. Reinstall the back cover.
7. After replacing the filter, plug the power cord of the air purifier into the power socket,
and press the power button. The display panel will still show the indicator that the
filter has finished its service life, and the LED light will still be flashing yellow.
Press and hold the mode button for seven seconds and the display will show the
‘Filter 100%’ indicator to indicate the filter has been replaced successfully and reset.
If the filter has not been used for 2200 hours but needs to be replaced for whatever reason:
1. Press and hold the mode button for seven seconds. The display panel will then show
a reset icon .
2. Press the mode button again to reset the filter to 100%.
Storage
Place it in a well-ventilated area away from direct sunlight.
If the air purifier will not be used for an extended period, ensure to turn on the appliance
every now and then to ensure good performance.

19
Problem
Solution
The air purifier is not
working.
• Ensure there is no power outage and that the power socket is
well connected.
• Ensure the filter has not finished its service life. If so, turn off
and unplug the air purifier, then replace the filter.
The volume of air being
emitted from the
appliance is less than
usual.
• Ensure there is no dust on the filter. If there is dust, clean the
filter.
• Ensure the air inlet and air outlet are not blocked. Remove any
blockage if necessary.
The air purifier is
making significant
noises.
• Ensure there is nothing stuck on the air outlet. If so, clean the
air outlet.
• Ensure the appliance is placed on a stable, flat surface.
• Adjust the appliance to a lower volume mode (for example,
sleep mode).
The air purifier is
emitting an odour.
• It is normal that air purifiers may smell like plastic the first few
times they are used.
• If the filters are dirty, the air purifier will emit an odour. Clean or
replace the filters.
• If there is a burning smell, unplug the power cord immediately.
Stop use and contact help.Kogan.com for assistance.
The reminder for filter
replacement keeps
appearing after the
new filter has been
installed.
The timer for the filter must be reset. Press and hold the mode
button for seven seconds. The yellow LED light will disappear,
and the filter timer will be reset.
If the troubleshooting solutions above do not solve your issues, contact help.Kogan.com for
assistance.
Do not disassemble the air purifier yourself.
TROUBLESHOOTING

20
Dimensions
700 x 310 x 310mm
Weight
8.8kg
Rated voltage
100–240V, 50/60Hz
Power
60W
Noise
56dB
Coverage area
77m²
SPECIFICATIONS
This manual suits for next models
1
Table of contents
Other Kogan Air Cleaner manuals

Kogan
Kogan SMARTERHOME KAIRPRFR4SA User manual

Kogan
Kogan SmarterHome 1S User manual

Kogan
Kogan Kapuriohepa User manual

Kogan
Kogan SMARTERHOME KABLFAN1CSA User manual

Kogan
Kogan SMARTERHOME SECURITY CAMERA DOORBELL 3 PRO User manual

Kogan
Kogan SMARTERHOME KASMAPF2PCA User manual

Kogan
Kogan SMARTERHOME KABLFAN2CSA User manual

Kogan
Kogan SMARTERHOME KARWASHR2SA User manual