manuals.online logo
Brands
  1. Home
  2. •
  3. Brands
  4. •
  5. Kogan
  6. •
  7. Automobile Accessories
  8. •
  9. Kogan KAHUDQ7GPSA User manual

Kogan KAHUDQ7GPSA User manual

GPS Car Head Up Display
KAHUDQ7GPSA
User Manual
Table of Contents
HUD Features.............................................................................................................................................................. 1
HUD Display Information.......................................................................................................................................2
Installation................................................................................................................................................................... 2
HUD Button Functions........................................................................................................................................... 3
HUD Settings............................................................................................................................................................. 4
Clock djustment..................................................................................................................................................... 6
Restore to Factory Settings.................................................................................................................................. 6
Using and installing the reflection film............................................................................................................. 7
Product Specs........................................................................................................................................................... 7
Troubleshooting........................................................................................................................................................ 8
HUD is short for Heads Up Display. The HUD will display driving data, reflected onto the
windscreen. This allows you to view information regarding travel without taking your eyes off the
road.
HUD Features
•Will work in any vehicle with a cigarette lighter socket.
•5.5” colour display.
•Multi-colour design, allowing for easy reading.
•Displays important information, such as speed, direction, driving time, distance, real time,
satellite number and altitude.
•uto power on and off.
•utomatic or manual brightness control.
1
HUD Display Infor ation
1. Real time icon
2. Current time
3. Settings icon
4. Speed alarm
5. Current Speed
6. Driving direction and buzzer icon
7. Driving distance (KM/MILE) or driving time (MIN)
8. Speed or voltage
9. Unit of speed and voltage
10. Light sensor
11. Driving distance/time unit
12. Satellite icon
13. Number of connected Satellites
14. Speed icons
Installation
Place the HUD unit so that it is sitting under the windscreen facing upwards with the buttons on
the left side, then connect the USB power supply to your car's cigarette lighter. Start the engine
and the HUD will power on, with the satellite icon flashing. Once the HUD has located a satellite,
the icon will stop flashing and the HUD will function.
2
HUD Button Functions
1. Power input, to connect to the USB power supply.
2. Power ON and OFF. ON is towards the power input, OFF towards the Input button.
3. Input button – three way button with various functions.
◦Up button – pull button up towards you
◦OK button – press button inwards
◦Down button – push button towards the windscreen
Using the Input Button:
Press and hold the input button for 5 seconds to enter into the settings menu. Once you have
finished adjusting settings, hold the button in again for 5 seconds to save and exit.
•Up Button: increase a settings value.
•Down Button: decrease a settings value.
•OK Button (Out of Settings): switch between KM, Time or Miles travelled.
•Down Button and hold: turn speed alarm on and off.
3
HUD Settings
s the HUD receives data from satellites, GPS data such as speed or distance travelled may be
slightly different to your car dashboard data. You can adjust the speed display on the HUD to get
results closer to your dash information. To do this, you should drive at a stable speed such as
60km/h and note the difference between the speedometer on the HUD and in the car.
Kogan.com recommends you have a friend assist you with this so that you can pay full attention
to the road.
For example, if you find that the HUD is 5km/h slower than your car speedometer, then you
should change the value of setting 0, as shown below, to 105. Note that this adjustment may
need to be changed over time as your tyres wear, or if you change components of your car such
as tyres, wheels or other drivechain parts.
Menu Parameters djustment
Range Explanation Default Display State
0 Speed 50-150
This setting allows
you to adjust the
reading on the HUD
to match your
speedometer.
See above for a
detailed explanation
on how to do this.
100
1Speed
larm 30-250
Sets the speed at
which your HUD will
beep to alert you to
your speed.
112
2Brightness
djustment 0 – 2
0 for automatic
adjustment.
1 for darkest.
2 for brightest.
0
3 Speed Unit 0 – 2
0 is km/h
1 is mph
2 is Voltage
0
4
4Distance or
Time Switch 0 – 2
0 is KM driven
1 is driving time
2 is miles driven
0
5
Driving time
and altitude
switch
0 – 1 0 is driving time
1 is altitude 0
6 Timezone -12 to 12 Timezone (from
GMT -12 to GMT 12) 10
7
Start
Reference
Voltage
0 – 150
Sets the Voltage that
the unit will auto
power on and off at.
By default, the HUD
will power on at 13.2V
or higher, and power
off when lower than
13.2V.
132
8
Restore to
Factory
Settings
0 – 1
Set to 1, then press
and hold the button
for 5 seconds to
restore all settings to
factory default.
0
5
Clock Adjust ent
Make sure your GMT setting matches your location (default is GMT+10). From within menu 6 in
the settings menu, adjust the values to suit whatever time zone you are in.
Note that you will need to adjust your clock for daylight savings time.
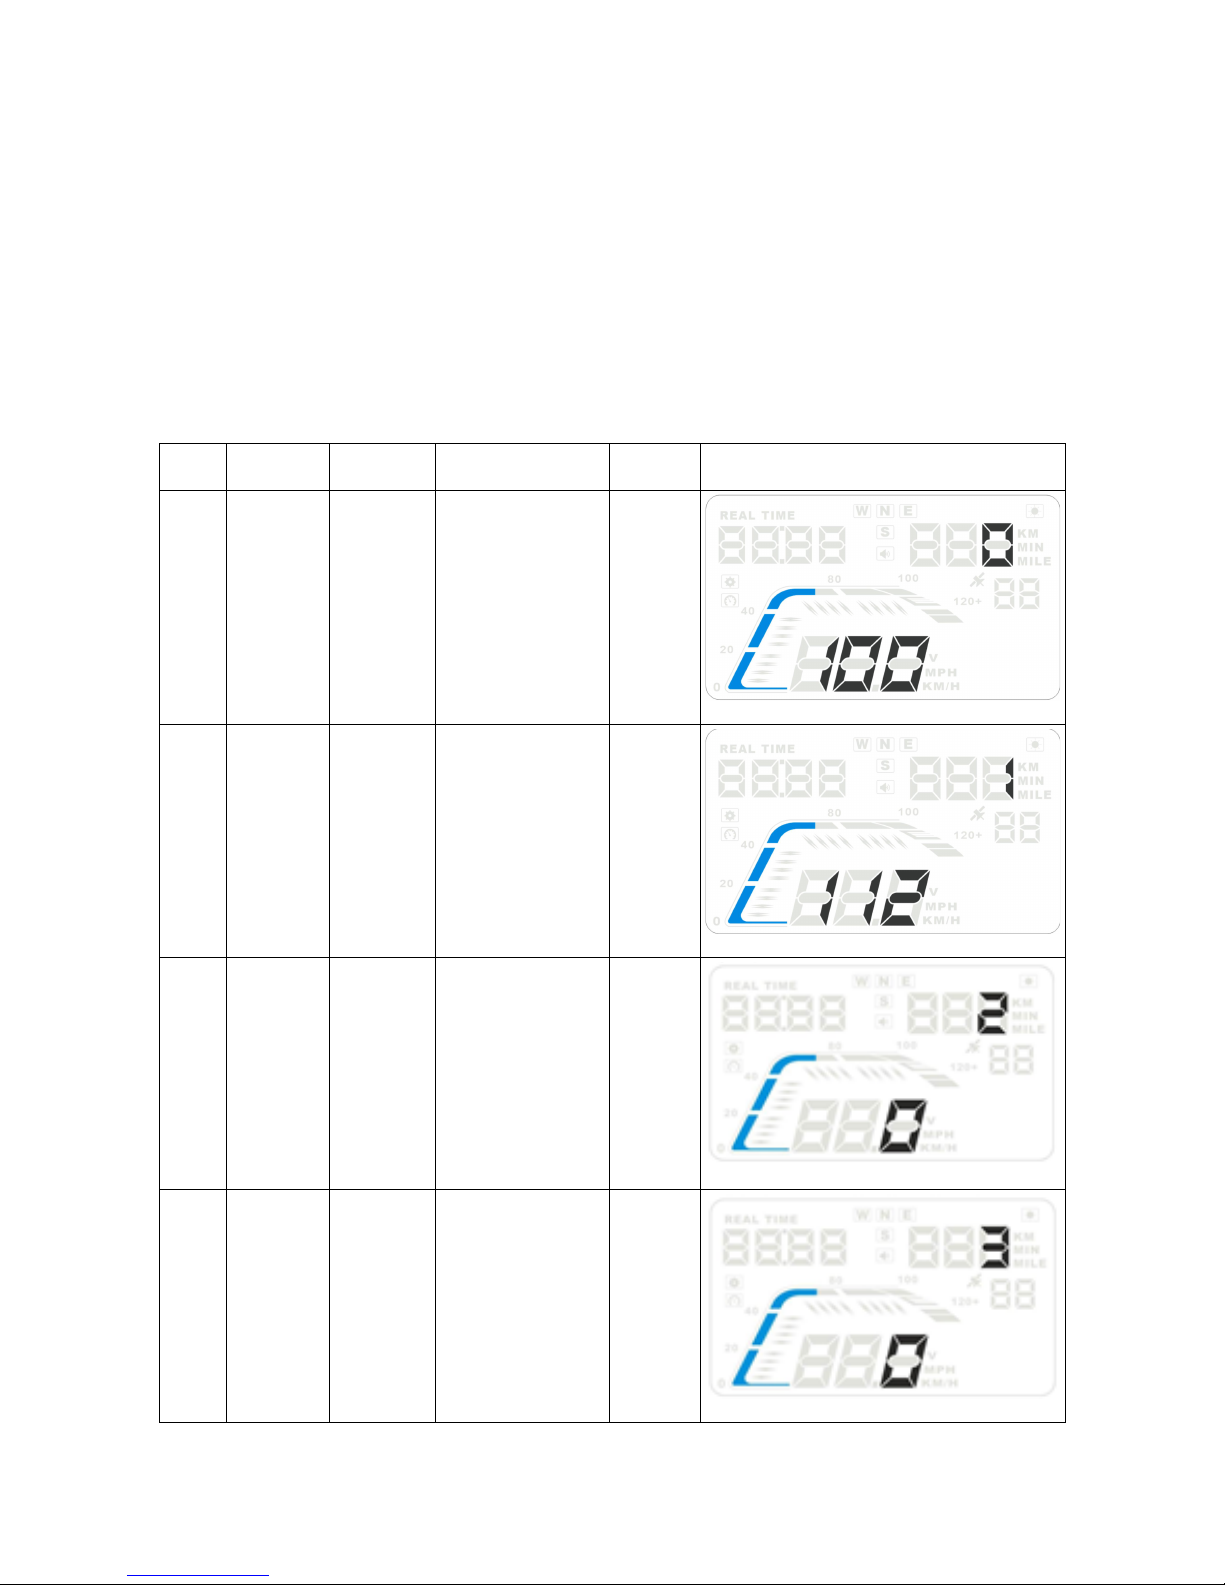
HUD adjustment
Code
Region GMT
8 Western ustralia GMT+8
9.3 Northern Territory, South ustralia GMT+9.5
10 Queensland, New South Wales, Victoria, Tasmania GMT+10
10.3 Daylight Savings – South ustralia GMT+10.5
11 Daylight Savings – New South Wales, Victoria, Tasmania GMT+11
0 United Kingdom, Iceland, Ireland, Portugal UTC
1 Norway, Sweden, Denmark, Poland, Germany, France, Netherlands, Spain, Italy GMT+1
2 Finland, Russia, Ukraine, Romania, Turkey, Israel, Egypt, South frica GMT+2
3 Saudi rabia, Bahrain, Kenya, Iran,Belarus GMT+3
4 Mauritius, United rab Emirates, fghanistan, Seychelles GMT+4
5 Pakistan, Turkmenistan, Sri Lanka, India,Nepal GMT+5
6 Bangladesh, Kazakhstan, Bhutan GMT+6
7 Vietnam, Laos, Cambodia, Thailand, Indonesia GMT+7
8 China, Malaysia, Singapore, Philippines, Hong Kong, Taiwan, Macau GMT+8
9 Japan,Korea GMT+9
10 ustralia, Guam GMT+10
11 Solomon Islands, Vanuatu GMT+11
12 New Zealand, Fiji GMT+12
-1 zores, Cape Verde GMT-1
-2 Mid- tlantic GMT-2
-3 Brazil, rgentina, Uruguay,Chile GMT-3
-4 Venezuela, Bolivia, Paraguay GMT-4
-5 Canada, Panama, Cuba, New York GMT-5
-6 Mexico GMT-6
-7 Salt Lake City GMT-7
-8 California, San Francisco GMT-8
-9 East laska GMT-9
-10 Hawaii GMT-10
-11 Samoa, Midway GMT-11
-12 Eniwetok Island GMT-12
Restore to Factory Settings
When the HUD is powered on, press and hold the button for 5 seconds to enter the menu
settings, then press it until you get to menu item 8. Pull the button down to option 1, then hold
the button for 5 seconds to save and exit back to the display interface.
6
Using and installing the reflection fil
The HUD projects information up onto the windscreen. Due to the construction of your
windscreen, the HUD may create a double reflection on the windscreen, which will make it
difficult to read. If this occurs, please use the reflective film.
First, place the non-slip mat onto your dashboard, then place the HUD on it. The reflective film
can then be stuck into position right above the HUD position.
Sticking the film to the windscreen:
1. Spray some water onto the place where the film will be stuck, then use a dry cloth to
clean it.
2. Take off the backside (marked 1) from the reflective film, then paste it onto the
windscreen.
3. Once you have adjusted the location, you can use a ruler or something else flat to smooth
the film out, squeezing any bubbles or water out.
4. Take off the protection film (marked 2) from the reflective film. If the film isn't positioned
to display all of the information, please adjust the non-slip mat to move the position of
the HUD.
Product Specs
Working Voltage DC8 – 24V
Working Current 40m
Standby Current 15m
Compass ccuracy ±1°
Speed Range 0 – 400KM/H
Real Time Precision Dependant on GPS satellite specs
HUD Size 13 x 7.8 x 1.5cm
12V Power Supply 1000m , USB Mini Cable
HUD Weight 115g
7
Troubleshooting
HUD screen not powering up
Check that the power cable is plugged in securely to the HUD and to the cigarette lighter socket.
Check the HUD switch to ensure it is in the ON position. If there is still no display, please try the
unit in another car to test whether the car cigarette lighter is supplying power. If your car is not
supplying power, please consult with your car user manual or a qualified mechanic.
No speed, HUD powers off after 20 seconds or HUD will not automatically power on or off
When the starting voltage is less than 13.2V, the HUD will not power on. If your engine is running
and the HUD is still not working, please toggle the power switch on the side to turn it on, then
hold the button in for 5 seconds to enter into the settings menu. Once in the settings, navigate
through to settings menu 7. Push or pull the button to adjust the voltage from 132 to 128 or
lower. Try turning on your car again to see if the HUD now automatically turns on.
HUD will not automatically power off after the car is turned off
The HUD is designed for a default voltage value of 13.2V. When the voltage is above 13.2V, it will
automatically power on, then when it is lower than 13.2V is will automatically power off. If the
HUD does not power off automatically, hold the input button in for 5 seconds to enter into the
settings menu, then navigate through to settings menu 7. djust the voltage level to 135 or
higher, then press and hold the input button for 5 seconds to save. Please note that the value
shouldn't be set too high, as the HUD will not automatically power on due to not receiving
sufficiently high voltage.
Inaccurate Speed
When the HUD is powered on, press and hold the button for 5 seconds to enter into settings.
The menu 0 will show the parameter of 100 Push or pull the input button up or down to increase
or decrease the value according to the difference to your speedometer. For example, if your
HUD reads 5km/h lower than your speedometer, change this to 105. If your HUD is 4km/h higher
than your speedometer, change this value to 96. fter making the adjustment, press and hold the
button for 5 seconds to save.
Overspeed larm
The default value for the overspeed alarm is 112km/h. Users can choose to increase/decrease this
value by themselves. When the HUD is powered on, press and hold the button for 5 seconds to
enter into the settings menu, then navigate to menu 1. The parameter will display 112, which
represents the speed at which the HUD will give an alarm once the car reaches that speed.
Push or pull the button up or down to set the desired speed, then press and hold the button in
for 5 seconds to save.
Cannot see the HUD clearly in sunlight
Check whether the HUD protective film is torn and that the reflection film is positioned correctly.
If this does not help you, press and hold the input button for 5 seconds to enter into the settings
menu, then navigate to menu 1. The parameter will display 0, automatic adjustment. Change this
to 2 for the highest brightness level, then press and hold the input button for 5 seconds to save.
Unit keeps crashing or showing bizarre or incorrect data
Please do a factory reset on the unit.
8

Other Kogan Automobile Accessories manuals

Kogan CERTA CTCVINCVR14A User manual

Kogan

Kogan CERTA CTCVINCVR14A User manual

Kogan KAMIRRCRBSA User manual

Kogan

Kogan KAMIRRCRBSA User manual

Kogan KHIONFRDEOA User manual

Kogan

Kogan KHIONFRDEOA User manual

Kogan KABLU41KITA User manual

Kogan

Kogan KABLU41KITA User manual

Kogan KAQICARIRBA User manual

Kogan

Kogan KAQICARIRBA User manual

Kogan Ovela OVCEBL12VCA User manual

Kogan

Kogan Ovela OVCEBL12VCA User manual

Kogan KABLU41KITA User manual

Kogan

Kogan KABLU41KITA User manual

Kogan KABTFMTRVCA User manual

Kogan

Kogan KABTFMTRVCA User manual

Kogan KAHUDQ7GPSA User manual

Kogan

Kogan KAHUDQ7GPSA User manual

Kogan KAHUDA8OBDA User manual

Kogan

Kogan KAHUDA8OBDA User manual

Kogan KAPWB12V14A User manual

Kogan

Kogan KAPWB12V14A User manual

Kogan KABLUHANDSFM User manual

Kogan

Kogan KABLUHANDSFM User manual

Kogan KARVSRCAMRA User manual

Kogan

Kogan KARVSRCAMRA User manual

Popular Automobile Accessories manuals by other brands

bosal 043221 Fitting instructions

bosal

bosal 043221 Fitting instructions

Curtis 1POLXP1000RP Installation & owner's manual

Curtis

Curtis 1POLXP1000RP Installation & owner's manual

EUFAB 17526 manual

EUFAB

EUFAB 17526 manual

Nitrous Express 15935 operating instructions

Nitrous Express

Nitrous Express 15935 operating instructions

Dynalink X 0604B operating instructions

Dynalink

Dynalink X 0604B operating instructions

Toyota Bluetooth hands-free system owner's manual

Toyota

Toyota Bluetooth hands-free system owner's manual

MBRP Off Camber Fabrications 130717 Assembly

MBRP

MBRP Off Camber Fabrications 130717 Assembly

INDRA Smart PRO installation guide

INDRA

INDRA Smart PRO installation guide

Dakota Digital ION-05 manual

Dakota Digital

Dakota Digital ION-05 manual

Dynojet Power commander V installation instructions

Dynojet

Dynojet Power commander V installation instructions

Yakima Landing Pad 21 instructions

Yakima

Yakima Landing Pad 21 instructions

Prorack K925 Fitting instructions

Prorack

Prorack K925 Fitting instructions

YouGarage Y-Dash installation manual

YouGarage

YouGarage Y-Dash installation manual

Mitsubishi MOTORS KJ0 owner's manual

Mitsubishi MOTORS

Mitsubishi MOTORS KJ0 owner's manual

Crux SOOGM-16V manual

Crux

Crux SOOGM-16V manual

Black Horse Off Road 7G152506SS installation instructions

Black Horse Off Road

Black Horse Off Road 7G152506SS installation instructions

SUSPENZ 44-0103 manual

SUSPENZ

SUSPENZ 44-0103 manual

Safe Fleet Prime Design FBM-1016-BLK Assembly instructions

Safe Fleet

Safe Fleet Prime Design FBM-1016-BLK Assembly instructions

manuals.online logo
manuals.online logoBrands
  • About & Mission
  • Contact us
  • Privacy Policy
  • Terms and Conditions

Copyright 2025 Manuals.Online. All Rights Reserved.