manuals.online logo
Brands
  1. Home
  2. •
  3. Brands
  4. •
  5. Kohler
  6. •
  7. Bathroom Fixture
  8. •
  9. Kohler AWAKEN 76667T-E User manual

Kohler AWAKEN 76667T-E User manual

1269273-AN2-A 1
BEFORE YOU BEGIN
All information is based on the latest product information available at the time of publication. Kohler Co. reserves
the right to make changes in product characteristics, packaging, or availability at any time without notice.
Please leave these instructions for the consumer. They contain important information.
NOTES:
1. Observe local plumbing codes.
2. An inline water filter must be used with this product.
3. The highest working pressure for handshower is 0.5MPa(5 bar). If it exceeds 0.5MPa(5 bar), a pressure reducer
is needed. The highest water and environment temperature is 60°C. Please keep handshower, showerhead and
the shower arm away from heater, or it may become damaged and cause injury to the user.
4. All installations should comply with the relevant requirements of AS/NZS 3500 and AS/NZS 6400.
1269273-AN2-A 4
INSTALLATION INSTRUCTIONS
76667T-E Slide Shower76667T-E Slide Shower
AWAKENAWAKEN
ROUGH-IN DIMENSIONS
SERVICE PARTS
**Color code must be specified when ordering.
Ø116
249
258
1226887**
79680
1500
560~660
58
700~800
75
60
1248781**
23096
1208176**
1195838**
1081607
1269272**
1061576
1208178
1219396**
1208178
1208177**
1061576
51 59
44
58
38
G1/2˝
G1/2˝
G1/2˝
G1/2˝
G1/2˝
1194751**
1128483
23096
1269273-AN2-A 2
1269273-AN2-A 3
CLEANING INSTRUCTIONS
All Finishes: Clean the finish with mild soap and warm water. Wipe entire surface completely dry with clean soft
cloth. Many cleaners may contain chemicals, such as ammonia, chlorine, toilet cleaner etc, which could adversely
affect the finish and are not recommended for cleaning.
Do not use abrasive cleaners or solvents on Kohler faucets and fittings.
INSTALLATION
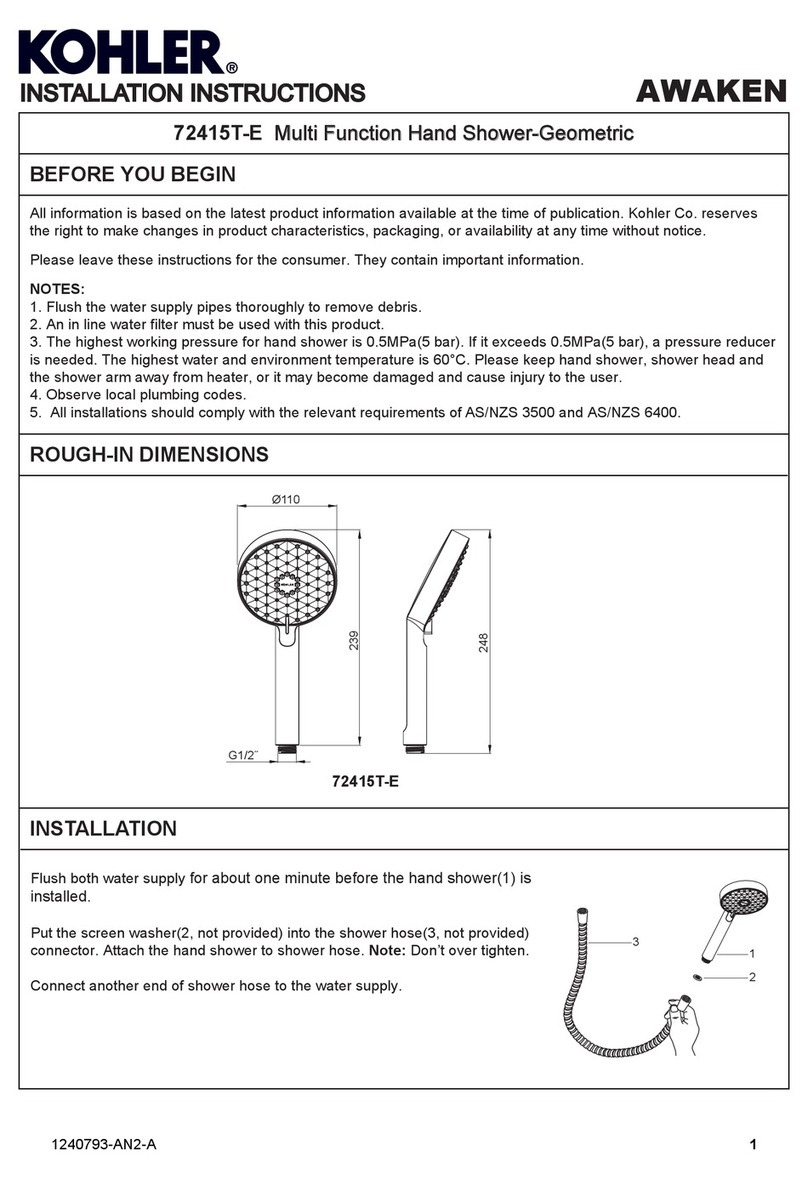
How to Install the Handshower and Hose
Flush both water supplies for about one minute before
the handshower(18) is installed. Attach the
handshower to shower hose(17). NOTE: Don’t over
tighten.
Connect another end of shower hose to the outlet(14)
of the connection.
Hang the handshower in the bracket(4).
How to Install the Slide Bar
Decide on a suitable position for the slide bar avoiding
buried cables and pipes in the wall.
Drill two holes at the proper height on the finished wall
according to the rough-in dimensions and should
match the anchors(1).
Put anchors into the holes. Install the upper and under
base(2) with screws(3) in the wall.
Place the bar(5) into the under slide bar body(6).
Install the screw(7), tighten them by hex wrench(8).
Slide the handshower holder(4) onto the bar. The
height of handshower holder can be adjusted by
pressing the pinch cock(9) and sliding up and down.
Adjust it to the proper position.
Tighten the screw(7) to secure upper slide bar
body(10) by hex wrench according to the rough-in
dimensions. Make sure the directions of the upper and
under slide bar body are consistent.
Slide the bracket escutcheons(11) onto the bases(2),
confirm the drain notch of the escutcheon is pointed
down. Install the whole slide bar onto the bases.
Tighten the screws(12) by hex wrench to secure the
slide bar.
18
17
How to Operate the Handshower
Rotate the knob of the handshower to change the water
flow.
How to Maintain the Handshower
Any debris or mineral build-up may cause the flow
stream to become distorted or reduce the flow rate. To
remove the debris or mineral build-up, run water
through the handshower, firmly press or rub your finger
back and forth across the rubber nozzles.
560~660
3
12
Drain notch
11
11
12
2
7
2
10
1
7
5
6
4
9
8
How to Install the Connection Kit
Before installation, installer must provide G1/2″ supply
fitting(13). Ensure it extend 12~20mm beyond the
finished wall.
Apply tape or thread sealant to G1/2″ threads of the
supply fitting. Apply a ring of plumber putty or other
sealants around the underside of the connection
kit(16). Install the connection kit onto the supply fitting.
Adjust the connection kit and make sure the outlet(14)
and drain notch(15) of the escutcheon downwards.
Remove any excess putty.
①
②
③
13
16
15
14
12~20mm
Drain
notch
Other Kohler Bathroom Fixture manuals

Kohler K-11545X-4 Assembly instructions

Kohler

Kohler K-11545X-4 Assembly instructions

Kohler MATTIA K-36974T User manual

Kohler

Kohler MATTIA K-36974T User manual

Kohler Sonata K-1641 User manual

Kohler

Kohler Sonata K-1641 User manual

Kohler ARICA K-705230 User manual

Kohler

Kohler ARICA K-705230 User manual

Kohler BEITOU 72830T-L User manual

Kohler

Kohler BEITOU 72830T-L User manual

Kohler K-T10426 Assembly instructions

Kohler

Kohler K-T10426 Assembly instructions

Kohler K-1122P-H Quick start guide

Kohler

Kohler K-1122P-H Quick start guide

Kohler K-704517 Assembly instructions

Kohler

Kohler K-704517 Assembly instructions

Kohler Englefield Valencia Elite User manual

Kohler

Kohler Englefield Valencia Elite User manual

Kohler Finial K-705727-L User manual

Kohler

Kohler Finial K-705727-L User manual

Kohler K-T948 Assembly instructions

Kohler

Kohler K-T948 Assembly instructions

Kohler K-809 Quick start guide

Kohler

Kohler K-809 Quick start guide

Kohler PureWash E700 User manual

Kohler

Kohler PureWash E700 User manual

Kohler K-819 User manual

Kohler

Kohler K-819 User manual

Kohler K-5264 Operating manual

Kohler

Kohler K-5264 Operating manual

Kohler K-6534 User manual

Kohler

Kohler K-6534 User manual

Kohler FAMILY CARE K-706264T-FM-SHP User manual

Kohler

Kohler FAMILY CARE K-706264T-FM-SHP User manual

Kohler K-2011 User manual

Kohler

Kohler K-2011 User manual

Kohler Rada SF1 User manual

Kohler

Kohler Rada SF1 User manual

Kohler K-6525 User manual

Kohler

Kohler K-6525 User manual

Kohler Archer K-1122-GHLAW User guide

Kohler

Kohler Archer K-1122-GHLAW User guide

Kohler K-T9474 Assembly instructions

Kohler

Kohler K-T9474 Assembly instructions

Kohler K-9923 User manual

Kohler

Kohler K-9923 User manual

Kohler K-13688 Assembly instructions

Kohler

Kohler K-13688 Assembly instructions

Popular Bathroom Fixture manuals by other brands

Moen 186117 Series installation guide

Moen

Moen 186117 Series installation guide

Hans Grohe Raindance Showerpipe 27235000 Instructions for use/assembly instructions

Hans Grohe

Hans Grohe Raindance Showerpipe 27235000 Instructions for use/assembly instructions

Signature Hardware ROUND SWIVEL BODY SPRAY 948942 Install

Signature Hardware

Signature Hardware ROUND SWIVEL BODY SPRAY 948942 Install

fine fixtures AC3TH installation manual

fine fixtures

fine fixtures AC3TH installation manual

LIXIL HP50 Series quick start guide

LIXIL

LIXIL HP50 Series quick start guide

KOLO ATOL PLUS installation manual

KOLO

KOLO ATOL PLUS installation manual

Hans Grohe PuraVida 15073000 Instructions for use/assembly instructions

Hans Grohe

Hans Grohe PuraVida 15073000 Instructions for use/assembly instructions

Toto TS111B8 Installation and owner's manual

Toto

Toto TS111B8 Installation and owner's manual

Coram Showers OFFSET QUADRANT manual

Coram Showers

Coram Showers OFFSET QUADRANT manual

baliv DU-2010 manual

baliv

baliv DU-2010 manual

odass OD-1710 instruction manual

odass

odass OD-1710 instruction manual

Oxygenics Evolution Easy installation instructions

Oxygenics

Oxygenics Evolution Easy installation instructions

Bradley Express SS Series installation instructions

Bradley

Bradley Express SS Series installation instructions

Helvex TH-974 installation guide

Helvex

Helvex TH-974 installation guide

DURAVIT C.1 C15240 0090 Instructions for mounting and use

DURAVIT

DURAVIT C.1 C15240 0090 Instructions for mounting and use

Sunshower PURE SOLO manual

Sunshower

Sunshower PURE SOLO manual

Heatstore HSTRL500WTN Installation and operating instructions

Heatstore

Heatstore HSTRL500WTN Installation and operating instructions

Delabie Delabie Sporting 714700 manual

Delabie

Delabie Delabie Sporting 714700 manual

manuals.online logo
manuals.online logoBrands
  • About & Mission
  • Contact us
  • Privacy Policy
  • Terms and Conditions

Copyright 2025 Manuals.Online. All Rights Reserved.