manuals.online logo
Brands
  1. Home
  2. •
  3. Brands
  4. •
  5. Kohler
  6. •
  7. Plumbing Product
  8. •
  9. Kohler 8959X-9 User manual

Kohler 8959X-9 User manual

ขอมูลในคูมือนี้มาจากขอมูลผลิตภัณฑลาสุดที่มีอยูในชวงเวลาการ
จัดพิมพ บริษัทฯขอสงวนสิทธิ์ในการเปลี่ยนแปลงขอมูลผลิตภัณฑ
บรรจุภัณฑที่มีอยูโดยมิตองแจงใหทราบลวงหนา
คูมือนี้มีขอมูลสำคัญ โปรดมอบเอกสารใหกับเจาของผลิตภัณฑ
ขอสังเกต:
1. เปดวาลวนํ้าทำความสะอาดทอนํ้าดี เพื่อขจัดเศษสิ่งสกปรก
ตางๆ
2. สำหรับการติดตั้งใหม ประกอบกอกน้ำเขากับอางลางหนากอน
การติดตั้งอางลางหนา
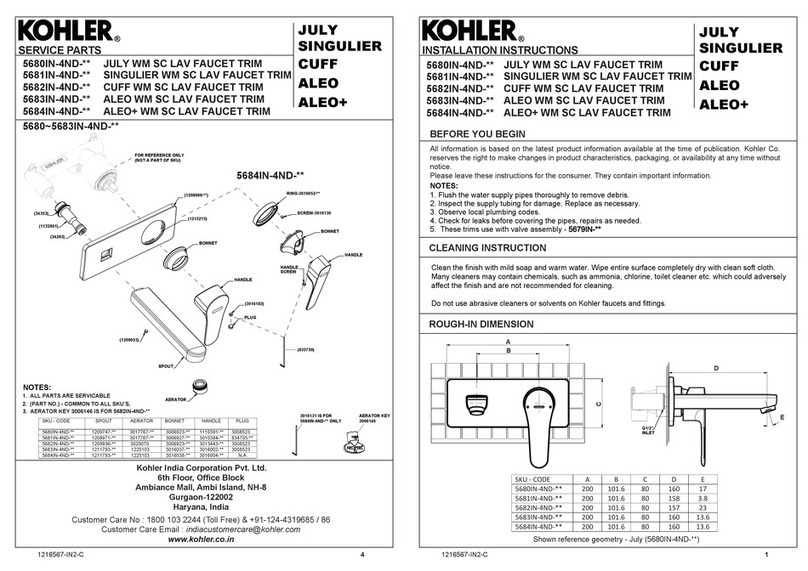
BEFORE YOU BEGIN
All information is based on the latest product
information available at the time of publication. Kohler
Co. reserves the right to make changes in product
characteristics, packaging, or availability at any time
without notice.
Please leave these instructions for the consumer.
They contain important information.
NOTES:
1. Flush the water supply pipes thoroughly to remove
debris.
2. For new installations, assemble faucet to lavatory
before installing lavatory.
1146746-X2-A 1
8959X-9 กอกผสมอางลางหนาแบบกานโยก
8990X-9 กอกผสมอางลางหนาทรงสูง
กอนเริ่มการติดตั้ง
การใชงานมือบิดกานโยก HANDLE OPERATION
INSTALLATION INSTRUCTIONS
ขอแนะนําการติดตั้งและการดูแลรักษา
Single Control Lav Faucet
ยกกานโยกและหมุนกานโยกทวนเข็มนาิกาเพื่อเปดน้ำเย็น,
หมุนกานโยกตามเข็มเพื่อเปดนํ้ารอน
Lift handle gently. Turn counter-clockwise for cold
water, clockwise for hot water.
1146746-X2-A 4
8959X-9
8990X-9
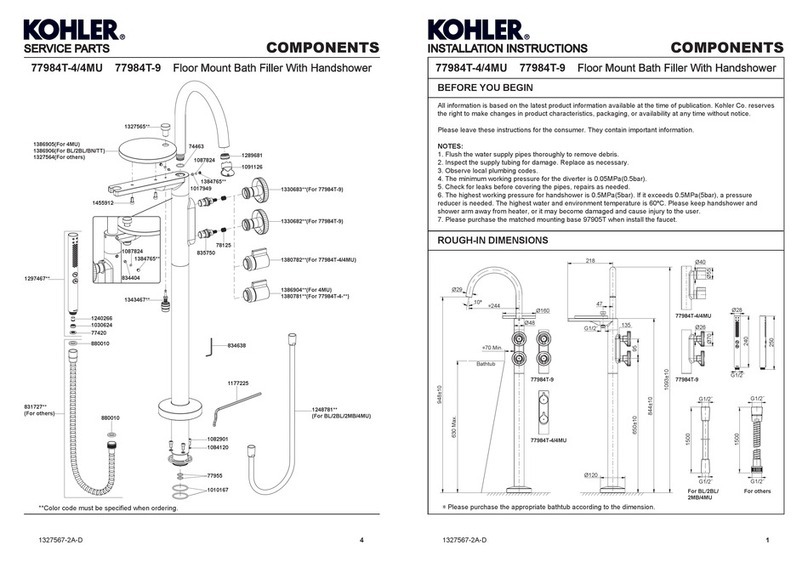
ระยะการติดตั้ง ROUGH-IN DIMENSIONS
203.5
512
Max 40
ไมเกิน 40
G1/2″
Ø30~Ø37
100
114
96
64°
185
199
64°
Ø30~Ø37
289
427
G1/2″
116
Ø54
Ø36.5
176.5
97.5 108
Ø31.7
OOBI
กอกผสมอางลางหนาแบบกานโยก รุนทูบี
Max 40
ไมเกิน 40
*Dimensions are approximate.
*ขนาดระยะแสดงคาโดยประมาณ
*Unit: mm
*หนวย: มม.
การรับประกันสินคา LIMITED WARRANTY
Kohler (Thailand) Public Company Limited warrants to the original
products, which are purchased from authorized distributors and dealers
within Kingdom of Thailand only, to be free of defects in material and
workmanship.
Within the below mentioned periods from the date of purchase,
Kohler(Thailand) Public Company Limited will at its election, repair,
replace or make appropriate adjustment where company’s inspection
disclose any such defect occurring in normal usage and maintenance but
is not responsible for labor charges, removal charges, installation, or
other incidental or consequential costs. In no event shall the liability of
Kohler(Thailand) Public Company Limited exceed the purchase price
of the product. This warranty applies only to Kohler Faucets installed in
Thailand.
• Ceramic Valve(leak/drip)
- Lifttime Limited Warranty* for residential use
- and Five (5) Years for commercial use
• Finish One(1) Year
• Fitting Three(3) Years
• Automatic faucet One(1) Year
• Hygiene spray(leak/drip Five(5) Years for selected models
from hygiene spray body) only
• Shower One(1) Year
• Bathroom accessories One(1) Year
This limited warranty DOES NOT COVER the defect or damage caused by
accident, natural disasters such as fire, flood, or earthquake, misuse or
abuse of products. Improper care and cleaning will avoid the warranty.
Consumers are responsible for the cost of service parts and service fee
for such cases.
To ensure continuous product quality and performance, as well as
product durability and lifetime, without any damage to the product,
consumers should purchase and use only genuine service parts and
after-sales services from Kohler (Thailand) Public Company Limited or
company’s authorized service centers, distributors, or dealers only.
*KOHLER® Faucet Lifetime Limited Warranty
Kohler (Thailand) warrants its faucets manufactured after January 1,
1997, to be leak and drip free during normal residential use for as long as the
original consumer purchaser owns his or her home. If the faucet should
leak or drip during normal use, Kohler (Thailand) will, free of charge;
replace
the new cartridge necessary to put the faucet in good working
condition.
Kohler (Thailand) also warrants all other aspects of the faucet or
accessories (“Faucet”)**to be free of defects in material and workmanship
during normal residential use for as long as the original consumer
purchaser owns his or her home. If a defect is found in normal residential
use, Kohler (Thailand) will, at its election, repair, provide a replacement
part or product, or make appropriate adjustment. Damage to a product
caused by accident, misuse, or abuse is not covered by this warranty.
Improper care and cleaning will also void the warranty.
Proof of purchase (original sales receipt) must be provided to
Kohler(Thailand) with all warranty claims. Kohler (Thailand) is not
responsible for labor charges, installation, or other incidental or consequential
costs. In no event shall the liability of Kohler (Thailand) exceed the
purchase price of the Faucet.
Important: Never use cleaners containing abrasive cleansers, ammonia,
bleach, acids, waxes, alcohol, solvents or other products not
recommended for chrome. This will void the warranty.
To obtain warranty service, please contact your dealers or contact the
KOHLER (Thailand) Call Center, together with proof of purchase at;
Call Center
KOHLER (Thailand) Public Company Limited
16th Floor, Jasmine City Building
2 Soi Sukhumvit 23, Sukhumvit Road,
Wattana, Bangkok 10110
Tel: 02204-6222 Fax: 0-2204-6224
Email: [email protected]
COPYRIGHT ©2011 BY KOHLER (THAILAND) PUBLIC COMPANY
LIMITED
1146746-X2-A 2
How To Install The Faucet
Screw the stud(1) to the thread hole on the
bottom of faucet. Insert the lift rod(2) into
the hole at the rear of the body assembly.
Put the washer(3) into the bottom of
body(5) through the flexible hoses(4) and
the stud. Insert hoses and stud into the hole
of lavatory. Position the faucet. From
underside of the lavatory, fit the
bracket(6)(Rubber washer is on the top)
onto the stud. Secure the faucet by
tightening nut(7).
Attach the hoses to water supplies. When
facing the front of the faucet, the left hose
connects to hot water, the right hose with
"COLD" label connects to cold water.
วิธีติดตั้งกอกน้ำ
ขันสลักเกลียว(1) เขาทางดานลางของกอกน้ำ
สวมกานโยก(2) เขากับรูดานหลังของตัวกอกน้ำ
สวมแหวนรอง(3) เขาที่ฐานตัวกอกน้ำ(5)
ผานสายน้ำดี(4) และสลักเกลียว สวมสายน้ำดีและ
สลักเกลียวเขากับอางลางหนา จัดตำแหนงกอกน้ำ
ประกอบแหวนรองรูปเกือกมา(6) (ยางอยูดานบน)
เขากับสลักเกลียวดานใตอางลางหนา ติดตั้ง
กอกน้ำโดยขันนอตใหแนน
ประกอบสายน้ำดีเขากับวาลวเปดน้ำ เมื่อหันหนา
เขาหากอกน้ำสายน้ำดีทางดานซายจะประกอบ
เขากับน้ำรอน สายน้ำดีขางขวาที่ติดสติ๊กเกอร
“COLD” จะประกอบเขากับน้ำเย็น
1146746-X2-A 3
การติดตั้ง INSTALLATION
3
การดูแลรักษาและทําความสะอาด CLEANING INSTRUCTIONS
ทดสอบการติดตั้ง INSTALLATION CHECKOUT
ตรวจสอบใหแนใจวา นอตทุกตัวขันแนน และ
กานโยกอยูในตำแหนงปด
จากนั้นเปดวาลวน้ำ เพื่อตรวจสอบการรั่วซึม
ซอมแซมหากเกิดการรั่วซึม
ถอดปากกอกน้ำออกโดยกดปุม(25) ดานใตของ
ปากกอกน้ำ(24) เปดกอกน้ำสักครูเพื่อใหขจัดเศษ
สิ่งสกปรกตางๆ ออก จากนั้นปดกอกน้ำและ
ประกอบปากกอกน้ำเขายังตำแหนงเดิม
สำหรับทุกพื้นผิวของผลิตภัณฑ: ทำความสะอาดพื้นผิวดวย
น้ำสบูออนและเช็ดใหแหงดวยผานุม ไมแนะนำผลิตภัณฑทำความ
สะอาดที่มีสวนผสมของสารเคมี เชน แอมโมเนีย, คลอรีน หรือ
น้ำยาทำความสะอาดประเภทโถสุขภัณฑ ทำความสะอาดกอกน้ำ
ซึ่งอาจทำลายพื้นผิวของกอกน้ำ
หามใชผลิตภัณฑทำความสะอาดประเภทกัดผิวหรือตัวทำละลาย
กับกอกน้ำหรืออุปกรณของโคหเลอร
All Finishes: Clean the finish with mild soap and warm
water. Wipe entire surface completely dry with clean
soft cloth. Many cleaners may contain chemicals, such
as ammonia, chlorine, toilet cleaner etc. which could
adversely affect the finish and are not recommended
for cleaning.
Do not use abrasive cleaners or solvents on Kohler
faucets and fittings.
Ensure that all connections are tight.
Ensure that the handle is in the off position.
Turn on the drain and main water supply,
and check for leaks. Repair as needed.
Press the bulge(25) of the aerator(24) on
the underside of the spout, Remove the
aerator. Turn on the faucet. Run the water
through the spout about one minute to
remove any debris. Remove any debris
from the aerator. Shut off the faucet.
Reinstall the aerator.
25
24
1
2
5
6
7
4
วิธีติดตั้งสะดืออาง
ถอดหนาแปลน(8) จากตัวสะดืออาง(9)
สวมแหวนรอง(10) เขากับดานใตของหนาแปลน
พันเทปพันเกลียวรอบทอ(11) ติดตั้งตัวสะดืออาง
โดยสวมตัวสะดืออางดานใตอางลางหนาและหัน
ดานรูที่ประกอบกานโยก(12) ใหอยูตำแหนง
ดานหลังของอางลางหนา จากนั้นขันหนาแปลน
เขากับตัวสะดืออางพอตึงมือ และขันนอต(13)
จากใตอางลางหนา
วางตัวอุดสะดืออาง(14) เขากับตัวสะดืออางโดย
ใหตำแหนงรูของตัวอุดสะดืออาง(15) ตรงกับ
รูกานโยกสะดืออาง
ขอสังเกต หากจำเปน ทาซิลิโคนดานใตหนาแปลน
สะดืออาง(8) แทนการใชแหวนยาง(10)
วางแหวนยาง(16) เขากับกาน และสวมแหวน
พลาสติก(17) และนอต(18)เขาที่ปลายกาน(19)
อีกดานที่มีลูกบอลสวมอยู ประกอบกาน(20)
เขาไปยังรูกานสะดืออางและรูของตัวอุด(15)
จากนั้นจึงขันนอตใหแนน
ตรวจสอบใหแนใจวา ตำแหนงของกานสะดือ
อยูทางดานหลังของอางลางหนา ขันนอต(13)
เขากับตัวสะดืออางใหแนน เช็ดซิลิโคนสวนที่เกินออก
ขอสังเกต หามเคลื่อนยายตำแหนงสะดืออาง
หลังจากขันนอตแนนแลว เพราะอาจทำให
ซิลิโคนแตก
How To Install The Drain
Remove the flange(8) from drain body(9).
Slide the washer(10) onto the underside of
the drain flange. Apply thread tape to
tailpiece(11). Install to drain body. Insert
drain body into underside of lavatory with
drain lever hole(12) facing to the back of
lavatory and thread flange onto drain body
until hand tight. Tighten the locklnut(13) by
hand from the underside of the fixture.
Place stopper(14) into drain body aligning
the flat side of stopper hole(15) with the
drain lever hole.
NOTE: If needed, apply a ring of
plumbers putty or other sealants around the
underside of the drain flange(8), instead of
using rubber washer(10).
Place the rubber washer(16) into the drain
lever hole. Put another plastic washer(17)
and retaining nut(18) into the long end of
ball lever rod(19). Insert the ball lever
assembly(20) into the drain lever hole and
through the stopper hole(15), and tighten
the retaining nut.
Be sure that the ball lever points to the
back of the lavatory. Tighten the
locknut(13) onto the drain body. Remove
any excess putty.
NOTE: Do not reposition the drain after the
locknut is tightened, or you may break the
putty seal.
ขันสกรู(21) เขากับแกนกานยก(22) ใหแนน
สวมกานผานรูกานยก จากนั้นใชคลิปรูปตัว “V”
(23) ประกอบแกนกานยกเขากับกานสะดืออาง
สำหรับ 8959X-9 ในตำแหนงปดสะดืออาง
ระยะความสูงของกานยกถึงพื้นเคานเตอร
สูงไมเกิน 34 มม.
สำหรับ 8990X-9 ในตำแหนงปดสะดืออาง
ระยะความสูงของกานยกถึงพื้นเคานเตอร
สูงไมเกิน 54 มม.
กดกานลงเพื่อใหอยูในตำแหนงเปดสะดืออาง
จากนั้นขันสกรูใหแนน
Assemble thumb screw(21) to link(22), and
link onto ball lever rod with "V"-clip(23).
Slide lift rod through the hole of the link. For
8959X-9, position the lift rod so that the
length between the top of the lift rod and
the mounting surface can not exceed
34mm when the drain is closed. For
8990X-9, position the lift rod so that the
length between the top of the lift rod and
the mounting surface can not exceed
54mm when the drain is closed.
Push the ball lever down into the open
position. Tighten thumb screw.
8
9
10
11
12
13
8
14
15
16
1718
19
20
21
22
23
34mm(8959X-9)
54mm(8990X-9)
Single Control Lav Faucet
8959X-9 กอกผสมอางลางหนาแบบกานโยก
8990X-9 กอกผสมอางลางหนาทรงสูง
1146746-X2-A 5
1146748
Hose
สายน้ำดี
3010821
Tube
ทอ
1146747**
Lever
มือบิด
870858
O-ring
โอริง
3008713
O-ring
โอริง
3010708(Green/
เขียว
)
3013333(White/
ขาว
)
Spout Insert
ปากกอก
3010823
Tube
ทอ
870858
O-ring
โอริง
3008713
O-ring
โอริง
1147325**
Lift Rod Kit
ชุดกานยก
สะดืออาง
870721
O-ring
โอริง
870721
O-ring
โอริง
1147326
Cartridge Seat Kit
ชุดกระบอกวาลว
1123942
Flow Regulator
ตัวลดแรงดันน้ำ
871568
O-ring
โอริง
1086390
Valve
วาลว
3010715
Nut
นอต
3010970**
Bonnet
ฝาครอบ
833438
Screw
สกรู
834705**
Plug
ปลั๊ก
836664
Mounting Hardware
อุปกรณยึดกอกน้ำ
834753**
Pop Up Drain
สะดืออางลางหนา
1080817
O-ring
โอริง
880406
Washer
แหวนรอง
880008**
Stopper
ตัวอุดสะดืออาง
880037
Link Kit
ชุดแกนขอตอสะดืออาง
OOBI
3010708(Green/
เขียว
)
3013333(White/
ขาว
)
Spout Insert
ปากกอก
SERVICE PARTS
อุปกรณประกอบและอะไหล
กอกผสมอางลางหนาแบบกานโยก รุนทูบี
**ระบุรหัสวัสดุเคลือบผิว/สีในการสั่งซื้อผลิตภัณฑ
**Color code must be specified when ordering
Call Center: +(66) 2204 6222
e-mail: [email protected]

This manual suits for next models

1

Other Kohler Plumbing Product manuals

Kohler K-5024-T User manual

Kohler

Kohler K-5024-T User manual

Kohler K-10088 Assembly instructions

Kohler

Kohler K-10088 Assembly instructions

Kohler 16366 User manual

Kohler

Kohler 16366 User manual

Kohler PureWash K-98804 User manual

Kohler

Kohler PureWash K-98804 User manual

Kohler 11829T-B User manual

Kohler

Kohler 11829T-B User manual

Kohler K-7114 User manual

Kohler

Kohler K-7114 User manual

Kohler 1031338 Manual

Kohler

Kohler 1031338 Manual

Kohler COUTURE WATERGUARD User manual

Kohler

Kohler COUTURE WATERGUARD User manual

Kohler Aleo 77751X-4CD User manual

Kohler

Kohler Aleo 77751X-4CD User manual

Kohler HYDRO-TOWER 200 Series User manual

Kohler

Kohler HYDRO-TOWER 200 Series User manual

Kohler K-19797T User manual

Kohler

Kohler K-19797T User manual

Kohler MODERN LIFE K-21842T User manual

Kohler

Kohler MODERN LIFE K-21842T User manual

Kohler K-73078 Assembly instructions

Kohler

Kohler K-73078 Assembly instructions

Kohler Coralais K-15186 Assembly instructions

Kohler

Kohler Coralais K-15186 Assembly instructions

Kohler K-75449-BV User manual

Kohler

Kohler K-75449-BV User manual

Kohler K-1122-LA Quick start guide

Kohler

Kohler K-1122-LA Quick start guide

Kohler 15343 Series Instruction Manual

Kohler

Kohler 15343 Series Instruction Manual

Kohler COMPOSED K-25421T User manual

Kohler

Kohler COMPOSED K-25421T User manual

Kohler Devonshire K-TS395-4S User manual

Kohler

Kohler Devonshire K-TS395-4S User manual

Kohler K-9310X Assembly instructions

Kohler

Kohler K-9310X Assembly instructions

Kohler 30440 User manual

Kohler

Kohler 30440 User manual

Kohler K-5814 Assembly instructions

Kohler

Kohler K-5814 Assembly instructions

Kohler K-45210 Assembly instructions

Kohler

Kohler K-45210 Assembly instructions

Kohler K-2953 Assembly instructions

Kohler

Kohler K-2953 Assembly instructions

Popular Plumbing Product manuals by other brands

miseno MNOVT550CP manual

miseno

miseno MNOVT550CP manual

Hans Grohe Talis E2 Series Instructions for use/assembly instructions

Hans Grohe

Hans Grohe Talis E2 Series Instructions for use/assembly instructions

Swiss Madison VESSEL SM-VS242MB installation instructions

Swiss Madison

Swiss Madison VESSEL SM-VS242MB installation instructions

Bradley S19-430EFW Installation

Bradley

Bradley S19-430EFW Installation

Brizo Sotria 68450-PC manual

Brizo

Brizo Sotria 68450-PC manual

Finnleo Euro Outdoor Series owner's manual

Finnleo

Finnleo Euro Outdoor Series owner's manual

Moen T86001 Series manual

Moen

Moen T86001 Series manual

Weka 508.1414.00.00E ASSEMBLY, USER AND MAINTENANCE INSTRUCTIONS

Weka

Weka 508.1414.00.00E ASSEMBLY, USER AND MAINTENANCE INSTRUCTIONS

Axor 16291XXX Service manual

Axor

Axor 16291XXX Service manual

Brizo MultiChoice 75 Series installation instructions

Brizo

Brizo MultiChoice 75 Series installation instructions

Rona Uberhaus Design TL-8267-WL-UHD instructions

Rona

Rona Uberhaus Design TL-8267-WL-UHD instructions

Sloan Optima EBF-665 Repair Parts and Maintenance Guide

Sloan

Sloan Optima EBF-665 Repair Parts and Maintenance Guide

Gerber denze D220887 manual

Gerber

Gerber denze D220887 manual

Fantini Rubinetti M011A instructions

Fantini Rubinetti

Fantini Rubinetti M011A instructions

Sensea ESSENTIAL Assembly, Use, Maintenance Manual

Sensea

Sensea ESSENTIAL Assembly, Use, Maintenance Manual

Taymor KAI 06-4021HS Installation

Taymor

Taymor KAI 06-4021HS Installation

Halsey Taylor USES HFC-134A REFRIGERANT owner's manual

Halsey Taylor

Halsey Taylor USES HFC-134A REFRIGERANT owner's manual

Kemper FROSTI XS Installation and operating manual

Kemper

Kemper FROSTI XS Installation and operating manual

manuals.online logo
manuals.online logoBrands
  • About & Mission
  • Contact us
  • Privacy Policy
  • Terms and Conditions

Copyright 2025 Manuals.Online. All Rights Reserved.