manuals.online logo
Brands
  1. Home
  2. •
  3. Brands
  4. •
  5. Kolcraft
  6. •
  7. Baby Accessories
  8. •
  9. Kolcraft ELMO TINY STEPS User manual

Kolcraft ELMO TINY STEPS User manual

Other Kolcraft Baby Accessories manuals

Kolcraft Sesame Street SN009-SPE User manual

Kolcraft

Kolcraft Sesame Street SN009-SPE User manual

Kolcraft 1-2-3 Learn with Me User manual

Kolcraft

Kolcraft 1-2-3 Learn with Me User manual

Kolcraft tiny steps User manual

Kolcraft

Kolcraft tiny steps User manual

Kolcraft Deluxe Bassinet User manual

Kolcraft

Kolcraft Deluxe Bassinet User manual

Kolcraft tiny steps User manual

Kolcraft

Kolcraft tiny steps User manual

Kolcraft My Mini Potty User manual

Kolcraft

Kolcraft My Mini Potty User manual

Kolcraft tot rider User manual

Kolcraft

Kolcraft tot rider User manual

Kolcraft Sesame Street User manual

Kolcraft

Kolcraft Sesame Street User manual

Kolcraft 123 sesame street User manual

Kolcraft

Kolcraft 123 sesame street User manual

Kolcraft tiny step User manual

Kolcraft

Kolcraft tiny step User manual

Kolcraft TINY SUEPS TOO User manual

Kolcraft

Kolcraft TINY SUEPS TOO User manual

Kolcraft Sesame Street User manual

Kolcraft

Kolcraft Sesame Street User manual

Kolcraft CONTOURS S75-T-R1 11/10 User manual

Kolcraft

Kolcraft CONTOURS S75-T-R1 11/10 User manual

Popular Baby Accessories manuals by other brands

Radiant TH23F operating instructions

Radiant

Radiant TH23F operating instructions

Playskool Busy Bath instructions

Playskool

Playskool Busy Bath instructions

Britax JETTA manual

Britax

Britax JETTA manual

Affinity ROOKIE instruction manual

Affinity

Affinity ROOKIE instruction manual

BEBE CONFORT BabyFix manual

BEBE CONFORT

BEBE CONFORT BabyFix manual

Childcare Galaxy manual

Childcare

Childcare Galaxy manual

Baninni BABYWALKER PIO BNBW009 manual

Baninni

Baninni BABYWALKER PIO BNBW009 manual

MONTESSORI ROOM Waldorf Rocker Assembly instructions

MONTESSORI ROOM

MONTESSORI ROOM Waldorf Rocker Assembly instructions

osann Marty Klimax manual

osann

osann Marty Klimax manual

Philips AVENT 690863016 null

Philips AVENT

Philips AVENT 690863016 null

Swereco 144971 Direction of use

Swereco

Swereco 144971 Direction of use

Leander Cradle Assembly

Leander

Leander Cradle Assembly

nuVita 7530 Assembly instructions

nuVita

nuVita 7530 Assembly instructions

Fisher-Price R4743 instructions

Fisher-Price

Fisher-Price R4743 instructions

Fisher-Price G8684 instruction sheet

Fisher-Price

Fisher-Price G8684 instruction sheet

bbluv Glüv instruction manual

bbluv

bbluv Glüv instruction manual

bbluv Glüv instruction manual

bbluv

bbluv Glüv instruction manual

bbluv Näj instruction manual

bbluv

bbluv Näj instruction manual

manuals.online logo
manuals.online logoBrands
  • About & Mission
  • Contact us
  • Privacy Policy
  • Terms and Conditions

Copyright 2025 Manuals.Online. All Rights Reserved.

Kolcraft®Enterprises, Inc. All Rights Reserved. W21S 7/09
Elmo Tiny Steps®2-in-1
Walker Instruction Sheet
Hoja de instrucciones
para andadera de Elmo
Tiny Steps®2-en-1
W21Sb_W15.qxd 3/21/2012 3:40 PM Page 1
2
Read all instructions BEFORE assembly and USE of this walker.
Keep instructions for future use.
IMPORTANT SAFETY INFORMATION:
How to Keep Your Child Safe While Using this Product
•NEVER leave child unattended. Always keep child in view while IN WALKER.
•CAUTION: Toys intended to be assembled by adult!
STAIR HAZARD
• Avoid serious injury or death. Block stairs/steps securely before using this walker.
• Use only on flat surfaces free of objects that could cause this walker to tip over.
Never use near stairs, steps, thresholds, hills, roadways, or pools.
• To avoid burns, keep child away from hot liquids, stoves, radiators, space heaters,
fireplaces, etc.
• Discontinue using this walker should it become damaged or broken.
• Never carry this walker with child in it. Never adjust seat while child is in product.
•DO NOT lift or carry by tray or toys.
•DO NOT use this walker until baby can sit up unassisted.
• To reduce the chance of child slipping out of seat, check that both feet of child
touch the floor.
• Discontinue use of activity walker (seated stage) if child can climb out or walk
unassisted.
Only use this activity walker (seated stage) if your child MEETS ALL of the
requirements below:
1. Can support body weight with legs
2. Weight is between 15 and 26 pounds (6.8 and 11.8 kgs)
3. Height is less than 32 inches (80 cms)
• To maintain stopping performance, clean friction strips regularly with damp cloth.
WARNING
W21Sb_W15.qxd 3/21/2012 3:40 PM Page 2
3
ADVERTENCIA
Lea todas las instrucciones ANTES de armar y USAR la andadera.
uarde las instrucciones para futura referencia.
INFORMACIÓN IMPORTANTE DE SE URIDAD:
Cómo mantener a su hijo seguro mientras está utilizando este producto
•NO deje nunca al niño solo. Tenga al niño siempre a la vista mientras utiliza la
ANDADERA.
• PRECAUCIÓN: Los juguetes están pretendidos para ensamblar por el adulto.
PELI RO EN ESCALERAS
• Evite heridas graves o mortales. Bloquée las escaleras / escalones antes de
utilizar esta andadera.
• Utilice solo en superficies planas sin objetos que puedan hacer que la andadera
vuelque. Nunca utilice cerca de escaleras, escalones, umbrales, colinas,
carreteras o piscinas.
• Para evitar quemaduras, mantenga al niño lejos de líquidos calientes, estufas,
radiadores, calefacciones, chimeneas etc.
• Si la andadera se rompe o se daña, deje de utilizarla.
• Nunca acarrée la andadera con el niño adentro. Nunca ajuste el asiento con el
niño adentro.
•NO la levante o la cargue por medio de la bandeja o los juguetes.
•NO utilice este producto hasta que el niño se pueda sentar sin
ayuda.
• Para reducir la posibilidad de que el niño se resbale fuera del asiento, compruebe
que sus pies tocan el suelo.
• Si el niño/a puede salirse o andar sin ayuda, deje de utilizar la andadera de
actividades (etapa de asiento).
Utilice esta andadera de actividades solamente si su hijo/a CUMPLE TODOS
los requerimientos abajo:
1. Puede soportar su propio peso con las piernas.
2. Pesa entre 6.8 y 11.8 kgs. (15 y 26 libras)
3. Mide menos de 80 cms. (32 pulgadas).
• Para mantener la función de parar, limpie las tiras de fricción con regularidad con
un trapo húmedo.
W21Sb_W15.qxd 3/21/2012 3:40 PM Page 3
Parts List Lista de piezas
4Continued on next page
Continuación en la página siguiente
Walker Frame
Marco de Andadera
Seat Pad
Cojín del asiento
Front Casters (2)
Ruedecillas delanteras
(2)
Axles (2)
Ejes (2)
Rear Wheels (2)
Ruedas traseras (2)
To Unfold and Assemble Walker Para desdoblar y ensamblar la
andadera
1To unfold walker, pull up sharply on the tray. Raise
upward until the vertical leg tabs lock into the base.
Para desdoblar la andadera, jale para arriba duramente
de la charola. Levante hacia arriba hasta que las
lengüetas verticales de la pata se cierre en el base.
Rotate top tray forward.
Darle vuelta hacia adelante a la bandeja.
HOW TO ASSEMBLE YOUR WALKER
CÓMO ARMAR SU ANDADERA
2
Vertical Leg Tab
Lengüeta de pata
vertical
1
Discovery Center™*
(select models)
(modelos selectos)
Tool Needed: Phillips Screwdriver
Herramienta necesitado: Destornillador de estrella
*Toys may vary
*Juguetes pueden variar
2
Upright Toys (2)
(select models)
Juguetes parados (2)
(modelos selectos)
W21Sb_W15.qxd 3/21/2012 3:40 PM Page 4
5
Attach Seat Pad Para colocar el cojín del asiento
1
Place seat pad into seat ring located on tray. Align it
so that high back support aligns with back of walker
ring.
Sitúe el cojín del asiento en el anillo del asiento situa-
do en la bandeja. Alinéelo de forma que el soporte alto
de espalda esté alineado con el trasero del anillo de la
andadera.
Insert the 4 tabs on the seat pad into slots located
around the front of the seat ring. Slide tabs through
holes.
Inserte las cuatro lengüetas en las ranuras situadas
alrededor de la área delantera del asiento. Deslice las
lengüetas a través de los agujeros.
1
2
High Back Support
Soporte Alto
de Espalda
3
3
Front Leg Button
Botón de la pata
delantera
Continued on next page
Continuación en la página siguiente
Insert the front leg into the slot in the base. Press
down on the top tray until the front leg button locks
into the base.
Inserta la pata delantera en la ranura de el base.
Presione hacia abajo en lo de arriba de la bandeja
hasta que el botón de la pata delantera se cierre en el
base.
2
Tabs
Lengüetas
W21Sb_W15.qxd 3/21/2012 3:40 PM Page 5
6
Attach Rear Wheels Unión de las ruedas traseras
Flip base over to expose underside. Locate rear
wheel opening in base of the walker.
Voltée la base para exponer la parte de abajo. Localice
la abertura de la rueda trasera en la base de la
andadera.
Align holes of wheel with corresponding axle holes
on the base of the walker. Plastic tab may need to
be pushed to the side to expose the axle hole. The
stem of the wheel should be facing the inside of the
base.
Alinee los agujeros de las ruedas con los agujeros del
eje correspondientes en la base de la andadera. Puede
que sea necesario empujar la pestaña de plástico para
que se vea el agujero del eje. El tubo de la rueda debe
de estar opuesta adentro de el base.
Slide metal axle into holes until the head of it passes
the plastic tab and clicks into place.
Deslice el eje de metal en los agujeros hasta que la
cabeza pase por la pestaña de plástico y encaje en su
lugar.
Repeat for other wheel.
Repita el proceso en la otra rueda.
1
2
3
4
3
Tabs
Lengüetas Grooves
Ranuras
Tab
Lengüeta
Underneath the tray, pull tabs and align into grooves.
Abajo de la bandeja, estire las lengüetas y alinée en
las ranuras.
Snap the back of the seat pad around the rear of the
seat ring.
Coloca el trasero de el cojín del asiento alrededor del
trasero de el anillo del asiento.
Test: Push down hard on seating area of seat pad to
make sure seat is securely in place.
Prueba: Empuje en el medio del cojín para asegurarse
de que está en su sitio.
CAUTION: Do not use walker if all tabs and snaps are
not secured properly, otherwise child may fall
through walker.
PRECAUCIÓN: No utilice la andadera si todas las
lengüetas y broches no están aseguradas adecuada-
mente. En caso contrario el niño podría caerse de la
andadera.
3
4
4
W21Sb_W15.qxd 3/21/2012 3:40 PM Page 6
7
Attach Front Casters Unión de las ruedecillas delanteras
Turn the base over and insert the stem of one of
the front casters into the hole in one of the front
corners. Push firmly until the caster snaps (locks)
into place.
Voltee la base y inserte el tubo de unas de las
ruedecillas delanteras en la agujero de unas de la
esquinas delanteras. Empuje firmemente hasta que la
pieza se coloca (asegure) en su lugar.
CAUTION: Be sure the caster is inserted fully into the
base. The top lip of the caster threads should be
flush with the base hole. Nothing below this lip
should be visible.
PRECAUCIÓN: asegúrese de que la rueda está total-
mente insertada en la base. La tapa de la parte de
arriba de los ribetes de la rueda debe estar alineada
con el agujero de la base. No se debe ver nada por
debajo de este labio.
1
Top Lip of
Caster Threads
Labio superior
de los ribetes
de la rueda
Correct
Assembly
Ensamblaje
correcto
Incorrect
Assembly
Ensamblaje
incorrecto
To Attach Upright Toys
(select models) Para unir los juguetes
(modelos selectos)
Locate holes in top tray. Align toy post and insert into
hole. Repeat for other toy.
NOTE: Wipe teether toys clean before use.
Localice los agujeros en la bandeja superior. Alinée los
postes de los juguetes e insértelos en el agujero.
Repita para el otro juguete. NOTA: Limpia los juguetes
chupadores antes de uso
CAUTION: Toys intended to be assembled by adult!
PRECAUCIÓN: Los juguetes están pretendidos para
ensamblar por el adulto.
1
1
WARNING
Do Not lift walker by toys or tray.
ADVERTENCIA
No levante la andadera por los juguetes o
la bandeja.
W21Sb_W15.qxd 3/21/2012 3:40 PM Page 7
8
To Install Batteries in Discovery Center™
(select models)
Para instalar las pilas en el juguete
electrónico
(modelos selectos)
Requires 3 “AAA” batteries (Not Included). To insert
batteries, use a Phillips head screwdriver to unfasten
battery cover. Insert batteries as shown. Secure
battery cover.
Requiere 3 “AAA” pilas (No Incluídas). Para insertar las
pilas, use un destornillador con punta de cruz para
quitar la tapa del compartimiento de pilas. Inserte las
pilas como se ve en el dibujo. Vuelva asegurar la tapa.
CAUTION: Old and new batteries (alkaline, standard
or rechargeable) should not be mixed. Different type
batteries should not be mixed. Remove batteries
before storing the toy.
PRECAUCIÓN: No mezcle pilas nuevas y usadas. No
mezcle pilas de tipo diferente. Saque las pilas antes de
guardar los juguete.
This toy has 2 levels of volume. Move switch to the
middle position for low volume and to the far right
for high volume. To turn off, move switch to “O”
position.
Este juguete tiene 2 niveles de volumen. Mueva el
interruptor a la posición media para volumen más bajo
y todo hasta la derecha para subir el volumen. Para
desconectar, sitúe el interruptor en la posición “O”.
1
+_
_
_
_
_
_
+
+
+__
__
__
+
+
+__
_
_
+
+
1
2
2
W21Sb_W15.qxd 3/21/2012 3:40 PM Page 8
9
To Attach Discovery Center™
(select models)
Para unir los juguetes electrónicos
(modelos selectos)
Insert the electronic toy bolts into the tray openings
as shown.
Inserte las tuercas del juguete electrónico en las
aberturas de la bandeja como se muestra.
To secure the electronic toy, flip tray over and tighten
each small nut until they are against the tray.
Para asegurar el juguete electrónico, dele la vuelta a la
bandeja y asegure cada tuerca chica hasta que esten
contra la bandeja.
CAUTION: Toys intended to be assembled by adult!
PRECAUCIÓN: ¡los juguetes están diseñados para que
los ensamble un adulto!
1
1
WARNING
Do Not lift walker by toys or tray. ADVERTENCIA
No levante la andadera por los juguetes o la bandeja.
2
2
To Convert to Walk-Behind Walker Para convertir en andadera para empujar
As your child grows, your Tiny Steps®Walker can be
converted to a Walk-Behind Walker.
Mientras su niño crece su Tiny Steps®andadera se
puede convertir en andadera para empujar.
Remove the seat pad by unfastening the 4 seat tabs
from the tray and unsnapping the rear of the seat
pad.
Remueva el asiento desbrochando las cuatro lengüetas
de la charola y desbrochando la trasera del el asiento.
Rotate the rear of the seat ring forward until it locks
into place, to become the Walk-Behind handle. Your
child can now stand behind the walker.
ire el trasero de el anillo del asiento hacia adelante
hasta que encaje en su lugar, para hacer la hasa de la
andadera para empujar. Su niño puede ahora pararse
tras la andadera.
1
2
2
2
W21Sb_W15.qxd 3/21/2012 3:40 PM Page 9
10
2
1
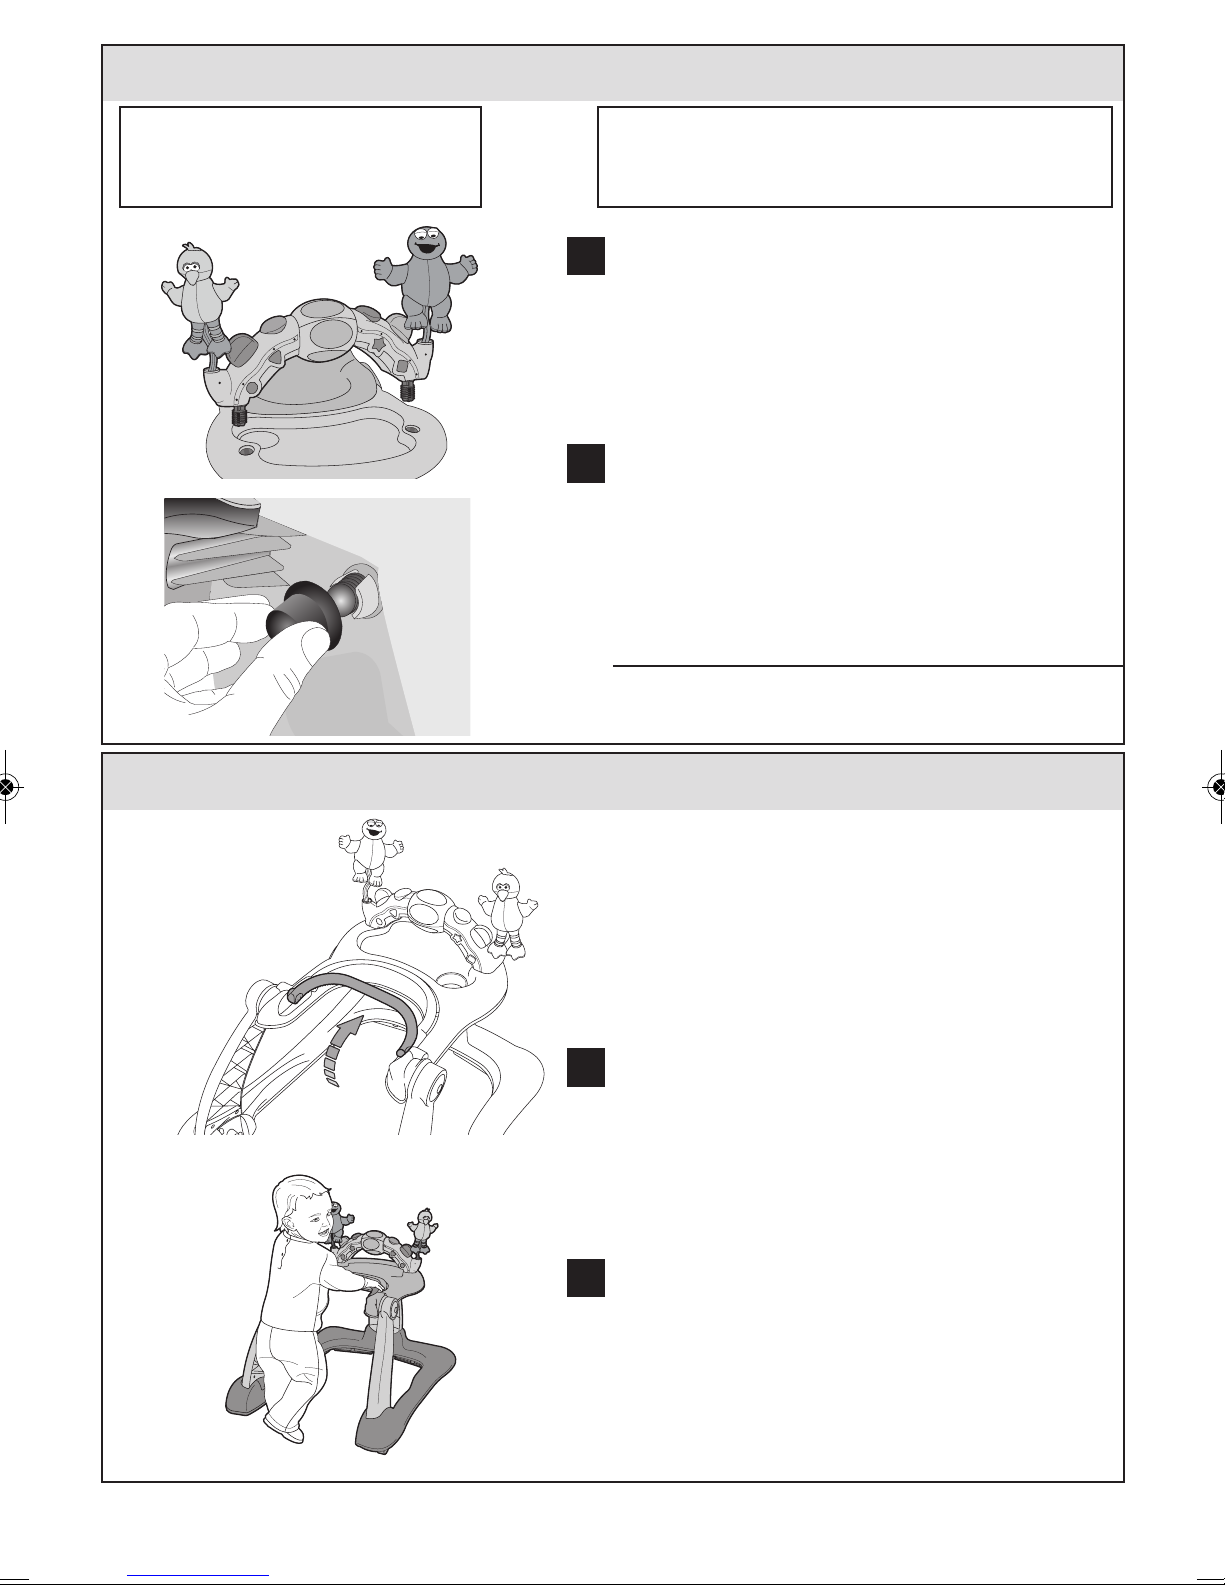
To Adjust Seat Pad Height
Para ajustar la altura del asiento
NOTE: As your child begins to grow, adjust height of
walker via the seat pad so that their toes touch the
ground when seated. To determine correct height
after assembly, place child in walker and make sure
their toes touch the ground.
NOTA: A medida que su hijo/a crezca, ajuste la altura
de la andadera de manera que sus dedos toquen el
suelo cuando esté sentado. Para determinar la altura
después de armarla, sitúe al niño/a en la andadera y
asegúerse de que ambos dedos tocan el suelo.
CAUTION: Child should not be in the walker during
adjustment.
PRECAUCIÓN:El niño/a no debe estar en la andadera
durante el ajuste.
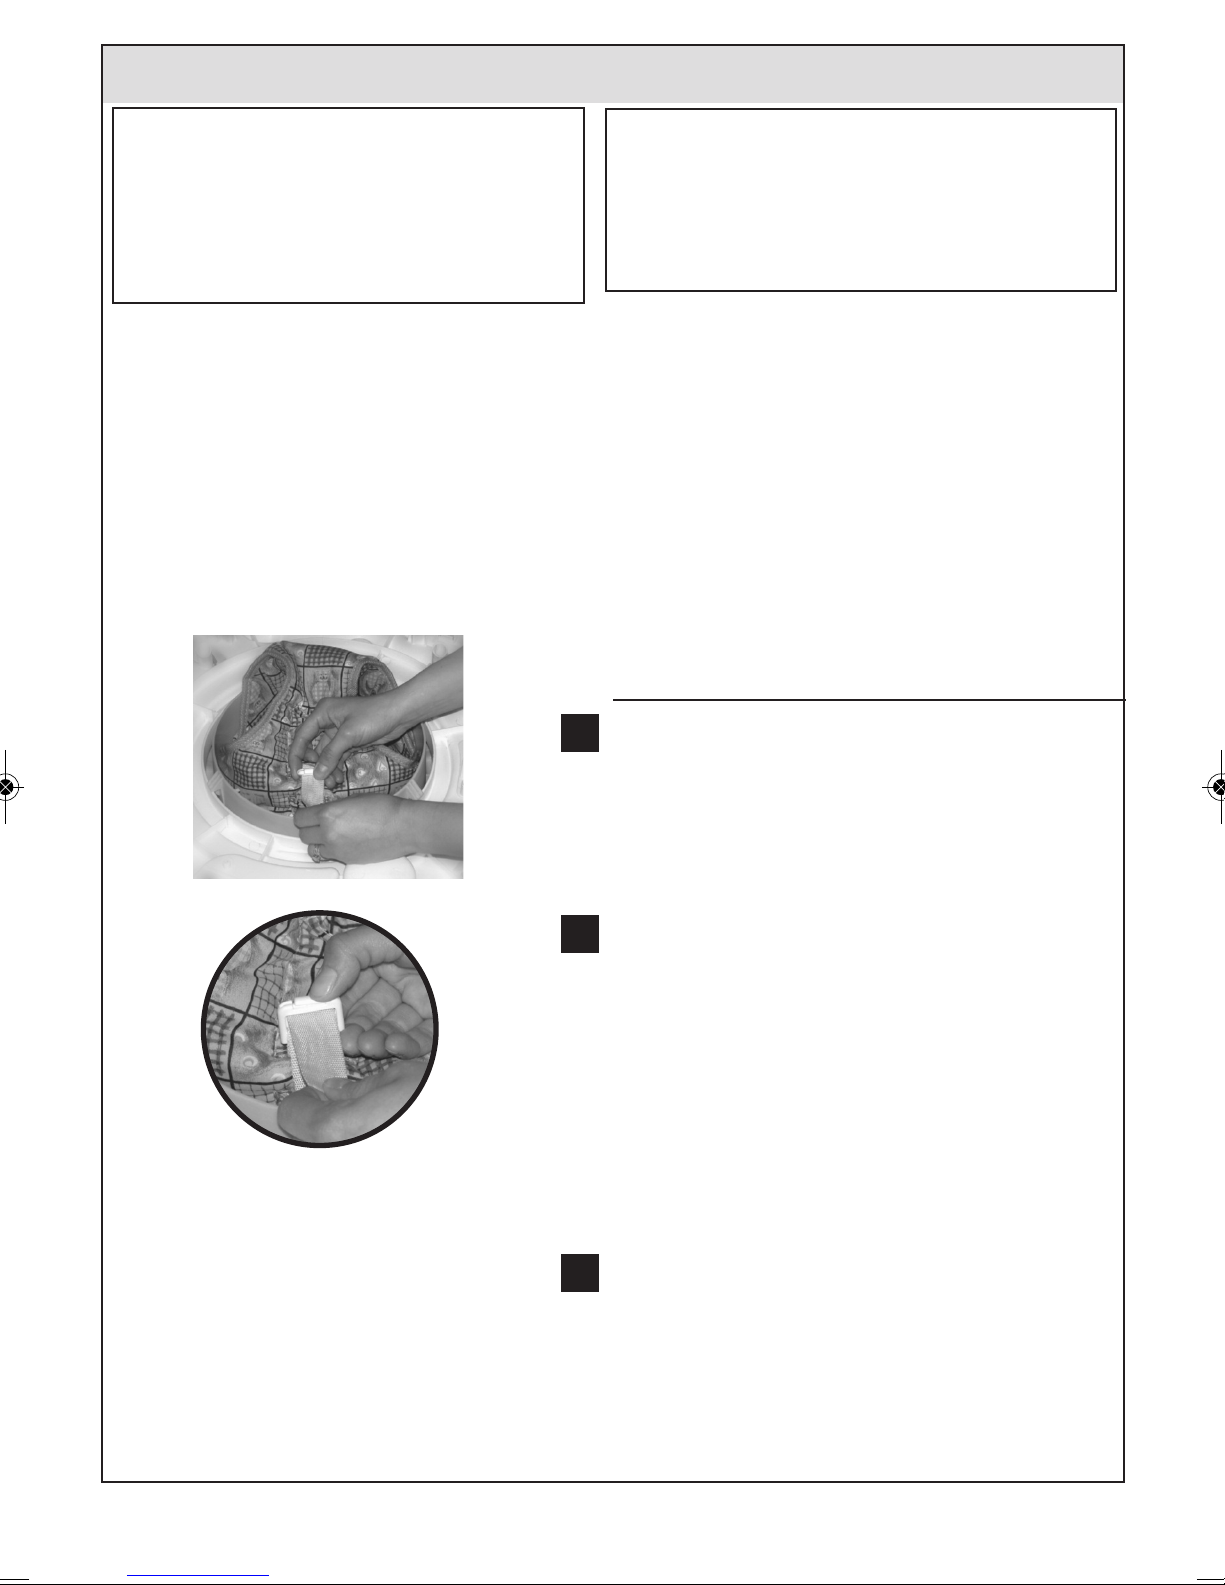
After seat pad is attached to tray, flip unit upside
down to access the restraint strap on underside of
seat pad.
Después de que la almohadilla del asiento esté unida a
la charola, voltée la unidad al revés para tener acceso
al cinturón de seguridad en la parte inferior de la
almohadilla del asiento.
Please note, to ensure proper operation, you will
need to periodically adjust the seat restraint to
accommodate your childs increased height. For
smaller babies, seat pad should be extended to its
lowest position. To adjust seat height, push button in
on restraint strap to release restraint.
Por favor, para asegurar el funcionamiento adecuado,
tendrá que ajustar periódicamente el cinturón de
seguridad para que se acomode al crecimiento de su
hijo. Para los bebés más pequeños, el asiento puede
extenderse hasta la posición más bajo. Para ajustar la
altura del asiento, presione el botón en el cinturón de
seguridad para soltarlo.
As baby grows, raise seat by tightening belt. This
helps to prevent the child from placing their feet flat
on ground and prevents your child from climbing
out.
A medida que su bebé crece, eleve el asiento ajustan-
do el cinturón. Esto ayuda para impedir que el niño
pueda apoyar completamente sus pies e impedir que
su niño pueda salirse del producto.
WARNING
DO NOT disassemble or adjust height while
baby is sitting in or near product. Always
make sure seat pad is adjusted to the
correct height position before placing child
in product.
ADVERTENCIA
NO desarme a ajuste la altura mientrás el bebé
está sentado en o cerca del producto. Asegúrese
siempre de que la almohadilla del asiento está
ajustada en la posición de altura adecuada antes
de situar al bebé en el producto.
1
2
3
W21Sb_W15.qxd 3/21/2012 3:40 PM Page 10