manuals.online logo
Brands
  1. Home
  2. •
  3. Brands
  4. •
  5. Koolatron
  6. •
  7. Accessories
  8. •
  9. Koolatron Total Chef TCES03 User manual

Koolatron Total Chef TCES03 User manual

06/2017-v1
WARRANTY
This product is warranted to the retail consumer for 90 days from date of retail purchase,
against defects in material and workmanship.
WHAT IS COVERED:
- Replacement parts and labor.
- Transportation charges to customer for the repaired product.
WHAT IS NOT COVERED:
- Commercial or industrial use of this product.
- Damage caused by abuse, accident, misuse, or neglect.
- Transportation of the unit or component from the customer to a Master Service Centre.
IMP IED WARRANTIES:
Any implied warranties, including the implied warranty of merchantability are also limited to
duration of 90 days from the date of retail purchase.
WARRANTY REGISTRATION:
Register on-line at www.koolatron.com AND keep the original, dated, sales receipt with this
manual.
WARRANTY AND SERVICE PROCEDURE:
If you have a problem with your unit, or you require replacement parts, please telephone the
following numbers for assistance:
North America 1-800-265-8456
Master Service Centres are at these locations:
U.S.A.
4330 Commerce Dr., Batavia, NY 14020-4102
Canada
139 Copernicus Blvd., Brantford, ON N3P 1N4
A Master Service Centre must perform all warranty work. Service after warranty may be
obtained at a Master Service Centre or at an authorized service dealer. Purchase Receipt
is required to establish warranty eligibility.
Instr ction Man al
Electric
Spiralizer
TCES03
H1S244
www.koolatron.com
©2017 Koolatron, Inc. All rights reserved.
All specification are subject to change without notice.
IMPORTANT SAFEGUARDS
Before using this appliance, carefully read this Instruction manual and keep it
together with the Warranty Certificate, cashier receipt and if possible, the
original package inclusive of its interior packing. If you give this appliance to
other people, please also pass on the operating instructions.
• The appliance is designed exclusively for private use and for the envisaged
purpose. This appliance is not intended for commercial use.
• Do not use the appliance outdoors. Protect it from heat, direct sunlight,
humidity (do not immerse into liquids under any circumstances) and sharp
edges. Do not use the appliance with wet hands. If the appliance gets wet,
unplug it immediately.
• Always switch off and unplug the appliance (pull the plug, not the cable) when
you do not use the appliance, or when you attach accessories, during cleaning
or malfunctioning.
• Do not leave the appliance unattended during operation. Always switch off and
unplug the appliance when leaving the room.
• Regularly check the appliance and cable for signs of damage. Do not continue
to operate the appliance in case of damage.
• Do only use original parts.
• For the safety of your children, keep any packing parts (plastic bags,
Styrofoam etc.) out of their reach. Don't let small children play with bags!
Danger of suffocation I
WARNING
• Always disconnect the appliance from the supply if it is left unattended and
before assembling, disassembling or cleaning.
• Switch off the appliance and disconnect from mains power supply before
changing accessories or attachments, which are moving during operation.
• Please wait until the motor has completely stopped before you remove the
cutting attachments.
• Do not manipulate any of the safety mechanisms!
• Do not repair the appliance by yourself. Always contact an authorized
technician. If the supply cord is damaged, it must be replaced by the
manufacturer, its service agent or similarly qualified persons in order to avoid a
hazard.
• This appliance is not be used by children.
• Keep the appliance and its cord out of reach of children.
• Children are not to play with the appliance.
• Appliances can be used by persons with reduced physical, sensory or mental
capabilities or lack of experience and knowledge if they have been given
supervision or instruction concerning use of the appliance in a safe way and if
they understand the hazards involved.
• The motor block is not intended for insertion into water for cleaning. Please
observe the instructions that we have included for you in the chapter
"Cleaning".
IMPORTANT SAFEGUARDS (cont.)
WARNING: Risk of inju y!
• The blades of the cutting attachments are very sharp! When fitting and remov-
ing the inserts and during cleaning you will come into contact with these
accessories. Use these accessories with the necessary caution to prevent
injuries. Only touch the inserts on the plastic.
• Always only use the pusher to press down the food and not your fingers, a fork
or other objects.
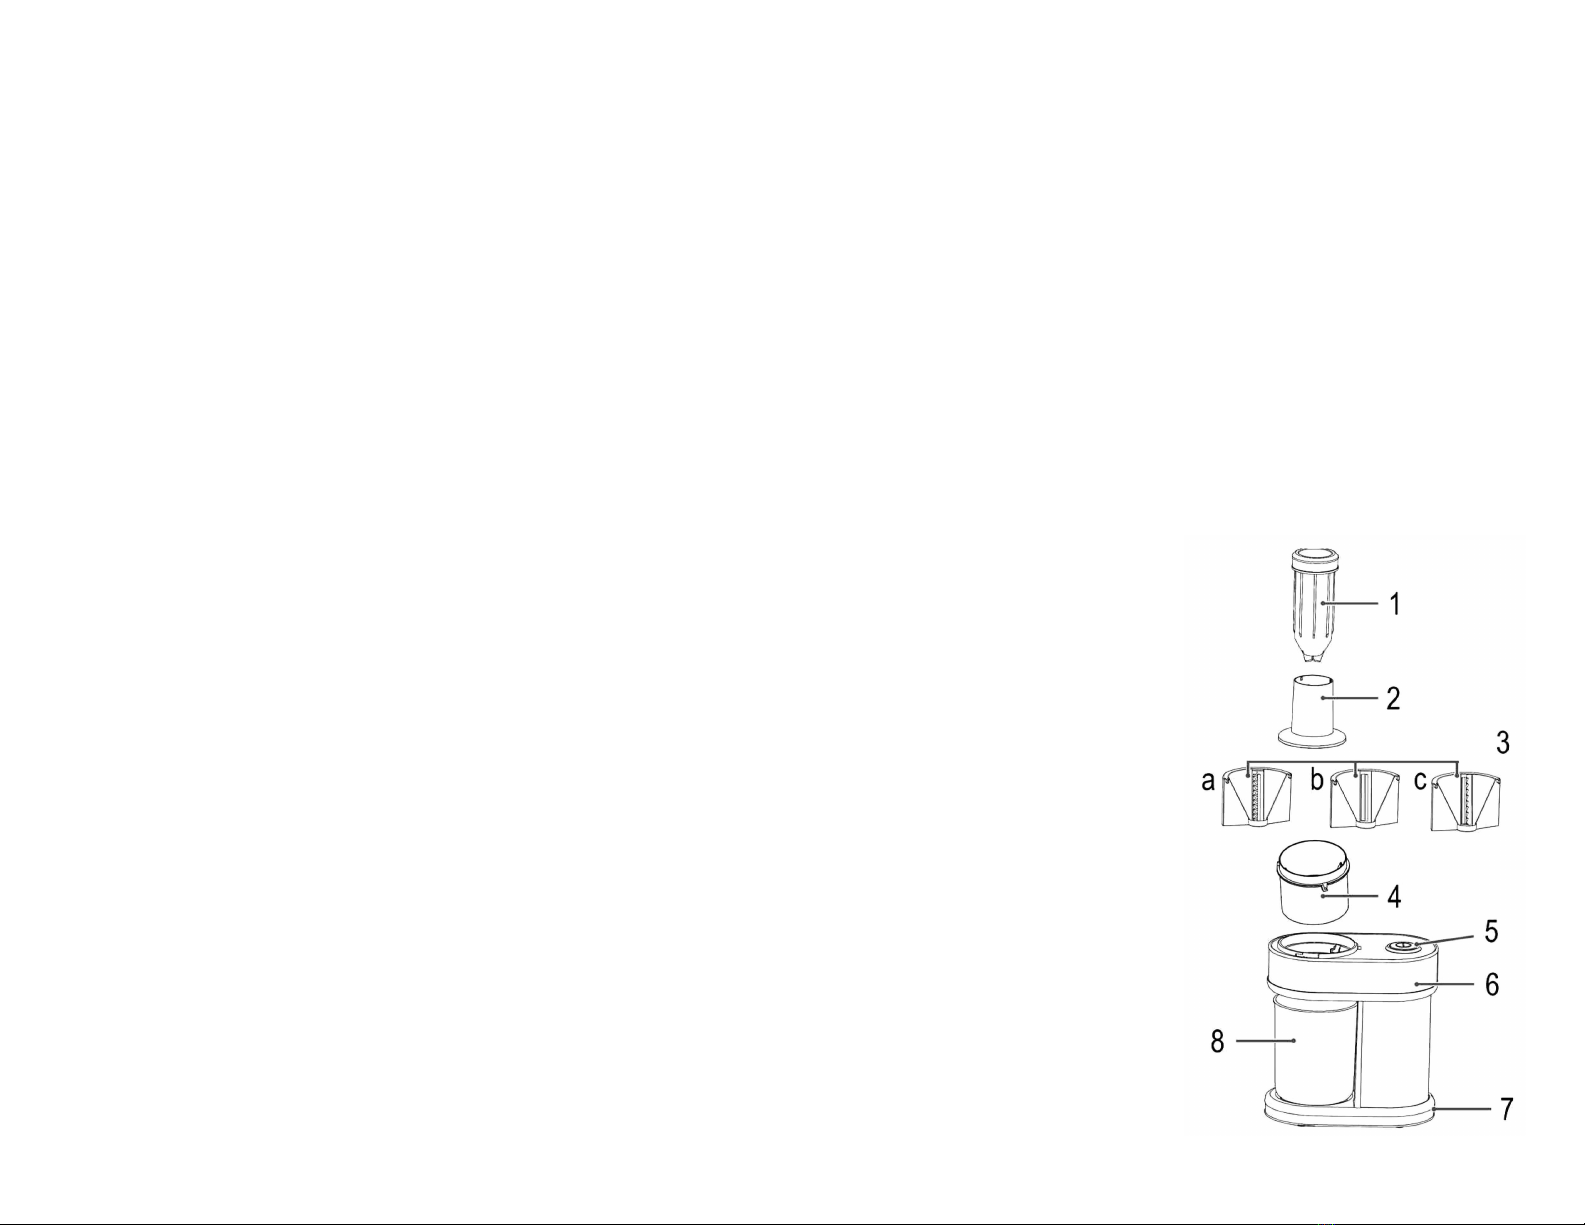
OVERVIEW OF THE COMPONENTS
1 Pusher
2 Feed tube
3 Cutting attachments
a Attachment for wave cutting (55 mm)
b Attachment for coarse cutting (55 mm)
c Attachment for medium sized cuttings (10mm)
4 Insert holder
5 On/Off Switch
6 Motor block
7 Cable storage
8 Container
32
4 5
ASSEMBLY/PREPARATIONS
1. Place the appliance on an even work surface.
2. Select a suitable attachment. Insert this attachment into the opening of the
insert holder. It has to lock into place audibly.
• Attachment for coarse cutting
• Attachment for medium sized cuttings
• Attachment for fine cutting
• Wave cut attachment
3. Install the insert holder in the motor by turning it into the "C OSE' direction.
Please make sure that the insert holder is locked into the motor.
4. Install the feed neck on the motor housing and lock it in clockwise direction.
Pay attention to the guiding pins. The feed neck has to lock in place audibly.
NOTE - The appliance is equipped with a safety switch. If the feed neck does
not lock into place audibly, the appliance does not tum on.
5. Put the container into the appliance.
POWER CAB E
Pull the power cable out of the cable storage.
E ECTRIC CONNECTION
1. Before you plug the mains plug into the outlet, check whether the system
voltage that you want to use, matches the one of the appliance. You will find
information about it on the type plate.
2. Connect the appliance to a correctly installed grounded outlet.
SHORT-TERM OPERATION
Do not operate the appliance for longer than 2 minutes and then allow the appli-
ance to cool down for 2 minutes.
INTENDED USE
• This appliance can be used to cut solid food into "spirals." (e.g. Carrots, pota-
toes, zucchini, red beets, cucumbers, apples, radish, pears, etc.)
• It is only designed for this use and should only be used for this intended pur-
pose.
• It cannot be used to chop soft food such as bananas or aubergine.
• Only use this appliance as instructed in this user manual. Do not use this
appliance commercially.
• No other use is intended and can cause damage or personal injuries.
• The manufacturer is not responsible for any damages incurred due to improper
use.
UNPACK APP IANCE
1. Take the appliance out of its packaging.
2. Remove all packaging materials, such as foils, filling materials, cable ties and
cartons.
3. Check that all accessories are included in the box.
4. If the contents of the box are incomplete or if damage is found, do not
operate the appliance. Return it to the dealer immediately.
NOTE -Clean manufacturing residues and dust from the appliance as described
under "Cleaning".
NOTES ON USE
Your new appliance is perfect if you want to prepare healthy and tasty meals.
Just exchange pasta with crisp vegetables. Advantages: More nutrients, more
fibers, and more energy! You food does not only taste good, but it also looks
appealing!
• Please peel carrots before using the appliance. The smoother the surface of
the food is, the better is the result in terms of continuous spirals.
• Put your food as upright as possible into the feed neck.
CAUTION! The vertical insertion has a considerable influence on the result.
• Individual vegetable noodle servings can be prepared better if the noodles are
not too long. Avoid continuous spirals by reducing the pressure applied to the
food pusher periodically.
• Food with a diameter of more than 60 mm cannot be processed. Please trim
the food at the sides to process it with this appliance.
CLEANING
WARNING
• Always remove the power cord before cleaning.
• Never immerse the motor block in water. It could result in an electric shock or
fire.
• The cutting surfaces of the inserts are sharp. Injury may occur! Always touch
the inserts on the plastic.
CAUTION
• Do not use a wire brush or other abrasive utensils for cleaning.
• Do not use aggressive or abrasive cleaning agents.
NOTE
Colour residues from vegetables (e.g. carrots) could be removed best with a
cloth and cooking oil.
Immediately clean the appliance after each use.
ACCESSORIES
1. For opening, turn the feed neck counterclockwise.
2. Remove the insert holder by turning it into the "OPEN" direction and pull it out
upwards.
3. Remove the attachment from the insert holder by pressing the lock button.
(See the figure 5)
4. For easy cleaning, the blades can be removed from the attachments.
5. You may rinse the accessories in a bowl of hot water and then dry them.
HOUSING
1. Clean the housing with a moist towel.
2. Remove any residual water with a dry cloth.
TECHNICA DATA
Power supply 110-120V~ 60 Hz
Power consumption 100W
Protection class II
Short-term operation 2 minutes
Net weight approx. 1.97 kg
OPERATION
1. Tum on the appliance with the ON/OFF button.
2. Put your food as upright as possible into the feed neck.
WARNING!
• The tip of the food pusher has sharp edges. Risk of injuries
• Never put your fingers or tools into the feed tube!
CAUTION! The vertical insertion has a considerable influence on the result.
3. If the container is full or your food is used up, turn off the appliance with the
ON/OFF button.
4. Pull out the food pusher from the feed neck.
NOTE - A bit of food will remain onto the food pusher.
END OF OPERATION
Disconnect the plug from the outlet.
CAB E STORAGE
Push the power cable back into the cable storage.
6 7

Other manuals for Total Chef TCES03

1

Other Koolatron Accessories manuals

Koolatron PET CHIME Manual

Koolatron

Koolatron PET CHIME Manual

Koolatron Coca-Cola CCSB5-A User manual

Koolatron

Koolatron Coca-Cola CCSB5-A User manual

Koolatron LENTEK Pet Paw PP-05 Manual

Koolatron

Koolatron LENTEK Pet Paw PP-05 Manual

Koolatron KCH250 User manual

Koolatron

Koolatron KCH250 User manual

Koolatron Coca-Cola CC12-G User manual

Koolatron

Koolatron Coca-Cola CC12-G User manual

Koolatron Auto Guard Manual

Koolatron

Koolatron Auto Guard Manual

Koolatron LENTEK Sila IO-41 Manual

Koolatron

Koolatron LENTEK Sila IO-41 Manual

Koolatron Fun Kool P25 User manual

Koolatron

Koolatron Fun Kool P25 User manual

Koolatron D24 User manual

Koolatron

Koolatron D24 User manual

Koolatron Corona CRUISER User manual

Koolatron

Koolatron Corona CRUISER User manual

Koolatron Total Chef TCES03 User manual

Koolatron

Koolatron Total Chef TCES03 User manual

Koolatron Pet Dish PD06 Manual

Koolatron

Koolatron Pet Dish PD06 Manual

Koolatron CocaCola CC10-G User manual

Koolatron

Koolatron CocaCola CC10-G User manual

Koolatron Coca-Cola CC12-G User manual

Koolatron

Koolatron Coca-Cola CC12-G User manual

Koolatron CC10-JP User manual

Koolatron

Koolatron CC10-JP User manual

Koolatron PET PAW PP-05 Manual

Koolatron

Koolatron PET PAW PP-05 Manual

Koolatron W65 User manual

Koolatron

Koolatron W65 User manual

Koolatron Miller Lite User manual

Koolatron

Koolatron Miller Lite User manual

Koolatron C05 User manual

Koolatron

Koolatron C05 User manual

Koolatron SmartKool SK30 User manual

Koolatron

Koolatron SmartKool SK30 User manual

Popular Accessories manuals by other brands

Philips SAC2550 Specifications

Philips

Philips SAC2550 Specifications

Grizzly T10667 instructions

Grizzly

Grizzly T10667 instructions

CyberData 011216 Operation guide

CyberData

CyberData 011216 Operation guide

Steinberg CI1 Manual de operaciones

Steinberg

Steinberg CI1 Manual de operaciones

Acuity Controls MSD 7 instruction sheet

Acuity Controls

Acuity Controls MSD 7 instruction sheet

Alesis iO14 Reference manual

Alesis

Alesis iO14 Reference manual

TELEDYNE API OPTI-Sense 5200 user manual

TELEDYNE API

TELEDYNE API OPTI-Sense 5200 user manual

Netvue Belle quick guide

Netvue

Netvue Belle quick guide

Yaohua Weighing System XK3190-A12 user manual

Yaohua Weighing System

Yaohua Weighing System XK3190-A12 user manual

Tait TB9100 Service manual

Tait

Tait TB9100 Service manual

Schlage P516-486 installation instructions

Schlage

Schlage P516-486 installation instructions

Naish Fusion 5-Line manual

Naish

Naish Fusion 5-Line manual

Endress+Hauser Deltapilot S FMB70 Safety instructions

Endress+Hauser

Endress+Hauser Deltapilot S FMB70 Safety instructions

Hunter Soil-Clik owner's manual

Hunter

Hunter Soil-Clik owner's manual

Baumer R600V.DAE0-11209335 manual

Baumer

Baumer R600V.DAE0-11209335 manual

netvox R718PA2 user manual

netvox

netvox R718PA2 user manual

Philips OccuSwitch LRM1771 installation guide

Philips

Philips OccuSwitch LRM1771 installation guide

Bo-Camp 4471546 instruction manual

Bo-Camp

Bo-Camp 4471546 instruction manual

manuals.online logo
manuals.online logoBrands
  • About & Mission
  • Contact us
  • Privacy Policy
  • Terms and Conditions

Copyright 2025 Manuals.Online. All Rights Reserved.