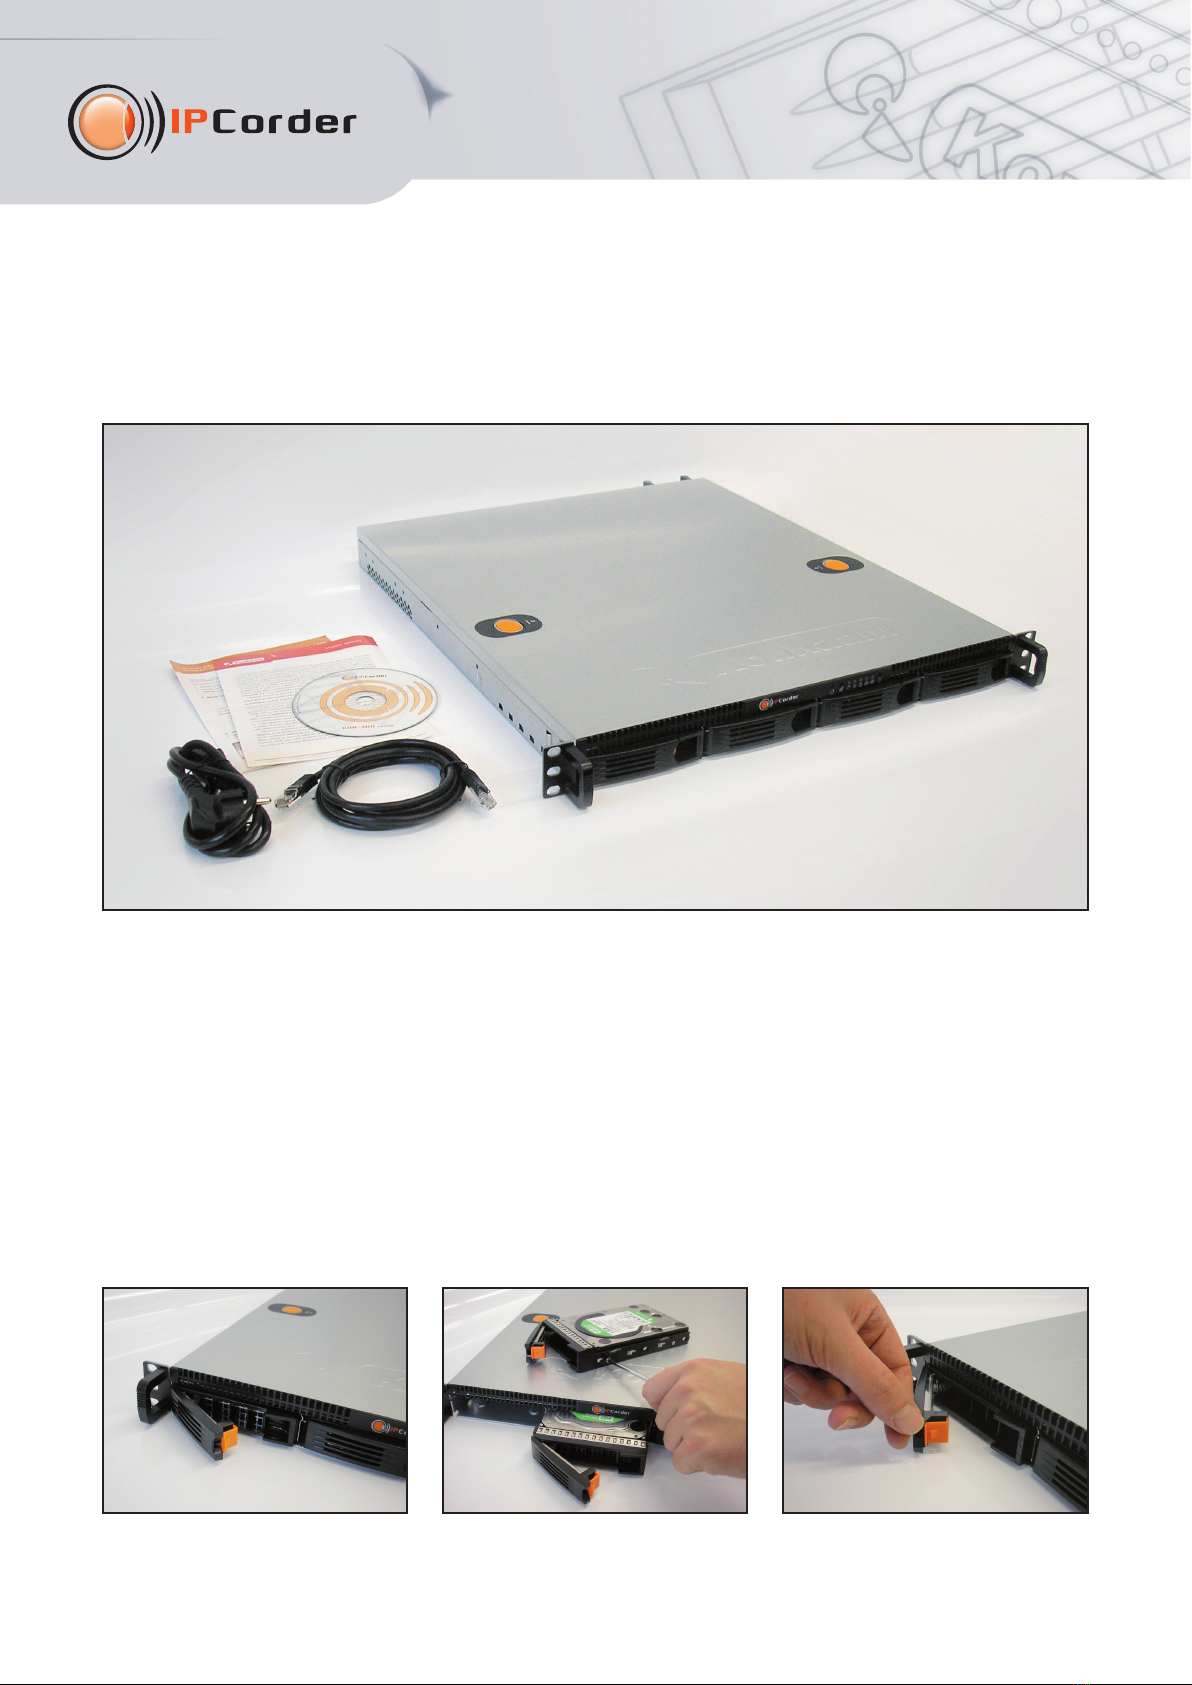
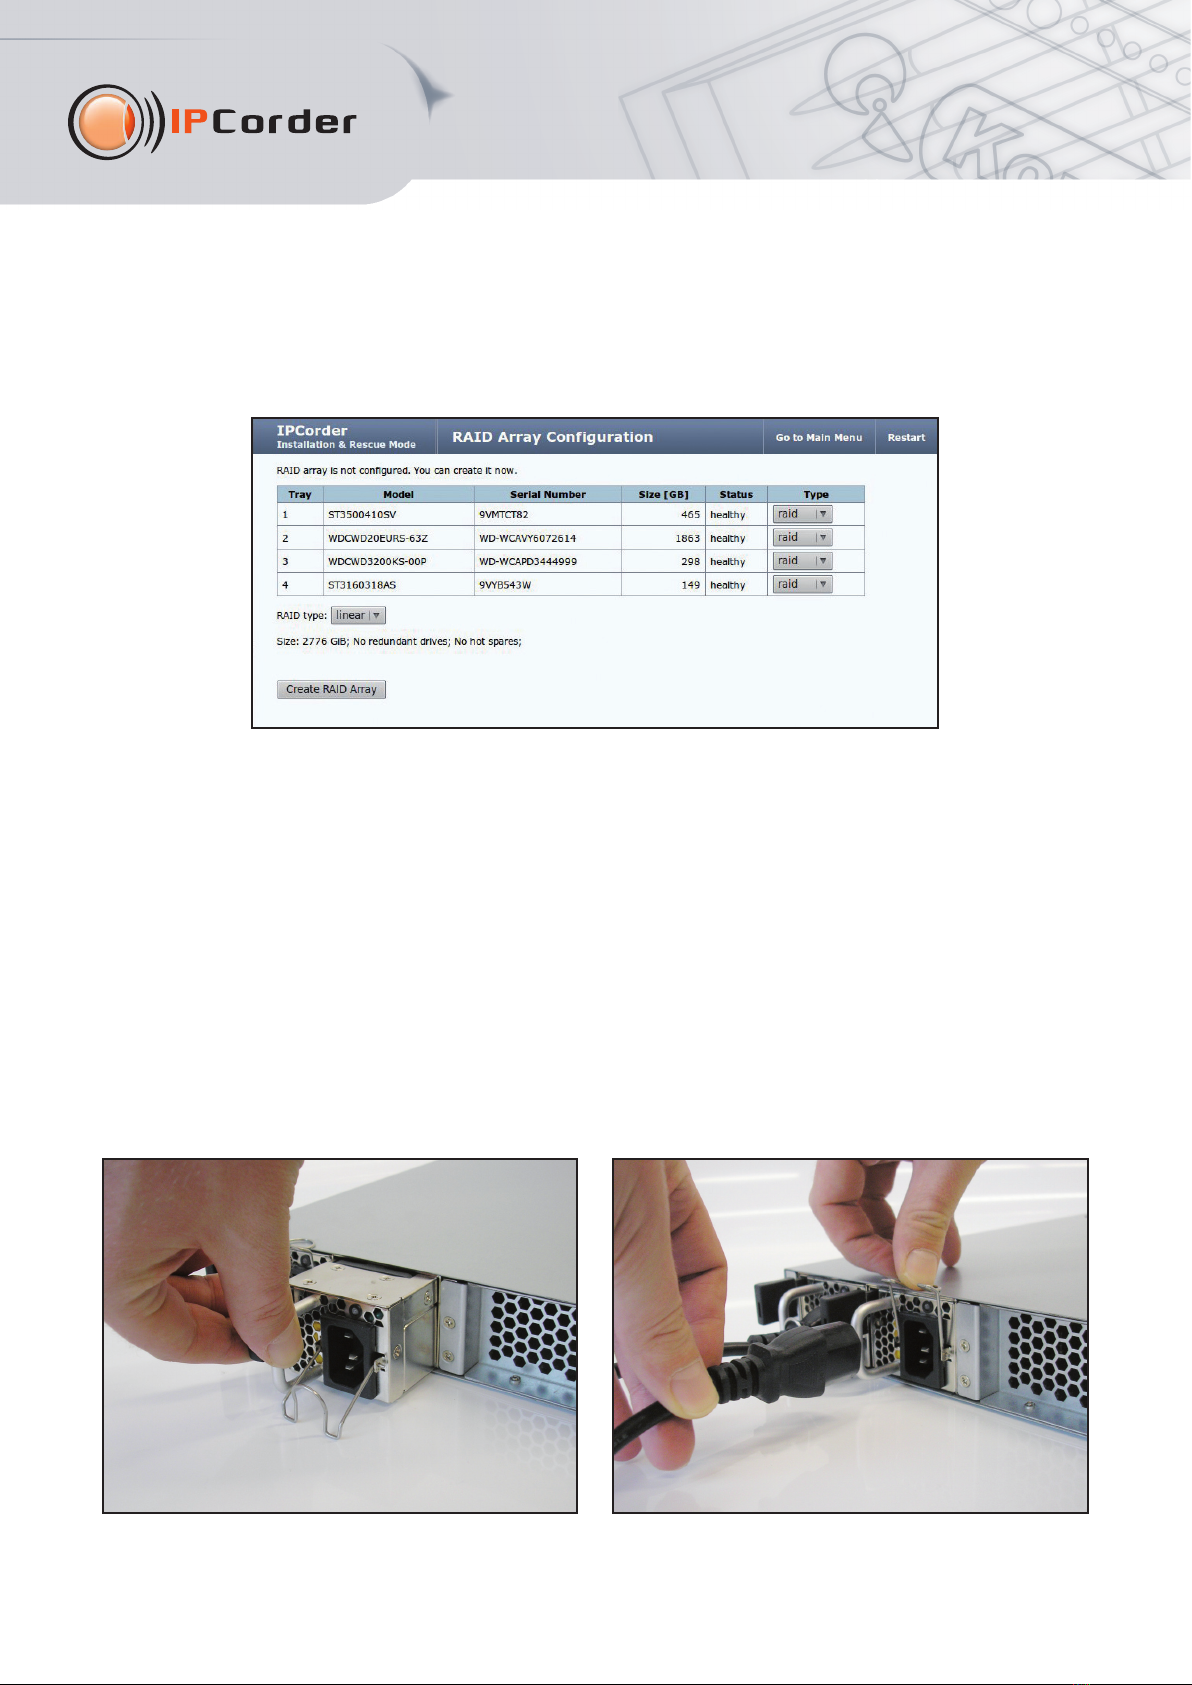
Koukaam IPcorder KRR-416 User manual

IPCorder KRR-416/424
Quick Installation Guide
Thank you for purchasing this product of the company KOUKAAM a.s. Before you start using it, please read this
installation guide which will quickly guide you through the setup process. For more information please refer to
the User manua available on the enclosed CD.
Important safety instructions
The device you purchased requires a certain voltage to function. The device may be damaged in case of incorrect
manipulation with it, and/or the person who performs the manipulation may be injured.
• The manufacturer is not responsible for any possible damage caused by operating the device outside the permitted
or intended uses or by using the device in an unsuitable environment.
• The device can't be used outdoors.
• Do not use the device in the presence of strong vibrations.
• Unauthorized modifications of the device may damage it or set it on fire.
• Protect the device from liquids and high temperatures.
• Do not drop the device.
• Use only the intended attachments (hard disks, cables, etc.).
• If the device doesn't work properly, contact your dealer.
This guide describes IPCorder KRR-416/424. All models differ in the maximum number of simultaneously
connected cameras:
•KRR-416: up to 16 cameras or videoservers
•KRR-424: up to 24 cameras or videoservers
1

2
1. Package contents
Package contains IPCorder KRR-416/424, power cable, network cable, installation CD, installation guide and licence
agreement.
2. Ho to set up IPCorder in a fe minutes
• Install your IPCorder to a 19“ rack and place it to a free 1U position.
• IPCorder KRR-416/424 supports up to four 3.5“ SATA I, SATA II or SATA III hard disks (you can use all types together).
To install the disk:
1) Release the safety lock of the box and take it out.
2) Screw the disk to the box.
3) Insert the box with the disk back into your IPCorder and secure the safety lock.

3
• Connect the device to the computer network (use network adapter number 1) and plug it into an electric outlet.
• On start-up, IPCorder tries to obtain an IP address automatically via DHCP; if unsuccessful, the IP address is set to
the default value of 192.168.1.78. If the IPCorder is in the same subnet as the PC used to access it, it should appear
in the Network Devices folder under Microsoft Windows.
• To obtain the IP address of your IPCorder you can use the IPCorder Discover – an application for discovering
IPCorder device in your network. You can find it on the enclosed CD or download it directly from
http://updates.ipcorder.com. Windows users can use the file IPCorderDiscover.exe; for other operating systems
use the file IPCorderDiscover.jar. The utility requires Java SE 5 or higher installed on your computer
(http://java.com/en/down oad).
• After starting the utility click the Discover button and the application will list all IPCorder devices it can access.
In case the utility fails to find your IPCorder, turn off your local personal firewall and/or antivirus. If the IPCorder
is running in Service mode (formerly known as Rescue mode), you can change its network settings in the application
by the Device setup button. You can use Locate button for easier physical localization – red diode (exclamation
mark) on your IPCorder will start blinking.

4
• Double click the device you wish to set up in the list of discovered devices and the web interface in
Insta ation & Rescue mode will appear in your default internet browser. You can configure the RAID array on
RAID Array Configuration screen. After the RAID array is created, restart to Normal mode. While Service mode
is running, the red exclamation mark on the front panel will be lighting.
• After a while you should see the normal login window. Default user name is admin, default password is admin.
• After the first login you will see Configuration Guide which will lead you through the configuration of basic IPCorder
settings. Please pay close attention to setting your password and the system time. You can also let the IPCorder find
the cameras in your network and set up their recording options. All these actions are accessible via the Settings menu.
• To ensure higher reliability, IPCorder KRR 416/424 can be equipped with additional power supply (not included
with the IPCorder). To install the additional power supply:
1) Turn off your IPCorder and unplug it from the power supply.
2) Take off the cover of the slot for the additional power supply.
3) Insert the additional power supply.
4) Connect power cables to both power supplies.

5
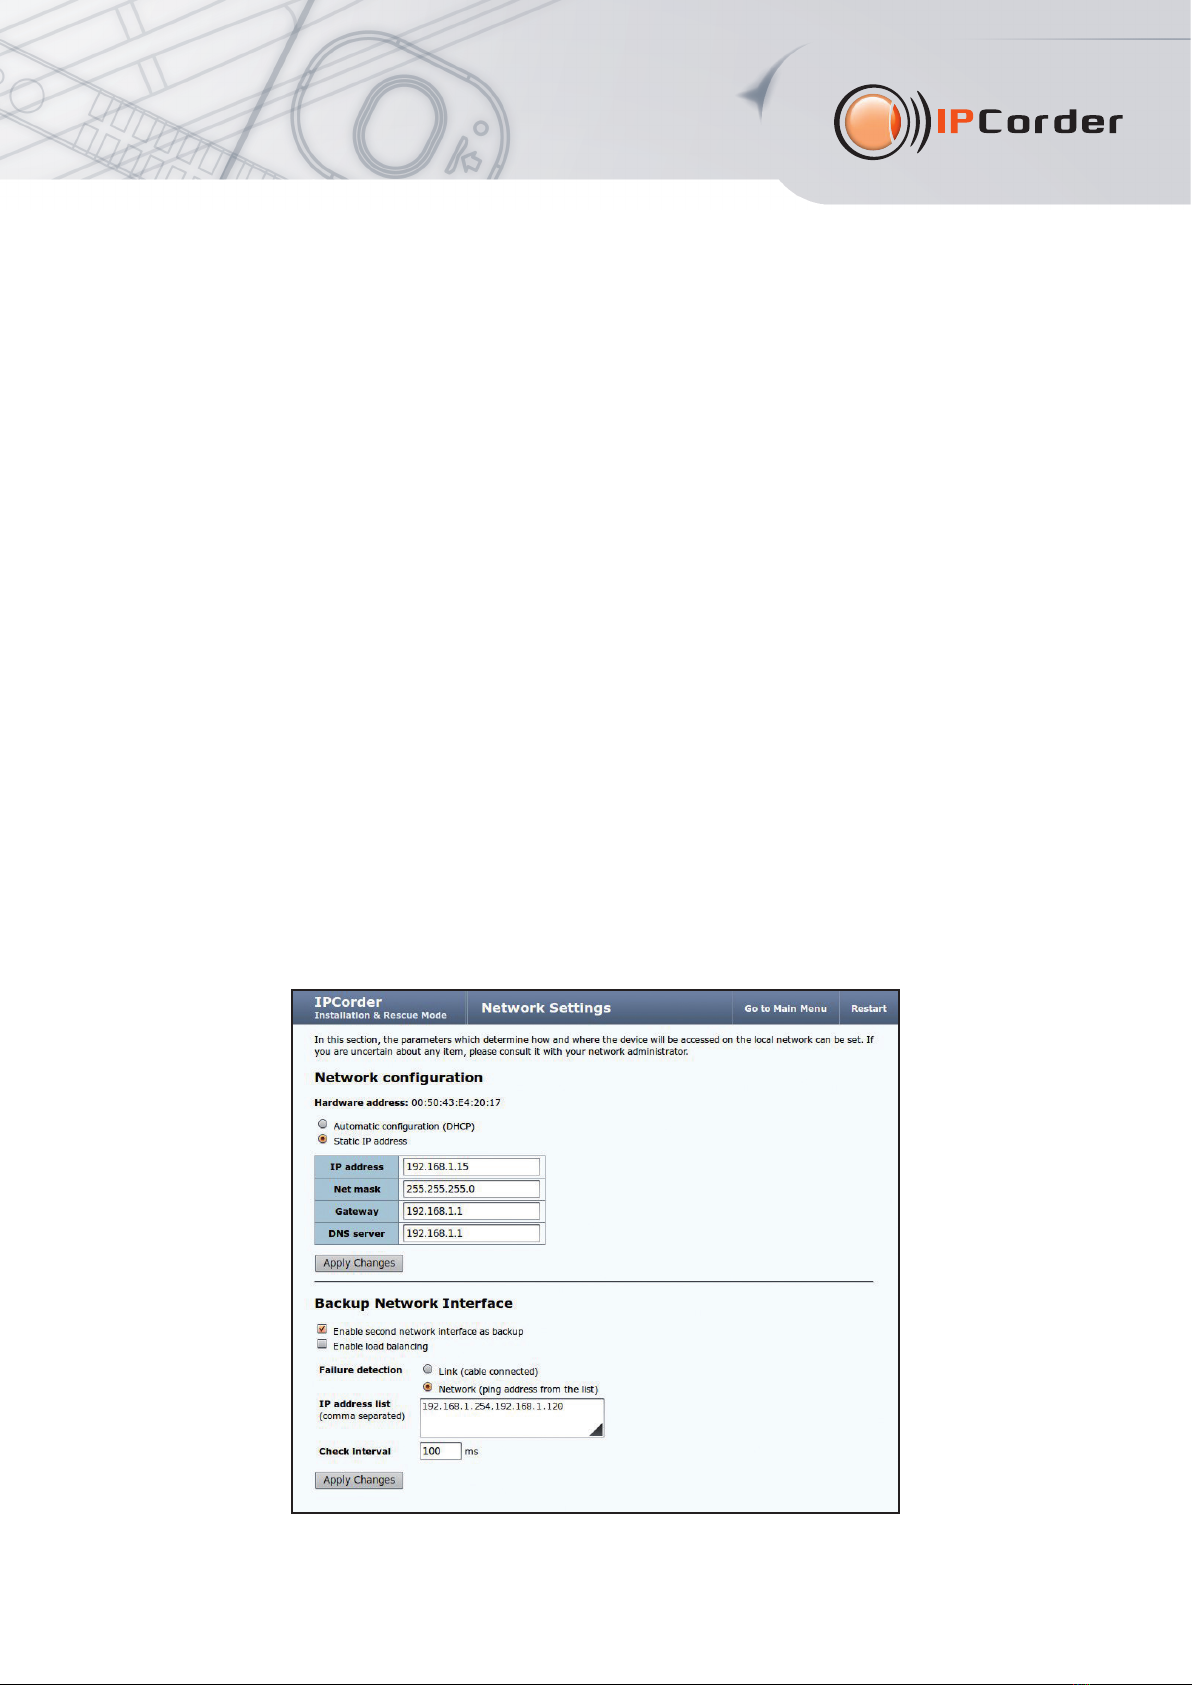
Backup Netwo k Inte face
IPCorder KRR-416/424 supports the Backup Network Interface function. This service prevents disconnection from the network
in case of failure of one of network routes (both network adapters of the IPCorder must be connected). This can prevent
unavailability of the IPCorder in case of unwanted removal of a network cable or switch failure. To set up this service:
1) Connect the second network cable to your IPCorder (use network adapter number 2) and to the switch.
2) Go to the Nework tab in the web interface of the IPCorder:
• If Service mode is active – continue to the Network page and if needed set up the basic network settings.
• If Normal mode is active - go to the Settings menu in the upper part of screen, then select Configuration - Storage
and if needed set up the basic network settings.
3 Check the Enab e second network interface as backup option in the Backup Network Interface section.
4) Choose how the connection failure will be detected:
•Link (cab e connected) – this option detects disconnection of the network cable. If the cable from network adapter
no.1 is removed, the connection through the network adapter no.2 will be automatically activated and vice versa.
•Network (ping address from the ist) – this option checks if there is any traffic running through the active network
adapter of the IPCorder. If no network traffic is detected, the connection through the backup network adapter will be
automatically activated. Type at least one IP address of the independent server to the IP address ist text field.
5) In the Check Inte val text field, set the interval for checking availability of the connection, the default value is set to
100ms, the typed value is used for both types of failure detection.
6) Click the App y button to confirm the settings (use buttons App y Changes and Restart if Service mode is active).
Note: The Backup Network Interface function is active only in Normal mode. If you are using DHCP server to obtain an
IP address, it is possible that after the settings are confirmed, your IPCorder will temporarily obtain another IP address.

6
• For optimal use of your IPCorder and all of its functions, make sure you have the latest stable version of firmware
installed.
3. LED signalization, button actions and acoustic signalization
The front panel of IPCorder KRR-416/424 contains 5 signal LEDs:
•The Network diode ( ) (2x) lights if a network cable is connected to the network adapter.
•The Storage diode ( ) lights if the storage is in proper condition, blinks if the disk array is degraded and blinks
fast in case of storage failure.
• The meaning of Power ( ) and Info ( ) diodes is described in the following table:
Disk boxes are equipped with three LED diodes:
• The b ue diode lights if the disk is connected.
• The red diode blinks in case of disk failure, blinks in combination with the green diode if the disk array is assembling
or synchronizing, lights if the disk is not part of the disk array.
• The green diode indicates disk activity.
Status Powe LED Info LED
Service mode is active - on
Factory reset on fast blinking
Normal mode is active on -
Found by Discover on blinking
IPCorder is starting blinking -

7
Button functions
Power button ( ):
• Performs the software shutdown on short press.
• Performs the hardware poweroff if hold for 15 seconds (this is the same as unplugging the device from power supply).
Reset button ( ) at the front side of your IP Corder:
• Restarts to Service mode on short press (if the IPCorder is in Normal mode).
• Restarts to Normal mode on short press (if the IPCorder is in Service mode).
• Performs the factory reset if hold during the startup.
Reset button ( ) at the back side of your IP Corder:
• Restarts to Service mode on short press (if the IPCorder is in Normal mode).
• Restarts to Normal mode on short press (if the IPCorder is in Service mode).
• Performs the factory reset if hold for 15 seconds.
Mute button ( ):
• Temporarily disable the acoustic signalization on short press.
The acoustic signalization will be activated if:
• The temperature reaches 60 C.
• The storage fails.
4. System Requirements
Your system has to meet the minimum system requirements otherwise the software may not work properly. The minimum
requirements are:
•Ope ating system: Microsoft Windows 2000, 2003, XP, Vista, 7; Mac OS X 10.5 and 10.6; Linux 2.6.
•Inte net b owse : Mozilla Firefox 4 or higher (recommended); Internet Explorer 8 and 9 (32-bit versions only);
Chrome 12 or higher; Safari 4 and 5 (only on Mac OS X).
• Enabled JavaScript and cookies (see the preferences of your web browser).
• Java SE 5.0 or higher, the latest Oracle JRE is recommended (the latest version of Oracle Java 6).
•Ha dwa e configu ation: depends on the type and number of connected cameras, but at least 2GHz processor
and 1GB of RAM is recommended.

8
The system allows users to download screenshots from videos as well as entire videos stored on the hard disk.
The screenshots are in standard JPEG format and can be viewed in any common graphic viewer. The exported
videos can be played using FFDShow decoder or another similar filter. The easiest way to watch the videos
is to use VLC media player, which already contains all necessary filters. VLC player is available for free.
5. Support
Should you experience any issues with your IPCorder, please contact the dealer who sold you the device or directly the
technical support of Koukaam a.s. company on the address suppor[email protected]. Before you do this, please check if
your IPCorder has the latest firmware version (upgrade to the latest version could solve your problem).
We believe you will be satisfied with our product. If you have any questions or comments regarding functions
of the IPCorder, please contact us.
Team Koukaam
The manufacturer is not responsible for any technical or typographical mistakes and reserves the right to make any
changes in the product or in this user manual without prior notice.
The manufacturer doesn't provide any warranty in regard to information included in this user manual, the potential
implied warranty of merchantability of this product or the warranty of fitness for a particular purpose.
The manufacturer warranty does not apply notably to damage caused by misuse of the device, to damage caused by
not following instructions and recommendations from the user manual and to damage caused by unauthorized activities
performed by anyone who is not member of authorized warranty service of the manufacturer.
November 2011
© 2011 KOUKAAM a.s. All rights reserved
This manual suits for next models
1
Table of contents
Other Koukaam Network Hardware manuals
Popular Network Hardware manuals by other brands

Positron
Positron GAM-PWR-4-M Quick installation guide

AVLink
AVLink IPS-TF user manual

Black Box
Black Box ServSelect KV119A Installer/user guide

Ntron
Ntron 102MC User manual & installation guide

LT Security
LT Security 4CH(4 POE) Quick operation guide

OPENTEXT
OPENTEXT Tableau Forensic T6u SAS Bridge Quick reference guide