manuals.online logo
Brands
  1. Home
  2. •
  3. Brands
  4. •
  5. KRAM telecom
  6. •
  7. Automobile Accessories
  8. •
  9. KRAM telecom Drive & Talk User manual

KRAM telecom Drive & Talk User manual

Product Description
Car-specific Fakra Hi-fi Soft mute
Drive & Talk enables the use of the car speakers for phone con-
versation.
Speaker-function: This is achieved by using the mutebox-relays
to disconnect the rear speaker and connect the front speakers
to the carkit. This way the radio sound is muted and the sound
from the carkit is sent through the cars front speakers. You will
achieve a perfect hands-free sound without interference from
the car radio.
For a complete cableset two item numbers are needed. The 1st
item number includes the mutebox and the car-specific cable-
set. The 2nd item number is a carkit-specific adaptor-cable for
adapting the car-specific cable to the carkit.
Power supply of the carkit: All car-specific cablesets have an in-
tegrated carkit-powersupply. In the car-specific cablesets the
constant 12v and the ground wire are connected to the 6 way
connector. This connector is to be fitted to the 6 way connector
on the carkit adaptor. This way powersupply, of the carkit, is
achieved without cutting the cars wiringloom.
Mute function: The mutewire is connected from the carkit to the
mutebox through the carkit adaptor. The mutewire is also con-
nected to the radios mute input. This enables the use of the ra-
dios built in mute function. If the radios mute input pin is un-
known the mute wire can be found in a yellow flywire fitted
with a bullit connector. Please note that not all radios are
equipped with a mute function.
Made in Denmark by
Kram Telecom A/S
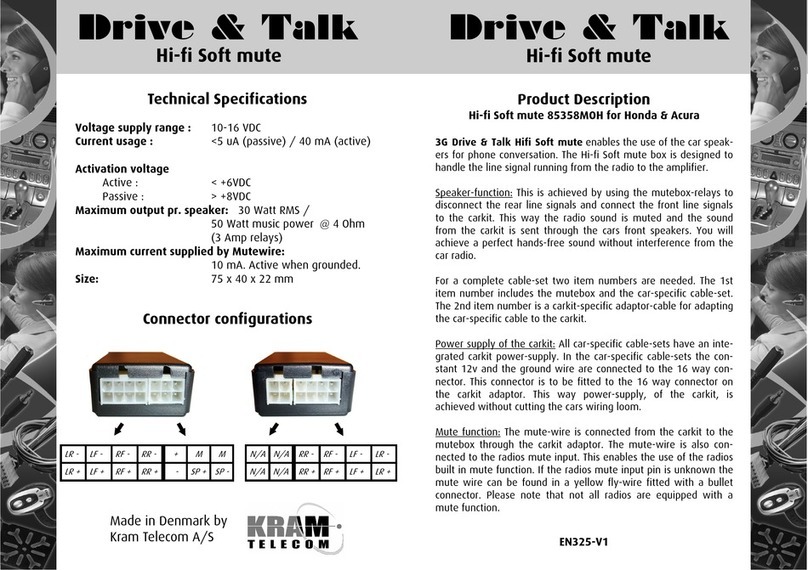
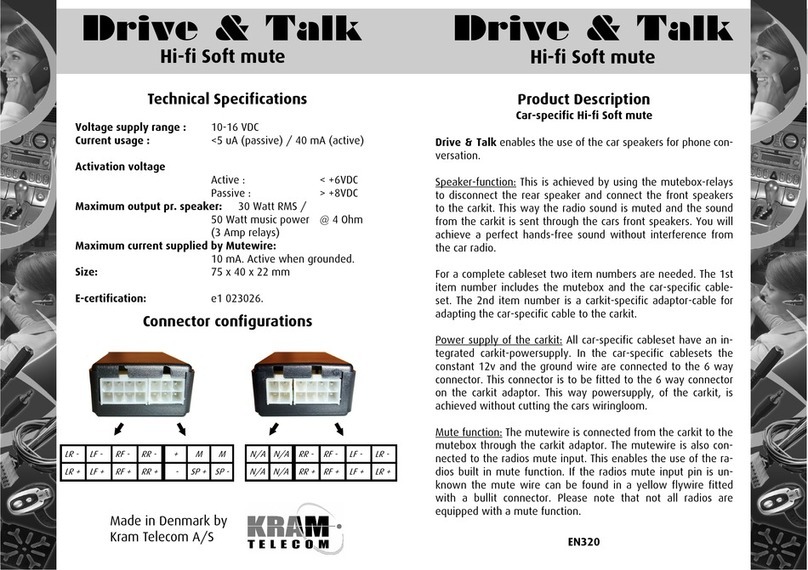
Connector configurations
Technical Specifications
Voltage supply range : 10-16 VDC
Current usage : <5 uA (passive) / 40 mA (active)
Activation voltage
Active : < +6VDC
Passive : > +8VDC
Maximum output pr. speaker: 30 Watt RMS /
50 Watt music power @ 4 Ohm
(3 Amp relays)
Maximum current supplied by Mutewire:
10 mA. Active when grounded.
Size: 75 x 40 x 22 mm
EN375
Drive & Talk
Hi-fi Soft mute
Drive & Talk
Hi-fi Soft mute
+ M M
- SP + SP -
LR - LF - RF - RR -
LR + LF + RF + RR +
RR - RF - LF - LR -
RR + RF + LF + LR +
N/A N/A
N/A N/A
Installation description
Car-specific Fakra Hi-fi Soft mute
Needed items:
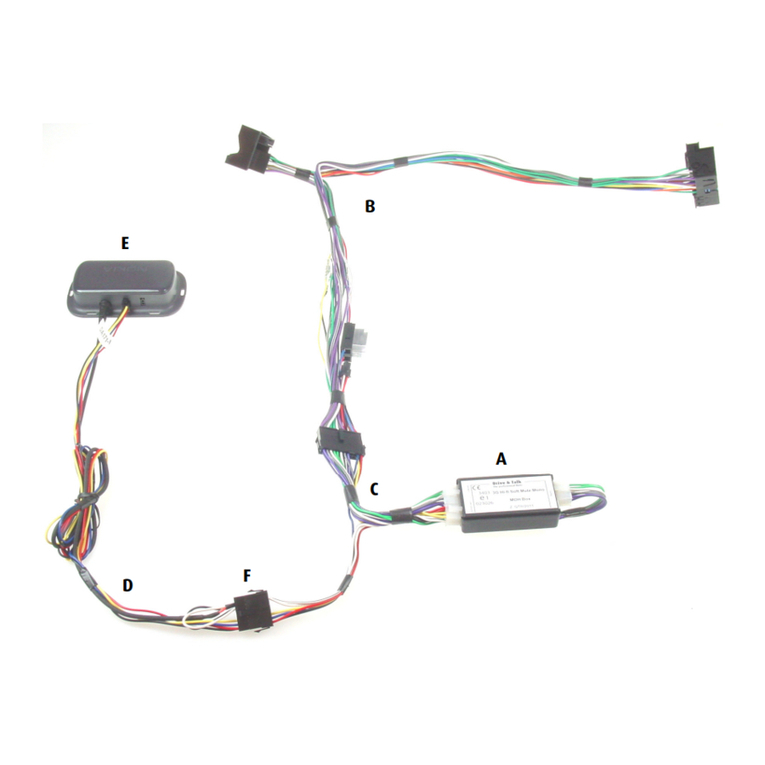
A. Mutebox.
B. Car-specific cable.
C. Carkit adaptor.
D. Carkit.
Note: The Mutebox
A
is always delivered with car-specific cable
B.
Installation:
1. Connect the mutebox to the Car-specific cableset. The end marked
“Radio” is connected to the end with the single 8 way connector
1
. The
other end marked “Speakers” is connected to the 6 and 8 way connec-
tors
2
.
2. Remove the radio unit from the centre consol.
3. Disconnect the radio connector from the radio.
4. Insert the Car-specific cable
B
between the connector on the radio
and the connector on the cars wiring loom. If there, in the Fakra connector removed from the radio, are inserted small plugs which pins has no connection to the radio.
Then these plugs has to be moved to the Fakra connector fitted into the radio. These small plugs can be used for ex. CD-changer, navigation, Optic Most-bus, Optic Can-
bus or Steering wheel controls.
5. Please check the configurations of the ground, ignition and constant 12v in connector
4
. The red wire should be the constant 12v, the blue Ignition, and the
black should be ground. The two bullet connectors on the Car-specific cableset gives you the possibility to connect the blue ignition wire to the red constant wire if this
is preferred. Note: If no ignition exist in radio connector the Ignition wire is connected to the red constant 12V bullet connector, or a IGNIBOX item nr. 69600 can be in-
serted to generate a artificial ignition. If a real Ignition is preferred for the carkit please disconnect the blue wire from the constant 12V bullet connector and connect it
to a real ignition found elsewhere (for an example in the fusebox).
6. The Carkit adaptor
C
is connected to connector
4
from the car-specific cableset
B
.
7. The carkit is unwrapped & connected. The original speaker and powersupply cable is not used with this cableset. Connector
6
from the carkit adaptor
C
is con-
nected to the carkit-powersupply input. Connector
7
from the carkit adaptor
C
is fitted to the speaker output on the carkit.
8. Check the position of the mute wire. The yellow mute wire
from the carkit adaptor is normally prefitted to the mute-input on the radio. If the placement of the
radios mute input-pin is unknown the mute-wire can be found in a yellow wire with a female bullet near one of the car-specific connectors on the cableset
B
. By con-
necting the mute-wire you achieve that the radio writes ”Mute” or ”Phone” when the phone is used and at the same time pauses the CD-player. Note: In some car
models it is necessary to connect the yellow mutewire to the radios mute input, to achieve a complete mute of the radio sound.
9. Finally the speaker volume needs to be pre
Finally the speaker volume needs to be preFinally the speaker volume needs to be pre
Finally the speaker volume needs to be pre-
--
-adjusted.
adjusted.adjusted.
adjusted. Connect the phone to the carkit and adjust the phone volume to its middle position. Make a call and adjust
the volume to an appropriate level by using the adjustment screw on the back of the mutebox. Note: In some car models it is necessary to have the radio turned ON
to get carkit sound from this solution.
10.
10.10.
10. Refit the radio.
For further information regarding the installation of the carkit please refer to the carkit manual.
See our complete Radio Mute program on our website
www.kram.dk
A 1
3 D
B
B
C
2
7
6
4
5
Drive & Talk
Hi-fi Soft mute
Drive & Talk
Hi-fi Soft mute
Other KRAM telecom Automobile Accessories manuals

KRAM telecom Drive & Talk User manual

KRAM telecom

KRAM telecom Drive & Talk User manual

KRAM telecom 67725X719 Operator's manual

KRAM telecom

KRAM telecom 67725X719 Operator's manual

KRAM telecom 68631 User manual

KRAM telecom

KRAM telecom 68631 User manual

KRAM telecom 68656 User manual

KRAM telecom

KRAM telecom 68656 User manual

KRAM telecom 85358MOH User manual

KRAM telecom

KRAM telecom 85358MOH User manual

KRAM telecom Xpress mutecable 85 Series User manual

KRAM telecom

KRAM telecom Xpress mutecable 85 Series User manual

KRAM telecom Hi-fi Soft mute Operator's manual

KRAM telecom

KRAM telecom Hi-fi Soft mute Operator's manual

KRAM telecom 68657 User manual

KRAM telecom

KRAM telecom 68657 User manual

Popular Automobile Accessories manuals by other brands

DICE DCR-50 installation guide

DICE

DICE DCR-50 installation guide

Safe Fleet PRIME DESIGN VCR-TC11B Assembly instructions

Safe Fleet

Safe Fleet PRIME DESIGN VCR-TC11B Assembly instructions

APS iArmor Installation

APS

APS iArmor Installation

Cruz N26-170 Assembly instructions

Cruz

Cruz N26-170 Assembly instructions

Thule ProRide 591 Fitting instructions

Thule

Thule ProRide 591 Fitting instructions

Cartizan VI-BM-24C instruction manual

Cartizan

Cartizan VI-BM-24C instruction manual

Dynojet Power Commander III installation guide

Dynojet

Dynojet Power Commander III installation guide

Thule 218 manual

Thule

Thule 218 manual

AmazonBasics B00511PS3C manual

AmazonBasics

AmazonBasics B00511PS3C manual

Whispbar K102W Fitting instructions

Whispbar

Whispbar K102W Fitting instructions

Mazda 0000-8L-K01 installation instructions

Mazda

Mazda 0000-8L-K01 installation instructions

Kuda-Phonebase 189040 Installation instruction

Kuda-Phonebase

Kuda-Phonebase 189040 Installation instruction

Fiamma Carry-Bike Lift 77 Installation and use instructions

Fiamma

Fiamma Carry-Bike Lift 77 Installation and use instructions

Witter SK29U Fitting instructions

Witter

Witter SK29U Fitting instructions

Allen Sports S103 instructions

Allen Sports

Allen Sports S103 instructions

Metra Electronics 99-7326 installation instructions

Metra Electronics

Metra Electronics 99-7326 installation instructions

A-Tach Mounts ST-1 instructions

A-Tach Mounts

A-Tach Mounts ST-1 instructions

KW automotive Variant 3 Setup manual

KW automotive

KW automotive Variant 3 Setup manual

manuals.online logo
manuals.online logoBrands
  • About & Mission
  • Contact us
  • Privacy Policy
  • Terms and Conditions

Copyright 2025 Manuals.Online. All Rights Reserved.