LaGard AuditGard Manual

(P/N) 742.049 Rev A 06/10 • © copyright 2010 Kaba Mas LLC
page 1 of 13
AuditGard locks are shipped from LA GARD in Factory Default
state without Users or features enabled.
Factory Default: The Lock must be in the Factory Default state
to be programmed by the PC software.
Factory mode functions as follows:
• 1 key – When pressed, will open the Lock.
• 0 key – When pressed, prompts the AuditGard Setup software
to send the configuration settings to the Lock.
• All other keys perform no function.
Setup: AuditGard locks must be programmed using the
AuditGard Setup Software.
Once programmed the Master and Manager Combinations are
enabled, and MUST be changed to activate the Lock.
Active: The Master must be changed before any Master
commands are available. The Manager combination must be
changed before any Manager commands are available.
PROGRAMMABLE LOCK FEATURES
MODES (Multiple Modes may be selected.)
• Silent Alarm (Alarm Box Required)
If enabled, this option will send a signal to an outside alarm
system through the LA GARD Alarm Box.
• Dual Mode
If enabled, two combinations will be required to operate
the Lock.
The Manager and one additional User must be active.
• Time Delay Override
If enabled, User 9 can override delay period.
User 9 must be active.
EXTERNAL SIGNALS (Alarm Box Required. Only one External
Signal type may be selected.)
An external input signal to the Alarm Box will either Disable
Opening Only or Disable All Access depending on the selection
programmed for External Signals.
• External Signal disables Lock opening with valid combination.
• OR External Signal disables Lock opening with valid
combination and all Lock commands.
TIME DELAY
• Delay Period 1 - 99 minutes
• Open Period 1 - 19 minutes
NOTE: If the Time Delay On is not selected, then this feature is
inactive. This feature may be enabled later. (Refer to Manager
Instructions 759.128.)
COMBINATION LENGTH
A combination length from six (6) to nine (9) digits may
be selected.
NOTE: To maintain the VdS Class 2 and EN 1300 Class B
certification when the duress alarm feature is used, a combination
length of 7 digits or longer must be selected.
LOCK USERS
Master
• Cannot open Lock
• Change Combination (Master combination is always
eight digits)
• Audit Lock
• Initiate Lock Reset
• If selected, Enable/Disable Manager
• If selected, Delete Manager
Manager (ID# 1)
• Open Lock
• Change Combination
• Enable/Disable Users
• Delete Users
• Set Time Delay Values
• Audit Lock
Users (ID# 2-9)
• Open Lock
• Change Combination
STANDARD LOCK FEATURES
Wrong Try Penalty
• Entry of four (4) consecutive invalid combinations initiates a five
(5) minute delay penalty.
Lock responses during the penalty period are as follows:
- The LED will flash every ten (10) seconds.
- If any key is pressed, the Lock will flash the LED and beep
three times.
• Once the penalty period has ended, two (2) consecutive invalid
combinations will initiate another five (5) minute penalty period.
Low Battery Warning
• Repeated audio/visual signals (LED flashes/beeps) during Lock
opening indicate the battery is low and should be
replaced immediately.
• If the battery level becomes too low to safely operate the Lock,
pressing any key will initiate the low battery warning.
The battery must be replaced before the Lock will operate.
Audit Records
• Lock records the last 512 events in non-volatile memory.
• Audit file cannot be deleted from the Lock.
• Either the Master or the Manager can audit the Lock.
• AuditGard auditing software and an Interface Adapter are
required to retrieve a Lock audit.
AUDITGARD
LGA Electronic Combination Lock
setup instructions

(P/N) 742.049 Rev A 06/10 • © copyright 2010 Kaba Mas LLC
page 2 of 13
LOCK OPERATING CONVENTIONS
Without eKEY
• If a mistake is made while entering keystrokes, wait thirty (30) seconds and repeat operation.
• To access lock commands, enter combination and hold down the last digit until Lock double signals and the LED stays on.
• In Dual Mode, two combinations are required to operate the Lock.
NOTE: In Dual Mode, a valid User combination must be entered first, followed by the Manager combination, to access the
following Manager Commands: 1, 2, 3, 7 and 9.
• Lock must be opened within 4 seconds once a valid combination has been entered.
• To open a container with a Swing Bolt Lock, turn the container handle to the open position and open the door.
• To open a container with a Dead or Spring Bolt Lock, turn the keypad or dial to retract the bolt and open the door.
• When closing a container, verify that it has been secured.
With eKEY(Dual Token)
NOTE: Locks must be factory programmed with this feature enabled. The eKEY is a 48-bit encrypted unique serial number dual
token device.
• To open the Lock, enter combination, insert and quickly remove the eKEY. The Lock will open after the eKEY is removed.
• To access Lock commands, enter combination and insert the ekEY until Lock double signals and the LED stays on.
LOCK RESPONSES
Standard Operations
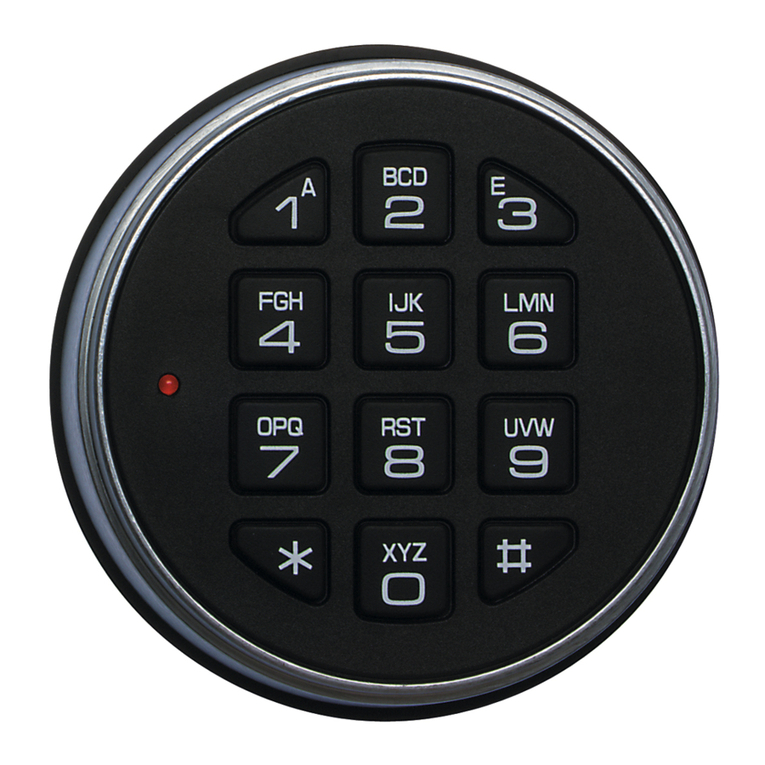
Entry Devices with LEDs (3125, 3190 and 3750-K) respond with both LED flashes and beeps.
• Single signal - one (1) LED flash and one (1) beep indicate the operation is complete.
• Double signal - two (2) LED flashes and two (2) beeps indicate entry is valid or accepted.
• Triple signal - three (3) LED flashes and three (3) beeps indicate invalid or not accepted.
NOTE: The 8130 Entry Device (no LED) responds with beeps only.
Additional Operations
• Delay Period - The LED will flash once every second.
• Open Period - The LED will flash twice a second, and the Entry Device will beep every 10 seconds.
• Penalty Period - The LED will flash every ten (10) seconds.
• Low Battery Warning - During a Lock opening, the LED will flash and Entry Device will beep repeatedly.

(P/N) 742.049 Rev A 06/10 • © copyright 2010 Kaba Mas LLC
page 3 of 13
program the lock using setup software
The AuditGard Setup software allows the Manager to install Users, select the modes of operation, and configure other parameters.
The settings are then uploaded to the Lock using either a Serial (P/N 42150) or USB (P/N 707010) Interface adapter and the
programming cable. There are two types of programming cables used with the AuditGard (P/N 42145 or P/N 43087) depending upon
which Entry Device is used.
CONFIGURE LOCK SETTINGS
Start the Setup Program:
Select the AG Setup icon from the desktop (Figure 1) or complete the following steps:
1. Select the Start icon from the Windows task bar.
2. Select the Programs or All Programs menu item.
3. Select the LA GARD menu item.
4. Select the LA GARD AG menu item.
5. Select the AuditGard Setup icon.
Start -> Programs -> LA GARD -> LA GARD AG -> AuditGard Setup
Figure 1.
The Setup Main Menu screen will be displayed (Figure 2).
Figure 2.

(P/N) 742.049 Rev A 06/10 • © copyright 2010 Kaba Mas LLC
page 4 of 13
Select the COM Port
When the Setup program is started, it identifies the COM Ports that are currently available on your PC. You must select the COM Port
to be used when communicating with the lock each time you start the program.
1. Access the Device Manager to determine which COM Port to select for the Setup Software by completing the following steps:
a. Right click on My Computer.
b. Select Manage.
The Computer Management window is displayed.
c. Under System Tools, select the Device Manager.
d. From the Device Manager list, select Ports (COM & LPT).
The list of communication and printer ports currently identified in the PC system will be displayed.
e. Plug the USB or Serial Interface Adapter into an available USB port on the PC.
If using a USB Adapter, the list of ports will be updated to reflect the new device. The LA GARD USB Interface Adapter can
be identified in the list as USB Serial Adapter. The virtual COM Port assigned to the USB port where the Adapter is currently
installed will follow the device description (Figure 3).
Figure 3.
If using a Serial Adapter, identify the standard Serial COM Port to be used. Standard Serial COM Ports are identified in the
list with a description of Communications Port.
2. From the Setup software, select the Configuration menu on the Menu bar.
The list of available COM Ports will be displayed.

(P/N) 742.049 Rev A 06/10 • © copyright 2010 Kaba Mas LLC
page 5 of 13
3. Select the appropriate COM port from the list (Figure 4). For a USB Adapter select the virtual COM Port assigned by the system. For
a Serial Adapter select the standard Serial COM Port to be used.
Figure 4.
Select Mode(s):
Select by placing a check mark in the desired operational Mode, External Signals, and Time Delay. Multiple modes can be selected.
Silent Alarm: If selected, a LA GARD alarm box will be required to use this feature.
Dual Mode: If selected, two combinations are required to operate the lock. At least one additional User with combination must be
installed. The software will automatically install User 2 if no other User(s) are selected for installation (Figure 5).
Figure 5

(P/N) 742.049 Rev A 06/10 • © copyright 2010 Kaba Mas LLC
page 6 of 13
Time Delay Override: If selected, User 9 must be installed to use this option.
If selected, the software will automatically install User 9 (Figure 6).
Figure 6

(P/N) 742.049 Rev A 06/10 • © copyright 2010 Kaba Mas LLC
page 7 of 13
Select Combination Length:
To change the Combination Length, click on the up and down arrows. A combination length of 6 to 9 digits can be selected.
Example: 7 digits (Figure 7)
Select External Signals:
By placing a check mark in the desired option, select either Disable Opening Only or Disable All Access. Double-clicking on an option
will also toggle the check mark to the other option. (Figure 8).
Select Time Delay:
The Delay and Open Periods may be set up in this window. Enable feature by placing a check mark in the Time Delay On box. Then
enter the desired time period in the text box or use the up and down arrows to select the time periods.
Example: 15 min Delay Period and 5 min Open Period (Figure 9).
• A Delay period between 1 - 99 minutes may be selected.
• An Open period between 1 - 19 minutes may be selected.
NOTE: If Time Delay On is not selected, this feature is inactive. This feature may be enabled later by the Manager. (Refer to
AuditGard Manager Instructions 759.128.)
Figure 7
Figure 8 Figure 9

(P/N) 742.049 Rev A 06/10 • © copyright 2010 Kaba Mas LLC
page 8 of 13
Install Users:
To install a User, place a check mark in the Installed box next to the User ID you wish to install, or you can click the Select All button
(Figure 10). If a User box is unchecked, the User is unavailable and cannot be enabled by the Manager later.
Figure 10
Master Combination:
The Master default combination is 5-5-5-5-5-5-5-5, and the combination is always eight digits.
The Master can audit the Lock, initiate Lock Reset, and if selected Enable/Disable/Disable the Manager (Figure 11). The Master
CANNOT open the Lock. Refer to Master Instructions 788.0310.
NOTE: If the default combination is change using the software, the Master combination must still be changed at the keypad before any
Master commands are available.
Figure 11
Manager Combination:
The Manager default combination is 1-2-3-4-5-6 (Figure 12).
The Manager can open the Lock, audit the Lock, Enable/Disable/Disable the Users, change time settings, and confirm Lock Reset.
NOTE: If the default combination is change using the software, the Manager combination must still be changed at the keypad before
any Manager commands are available.
Figure 12

(P/N) 742.049 Rev A 06/10 • © copyright 2010 Kaba Mas LLC
page 9 of 13
SEND SETTINGS TO THE LOCK
A LA GARD Interface adapter and programming cable is required to program the lock.
1. Connect Entry Device to the lock by plugging the cable into the lock port marked ENT.
2. Connect power to the lock through the Entry Device (9-volt battery) or by connecting a LA GARD battery box or AC Power Adapter
to the lock port marked BAT.
3. Plug the Interface Adapter with the appropriate programming cable into PC.
4. Plug the programming cable into the audit/programming port of the Entry Device (Figure 13).
Figure 13
5. Click on the Transmit button in the software (Figure 14).
6. Press the 0 key on the keypad to begin transmitting the configurations to the lock. (Figures 15, 16, & 17).
• If the COM port has been incorrectly set, return to the setup window (Figure 3), and select the correct COM port.
• If you do not know which COM port to use, check the computer’s Device Manager.
7. Disconnect the programming cable from the Entry Device.
8. Repeat steps 3 - 7 for each lock to be programmed with this configuration.
NOTE: If you receive a transmission error, check connections and COM port setting. Then resend the configuration settings to
the lock.
NOTE: To change the settings after programming, the Lock must be reset. Refer to the Reset Lock section of this document.
Figure 14
Figure 15 Figure 16 Figure 17

(P/N) 742.049 Rev A 06/10 • © copyright 2010 Kaba Mas LLC
page 10 of 13
SAVE SETUP CONFIGURATION
Once the setup configuration has been completed, you may name and save the setup file (*.xml) for future use.
1. Click the Save button or on the Files tab at the top of the program and select Save (Figure 18).
Figure 18
2. Name the file and click the Save button (Figure 19).
Figure 19

(P/N) 742.049 Rev A 06/10 • © copyright 2010 Kaba Mas LLC
page 11 of 13
Open Saved configuration File:
Once a configuration file has been saved, it may be used to program a Lock by using the Load function of the AuditGard
Setup software.
1. Click the Load button or select Load from the File menu on the Menu bar (Figure 20).
Figure 20
2. Select the desired audit file to view and click the Open button (Figure 21).
Figure 21

(P/N) 742.049 Rev A 06/10 • © copyright 2010 Kaba Mas LLC
page 12 of 13
Exit the program:
Click the Quit button, select Quit from the Files menu on the Menu bar, or click on the red [X] in the upper right hand corner
(Figure 22).
Figure 22
ACTIVATE THE LOCK
CAUTION: Always perform this operation with the door open, and test the opening of the Lock with the new combination several times
before closing the door.
Once programmed, the Manager combination (default 1-2-3-4-5-6) will open the lock.
OPEN LOCK
1. Enter the Manager combination (default 1-2-3-4-5-6).
2. Open the Lock within four (4) seconds.
To complete the activation and add User(s) combinations the Manager combination MUST be changed.
CHANGE MANAGER COMBINATION
1. Enter the Manager combination (default 1-2-3-4-5-6) and hold down the last digit until Lock double signals and the LED
stays on.
2. PRESS 0.
3. Enter the NEW combination.
4. Re-enter the NEW combination to confirm
The Lock is now active.
5. Test unit operation several times before closing the door
To enable User(s) and change Time delay sittings refer to AuditGard Manager Instructions 759.128.
NOTE: When selecting a combination, do not use a birthday or other predictable information that could give correlation between the
user and the combination.

(P/N) 742.049 Rev A 06/10 • © copyright 2010 Kaba Mas LLC
page 13 of 13
reset the lock
The Lock must be Reset in order to change configuration settings once it has been programmed with the Setup Software.
HARDWARE RESET
(Reset Box [P/N 6066] required.)
1. Remove battery.
2. Hold down the 0 key for at least 10 seconds to discharge all internal capacitors.
3. Connect Reset Box to BAT port on Lock.
4. PRESS 1.
If the lock opens, the factory reset is complete. If the lock does not open, disconnect the Reset Box and repeat steps 2 and 3.
5. Disconnect Reset Box.
The Lock is now in Factory default, and can be reprogrammed using AuditGard Setup Software.
SOFTWARE RESET
NOTE: The Master and Manager combinations must be changed before the Software Reset is available.
1. PRESS 0 and hold until the Lock double signals.
2. Enter Master combination and hold down last digit of combination until Lock double signals and the LED stays on.
3. PRESS 8.
4. Enter Manager combination, to confirm Reset.
The lock will long beep (2 seconds).
The Lock is now in Factory default, and can be reprogrammed using AuditGard Setup Software.
Table of contents
Other LaGard Lock manuals

LaGard
LaGard LGBASIC 3710 Operation instructions

LaGard
LaGard 3750-K User manual

LaGard
LaGard KEYLOCK 2270 User manual

LaGard
LaGard 39E User manual

LaGard
LaGard COMBOGARD 33E User manual

LaGard
LaGard LGBASIC 3765-2 User manual

LaGard
LaGard 3750-K User manual

LaGard
LaGard LGBASIC 3710 Operation instructions

LaGard
LaGard AuditGard 66e Operation instructions

LaGard
LaGard SMARTLINC Manual
Popular Lock manuals by other brands

Alarm Lock
Alarm Lock Trilogy Networx Double-Sided PDL6300 installation instructions

Kwikset
Kwikset Smartcode 888 installation guide

KSQ
KSQ Kilitronik miniK 10mc operating manual

Shark
Shark 47.505 Warranty and Installation Instructions

PeopleKey
PeopleKey V30-S2 Series Mounting guide

Kaba
Kaba Confidant RFID Kit 1 installation guide